Spring MVC单文件上传(附带实例)
Spring MVC单文件上传(附带实例)
本节通过一个应用案例 springMVCDemo11 讲解 Spring MVC 框架如何实现单文件上传,具体步骤如下:
1)创建应用并导入 JAR 包
创建应用 springMVCDemo11,将 Spring MVC 相关的 JAR 包、commons-fileupload 组件相关的 JAR 包以及 JSTL 相关的 JAR 包导入应用的 lib 目录中,如图 1 所示。
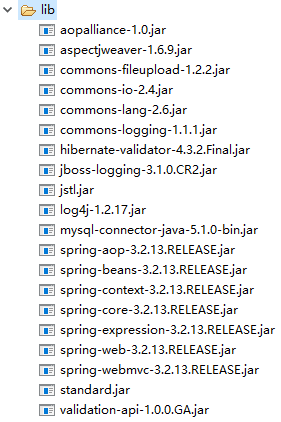
图 1 springMVCDemo11
2)创建 web.xml 文件
在 WEB-INF 目录下创建 web.xml 文件。为防止中文乱码,需要在 web.xml 文件中添加字符编码过滤器,这里不再赘述。
3)创建文件选择页面
在 WebContent 目录下创建 JSP 页面 oneFile.jsp,在该页面中使用表单上传单个文件,具体代码如下:
<%@ page language="java" contentType="text/html; charset=UTF-8"pageEncoding="UTF-8"%><!DOCTYPE html PUBLIC "-//W3C//DTD HTML 4.01 Transitional//EN" "http://www.w3.org/TR/html4/loose.dtd"><html><head><meta http-equiv="Content-Type" content="text/html; charset=UTF-8"><title>Insert title here</title></head><body><form action="${pageContext.request.contextPath }/onefile"method="post" enctype="multipart/form-data">选择文件:<input type="file" name="myfile"><br>文件描述:<input type="text" name="description"><br><input type="submit" value="提交"></form></body></html>
4)创建 POJO 类
在 src 目录下创建 pojo 包,在该包中创建 POJO 类 FileDomain。然后在该 POJO 类中声明一个 MultipartFile 类型的属性封装被上传的文件信息,属性名与文件选择页面 oneFile.jsp 中的 file 类型的表单参数名 myfile 相同。具体代码如下:
package pojo;import org.springframework.web.multipart.MultipartFile;public class FileDomain {private String description;private MultipartFile myfile;public String getDescription() {return description;}public void setDescription(String description) {this.description = description;}public MultipartFile getMyfile() {return myfile;}public void setMyfile(MultipartFile myfile) {this.myfile = myfile;}}
5)创建控制器类
在 src 目录下创建 controller 包,并在该包中创建 FileUploadController 控制器类。具体代码如下:
kage controller;import java.io.File;import javax.servlet.http.HttpServletRequest;import org.apache.commons.logging.Log;import org.apache.commons.logging.LogFactory;import org.springframework.stereotype.Controller;import org.springframework.web.bind.annotation.ModelAttribute;import org.springframework.web.bind.annotation.RequestMapping;import pojo.FileDomain;@Controllerpublic class FileUploadController {// 得到一个用来记录日志的对象,这样在打印信息时能够标记打印的是哪个类的信息private static final Log logger = LogFactory.getLog(FileUploadController.class);/*** 单文件上传*/@RequestMapping("/onefile")public String oneFileUpload(@ModelAttribute FileDomain fileDomain,HttpServletRequest request) {/** 文件上传到服务器的位置“/uploadfiles”,该位置是指* workspace\.metadata\.plugins\org.eclipse* .wst.server.core\tmp0\wtpwebapps, 发布后使用*/String realpath = request.getServletContext().getRealPath("uploadfiles");String fileName = fileDomain.getMyfile().getOriginalFilename();File targetFile = new File(realpath, fileName);if (!targetFile.exists()) {targetFile.mkdirs();}// 上传try {fileDomain.getMyfile().transferTo(targetFile);logger.info("成功");} catch (Exception e) {e.printStackTrace();}return "showOne";}}
6)创建 Spring MVC 的配置文件
在上传文件时需要在配置文件中使用 Spring 的 CommonsMultipartResolver 类配置 MultipartResolver 用于文件上传,应用的配置文件 springmvc-servlet.xml 的代码如下:
<?xml version="1.0" encoding="UTF-8"?><beans xmlns="http://www.springframework.org/schema/beans"xmlns:xsi="http://www.w3.org/2001/XMLSchema-instance"xmlns:mvc="http://www.springframework.org/schema/mvc"xmlns:p="http://www.springframework.org/schema/p"xmlns:context="http://www.springframework.org/schema/context"xsi:schemaLocation="http://www.springframework.org/schema/beanshttp://www.springframework.org/schema/beans/spring-beans.xsdhttp://www.springframework.org/schema/contexthttp://www.springframework.org/schema/context/spring-context.xsdhttp://www.springframework.org/schema/mvchttp://www.springframework.org/schema/mvc/spring-mvc.xsd"><!-- 使用扫描机制扫描包 --><context:component-scan base-package="controller" /><!-- 完成视图的对应 --><!-- 对转向页面的路径解析。prefix:前缀, suffix:后缀 --><beanclass="org.springframework.web.servlet.view.InternalResourceViewResolver"><property name="prefix" value="/WEB-INF/jsp/" /><property name="suffix" value=".jsp" /></bean><!-- 配置MultipartResolver,用于上传文件,使用spring的CommonsMultipartResolver --><bean id="multipartResolver"class="org.springframework.web.multipart.commons.CommonsMultipartResolver"><property name="maxUploadSize" value="5000000" /><property name="defaultEncoding" value="UTF-8" /></bean></beans>
7)创建成功显示页面
在 WEB-INF 目录下创建 JSP 文件夹,并在该文件夹中创建单文件上传成功显示页面 showOne.jsp。具体代码如下:
<%@ page language="java" contentType="text/html; charset=UTF-8"pageEncoding="UTF-8"%><!DOCTYPE html PUBLIC "-//W3C//DTD HTML 4.01 Transitional//EN" "http://www.w3.org/TR/html4/loose.dtd"><html><head><meta http-equiv="Content-Type" content="text/html; charset=UTF-8"><title>Insert title here</title></head><body>${fileDomain.description }<br><!-- fileDomain.getMyFile().getOriginalFilename()-->${fileDomain.myfile.originalFilename }</body></html>
8)测试文件上传
发布 springMVCDemo11 应用到 Tomcat 服务器并启动 Tomcat 服务器,然后通过地址“http://localhost:8080/springMVCDemo11/oneFile.jsp”运行文件选择页面,运行结果如图 2 所示。

图 2 单文件选择页面
在图 2 中选择文件并输入文件描述,然后单击“提交”按钮上传文件,若成功则显示如图 3 所示的结果。

图 3 单文件成功上传结果




还没有评论,来说两句吧...