Android开发手机通讯录
Android Studio开发手机通讯录
- 课程设计
- 课程设计要求
- 课程设计题目
- 题目1 通讯录管理
- 题目2 拨号和短信管理
- 代码实现
- 首先我们先来理清楚思路
- 创建数据库
- 设置适配器
- 主页面
- 添加联系人活动
- 编辑联系人活动
- 主活动
- 配置AndroidManifest.xml文件
- 程序效果
课程设计
经过一个学期的Android开发学习,本次学期末,为了检验大家的学习情况,此次期末的课程设计为使用Android Studio开发一款手机通讯录
课程设计要求
- 分析课程设计题目,具有一定的需求分析的能力;
- 根据题目要求,具有算法设计能力和数据库处理能力;
- 理解安卓开发的的语法规则、编程思想,具有程序代码编写能力;
- 程序运行、调试能力;
- 设计完成后提交课程设计报告。
- 以下题目1必做,题目2选做。
课程设计题目
题目1 通讯录管理
功能要求如下:
- 本题目的要求为设计一个通讯录管理系统,通讯录的内容包括姓名、手机号码1、手机号码2、家庭座机号码、办公座机号码、地址和备注信息;
- 添加通讯录功能:用一个活动录入新的通讯录;
- 显示通讯录,用一个ListView显示所有通讯录的姓名和手机号码;
- 长按通讯录删除该通讯录条目;
- 设计相应的数据库表进行存取;
- 用word组织结构图画出所设计管理系统的功能模块;
- 截取每个活动的界面,存放到设计报告中;
运行程序后,在屏幕上显示通讯录。用户可以长按删除或用按钮添加通讯录。
题目2 拨号和短信管理
功能要求如下:
根据上题所做的通讯录,制作对应的拨号和短信功能,可以实现通讯录中点击对应的条目后选择应对的号码进行拨号或发送短信。
代码实现
首先我们先来理清楚思路
- 根据课程设计的需求,我们需要创建一个主页面,用来显示联系人的相关信息,如电话号码,名字,头像等(其中头像可以不用加进去)。
- 可以添加联系人,其中联系人存储在SQLite数据库中,所以我们还需要创建一个数据库文件,当然我们使用的是Android自带的数据库,可以使用一个java类进行数据库的创建即可。
- 我们需要添加的联系人可以从主页面点击添加按钮,跳转到添加联系人活动中,添加联系人的相关信息(姓名,联系方式1,联系方式2,家庭座机号,办公座机号,地址,备注),这里姓名属于必填项,同时,联系方式1、联系方式2、家庭座机号、办公座机号中必须填写一项,其余信息可以不用填写。
- 填写完成所有的信息后,点击保存按钮,将所填写的信息保存到数据库中
- 将所保存的联系人信息显示在主页面中,所以我们还需要创建一个listView的适配器。
- 可以实现打电话、发短信功能,所以我们需要去获取手机的打电话和发短息的相关权限。
- 实现编辑联系人功能(这一点课程设计要求中没有提到,小编觉得不管在多垃圾的联系人管理软件都应该支持联系人信息的编辑)
- 长按可以删除联系人
- 查看联系人相关信息
创建数据库
因为要求,我们需要把联系人存储到数据中,所以我们需要创建一个用来创建数据库的类,数据库中包含了我们所存储的联系人的所有信息,所以需要的字段有姓名、电话1、电话2、家庭电话、办公电话、地址、备注。具体代码实现如下:
package com.example.myaddressbook;import android.content.Context;import android.database.sqlite.SQLiteDatabase;import android.database.sqlite.SQLiteOpenHelper;public class Datebase extends SQLiteOpenHelper {//定义创建数据库说用到的语句,并定制了数据库字段private static final String CREATE_PhoneNumber = "create table PhoneNumber(id integer primary key autoincrement, name text, " +"phone1 text, phone2 text, housePhone text, officePhone text,address text,remark text)";private Context mContext;public Datebase(Context context, String name, SQLiteDatabase.CursorFactory factory, int version){super(context, name, factory, version);mContext = context;}@Overridepublic void onCreate(SQLiteDatabase sqLiteDatabase) {//创建数据库sqLiteDatabase.execSQL(CREATE_PhoneNumber);}@Overridepublic void onUpgrade(SQLiteDatabase sqLiteDatabase, int i, int i1) {//升级数据库sqLiteDatabase.execSQL("drop table if exists PhoneNumber");onCreate(sqLiteDatabase);}}
到目前为止,我们创建好了我们程序所需要的数据库,需要使用数据库只需要在MainActivity中创建数据库类的对象即可。
设置适配器
定义所需要的联系人信息的类,制作ListView适配器,将我们所需要的信息添加到ListVie中。
首先,我们要创建一个Phone类,用来定义联系人所需要用到的信息,其实现代码如下:
package com.example.myaddressbook;public class Phone {private String name,phone1,phone2,houerPhone,officephone,address,remark;public Phone(){}public String getName() {return name;}public String getPhone1() {return phone1;}public String getPhone2() {return phone2;}public String getHouerPhone() {return houerPhone;}public String getOfficephone() {return officephone;}public String getAddress() {return address;}public String getRemark() {return remark;}public Phone(String name, String phone1,String phone2,String houerPhone, String officephone,String address,String remark){this.name = name;this.phone1 = phone1;this.phone2 = phone2;this.houerPhone = houerPhone;this.officephone = officephone;this.address = address;this.remark = remark;}}
定义ListView适配器,定制LIstView,此时,我们需要创建一个布局文件,定制自己喜欢的布局,这里我设置的布局文件为一个嵌套布局,左边显示图片(头像)中间为内部嵌套布局文件,分为上下两个TextView,上面用来显示联系人的名字,下面用来显示联系人联系方式。右边有三个按钮,分别实现打电话功能、发短信功能、编辑联系人信息功能,布局样式如下:
定义好我们的定制listView之后,我们需要创建一个ListView适配器,其全部代码如下:
package com.example.myaddressbook;import android.content.Context;import android.view.LayoutInflater;import android.view.View;import android.view.ViewGroup;import android.widget.ArrayAdapter;import android.widget.Button;import android.widget.ImageView;import android.widget.TextView;import androidx.annotation.NonNull;import androidx.annotation.Nullable;import java.util.List;public class ListAdapter extends ArrayAdapter<Phone>{private int resourceId;Phone phone = new Phone();public ListAdapter(Context context, int textViewResourceId, List<Phone> objects /*,MyCallback callback*/){super(context, textViewResourceId, objects);resourceId = textViewResourceId;// this.mCallback = callback;}@NonNull@Overridepublic View getView(int position, @Nullable View convertView, @NonNull ViewGroup parent) {final int i = position;Phone phone = (Phone)getItem(position);View view;ViewHolder viewHolder;if (convertView == null){view = LayoutInflater.from(getContext()).inflate(resourceId,parent,false);viewHolder = new ViewHolder();viewHolder.phoneImage = (ImageView)view.findViewById(R.id.phone_image);viewHolder.textViewName = (TextView)view.findViewById(R.id.list_name);viewHolder.textViewPhone = (TextView)view.findViewById(R.id.list_phone);viewHolder.buttonCall = (Button)view.findViewById(R.id.button_call);viewHolder.buttonChanges = (Button)view.findViewById(R.id.button_change);viewHolder.buttonShotMassage = (Button)view.findViewById(R.id.button_massages);view.setTag(viewHolder);}else{view = convertView;viewHolder = (ViewHolder) view.getTag();}viewHolder.phoneImage.setImageResource(R.drawable.ic_launcher_foreground);viewHolder.textViewName.setText(phone.getName());if (phone.getPhone1().equals("")){if (phone.getPhone2().equals("")){if (phone.getHouerPhone().equals("")){viewHolder.textViewPhone.setText(phone.getOfficephone());}else{viewHolder.textViewPhone.setText(phone.getHouerPhone());}}else {viewHolder.textViewPhone.setText(phone.getPhone2());}}else {viewHolder.textViewPhone.setText(phone.getPhone1());}viewHolder.buttonCall.setOnClickListener(new View.OnClickListener(){@Overridepublic void onClick(View v){mOnItemCallListener.onCallClick(i);}});viewHolder.buttonChanges.setOnClickListener(new View.OnClickListener() {@Overridepublic void onClick(View view) {mOnItemChangesListener.onChangesClick(i);}});viewHolder.buttonShotMassage.setOnClickListener(new View.OnClickListener() {@Overridepublic void onClick(View view) {mOnItemMassgasListener.onMassgasClick(i);}});return view;}class ViewHolder{ImageView phoneImage;TextView textViewName;TextView textViewPhone;Button buttonCall;Button buttonChanges;Button buttonShotMassage;}public interface onItemCallListener {void onCallClick(int i);}private onItemCallListener mOnItemCallListener;public void setOnItemCallClickListener(onItemCallListener mOnItemCallListener) {this.mOnItemCallListener = mOnItemCallListener;}public interface onItemChangesListener {void onChangesClick(int i);}private onItemChangesListener mOnItemChangesListener;public void setOnItemChangesClickListener(onItemChangesListener mOnItemChangersListener) {this.mOnItemChangesListener = mOnItemChangersListener;}public interface onItemMassgasListener {void onMassgasClick(int i);}private onItemMassgasListener mOnItemMassgasListener;public void setOnItemMassgasClickListener(onItemMassgasListener mOnItemMassgasListener) {this.mOnItemMassgasListener = mOnItemMassgasListener;}}
主页面
创建一个项目,这里小编创建的项目为MyAddressBook。项目创建好之后在activity_main.xml文件中设置布局,因为需要联系人按列表显示,所以在布局文件中使用一个ListView控件,同时添加一个Button,用来添加联系人使用。具体布局详情以及布局文件如下所示:
<?xml version="1.0" encoding="utf-8"?><RelativeLayout xmlns:android="http://schemas.android.com/apk/res/android"xmlns:app="http://schemas.android.com/apk/res-auto"xmlns:tools="http://schemas.android.com/tools"android:layout_width="match_parent"android:layout_height="match_parent"tools:context=".MainActivity"><ListViewandroid:layout_width="match_parent"android:layout_height="match_parent"android:scrollbars="vertical"android:fadeScrollbars="true"android:id="@+id/list_list"/><Buttonandroid:layout_width="50dp"android:layout_height="50dp"android:id="@+id/button_add"android:padding="0dp"android:layout_alignParentBottom="true"android:layout_alignParentRight="true"android:textSize="25dp"android:textColor="#FC752D"android:background="@mipmap/add_phone"android:layout_margin="30dp"/></RelativeLayout>
在上述代码中,使用的是相对布局,同时包含了ListView和Button,ListView用来显示联系人信息,Button用来点击跳转至添加联系人活动中。(这里小编技术不够,使用相对布局和ListView的特性设置了一个伪浮动按钮,大神勿喷!)
添加联系人活动
根据课程设计要求,我们在点击主页面的添加按钮之后会跳转到添加联系人活动中,所以我们需要创建一个添加联系人的活动。
首先我们需要设置好我们的布局文件,代码和效果如下: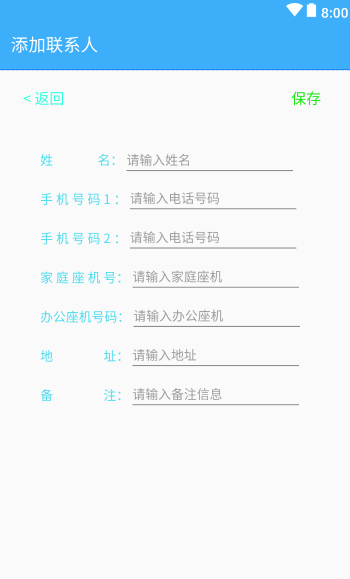
添加联系人的页面布局代码具体实现如下:
<?xml version="1.0" encoding="utf-8"?><RelativeLayout xmlns:android="http://schemas.android.com/apk/res/android"xmlns:app="http://schemas.android.com/apk/res-auto"xmlns:tools="http://schemas.android.com/tools"android:layout_width="match_parent"android:layout_height="match_parent"android:id="@+id/wrap"tools:context=".AddPhoneNumber"><RelativeLayoutandroid:layout_width="match_parent"android:layout_height="wrap_content"android:id="@+id/line1"android:layout_marginTop="10dp"><Buttonandroid:layout_width="wrap_content"android:layout_height="wrap_content"android:id="@+id/back"android:textColor="#2BFFDB"android:textSize="17dp"android:layout_alignParentLeft="true"android:layout_marginLeft="10dp"android:text="@string/back"android:background="@drawable/button_background"/><Buttonandroid:id="@+id/save"android:layout_width="wrap_content"android:layout_height="wrap_content"android:background="@drawable/button_background"android:layout_marginRight="10dp"android:layout_alignParentRight="true"android:textColor="#17E910"android:textSize="17dp"android:text="保存" /></RelativeLayout><TextViewandroid:layout_width="wrap_content"android:layout_below="@id/line1"android:layout_height="wrap_content"android:id="@+id/button_name"android:textSize="15dp"android:textColor="#4BDBEE"android:layout_marginTop="37dp"android:layout_marginLeft="50dp"android:text="姓 名:"/><TextViewandroid:layout_width="wrap_content"android:layout_height="wrap_content"android:id="@+id/button_phone_number1"android:textSize="15dp"android:textColor="#4BDBEE"android:layout_marginTop="25dp"android:layout_marginLeft="50dp"android:layout_below="@id/button_name"android:text="手 机 号 码 1 :"/><TextViewandroid:layout_width="wrap_content"android:layout_height="wrap_content"android:textSize="15dp"android:textColor="#4BDBEE"android:layout_marginTop="25dp"android:layout_marginLeft="50dp"android:id="@+id/button_phone_number2"android:layout_below="@id/button_phone_number1"android:text="手 机 号 码 2 :"/><TextViewandroid:layout_width="wrap_content"android:layout_height="wrap_content"android:textSize="15dp"android:textColor="#4BDBEE"android:layout_marginTop="25dp"android:layout_marginLeft="50dp"android:layout_below="@id/button_phone_number2"android:id="@+id/button_house_number"android:text="家 庭 座 机 号:"/><TextViewandroid:layout_width="wrap_content"android:layout_height="wrap_content"android:id="@+id/button_office_number"android:textSize="15dp"android:textColor="#4BDBEE"android:layout_marginTop="25dp"android:layout_marginLeft="50dp"android:layout_below="@id/button_house_number"android:text="办公座机号码:"/><TextViewandroid:layout_width="wrap_content"android:layout_height="wrap_content"android:id="@+id/button_address"android:textSize="15dp"android:textColor="#4BDBEE"android:layout_marginTop="25dp"android:layout_marginLeft="50dp"android:layout_below="@id/button_office_number"android:text="地 址:"/><TextViewandroid:layout_width="wrap_content"android:layout_height="wrap_content"android:id="@+id/button_remark"android:textSize="15dp"android:textColor="#4BDBEE"android:layout_marginTop="25dp"android:layout_marginLeft="50dp"android:layout_below="@id/button_address"android:text="备 注:"/><EditTextandroid:layout_width="200dp"android:layout_height="wrap_content"android:layout_below="@id/line1"android:inputType="text"android:textColor="#F40"android:textSize="15dp"android:maxLength="10"android:hint="请输入姓名"android:layout_marginTop="27dp"android:layout_toRightOf="@id/button_name"android:id="@+id/edit_name"/><EditTextandroid:layout_width="200dp"android:layout_height="wrap_content"android:inputType="number"android:textColor="#F40"android:textSize="15dp"android:layout_marginTop="3dp"android:hint="请输入电话号码"android:maxLength="11"android:layout_below="@id/edit_name"android:layout_toRightOf="@id/button_phone_number1"android:id="@+id/edit_phone_number1"/><EditTextandroid:layout_width="200dp"android:inputType="number"android:layout_below="@id/edit_phone_number1"android:layout_height="wrap_content"android:maxLength="11"android:layout_marginTop="4dp"android:textColor="#F40"android:textSize="15dp"android:hint="请输入电话号码"android:layout_toRightOf="@id/button_phone_number2"android:id="@+id/edit_phone_number2"/><EditTextandroid:layout_width="200dp"android:layout_height="wrap_content"android:textColor="#F40"android:textSize="15dp"android:inputType="number"android:layout_marginTop="4dp"android:hint="请输入家庭座机"android:maxLength="12"android:layout_toRightOf="@id/button_house_number"android:layout_below="@id/edit_phone_number2"android:id="@+id/edit_house_number"/><EditTextandroid:layout_width="200dp"android:layout_below="@id/edit_house_number"android:layout_toRightOf="@id/button_office_number"android:layout_marginTop="4dp"android:inputType="number"android:layout_height="wrap_content"android:textColor="#F40"android:textSize="15dp"android:hint="请输入办公座机"android:maxLength="12"android:id="@+id/edit_office_number"/><EditTextandroid:layout_width="200dp"android:layout_height="wrap_content"android:inputType="text"android:layout_marginTop="4dp"android:textColor="#F40"android:textSize="15dp"android:hint="请输入地址"android:maxLength="20"android:layout_toRightOf="@id/button_address"android:layout_below="@id/edit_office_number"android:id="@+id/edit_address"/><EditTextandroid:layout_width="200dp"android:textColor="#F40"android:textSize="15dp"android:hint="请输入备注信息"android:layout_marginTop="4dp"android:layout_below="@id/edit_address"android:layout_toRightOf="@id/button_remark"android:layout_height="wrap_content"android:inputType="text"android:maxLength="30"android:id="@+id/edit_remark"/></RelativeLayout>
这里小编使用的也是相对布局,同时还使用了布局嵌套,在相对布局中嵌套一个布局,将title和下面的添加用户的信息分离,在内部嵌套的布局中,添加了两个按钮,这两个按钮的作用分别是返回主页面和保存所填写的用户信息,将信息提交到数据库。
其Activity代码实现文件如下:
package com.example.myaddressbook;import androidx.appcompat.app.AppCompatActivity;import android.content.ContentValues;import android.content.Intent;import android.database.Cursor;import android.database.sqlite.SQLiteDatabase;import android.os.Bundle;import android.view.View;import android.widget.Button;import android.widget.EditText;import android.widget.Toast;public class AddPhoneNumber extends AppCompatActivity {//定义所需要使用到的button和EditText控件对象Button buttonBack;Button buttonSave;EditText editTextName,editTextPhone1,editTextPhone2,editTextHousePhone,editTextOfficePhone,editTextAddress,editTextRemark;//电仪数据库类型的变量private Datebase datebase;SQLiteDatabase db;@Overrideprotected void onCreate(Bundle savedInstanceState) {super.onCreate(savedInstanceState);setContentView(R.layout.activity_add_phone_number);//创建数据库对象datebase = new Datebase(this,"PhoneNumber",null,1);//创建控件对象buttonBack = (Button) findViewById(R.id.back);buttonSave = (Button) findViewById(R.id.save);editTextName = (EditText) findViewById(R.id.edit_name);editTextPhone1 = (EditText)findViewById(R.id.edit_phone_number1);editTextPhone2 = (EditText)findViewById(R.id.edit_phone_number2);editTextHousePhone = (EditText)findViewById(R.id.edit_house_number);editTextOfficePhone = (EditText)findViewById(R.id.edit_office_number);editTextAddress = (EditText)findViewById(R.id.edit_address);editTextRemark = (EditText)findViewById(R.id.edit_remark);//设置点击返回按钮时触发的事件buttonBack.setOnClickListener(new View.OnClickListener() {@Overridepublic void onClick(View view) {//设置事件为返回到主活动中Intent intent = new Intent(AddPhoneNumber.this,MainActivity.class);startActivity(intent);}});//定义保存按钮被触发是的事件buttonSave.setOnClickListener(new View.OnClickListener() {@Overridepublic void onClick(View view) {// 定义字符串,并写获取EditText输入框中的文字String edit_name = editTextName.getText().toString(),edit_phone1 = editTextPhone1.getText().toString(),edit_phone2 = editTextPhone2.getText().toString(),edit_housePhone = editTextHousePhone.getText().toString(),edit_officePhone = editTextOfficePhone.getText().toString(),edit_address = editTextAddress.getText().toString(),edit_remark = editTextRemark.getText().toString();// 判断输入的联系人姓名是否为空和联系方式1、联系方式2、家庭座机、办公座机其中一个是否不为空if ((!edit_name.equals("")) && (!edit_phone1.equals("") || !edit_phone2.equals("") || !edit_housePhone.equals("") || !edit_officePhone.equals(""))){//定义一个计数器,用来判断数据库中是否存在此联系人int count = 0;//定义可操作的数据库对象db = datebase.getWritableDatabase();//设置Curso对象,用来查看数据库中的信息Cursor cursor = db.query("PhoneNumber",null,null,null,null,null,null);//判断数据库是否为空if (cursor.moveToFirst()){do{// 获取数据库中的信息,并且赋值给所定义的字符串,括号内为数据库字段名称String name = cursor.getString(cursor.getColumnIndex("name"));String phone1 = cursor.getString(cursor.getColumnIndex("phone1"));String phone2 = cursor.getString(cursor.getColumnIndex("phone2"));String housePhone = cursor.getString(cursor.getColumnIndex("housePhone"));String officePone = cursor.getString(cursor.getColumnIndex("officePhone"));String address = cursor.getString(cursor.getColumnIndex("address"));String remark = cursor.getString(cursor.getColumnIndex("remark"));//判断数据库中是否已经存在输入的联系人的姓名,或者是否存在输入的信息相同的信息if ((name.equals(edit_name) && phone1.equals(edit_phone1)) && (phone2.equals(edit_phone2) && housePhone.equals(edit_housePhone)) &&(officePone.equals(edit_officePhone) && address.equals(edit_address) && remark.equals(edit_remark)) || name.equals(edit_name)){// 如果存在相同的,那么count自增count ++;}}while (cursor.moveToNext());}// 如果输入的信息不相同,也就是count没有进行运算if (count == 0){// 定义可写的数据库SQLiteDatabase db = datebase.getWritableDatabase();// 创建ContentValues对象ContentValues values = new ContentValues();// 调用put方法添加数据到ContentValues对象中values.put("name",edit_name);values.put("phone1", edit_phone1);values.put("phone2", edit_phone2);values.put("housePhone", edit_housePhone);values.put("officePhone", edit_officePhone);values.put("address",edit_address);values.put("remark", edit_remark);// 添加数据到数据库表中db.insert("PhoneNumber",null,values);// 清楚values的数据values.clear();// 提示保存成功Toast.makeText(AddPhoneNumber.this,"保存成功!",Toast.LENGTH_SHORT).show();// 跳转回主界面Intent intent = new Intent(AddPhoneNumber.this,MainActivity.class);startActivity(intent);}else{// 如果联系人已经存在,提示已经存在Toast.makeText(AddPhoneNumber.this,"联系人已存在!",Toast.LENGTH_SHORT).show();}}else{// 如果输入的必要信息没有填写,则会提示Toast.makeText(AddPhoneNumber.this,"请填写联系人相关信息!",Toast.LENGTH_SHORT).show();}}});}}
编辑联系人活动
这里是小编加入的一个而外的功能,可以对已经存储好的联系人的信息进行修改,布局文件如下所示: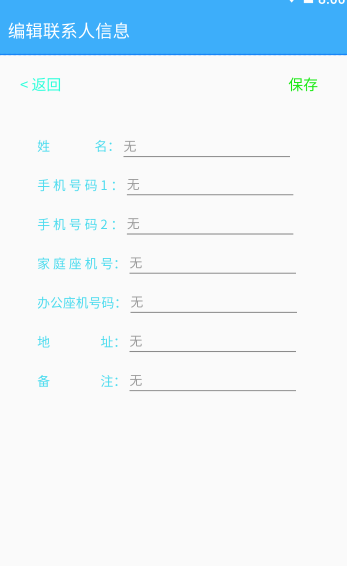
布局文件的代码实现入下:
<?xml version="1.0" encoding="utf-8"?><RelativeLayout xmlns:android="http://schemas.android.com/apk/res/android"xmlns:app="http://schemas.android.com/apk/res-auto"xmlns:tools="http://schemas.android.com/tools"android:layout_width="match_parent"android:layout_height="match_parent"tools:context=".EditPhone"><RelativeLayoutandroid:layout_width="match_parent"android:layout_height="wrap_content"android:id="@+id/check_line1"android:layout_marginTop="10dp"><Buttonandroid:layout_width="wrap_content"android:layout_height="wrap_content"android:id="@+id/check_back"android:textColor="#2BFFDB"android:textSize="17dp"android:layout_alignParentLeft="true"android:layout_marginLeft="10dp"android:text="@string/back"android:background="@drawable/button_background"/><Buttonandroid:id="@+id/check_save"android:layout_width="wrap_content"android:layout_height="wrap_content"android:background="@drawable/button_background"android:layout_marginRight="10dp"android:layout_alignParentRight="true"android:textColor="#17E910"android:textSize="17dp"android:text="保存" /></RelativeLayout><TextViewandroid:layout_width="wrap_content"android:layout_below="@id/check_line1"android:layout_height="wrap_content"android:id="@+id/check_button_name"android:textSize="15dp"android:textColor="#4BDBEE"android:layout_marginTop="37dp"android:layout_marginLeft="50dp"android:text="姓 名:"/><TextViewandroid:layout_width="wrap_content"android:layout_height="wrap_content"android:id="@+id/check_button_phone_number1"android:textSize="15dp"android:textColor="#4BDBEE"android:layout_marginTop="25dp"android:layout_marginLeft="50dp"android:layout_below="@id/check_button_name"android:text="手 机 号 码 1 :"/><TextViewandroid:layout_width="wrap_content"android:layout_height="wrap_content"android:textSize="15dp"android:textColor="#4BDBEE"android:layout_marginTop="25dp"android:layout_marginLeft="50dp"android:id="@+id/check_button_phone_number2"android:layout_below="@id/check_button_phone_number1"android:text="手 机 号 码 2 :"/><TextViewandroid:layout_width="wrap_content"android:layout_height="wrap_content"android:textSize="15dp"android:textColor="#4BDBEE"android:layout_marginTop="25dp"android:layout_marginLeft="50dp"android:layout_below="@id/check_button_phone_number2"android:id="@+id/check_button_house_number"android:text="家 庭 座 机 号:"/><TextViewandroid:layout_width="wrap_content"android:layout_height="wrap_content"android:id="@+id/check_button_office_number"android:textSize="15dp"android:textColor="#4BDBEE"android:layout_marginTop="25dp"android:layout_marginLeft="50dp"android:layout_below="@id/check_button_house_number"android:text="办公座机号码:"/><TextViewandroid:layout_width="wrap_content"android:layout_height="wrap_content"android:id="@+id/check_button_address"android:textSize="15dp"android:textColor="#4BDBEE"android:layout_marginTop="25dp"android:layout_marginLeft="50dp"android:layout_below="@id/check_button_office_number"android:text="地 址:"/><TextViewandroid:layout_width="wrap_content"android:layout_height="wrap_content"android:id="@+id/check_button_remark"android:textSize="15dp"android:textColor="#4BDBEE"android:layout_marginTop="25dp"android:layout_marginLeft="50dp"android:layout_below="@id/check_button_address"android:text="备 注:"/><EditTextandroid:layout_width="200dp"android:layout_height="wrap_content"android:layout_below="@id/check_line1"android:inputType="text"android:textColor="#F40"android:textSize="15dp"android:hint="无"android:layout_marginTop="27dp"android:layout_toRightOf="@id/check_button_name"android:id="@+id/check_edit_name"/><EditTextandroid:layout_width="200dp"android:layout_height="wrap_content"android:inputType="number"android:textColor="#F40"android:textSize="15dp"android:layout_marginTop="3dp"android:hint="无"android:maxLength="11"android:layout_below="@id/check_edit_name"android:layout_toRightOf="@id/check_button_phone_number1"android:id="@+id/check_edit_phone_number1"/><EditTextandroid:layout_width="200dp"android:layout_below="@id/check_edit_phone_number1"android:layout_height="wrap_content"android:inputType="number"android:maxLength="11"android:layout_marginTop="4dp"android:textColor="#F40"android:textSize="15dp"android:hint="无"android:layout_toRightOf="@id/check_button_phone_number2"android:id="@+id/check_edit_phone_number2"/><EditTextandroid:layout_width="200dp"android:layout_height="wrap_content"android:textColor="#F40"android:textSize="15dp"android:layout_marginTop="4dp"android:inputType="number"android:hint="无"android:maxLength="12"android:layout_toRightOf="@id/check_button_house_number"android:layout_below="@id/check_edit_phone_number2"android:id="@+id/check_edit_house_number"/><EditTextandroid:layout_width="200dp"android:layout_below="@id/check_edit_house_number"android:layout_toRightOf="@id/check_button_office_number"android:layout_marginTop="4dp"android:layout_height="wrap_content"android:inputType="number"android:textColor="#F40"android:textSize="15dp"android:hint="无"android:maxLength="12"android:id="@+id/check_edit_office_number"/><EditTextandroid:layout_width="200dp"android:layout_height="wrap_content"android:inputType="text"android:layout_marginTop="4dp"android:textColor="#F40"android:textSize="15dp"android:hint="无"android:layout_toRightOf="@id/check_button_address"android:layout_below="@id/check_edit_office_number"android:id="@+id/check_edit_address"/><EditTextandroid:layout_width="200dp"android:textColor="#F40"android:textSize="15dp"android:hint="无"android:layout_marginTop="4dp"android:layout_below="@id/check_edit_address"android:layout_toRightOf="@id/check_button_remark"android:layout_height="wrap_content"android:inputType="text"android:id="@+id/check_edit_remark"/></RelativeLayout>
其所对应 Activity代码如下:
package com.example.myaddressbook;import androidx.appcompat.app.AppCompatActivity;import android.content.ContentValues;import android.content.Intent;import android.database.Cursor;import android.database.sqlite.SQLiteDatabase;import android.os.Bundle;import android.view.View;import android.widget.Button;import android.widget.EditText;import android.widget.ListView;import android.widget.Toast;import java.util.ArrayList;import java.util.List;public class EditPhone extends AppCompatActivity {Button buttonCheck,buttonSave;EditText editTextName,editTextPhone1,editTextPhone2,editTextHousePhone,editTextOfficePhone,editTextAddress,editTextRemark;private Datebase datebase;SQLiteDatabase db;int i;Datebase dbHelper = new Datebase(this,"PhoneNumber",null,1);@Overrideprotected void onCreate(Bundle savedInstanceState) {super.onCreate(savedInstanceState);setContentView(R.layout.activity_check);buttonSave = findViewById(R.id.check_save);buttonCheck = findViewById(R.id.check_back);editTextName = findViewById(R.id.check_edit_name);editTextPhone1 = findViewById(R.id.check_edit_phone_number1);editTextPhone2 = findViewById(R.id.check_edit_phone_number2);editTextHousePhone = findViewById(R.id.check_edit_house_number);editTextOfficePhone = findViewById(R.id.check_edit_office_number);editTextAddress = findViewById(R.id.check_edit_address);editTextRemark = findViewById(R.id.check_edit_remark);datebase = new Datebase(this,"PhoneNumber",null,1);buttonCheck.setOnClickListener(new View.OnClickListener() {@Overridepublic void onClick(View view) {Intent intent = new Intent(EditPhone.this,MainActivity.class);startActivity(intent);}});//获取从中活动传递下来的数据Intent intent = getIntent();editTextName.setText(intent.getStringExtra("extra_name"));editTextPhone1.setText(intent.getStringExtra("extra_phone1"));editTextPhone2.setText(intent.getStringExtra("extra_phone2"));editTextHousePhone.setText(intent.getStringExtra("extra_housePhone"));editTextOfficePhone.setText(intent.getStringExtra("extra_officePhone"));editTextAddress.setText(intent.getStringExtra("extra_address"));editTextRemark.setText(intent.getStringExtra("extra_remark"));i = intent.getIntExtra("extra_i",0);final String editName = intent.getStringExtra("extra_name");buttonSave.setOnClickListener(new View.OnClickListener() {@Overridepublic void onClick(View view) {ContentValues values = new ContentValues();//获取用户此时输入的数据String edName = editTextName.getText().toString(),edPhone1 = editTextPhone1.getText().toString(),edPhone2 = editTextPhone2.getText().toString(),edHousePhone = editTextHousePhone.getText().toString(),edOfficePhone = editTextOfficePhone.getText().toString(),edAddress = editTextAddress.getText().toString(),edRemark = editTextRemark.getText().toString();db = datebase.getWritableDatabase();int ID = 0;Cursor cursor = db.query("PhoneNumber",null,null,null,null,null,null);if (cursor.moveToFirst()){do{// 获取此联系人在数据库表中的名字String name = cursor.getString(cursor.getColumnIndex("name"));// 对比名字是否符合if (name.equals(editName)){// 名字符合则获取此联系人在数据库表中的主键idID = cursor.getInt((cursor.getColumnIndex("id")));break;}}while (cursor.moveToNext());}values.put("name",edName);values.put("phone1", edPhone1);values.put("phone2", edPhone2);values.put("housePhone", edHousePhone);values.put("officePhone", edOfficePhone);values.put("address",edAddress);values.put("remark", edRemark);// 将所输入的信息提交至数据库修改,使用条件为主键等于刚刚所获取的主键值db.update("PhoneNumber",values,"id = ?",new String[]{ String.valueOf(ID)});values.clear();Toast.makeText(EditPhone.this,"保存成功!",Toast.LENGTH_SHORT).show();Intent intent1 = new Intent(EditPhone.this,MainActivity.class);startActivity(intent1);}});setReadOnly(editTextRemark);}}
主活动
但我们设置好我们所有的布局文件和相关的Activity文件之后,我们就可以在主活动中进行我们整个程序额逻辑实现,当然并不是最后才写我们的主活动,而是需要配合着活动,慢慢调试我们的程序的功能。
MainActivity的全部代码如下:
package com.example.myaddressbook;import androidx.appcompat.app.AlertDialog;import androidx.appcompat.app.AppCompatActivity;import android.content.DialogInterface;import android.content.Intent;import android.database.Cursor;import android.database.sqlite.SQLiteDatabase;import android.net.Uri;import android.os.Bundle;import android.view.View;import android.widget.AdapterView;import android.widget.Button;import android.widget.ListView;import android.widget.Toast;import java.util.ArrayList;import java.util.List;public class MainActivity extends AppCompatActivity {Button buttonAdd ;ListView listViewPhone;private List<Phone> phones= new ArrayList<>();ListAdapter adapter;SQLiteDatabase db;Datebase dbHelper = new Datebase(this,"PhoneNumber",null,1);@Overrideprotected void onCreate(Bundle savedInstanceState) {super.onCreate(savedInstanceState);setContentView(R.layout.activity_main);buttonAdd = findViewById(R.id.button_add);listViewPhone = findViewById(R.id.list_list);buttonAdd.setOnClickListener(new View.OnClickListener() {@Overridepublic void onClick(View view) {Intent intent = new Intent(MainActivity.this,AddPhoneNumber.class);startActivity(intent);}});db = dbHelper.getWritableDatabase();Cursor cursor = db.query("PhoneNumber",null,null,null,null,null,null);if (cursor.moveToFirst()){do{String name = cursor.getString(cursor.getColumnIndex("name"));String phone1 = cursor.getString(cursor.getColumnIndex("phone1"));String phone2 = cursor.getString(cursor.getColumnIndex("phone2"));String housePhone = cursor.getString(cursor.getColumnIndex("housePhone"));String officePone = cursor.getString(cursor.getColumnIndex("officePhone"));String address = cursor.getString(cursor.getColumnIndex("address"));String remark = cursor.getString(cursor.getColumnIndex("remark"));Phone phoneInfo = new Phone(name,phone1,phone2,housePhone,officePone,address,remark);phones.add(phoneInfo);}while (cursor.moveToNext());}adapter = new ListAdapter(MainActivity.this,R.layout.list_item, phones);listViewPhone.setAdapter(adapter);listViewPhone.setOnItemClickListener(new AdapterView.OnItemClickListener() {@Overridepublic void onItemClick(AdapterView<?> adapterView, View view, int i, long l) {Phone phone_check = phones.get(i);String checkName = phone_check.getName(),checkPhone1 = phone_check.getPhone1(),checkPhone2 = phone_check.getPhone2(),checkHousePhone = phone_check.getHouerPhone(),checkOfficePhone = phone_check.getOfficephone(),checkAddress = phone_check.getAddress(),checkRemark = phone_check.getRemark();AlertDialog.Builder builder = new AlertDialog.Builder(MainActivity.this);builder.setMessage(" 姓 名:" + checkName + "\n" +" 联 系 方 式 1 :" + checkPhone1 + "\n" +" 联 系 方 式 2 :" + checkPhone2 + "\n" +" 家 庭 座 机 号:" + checkHousePhone + "\n" +" 办 公 座 机 号:" + checkOfficePhone + "\n" +" 地 址 :" + checkAddress + "\n" +" 备 注 :" + checkRemark + "\n");builder.setTitle(" 查看联系人");builder.setPositiveButton("确定", new DialogInterface.OnClickListener() {@Overridepublic void onClick(DialogInterface dialogInterface, int i) {}});builder.show();// Intent intent = new Intent(MainActivity.this,EditPhone.class);// intent.putExtra("extra_name",checkName);// intent.putExtra("extra_phone1",checkPhone1);// intent.putExtra("extra_phone2",checkPhone2);// intent.putExtra("extra_housePhone",checkHousePhone);// intent.putExtra("extra_officePhone",checkOfficePhone);// intent.putExtra("extra_address",checkAddress);// intent.putExtra("extra_remark",checkRemark);// startActivity(intent);}});listViewPhone.setOnItemLongClickListener(new AdapterView.OnItemLongClickListener() {@Overridepublic boolean onItemLongClick(AdapterView<?> adapterView, View view, int i, long l) {DeleteDialog(i);return true;}});adapter.setOnItemCallClickListener(new ListAdapter.onItemCallListener() {@Overridepublic void onCallClick(int i) {Phone phone_check = phones.get(i);String phoneNumber = phone_check.getPhone1();Intent intent = new Intent();intent.setAction(Intent.ACTION_DIAL);intent.setData(Uri.parse("tel:" + phoneNumber));startActivity(intent);}});adapter.setOnItemChangesClickListener(new ListAdapter.onItemChangesListener() {@Overridepublic void onChangesClick(int i) {Phone phone_check = phones.get(i);String checkName = phone_check.getName(),checkPhone1 = phone_check.getPhone1(),checkPhone2 = phone_check.getPhone2(),checkHousePhone = phone_check.getHouerPhone(),checkOfficePhone = phone_check.getOfficephone(),checkAddress = phone_check.getAddress(),checkRemark = phone_check.getRemark();Intent intent = new Intent(MainActivity.this, EditPhone.class);intent.putExtra("extra_name",checkName);intent.putExtra("extra_phone1",checkPhone1);intent.putExtra("extra_phone2",checkPhone2);intent.putExtra("extra_housePhone",checkHousePhone);intent.putExtra("extra_officePhone",checkOfficePhone);intent.putExtra("extra_address",checkAddress);intent.putExtra("extra_remark",checkRemark);intent.putExtra("extra_i",i);startActivity(intent);Toast.makeText(MainActivity.this,"编辑",Toast.LENGTH_SHORT).show();}});adapter.setOnItemMassgasClickListener(new ListAdapter.onItemMassgasListener() {@Overridepublic void onMassgasClick(int i) {Phone phone_check = phones.get(i);String phoneNumber = phone_check.getPhone1();Intent intent = new Intent();intent.setAction(Intent.ACTION_VIEW);intent.setData(Uri.parse("smsto:" + phoneNumber));startActivity(intent);Toast.makeText(MainActivity.this,"短信",Toast.LENGTH_SHORT).show();}});}private void DeleteDialog(final int positon){AlertDialog.Builder builder = new AlertDialog.Builder(MainActivity.this);builder.setMessage("删除联系人");builder.setTitle("提示");builder.setPositiveButton("删除", new DialogInterface.OnClickListener() {@Overridepublic void onClick(DialogInterface dialogInterface, int i) {Phone phone_check = phones.get(positon);String checkName = phone_check.getName(),checkPhone1 = phone_check.getPhone1(),checkPhone2 = phone_check.getPhone2(),checkHousePhone = phone_check.getHouerPhone(),checkOfficePhone = phone_check.getOfficephone(),checkAddress = phone_check.getAddress(),checkRemark = phone_check.getRemark();phones.remove(positon);adapter.notifyDataSetChanged(); //更新listViewdb.delete("PhoneNumber","name = ? and phone1 = ? and phone2 = ? and housePhone = ? and officePhone = ? and address = ? and remark = ?",new String[]{ checkName,checkPhone1,checkPhone2,checkHousePhone,checkOfficePhone,checkAddress,checkRemark});Toast.makeText(MainActivity.this,"删除成功!",Toast.LENGTH_SHORT).show();}});builder.setNeutralButton("取消", new DialogInterface.OnClickListener() {@Overridepublic void onClick(DialogInterface dialogInterface, int i) {}});builder.show();}}
小编其实也是个菜鸟,可以看出来大多数功能不过是投机取巧,同时好多地方并没有按照标准来写,只是为了能够实现这样的功能即可,纯属为了应付课程设计,早点回家过年。。。。。。
配置AndroidManifest.xml文件
之前提到过,我们需要调用系统 打电话和发短信功能,那么我们需要向系统申请权限,只有程序有权限之后我们才能实现打电话功能。具体配置为打开AndroidManifest.xml文件,在文件中添加如下代码:
<uses-permission android:name="android.permission.CALL_PHONE"/><uses-permission android:name="android.permission.READ_PHONE_STATE"/>
因为我们在程序中使用了汉字,所以我们需要在
文件中加入这样的一行代码compileOptions.encoding = "UTF-8"
位置为如图所示的地方: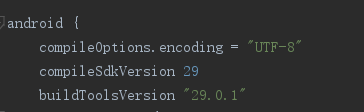
但我们做完所有的一切之后,我们的程序就达到了课程设计的要求,让我们来看看效果如何把
程序效果
添加联系人
查看联系人信息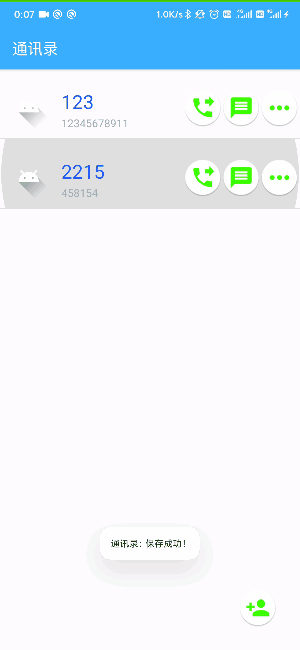
编辑联系人信息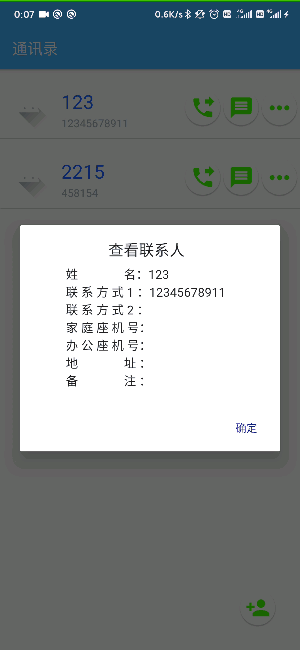
打电话功能
发送短信功能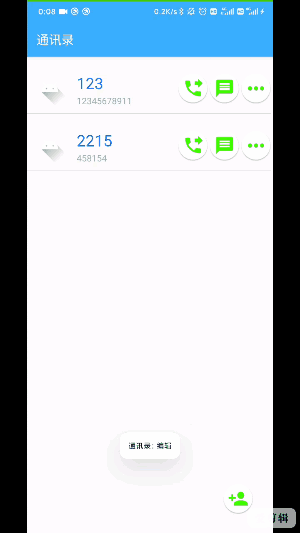
监测是否存在用户和是否输入联系人和联系方式
长按删除联系人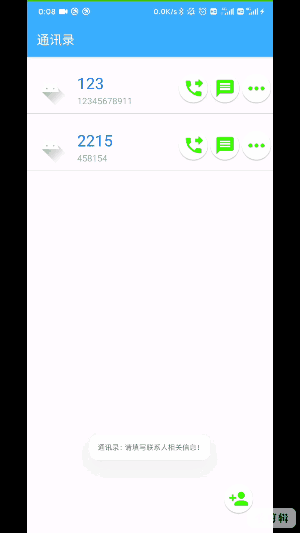
到此为止,所有功能已经实现了哦!!!小编英文不好,有些变量名可能存在拼写错误,各位大佬多多包含,如果有帮助到你,记得给个赞,转发哦!!!


")


还没有评论,来说两句吧...