SpringBoot2+Netty+WebSocket(netty实现websocket,支持URL参数)
关于Netty
Netty 是一个利用 Java 的高级网络的能力,隐藏其背后的复杂性而提供一个易于使用的 API 的客户端/服务器框架。
更新
- 2019-7-11 新增URL参数支持,并解决了带参URL导致的连接自动断开问题,感谢大家的支持。
MAVEN依赖
<dependencies><!-- https://mvnrepository.com/artifact/io.netty/netty-all --><dependency><groupId>io.netty</groupId><artifactId>netty-all</artifactId><version>4.1.36.Final</version></dependency></dependencies>
SpringBootApplication
启动器中需要new一个NettyServer,并显式调用启动netty。
@SpringBootApplicationpublic class SpringCloudStudyDemoApplication {public static void main(String[] args) {SpringApplication.run(SpringCloudStudyDemoApplication.class,args);try {new NettyServer(12345).start();System.out.println("https://blog.csdn.net/moshowgame");System.out.println("http://127.0.0.1:6688/netty-websocket/index");}catch(Exception e) {System.out.println("NettyServerError:"+e.getMessage());}}}
NettyServer
启动的NettyServer,这里进行配置
/** * NettyServer Netty服务器配置 * @author zhengkai.blog.csdn.net * @date 2019-06-12 */public class NettyServer {private final int port;public NettyServer(int port) {this.port = port;}public void start() throws Exception {EventLoopGroup bossGroup = new NioEventLoopGroup();EventLoopGroup group = new NioEventLoopGroup();try {ServerBootstrap sb = new ServerBootstrap();sb.option(ChannelOption.SO_BACKLOG, 1024);sb.group(group, bossGroup) // 绑定线程池.channel(NioServerSocketChannel.class) // 指定使用的channel.localAddress(this.port)// 绑定监听端口.childHandler(new ChannelInitializer<SocketChannel>() { // 绑定客户端连接时候触发操作@Overrideprotected void initChannel(SocketChannel ch) throws Exception {System.out.println("收到新连接");//websocket协议本身是基于http协议的,所以这边也要使用http解编码器ch.pipeline().addLast(new HttpServerCodec());//以块的方式来写的处理器ch.pipeline().addLast(new ChunkedWriteHandler());ch.pipeline().addLast(new HttpObjectAggregator(8192));ch.pipeline().addLast(new WebSocketServerProtocolHandler("/ws", null, true, 65536 * 10));ch.pipeline().addLast(new MyWebSocketHandler());}});ChannelFuture cf = sb.bind().sync(); // 服务器异步创建绑定System.out.println(NettyServer.class + " 启动正在监听: " + cf.channel().localAddress());cf.channel().closeFuture().sync(); // 关闭服务器通道} finally {group.shutdownGracefully().sync(); // 释放线程池资源bossGroup.shutdownGracefully().sync();}}}
MyChannelHandlerPool
通道组池,管理所有websocket连接
/** * MyChannelHandlerPool * 通道组池,管理所有websocket连接 * @author zhengkai.blog.csdn.net * @date 2019-06-12 */public class MyChannelHandlerPool {public MyChannelHandlerPool(){ }public static ChannelGroup channelGroup = new DefaultChannelGroup(GlobalEventExecutor.INSTANCE);}
MyWebSocketHandler
处理ws一下几种情况:
- channelActive与客户端建立连接
- channelInactive与客户端断开连接
channelRead0客户端发送消息处理
/* NettyServer Netty服务器配置 @author zhengkai.blog.csdn.net @date 2019-06-12 */
public class NettyServer {private final int port;public NettyServer(int port) {this.port = port;}public void start() throws Exception {EventLoopGroup bossGroup = new NioEventLoopGroup();EventLoopGroup group = new NioEventLoopGroup();try {ServerBootstrap sb = new ServerBootstrap();sb.option(ChannelOption.SO_BACKLOG, 1024);sb.group(group, bossGroup) // 绑定线程池.channel(NioServerSocketChannel.class) // 指定使用的channel.localAddress(this.port)// 绑定监听端口.childHandler(new ChannelInitializer<SocketChannel>() { // 绑定客户端连接时候触发操作@Overrideprotected void initChannel(SocketChannel ch) throws Exception {System.out.println("收到新连接");//websocket协议本身是基于http协议的,所以这边也要使用http解编码器ch.pipeline().addLast(new HttpServerCodec());//以块的方式来写的处理器ch.pipeline().addLast(new ChunkedWriteHandler());ch.pipeline().addLast(new HttpObjectAggregator(8192));ch.pipeline().addLast(new WebSocketServerProtocolHandler("/ws", "WebSocket", true, 65536 * 10));ch.pipeline().addLast(new MyWebSocketHandler());}});ChannelFuture cf = sb.bind().sync(); // 服务器异步创建绑定System.out.println(NettyServer.class + " 启动正在监听: " + cf.channel().localAddress());cf.channel().closeFuture().sync(); // 关闭服务器通道} finally {group.shutdownGracefully().sync(); // 释放线程池资源bossGroup.shutdownGracefully().sync();}}
}
socket.html
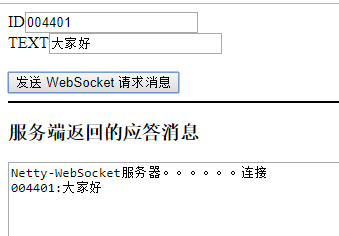
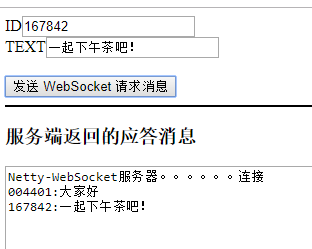
主要是连接ws,发送消息,以及消息反馈
<!DOCTYPE html PUBLIC "-//W3C//DTD XHTML 1.0 Transitional//EN" "http://www.w3.org/TR/xhtml1/DTD/xhtml1transitional.dtd"><html xmlns="http://www.w3.org/1999/xhtml"><head><meta http-equiv="Content-Type" content="text/html; charset=utf-8" /><title>Netty-Websocket</title><script type="text/javascript"> // by zhengkai.blog.csdn.net var socket; if(!window.WebSocket){ window.WebSocket = window.MozWebSocket; } if(window.WebSocket){ socket = new WebSocket("ws://127.0.0.1:12345/ws"); socket.onmessage = function(event){ var ta = document.getElementById('responseText'); ta.value += event.data+"\r\n"; }; socket.onopen = function(event){ var ta = document.getElementById('responseText'); ta.value = "Netty-WebSocket服务器。。。。。。连接 \r\n"; }; socket.onclose = function(event){ var ta = document.getElementById('responseText'); ta.value = "Netty-WebSocket服务器。。。。。。关闭 \r\n"; }; }else{ alert("您的浏览器不支持WebSocket协议!"); } function send(message){ if(!window.WebSocket){ return;} if(socket.readyState == WebSocket.OPEN){ socket.send(message); }else{ alert("WebSocket 连接没有建立成功!"); } } </script></head><body><form onSubmit="return false;"><label>ID</label><input type="text" name="uid" value="${uid!!}" /> <br /><label>TEXT</label><input type="text" name="message" value="这里输入消息" /> <br /><br /> <input type="button" value="发送ws消息" onClick="send(this.form.uid.value+':'+this.form.message.value)" /><hr color="black" /><h3>服务端返回的应答消息</h3><textarea id="responseText" style="width: 1024px;height: 300px;"></textarea></form></body></html>
Controller
写好了html当然还需要一个controller来引导页面。
@RestControllerpublic class IndexController {@GetMapping("/index")public ModelAndView index(){ModelAndView mav=new ModelAndView("socket");mav.addObject("uid", RandomUtil.randomNumbers(6));return mav;}}
效果演示
思路优化" class="reference-link">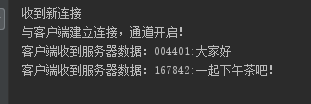 思路优化
思路优化
由于netty不能像默认的websocket一样设置一些PathVariable例如{uid}等参数(暂未发现可以,如果有发现欢迎补充),所以很多时候发送到后台的报文可以设置一些特殊的格式,例如上文的004401:大家好,可以分解为userid:text,当然userid也可以是加密的一些报文,甚至可以学习其他报文一样设置加密区,这取决于大家的业务需要. (已更新解决方案)
后言
项目已经整合进开源项目spring-cloud-study的子模块spring-cloud-study-netty-websocket,作为对websocket体系的补充,对SpringBoot2.0集成WebSocket,实现后台向前端推送信息 的完善。
改造netty支持url参数
最新改造的项目代码已经上传,克服了使用url会导致连接断开的问题,详情请看spring-cloud-study
首先,调整一下加载
handler的顺序,优先MyWebSocketHandler在WebSocketServerProtocolHandler之上。ch.pipeline().addLast(new MyWebSocketHandler());
ch.pipeline().addLast(new WebSocketServerProtocolHandler(“/ws”, null, true, 65536 * 10));其次,改造
MyWebSocketHandler的channelRead方法,首次连接会是一个FullHttpRequest类型,可以通过FullHttpRequest.uri()获取完整ws的URL地址,之后接受信息的话,会是一个TextWebSocketFrame类型。public class MyWebSocketHandler extends SimpleChannelInboundHandler
{ @Overridepublic void channelActive(ChannelHandlerContext ctx) throws Exception {System.out.println("与客户端建立连接,通道开启!");//添加到channelGroup通道组MyChannelHandlerPool.channelGroup.add(ctx.channel());}@Overridepublic void channelInactive(ChannelHandlerContext ctx) throws Exception {System.out.println("与客户端断开连接,通道关闭!");//添加到channelGroup 通道组MyChannelHandlerPool.channelGroup.remove(ctx.channel());}@Overridepublic void channelRead(ChannelHandlerContext ctx, Object msg) throws Exception {//首次连接是FullHttpRequest,处理参数 by zhengkai.blog.csdn.netif (null != msg && msg instanceof FullHttpRequest) {FullHttpRequest request = (FullHttpRequest) msg;String uri = request.uri();Map paramMap=getUrlParams(uri);System.out.println("接收到的参数是:"+JSON.toJSONString(paramMap));//如果url包含参数,需要处理if(uri.contains("?")){String newUri=uri.substring(0,uri.indexOf("?"));System.out.println(newUri);request.setUri(newUri);}}else if(msg instanceof TextWebSocketFrame){//正常的TEXT消息类型TextWebSocketFrame frame=(TextWebSocketFrame)msg;System.out.println("客户端收到服务器数据:" +frame.text());sendAllMessage(frame.text());}super.channelRead(ctx, msg);}@Overrideprotected void channelRead0(ChannelHandlerContext channelHandlerContext, TextWebSocketFrame textWebSocketFrame) throws Exception {}private void sendAllMessage(String message){//收到信息后,群发给所有channelMyChannelHandlerPool.channelGroup.writeAndFlush( new TextWebSocketFrame(message));}private static Map getUrlParams(String url){Map<String,String> map = new HashMap<>();url = url.replace("?",";");if (!url.contains(";")){return map;}if (url.split(";").length > 0){String[] arr = url.split(";")[1].split("&");for (String s : arr){String key = s.split("=")[0];String value = s.split("=")[1];map.put(key,value);}return map;}else{return map;}}
}
html中的ws地址也进行改造
socket = new WebSocket(“ws://127.0.0.1:12345/ws?uid=666&gid=777”);
改造后控制台输出情况
收到新连接
与客户端建立连接,通道开启!
接收到的参数是:{ “uid”:”666”,”gid”:”777”}
/ws
客户端收到服务器数据:142531:这里输入消息
客户端收到服务器数据:142531:这里输入消息
客户端收到服务器数据:142531:这里输入消息
failed: WebSocket opening handshake timed out
听说是ssl wss的情况下才会出现,来自 @around-gao 的解决方法:
把MyWebSocketHandler和WebSocketServerProtocolHandler调下顺序就好了。


(搜索一)")

——系统分区与格式化")
——设备文件名与挂载")


还没有评论,来说两句吧...