RabbitMQ应用场景与实例
- Publisher:是Message的生产者,Publisher这个Clients产生了一些Message。
- Consumer:Message的消费者,Publisher产生的Message,最终要到达Consumer这个Clients,进行消费。
- Exchange: 指定消息按什么规则,路由到哪个Queue,Message消息先要到达Exchange,在Server中承担着从Produce接收Message的责任。
- Queue:到达Exchange的消息,根据制定的规则(Routing key)到达对应的Queue,在Server中承担着装载Message,是Message的容器,等待被消费出去。
- Routing key:在Exchange和Queue之间隐藏有一条黑线,可以将这条黑线看成是Routing key,Exchange就是根据这些定义好的Routing key将Message送到对应的Queue中去,是Exchange和Queue之间的桥梁。
- Broker:之前一直不理解这个Broker,其实Broker就是接收和分发消息的应用,也就是说RabbitMQ Server就是Message Broker。
- VirtualHost: 虚拟主机,一个Broker里可以开有多个VirtualHost,它的作用是用作不同用户的权限分离。
- Connection:是Publisher/Consumer和Broker之间的TCP连接。断开连接的操作只会在Publisher/Consumer端进行,Broker不会断开连接,除非出现网络故障或者Broker服务出现问题,Broker服务宕了。
- Connection: Channel:如果每一次访问RabbitMQ就建立一个Connection,那在消息量大的时候建立TCP Connection的开销就会很大,导致的后果就是效率低下。
左边的Client向右边的Client发送消息,流程:
第一:获取Conection
第二:获取Channel
第三:定义Exchange,Queue
第四:使用一个RoutingKey将Queue Binding到一个Exchange上
第五:通过指定一个Exchange和一个RoutingKey来将消息发送到对应的Queue上,
第六:Consumer在接收时也是获取connection,接着获取channel,然后指定一个Queue,到Queue上取消息,它对Exchange,RoutingKey及如何Binding都不关心,到对应的Queue上去取消息就行了。
应用场景
1、异步处理
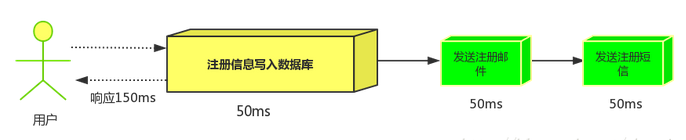
场景说明:用户注册后,需要发注册邮件和注册短信,传统的做法有两种1.串行的方式;2.并行的方式
(1)串行方式:将注册信息写入数据库后,发送注册邮件,再发送注册短信,以上三个任务全部完成后才返回给客户端。 这有一个问题是,邮件,短信并不是必须的,它只是一个通知,而这种做法让客户端等待没有必要等待的东西.
(2)并行方式:将注册信息写入数据库后,发送邮件的同时,发送短信,以上三个任务完成后,返回给客户端,并行的方式能提高处理的时间。
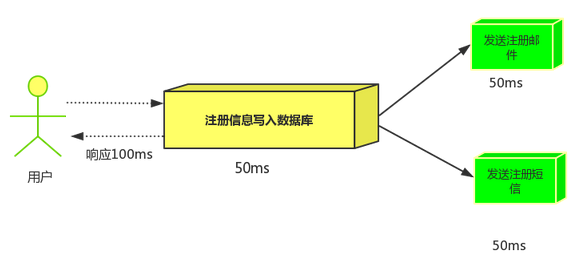
假设三个业务节点分别使用50ms,串行方式使用时间150ms,并行使用时间100ms。虽然并性已经提高的处理时间,但是,前面说过,邮件和短信对我正常的使用网站没有任何影响,客户端没有必要等着其发送完成才显示注册成功,英爱是写入数据库后就返回.(3)消息队列 :引入消息队列后,把发送邮件,短信不是必须的业务逻辑异步处理
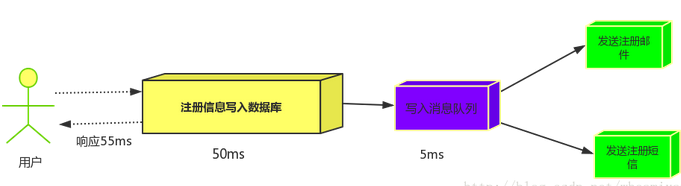
由此可以看出,引入消息队列后,用户的响应时间就等于写入数据库的时间+写入消息队列的时间(可以忽略不计),引入消息队列后处理后,响应时间是串行的3倍,是并行的2倍。
2 应用解耦
场景:双11是购物狂节,用户下单后,订单系统需要通知库存系统,传统的做法就是订单系统调用库存系统的接口.
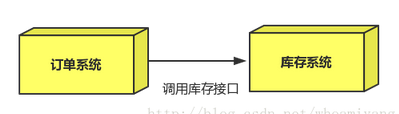
这种做法有一个缺点:
- 当库存系统出现故障时,订单就会失败。(这样马云将少赚好多好多钱^ ^)
- 订单系统和库存系统高耦合.
引入消息队列
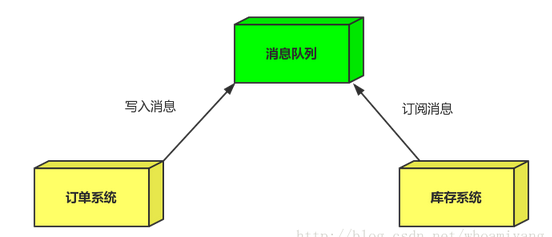
- 订单系统:用户下单后,订单系统完成持久化处理,将消息写入消息队列,返回用户订单下单成功。
- 库存系统:订阅下单的消息,获取下单消息,进行库操作。就算库存系统出现故障,消息队列也能保证消息的可靠投递,不会导致消息丢失(马云这下高兴了).
3 流量削峰
流量削峰一般在秒杀活动中应用广泛
场景:秒杀活动,一般会因为流量过大,导致应用挂掉,为了解决这个问题,一般在应用前端加入消息队列。
作用:
- 1.可以控制活动人数,超过此一定阀值的订单直接丢弃(我为什么秒杀一次都没有成功过呢^^)
- 2.可以缓解短时间的高流量压垮应用(应用程序按自己的最大处理能力获取订单)、、、
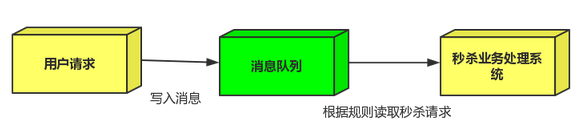
1.用户的请求,服务器收到之后,首先写入消息队列,加入消息队列长度超过最大值,则直接抛弃用户请求或跳转到错误页面.
2.秒杀业务根据消息队列中的请求信息,再做后续处理.
RabbitMQ实例
1、原生API
添加依赖:
<dependency><groupId>com.rabbitmq</groupId><artifactId>amqp-client</artifactId><version>4.1.0</version></dependency>
生产者代码:
public class Producer {public static void main(String[] args) throws IOException, TimeoutException {//创建连接工厂ConnectionFactory factory = new ConnectionFactory();factory.setUsername("guest");factory.setPassword("guest");//设置 RabbitMQ 地址factory.setHost("localhost");//建立到代理服务器到连接(TCP连接)Connection conn = factory.newConnection();//获得信道(信道复用TCP连接)Channel channel = conn.createChannel();//声明交换器String exchangeName = "hello-exchange";channel.exchangeDeclare(exchangeName, "direct", true); // "direct"将消息保存到队列的方式String routingKey = "hola";//发布消息byte[] messageBodyBytes = "quit".getBytes();channel.basicPublish(exchangeName, routingKey, null, messageBodyBytes);channel.close();conn.close();}}
消费者代码:
public class Consumer {public static void main(String[] args) throws IOException, TimeoutException {ConnectionFactory factory = new ConnectionFactory();factory.setUsername("guest");factory.setPassword("guest");factory.setHost("localhost");//建立到代理服务器到连接Connection conn = factory.newConnection();//获得信道final Channel channel = conn.createChannel();//声明交换器String exchangeName = "hello-exchange";channel.exchangeDeclare(exchangeName, "direct", true);//声明队列String queueName = channel.queueDeclare().getQueue();String bindingKey = "hola";//绑定队列,通过键 hola 将队列和交换器绑定起来channel.queueBind(queueName, exchangeName, bindingKey);while(true) {//消费消息boolean autoAck = false;String consumerTag = "";channel.basicConsume(queueName, autoAck, consumerTag, new DefaultConsumer(channel) {@Overridepublic void handleDelivery(String consumerTag,Envelope envelope,AMQP.BasicProperties properties,byte[] body) throws IOException {String routingKey = envelope.getRoutingKey();String contentType = properties.getContentType();System.out.println("消费的路由键:" + routingKey);System.out.println("消费的内容类型:" + contentType);long deliveryTag = envelope.getDeliveryTag();//确认消息channel.basicAck(deliveryTag, false); // 手动确认消息,防止消息丢失System.out.println("消费的消息体内容:");String bodyStr = new String(body, "UTF-8");System.out.println(bodyStr);}});}}}
2、RabbitMQ与Spring整合:
application_context_rabbit.xml:
<?xml version="1.0" encoding="UTF-8"?><beans xmlns="http://www.springframework.org/schema/beans"xmlns:xsi="http://www.w3.org/2001/XMLSchema-instance"xmlns:context="http://www.springframework.org/schema/context"xmlns:util="http://www.springframework.org/schema/util"xmlns:aop="http://www.springframework.org/schema/aop"xmlns:tx="http://www.springframework.org/schema/tx"xmlns:rabbit="http://www.springframework.org/schema/rabbit"xmlns:p="http://www.springframework.org/schema/p"xsi:schemaLocation="http://www.springframework.org/schema/contexthttp://www.springframework.org/schema/context/spring-context-3.0.xsdhttp://www.springframework.org/schema/beanshttp://www.springframework.org/schema/beans/spring-beans-3.0.xsdhttp://www.springframework.org/schema/utilhttp://www.springframework.org/schema/util/spring-util-3.0.xsdhttp://www.springframework.org/schema/aophttp://www.springframework.org/schema/aop/spring-aop-3.0.xsdhttp://www.springframework.org/schema/txhttp://www.springframework.org/schema/tx/spring-tx-3.0.xsdhttp://www.springframework.org/schema/rabbithttp://www.springframework.org/schema/rabbit/spring-rabbit-1.0.xsd"><context:property-placeholder location="classpath:application.properties"/><!-- RabbitMQ start --><!-- 连接配置 --><rabbit:connection-factory id="connectionFactory" host="${mq.host}" username="${mq.username}"password="${mq.password}" port="${mq.port}" /><rabbit:admin connection-factory="connectionFactory"/><!-- queue 队列声明 --><!--durable 是否持久化exclusive 仅创建者可以使用的私有队列,断开后自动删除auto-delete 当所有消费端连接断开后,是否自动删除队列 --><rabbit:queue id="orderinfomation_queue" name="${mq.queue}_orderinfomation" durable="true" auto-delete="false" exclusive="false" /><rabbit:queue id="payinfomation_queue" name="${mq.queue}_payinfomation" durable="true" auto-delete="false" exclusive="false" /><!-- 交换机定义 --><!--交换机:一个交换机可以绑定多个队列,一个队列也可以绑定到多个交换机上。如果没有队列绑定到交换机上,则发送到该交换机上的信息则会丢失。direct模式:消息与一个特定的路由器完全匹配,才会转发topic模式:按模式匹配--><rabbit:topic-exchange name="${mq.queue}_exchange" durable="true" auto-delete="false"><rabbit:bindings><!-- 设置消息Queue匹配的pattern (direct模式为key) --><rabbit:binding queue="orderinfomation_queue" pattern="orderinfomation"/><rabbit:binding queue="payinfomation_queue" pattern="payinfomation"/></rabbit:bindings></rabbit:topic-exchange><bean name="orderinfoService" class="com.youfan.service.impl.OrderinfoService"></bean><bean name="payinfoService" class="com.youfan.service.impl..PayinfoService"></bean><!-- 配置监听 消费者 --><rabbit:listener-container connection-factory="connectionFactory" acknowledge="auto"><!--queues 监听队列,多个用逗号分隔ref 监听器 --><rabbit:listener queues="orderinfomation_queue" ref="orderinfoService"/><rabbit:listener queues="payinfomation_queue" ref="payinfoService"/></rabbit:listener-container></beans>
application.properties:
mq.host=127.0.0.1mq.username=guestmq.password=guestmq.port=5672mq.queue=ms
监听的消费者:
public class PayinfoService implements MessageListener {public void onMessage(Message message) {System.out.println("消息消费者 = " + message.toString());}}public class OrderinfoService implements MessageListener {public void onMessage(Message message) {System.out.println("消息消费者 = " + message.toString());}}
3、Rabbit与SpringBoot整合
<dependency><groupId>org.springframework.boot</groupId><artifactId>spring-boot-starter-amqp</artifactId></dependency>
在application.yml中添加RabbitMQ地址:
spring:rabbitmq:host: 192.168.56.101username: leyoupassword: leyouvirtual-host: /leyou
监听者:
在SpringAmqp中,对消息的消费者进行了封装和抽象,一个普通的JavaBean中的普通方法,只要通过简单的注解,就可以成为一个消费者。@Componentpublic class Listener {@RabbitListener(bindings = @QueueBinding(value = @Queue(value = "spring.test.queue", durable = "true"),exchange = @Exchange(value = "spring.test.exchange",ignoreDeclarationExceptions = "true",type = ExchangeTypes.TOPIC),key = {"#.#"}))public void listen(String msg){System.out.println("接收到消息:" + msg);}}
@Componet:类上的注解,注册到Spring容器@RabbitListener:方法上的注解,声明这个方法是一个消费者方法,需要指定下面的属性:bindings:指定绑定关系,可以有多个。值是@QueueBinding的数组。@QueueBinding包含下面属性:value:这个消费者关联的队列。值是@Queue,代表一个队列exchange:队列所绑定的交换机,值是@Exchange类型key:队列和交换机绑定的RoutingKey
类似listen这样的方法在一个类中可以写多个,就代表多个消费者。
AmqpTemplate
Spring最擅长的事情就是封装,把他人的框架进行封装和整合。Spring为AMQP提供了统一的消息处理模板:AmqpTemplate,非常方便的发送消息,其发送方法:
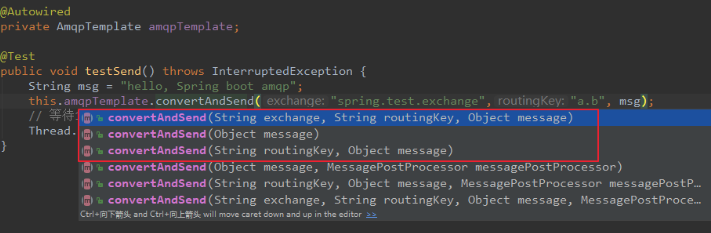
红框圈起来的是比较常用的3个方法,分别是:
- 指定交换机、RoutingKey和消息体
- 指定消息
- 指定RoutingKey和消息,会向默认的交换机发送消息
测试代码
@RunWith(SpringRunner.class)@SpringBootTest(classes = Application.class)public class MqDemo {@Autowiredprivate AmqpTemplate amqpTemplate;@Testpublic void testSend() throws InterruptedException {String msg = "hello, Spring boot amqp";this.amqpTemplate.convertAndSend("spring.test.exchange","a.b", msg);// 等待10秒后再结束Thread.sleep(10000);}}


(无废话版)---------------(四)")


还没有评论,来说两句吧...