Android系统启动1————概述和Liunx内核的启动
Android系统启动1————概述和Linux内核的启动
文章目录
- Android系统启动1————概述和Linux内核的启动
- 一.概述
- 1.系统启动的整体流程
- 2.init进程简介
- 3.Zygote进程简介
- 4.SystemServer进程简介
- 二.BootLoader的启动
- 1.BootLoaderd的启动1-汇编阶段
- 2.BootLoaderd的启动2-c语言阶段
- 三.Linux的启动
- 1.head.S
- 2.start_kernel
- 3.kernel进程
- 四.小结
- 五.参考资料
一.概述
1.系统启动的整体流程
Android启动大致分为三个阶段
- BootLoader引导即uBoot.bin
- linux内核启动即zImage
- Android系统启动即ramdisk.img与system.img
其中Android启动又可以分为下面的步骤
- init进程的启动
- zygote进程的启动
- system Service进程的启动
- 最后Launcher启动Home Activity
大致过程如下图所示: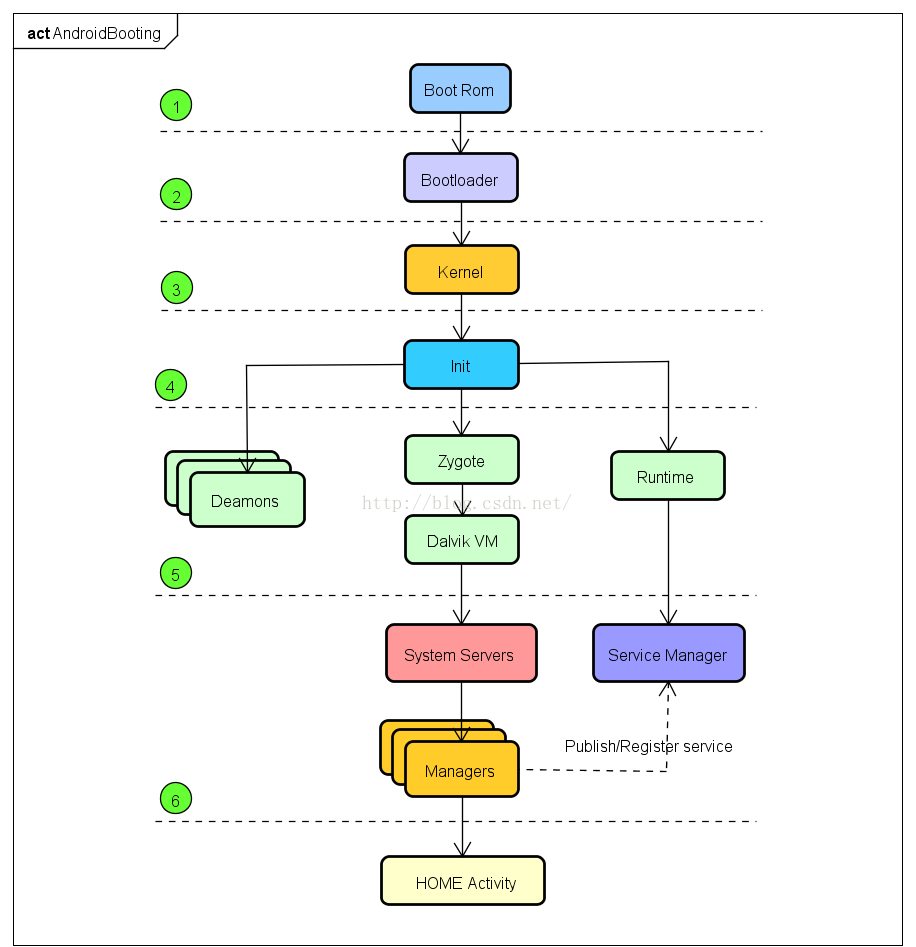 其中1,2,3是linux启动过程,4,5,6是android启动过程。
2.init进程简介
init进程是Android系统中用户空间的第一个进程,作为第一个进程,它被赋予了很多极其重要的工作职责,比如创建zygote(孵化器)和属性服务等。init进程是由多个源文件共同组成的,这些文件位于源码目录system/core/init。
也就是说,init进程负责两件事
- 负责创建系统中比较关键的进程,比如说zygote进程
- Andorid系统中有很多属性,于是init进程就提供了一个property Service(属性服务)来管理他们
3.Zygote进程简介
在Android中,虚拟机,应用程序进程以及运行系统的关键服务的SystemServer进程都是由Zygote进程来创建的,我们也将它称为孵化器。它通过fock(复制进程)的形式来创建应用程序进程和SystemServer进程,由于Zygote进程在启动时会创建DVM,因此通过fock而创建的应用程序进程和SystemServer进程可以在内部获取一个DVM的实例拷贝。
也就是说,Zygote进程主要负责下面三件事
- 启动虚拟机
- 创建SystemServer进程
- 创建应用进程
4.SystemServer进程简介
SystemServer的进程名实际上叫做“system_server”,通常简称为SS。
系统中的服务驻留在其中,常见的比如WindowManagerServer(Wms)、ActivityManagerSystemService(AmS)、 PackageManagerServer(PmS)等,这些系统服务都是以一个线程的方式存在于SystemServer进程中。
也就是说,在SystemServer中,主要负责各种服务的创建。
二.BootLoader的启动
当按开机键的时候,引导芯片开始从固化在ROM的预设代码开始执行,然后加载引导程序到RAM。这个引导程序就是BootLoader()。因为笔者没有做过单片机的相关学习,所以下面的内容是我根据网上的资料整理而来。文末会附上链接。
BootLoaderd 分为两个阶段,一个阶段是汇编部分,一个阶段是C语言部分.
另外,关于BootLoader有很多的实现,下面以一个比较通用的BootLoader实现 uBoot为例
1.BootLoaderd的启动1-汇编阶段
目录:cpu/arm920t/start.S
a.设置CPU进入SVC模式(系统管理模式),cpsr[4:0]=0xd3
#include <common.h>#include <config.h>//u-boot的主入口,跳入了后面的start_code.globl _start//这些是跳转向量表,和芯片的体系结构有关// ldr语句的意思是将第二个操作数(如:_undefined_instruction)指向的地址数据传给PC_start: b start_codeldr pc, _undefined_instructionldr pc, _software_interruptldr pc, _prefetch_abortldr pc, _data_abortldr pc, _not_usedldr pc, _irqldr pc, _fiq//.word 为定义一个4字节的空间 undefined_instruction 为地址, 即后面标号所对的偏移地址数据//undefined_instruction 为地址, 即后面标号所对的偏移地址数据_undefined_instruction: .word undefined_instruction_software_interrupt: .word software_interrupt_prefetch_abort: .word prefetch_abort_data_abort: .word data_abort_not_used: .word not_used_irq: .word irq_fiq: .word fiq//16字节对齐,并以0xdeadbeef填充,它是个Magic number 。.balignl 16,0xdeadbeef
b.接着进入Start_code中:设置CPU进入SVC模式。
/** the actual start code*/start_code:/** set the cpu to SVC32 mode*/mrs r0, cpsrbic r0, r0, #0x1forr r0, r0, #0xd3msr cpsr, r0bl coloured_LED_initbl red_LED_on
c.关看门狗,WTCON = 0x0,并设置寄存器地址
”watchdog”,俗称“看门狗”。“Watchdog” 在实现上可以是硬件电路也可以是软件定时器,能够在系统出现故障时自动重新启动系统。
复制代码/* turn off the watchdog */# if defined(CONFIG_S3C2400)# define pWTCON 0x15300000# define INTMSK 0x14400008 /* Interupt-Controller base addresses */# define CLKDIVN 0x14800014 /* clock divisor register */#else# define pWTCON 0x53000000# define INTMSK 0x4A000008 /* Interupt-Controller base addresses */# define INTSUBMSK 0x4A00001C# define CLKDIVN 0x4C000014 /* clock divisor register */# endif//关看门狗ldr r0, =pWTCONmov r1, #0x0str r1, [r0]
d.关中断,INTMSK=0xFFFFFFFF, INTSUBMSK=0x3FF。
/** mask all IRQs by setting all bits in the INTMR - default*/mov r1, #0xffffffffldr r0, =INTMSKstr r1, [r0]# if defined(CONFIG_S3C2410)ldr r1, =0x3ffldr r0, =INTSUBMSKstr r1, [r0]# endif
e.时钟设置CLKDIVN=0x3 , FCLK PCLK = 1
 4
4
/* FCLK:HCLK:PCLK = 1:2:4 *//* default FCLK is 120 MHz ! */ldr r0, =CLKDIVNmov r1, #3str r1, [r0]#endif /* CONFIG_S3C24X0 */
f.询问是否进行CPU初始化
#ifndef CONFIG_SKIP_LOWLEVEL_INITbl cpu_init_crit#endif
g.初始化堆栈,如果要在C语言环境下执行代码,就必须初始化堆栈
/* Set up the stack */stack_setup:/* 设置栈指针 */ldr r0, _TEXT_BASE /* upper 128 KiB: relocated uboot */sub r0, r0, #CONFIG_SYS_MALLOC_LEN /* malloc area */sub r0, r0, #CONFIG_SYS_GBL_DATA_SIZE /* bdinfo */#ifdef CONFIG_USE_IRQsub r0, r0, #(CONFIG_STACKSIZE_IRQ+CONFIG_STACKSIZE_FIQ)#endifsub sp, r0, #12 /* leave 3 words for abort-stack */clear_bss:ldr r0, _bss_start /* find start of bss segment */ldr r1, _bss_end /* stop here */mov r2, #0x00000000 /* clear */clbss_l:str r2, [r0] /* clear loop... */add r0, r0, #4cmp r0, r1ble clbss_l
只要将sp指针指向一段没有被使用的内存就完成栈的设置了。根据上面的代码可以知道U-Boot内存使用情况了,如下图所示: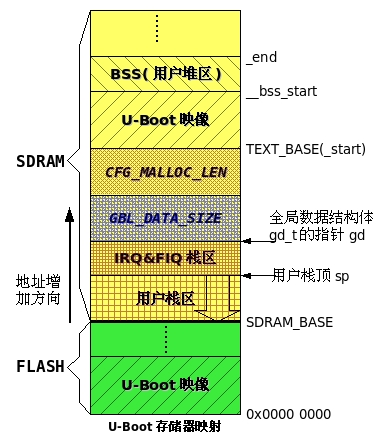
h.CPU的初始化,即cpu_init_crit函数,完成以后回到主函数
#ifndef CONFIG_SKIP_LOWLEVEL_INITcpu_init_crit:/** flush v4 I/D caches*/mov r0, #0mcr p15, 0, r0, c7, c7, 0 /* flush v3/v4 cache */mcr p15, 0, r0, c8, c7, 0 /* flush v4 TLB *//** disable MMU stuff and caches*/mrc p15, 0, r0, c1, c0, 0bic r0, r0, #0x00002300 @ clear bits 13, 9:8 (--V- --RS)bic r0, r0, #0x00000087 @ clear bits 7, 2:0 (B--- -CAM)orr r0, r0, #0x00000002 @ set bit 2 (A) Alignorr r0, r0, #0x00001000 @ set bit 12 (I) I-Cachemcr p15, 0, r0, c1, c0, 0/** before relocating, we have to setup RAM timing* because memory timing is board-dependend, you will* find a lowlevel_init.S in your board directory.*/mov ip, lrbl lowlevel_initmov lr, ipmov pc, lr#endif /* CONFIG_SKIP_LOWLEVEL_INIT */
i.清除bss段
clear_bss: /* 清除bss段 */ldr r0, _bss_start /* r0 = bss段的起始位置 */ldr r1, _bss_end @ stop here /* r1 = bss段结束位置 */mov r2, #0x0 @ clear value /* r2 = 0 */clbss_l:str r2, [r0] @ clear BSS location /* 先将r2,即0x0,存到地址为r0的内存中去 */cmp r0, r1 @ are we at the end yet /* 比较r0地址和r1地址,即比较当前地址是否到了bss段的结束位置 */add r0, r0, #4 @ increment clear index pointer /* 然后r0地址加上4 */bne clbss_l @ keep clearing till at end /* 如果不等于,那么就跳到clbss_l,即接着这几个步骤,直到地址超过了bss的_end位置,即实现了将整个bss段,都清零。*/
j.从这里跳转到第二阶段C代码中去
ldr pc, _start_armboot_start_armboot: .word start_armboot
汇编第一阶段的代码主要可以分为以下部分:
- 设置异常向量表
- 设置特权管理模式
- 初始化PLL、DDR、MUX…
- 关MMU,关CACHE
- 判断代码在RAM还是FLASH,将FLASH代码复制至RAM中
- 设置堆栈、清空bss段
- 跳转至C语言处,进入第二阶段
2.BootLoaderd的启动2-c语言阶段
目录:u-boot-2010.06\arch\arm\lib\board.c
第二阶段主要用到了两个数据结构即 gd_t 和 bd_t,这两个类型变量记录了刚启动时的信息,还将记录作为引导内核和文件系统的参数,如 bootargs 等,并且将来还会在启动内核时,由 uboot 交由 kernel 时会有所用。其定义如下:
gd_t :
#### u-boot-2010.06\arch\arm\include\asm\global_data.h ####/* U-Boot使用了一个存储在寄存器中的指针gd来记录全局数据区的地址,这个指针存放在指定的寄存器r8中 */typedef struct global_data {/* 全局数据结构 */bd_t *bd; /* 指向板级信息结构 */unsigned long flags; /* 标记位 */unsigned long baudrate; /* 串口波特率 */unsigned long have_console; /* serial_init() was called */unsigned long env_addr; /* 环境参数地址 */unsigned long env_valid; /* 环境参数 CRC 校验有效标志 */unsigned long fb_base; /* fb 起始地址 */#ifdef CONFIG_VFDunsigned char vfd_type; /* 显示器类型(VFD代指真空荧光屏) */#endif#ifdef CONFIG_FSL_ESDHC /* 宏未定义 */unsigned long sdhc_clk;#endif#if 0 /* 未定义 */unsigned long cpu_clk; /* cpu 频率*/unsigned long bus_clk; /* bus 频率 */phys_size_t ram_size; /* ram 大小 */unsigned long reset_status; /* reset status register at boot */#endifvoid **jt; /* 跳转函数表 */} gd_t;
bd_t
typedef struct bd_info {/* 板级信息结构 */int bi_baudrate; /* 波特率 */unsigned long bi_ip_addr; /* IP地址 */struct environment_s *bi_env; /* 板子的环境变量 */ulong bi_arch_number; /* 板子的 id */ulong bi_boot_params; /* 板子的启动参数 */struct /* RAM 配置 */{ulong start;ulong size;} bi_dram[CONFIG_NR_DRAM_BANKS];} bd_t;
a.tart_armboot 首先为全局数据结构和板级信息结构分配内存
gd = (gd_t*)(_armboot_start - CONFIG_SYS_MALLOC_LEN - sizeof(gd_t));/* compiler optimization barrier needed for GCC >= 3.4 */__asm__ __volatile__("": : :"memory"); /* 内存屏障,防止编译器优化 */memset ((void*)gd, 0, sizeof (gd_t)); /* 将指定的内存地址清零( 将全局数据清零 ) */gd->bd = (bd_t*)((char*)gd - sizeof(bd_t)); /* gd->bd指向一块地址( 取得板级信息数据结构的起始地址 ) */memset (gd->bd, 0, sizeof (bd_t)); /* gd->db指向地址中的内容清零( 将板级信息清零 ) */gd->flags |= GD_FLG_RELOC; /* 标记为代码已经转移到 RAM */
b.调用 init_sequence数组中的函数指针完成各部分的初始化
init_fnc_t *init_sequence[] = {#if defined(CONFIG_ARCH_CPU_INIT)arch_cpu_init, /* 基本的处理器相关配置 -- basic arch cpu dependent setup */#endiftimer_init, /* 初始化定时器 -- initialize timer before usb init */board_init, /* 板级特殊设备初始化(很重要) -- basic board dependent setup */#if defined(CONFIG_USE_IRQ)interrupt_init, /* 中断初始化 -- set up exceptions */#endif// timer_init, /* 初始化定时器 */#ifdef CONFIG_FSL_ESDHCget_clocks,#endifenv_init, /* 初始化环境变量(默认的环境变量) -- initialize environment */init_baudrate, /* 初始化波特率设置 -- initialze baudrate settings */serial_init, /* 初始化串口 */console_init_f, /* 控制台初始化 -- stage 1 init of console */display_banner, /* 打印uboot版本信息 -- say that we are here */#if defined(CONFIG_DISPLAY_CPUINFO)print_cpuinfo, /* 显示cpu信息 -- display cpu info (and speed) */#endif#if defined(CONFIG_DISPLAY_BOARDINFO)checkboard, /* 显示板级信息 -- display board info */#endif#if defined(CONFIG_HARD_I2C) || defined(CONFIG_SOFT_I2C)init_func_i2c, /* 初始化IIC,hard:真正iic,soft:gpio模拟iic */#endifdram_init, /* 配置可用RAM -- configure available RAM banks */#if defined(CONFIG_CMD_PCI) || defined (CONFIG_PCI)arm_pci_init, /* 初始化pci */#endifNULL,};/* 函数指针,执行指针数组中的内容(实际内容为函数指针),初始化cpu、总线、设备等等*/for (init_fnc_ptr = init_sequence; *init_fnc_ptr; ++init_fnc_ptr) {if ((*init_fnc_ptr)() != 0) {hang ();}}void hang (void) {puts ("### ERROR ### Please RESET the board ###\n");for (;;);}
c.start_armboot 在接下来的流程中还做了如下操作:
void start_armboot (void){…nand_init(); /* 初始化 NAND */…mmc_initialize(0); /* 初始化MMC */mmc_flash_init(0);env_relocate () /* 重定位环境变量,将其从 NAND 拷贝到内存中 */…gd->bd->bi_ip_addr = getenv_IPaddr ("ipaddr"); /* 设置IP地址 */stdio_init (); /* 初始化外设 */jumptable_init (); /* 初始化跳转函数表 */…console_init_r (); /* 控制台初始化第二阶段 */…misc_init_r (); /* 杂项设备初始化, eg:battery */…enable_interrupts (); /* 使能中断 */#ifdef CONFIG_KEDACOM_E2PROMextern int kd_set_ethaddr();kd_set_ethaddr();#endif…/* 如果存在则从环境变量中读取装载地址,其默认为 ulong load_addr = CONFIG_SYS_LOAD_ADDR; */if ((s = getenv ("loadaddr")) != NULL) {load_addr = simple_strtoul (s, NULL, 16);}#if defined(CONFIG_CMD_NET)if ((s = getenv ("bootfile")) != NULL) {copy_filename (BootFile, s, sizeof (BootFile));}#endif…#if defined(CONFIG_CMD_NET)…eth_initialize(gd->bd); /* 网络初始化 */…#endif#if defined(CONFIG_BOOTROM_SUPPORT)extern void download_boot(const int (*handle)(void));download_boot(NULL);#endifproduct_control();…#ifdef CONFIG_PARTTAB_ON_FLASHpartition_check_update_flags();#endif/* main_loop() can return to retry autoboot, if so just run it again. */for (;;) {main_loop (); /* 进入主循环 common/main.c */}}
d.main_loop 函数
#### u-boot-2010.06\arch\arm\lib\board.c ####void main_loop (void){…setenv ("ver", version_string); /* 设置版本信息 */…update_tftp ();….#if defined(CONFIG_BOOTDELAY) && (CONFIG_BOOTDELAY >= 0)s = getenv ("bootdelay"); /* 获取bootdelay环境变量的值 */bootdelay = s ? (int)simple_strtol(s, NULL, 10) : CONFIG_BOOTDELAY; /* 将字符串转换为long类型变量 */debug ("### main_loop entered: bootdelay=%d\n\n", bootdelay);debug ("### main_loop: bootcmd=\"%s\"\n", s ? s : "<UNDEFINED>");/* 倒数读秒,如果delay时间内没有操作,执行run_command命令 */if (bootdelay >= 0 && s && !abortboot (bootdelay)) {run_command (s, 0);}#endif /* CONFIG_BOOTDELAY */…for (;;) {…len = readline (CONFIG_SYS_PROMPT); /* 读取输入 */flag = 0; /* assume no special flags for now */if (len > 0)strcpy (lastcommand, console_buffer); /* 将输入保存到历史记录中 */else if (len == 0)flag |= CMD_FLAG_REPEAT; /* 如果没有输入则重复上次 */…if (len == -1)puts ("<INTERRUPT>\n");elserc = run_command(lastcommand, flag); /* 执行命令 */lastcommand[0] = 0; /* 将命令置无效命令令其不可重复 */}}
e.通过一个函数指针 thekernel()带三个参数跳转到内核( zImage )入口点开始执行
此时, u-boot 的任务已经完成,控制权完全交给内核( zImage )。在 uBoot 的文件lib_arm\bootm.c中定义了 thekernel, 并在 do_bootm_linux 的最后执行 thekernel。定义thekernel函数指针,获取bootargs参数给commandline指针。theKernel (0, machid, bd->bi_boot_params);第一个参数必须为0,第二个参数为机器类型ID,第三个参数为传递给内核参数的起始地址0x30000100
int do_bootm_linux(int flag, int argc, char *argv[], bootm_headers_t *images){bd_t *bd = gd->bd;char *s;int machid = bd->bi_arch_number;void (*theKernel)(int zero, int arch, uint params);int ret;#ifdef CONFIG_CMDLINE_TAGchar *commandline = getenv ("bootargs");#endifif ((flag != 0) && (flag != BOOTM_STATE_OS_GO))return 1;theKernel = (void (*)(int, int, uint))images->ep;s = getenv ("machid");if (s) {machid = simple_strtoul (s, NULL, 16);printf ("Using machid 0x%x from environment\n", machid);}ret = boot_get_ramdisk(argc, argv, images, IH_ARCH_ARM,&(images->rd_start), &(images->rd_end));if(ret)printf("[err] boot_get_ramdisk\n");show_boot_progress (15);debug ("## Transferring control to Linux (at address %0 lx) ...\n",(ulong) theKernel);#if defined (CONFIG_SETUP_MEMORY_TAGS) || \defined (CONFIG_CMDLINE_TAG) || \defined (CONFIG_INITRD_TAG) || \defined (CONFIG_SERIAL_TAG) || \defined (CONFIG_REVISION_TAG) || \defined (CONFIG_LCD) || \defined (CONFIG_VFD)setup_start_tag (bd);#ifdef CONFIG_SERIAL_TAGsetup_serial_tag (¶ms);#endif#ifdef CONFIG_REVISION_TAGsetup_revision_tag (¶ms);#endif#ifdef CONFIG_SETUP_MEMORY_TAGSsetup_memory_tags (bd);#endif#ifdef CONFIG_CMDLINE_TAGsetup_commandline_tag (bd, commandline);#endif#ifdef CONFIG_INITRD_TAGif (images->rd_start && images->rd_end)setup_initrd_tag (bd, images->rd_start, images->rd_end);#endif#if defined (CONFIG_VFD) || defined (CONFIG_LCD)setup_videolfb_tag ((gd_t *) gd);#endifsetup_end_tag (bd);#endif/* we assume that the kernel is in place */printf ("\nStarting kernel ...\n\n");#ifdef CONFIG_USB_DEVICE{extern void udc_disconnect (void);udc_disconnect ();}#endifcleanup_before_linux ();theKernel (0, machid, bd->bi_boot_params);/* does not return */return 1;}
小结,第二阶段代码可以分为下面部分
为gd、bd数据结构分配地址,并清零
- 执行 init_fnc_ptr 函数指针数组中的各个初始化函数:板级特殊设备初始化(board_init)、时钟初始化(timer_init)、初始化环境变量(env_init)、串口控制台初始化(init_baudrate、console_init_f)、打印U-Boot信息(display_banner、print_cpuinfo、checkboard)、配置可用RAM大小(dram_init)
- 对gd, bd 数据结构赋值初始化
- 各种设备初始化
- NAND Flash初始化 (nand_init) 、MMC初始化 (mmc_initialize、mmc_flash_init) 、网络初始化 (eth_initialize)、初始化串口(serial_init、console_init_r) 、初始化其他外设(stdio_init)、杂项设备初始化(misc_init_r)
- 环境变量代码重定位(env_relocate)
- 使能中断(enable_interrupts)
- 进入主循环(main_loop)
- 调用 thekernel进入kernel,启动Linux系统
三.Linux的启动
关于Linux系统启动主要分为三个阶段,第一个阶段是自解压过程,第二个是设置ARM处理器的工作模式、设置一级页表等,第三个阶段主要是C代码,包括Android的初始化的全部工作。
- 自解压过程,内核压缩和解压缩目录kernel/arch/boot/compressed,编译完成后将产生head.o、misc.o、piggy.gzip.o、vmlinux、decompress.o这几个文件。
- 解压缩完成后就进入Kernel初始化阶段。也就是我着重介绍的部分。
- 第三阶段主要是C代码,包括Android的初始化的全部工作
1.head.S
* Non-board-specific low-level startup code** Copyright (C) 2004-2006 Atmel Corporation** This program is free software; you can redistribute it and/or modify* it under the terms of the GNU General Public License version 2 as* published by the Free Software Foundation.*/#include <linux/linkage.h>#include <asm/page.h>.section .init.text,"ax".global kernel_entrykernel_entry:/* Start the show */lddpc pc, kernel_start_addr.align 2kernel_start_addr:.long start_kernel
从上面的代码我们看出,最终调用了start_kernel方法
2.start_kernel
asmlinkage __visible void __init start_kernel(void){char *command_line;char *after_dashes;/** Need to run as early as possible, to initialize the lockdep hash:* 需要尽早运行,初始化lockdep散列:*/lockdep_init();set_task_stack_end_magic(&init_task);smp_setup_processor_id();debug_objects_early_init();/** Set up the the initial canary ASAP:* 尽快设置初始ASAP:*/boot_init_stack_canary();cgroup_init_early();local_irq_disable();early_boot_irqs_disabled = true;/** Interrupts are still disabled. Do necessary setups, then* enable them*/boot_cpu_init();page_address_init();pr_notice("%s", linux_banner);setup_arch(&command_line);mm_init_cpumask(&init_mm);setup_command_line(command_line);setup_nr_cpu_ids();setup_per_cpu_areas();smp_prepare_boot_cpu(); /* arch-specific boot-cpu hooks */build_all_zonelists(NULL, NULL);page_alloc_init();pr_notice("Kernel command line: %s\n", boot_command_line);parse_early_param();after_dashes = parse_args("Booting kernel",static_command_line, __start___param,__stop___param - __start___param,-1, -1, NULL, &unknown_bootoption);if (!IS_ERR_OR_NULL(after_dashes))parse_args("Setting init args", after_dashes, NULL, 0, -1, -1, NULL, set_init_arg);jump_label_init();/** These use large bootmem allocations and must precede kmem_cache_init()*/setup_log_buf(0);pidhash_init();vfs_caches_init_early();sort_main_extable();trap_init();mm_init();/** Set up the scheduler prior starting any interrupts (such as the* timer interrupt). Full topology setup happens at smp_init()* time - but meanwhile we still have a functioning scheduler.*///初始化每个处理器的可运行队列,设置系统初始化进程即0号进程sched_init();/** Disable preemption - early bootup scheduling is extremely* fragile until we cpu_idle() for the first time.*/preempt_disable();if (WARN(!irqs_disabled(), "Interrupts were enabled *very* early, fixing it\n"))local_irq_disable();idr_init_cache();rcu_init();/* trace_printk() and trace points may be used after this */trace_init();context_tracking_init();radix_tree_init();/* init some links before init_ISA_irqs() */early_irq_init();init_IRQ();tick_init();rcu_init_nohz();init_timers();hrtimers_init();softirq_init();timekeeping_init();time_init();sched_clock_postinit();perf_event_init();profile_init();call_function_init();WARN(!irqs_disabled(), "Interrupts were enabled early\n");early_boot_irqs_disabled = false;local_irq_enable();kmem_cache_init_late();/** HACK ALERT! This is early. We're enabling the console before* we've done PCI setups etc, and console_init() must be aware of* this. But we do want output early, in case something goes wrong.*/console_init();if (panic_later)panic("Too many boot %s vars at `%s'", panic_later, panic_param);lockdep_info();/** Need to run this when irqs are enabled, because it wants* to self-test [hard/soft]-irqs on/off lock inversion bugs* too:*/locking_selftest();#ifdef CONFIG_BLK_DEV_INITRDif (initrd_start && !initrd_below_start_ok &&page_to_pfn(virt_to_page((void *)initrd_start)) < min_low_pfn) {pr_crit("initrd overwritten (0x%08lx < 0x%08lx) - disabling it.\n",page_to_pfn(virt_to_page((void *)initrd_start)), min_low_pfn);initrd_start = 0;}#endifpage_ext_init();debug_objects_mem_init();kmemleak_init();setup_per_cpu_pageset();numa_policy_init();if (late_time_init)late_time_init();sched_clock_init();calibrate_delay();pidmap_init();anon_vma_init();acpi_early_init();#ifdef CONFIG_X86if (efi_enabled(EFI_RUNTIME_SERVICES))efi_enter_virtual_mode();#endif#ifdef CONFIG_X86_ESPFIX64/* Should be run before the first non-init thread is created */init_espfix_bsp();#endifthread_stack_cache_init();cred_init();fork_init();proc_caches_init();buffer_init();key_init();security_init();dbg_late_init();vfs_caches_init();signals_init();/* rootfs populating might need page-writeback */page_writeback_init();proc_root_init();nsfs_init();cpuset_init();cgroup_init();taskstats_init_early();delayacct_init();check_bugs();acpi_subsystem_init();sfi_init_late();if (efi_enabled(EFI_RUNTIME_SERVICES)) {efi_late_init();efi_free_boot_services();}ftrace_init();/* Do the rest non-__init'ed, we're now alive *///调用kernel_thread()创建1号内核线程rest_init();}
start_kernel()函数中执行了大量的初始化操作:
- setup_arch():主要做一些板级初始化,cpu初始化,tag参数解析,u-boot传递的cmdline解析,建立mmu工作页表,初始化内存布局,调用mmap_io建立GPIO、IRQ、MEMCTRL、UART,及其他外设的静态映射表,对时钟,定时器,uart进行初始化
- sched_init():初始化每个处理器的可运行队列,设置系统初始化进程即0号进程
- softirq_init():内核的软中断机制初始化函数
- console_init():初始化系统的控制台结构
- rest_init():调用kernel_thread()创建1号内核线程,调用schedule()函数切换当前进程,在调用该函数之前,Linux系统中只有两个进程,即0号进程init_task和1号进程kernel_init,其中kernel_init进程也是刚刚被创建的。调用该函数后,1号进程kernel_init将会运行
3.kernel进程
Linux下有三个特殊的进程,idle(swapper)进程(PID = 0),init进程(PID = 1)和看threadd(PID = 2)
idle(swapper)进程由系统自动创建,运行在内核态.idle进程其pid=0,其前身是系统创建的第一个进程,也是唯一一个没有通过fork或者kernel_thread产生的进程。
- 完成加载系统后,演变为进程调度、交换,常常被称为交换进程。
init进程由idle通过kernel_thread创建,在内核空间完成初始化后,加载init进程,并最终转变为用户空间的init进程。
- 由0进程创建,完成系统的初始化,是系统中所有其他用户进程的祖先进程。
- linux中的所有进程都是由init进程创建并运行的,首先Linux内核启动,然后在用户空间中启动init进程,在启动其他系统进程
Kthreadd进程是idle通过kernel_thread创建,并始终运行在内核空间 ,负责所有内核线程的调度和管理
- Kthreadd的任务是管理和调度其他内核线程Kernel_thread ,会循环执行一个kthreadd的函数,作用是运行kthreadd_create_list全局链表中维护的kthread
- 当调用用kernel_thread创建的内核线程会被加入到此链表中,因此所有的内核线程都是直接或者间接的以kthreadd为父进程。
四.小结
前面的文章主要分析了2,3过程。
即BootLoader和Linux内核的启动过程。
下一篇介绍Android初始化语言。
之后继续分析init ,zygote,SystemService进程
五.参考资料
《Android高级进阶》
《深入理解android 卷一》
U-Boot – uboot代码深度解析
Android启动流程简析


还没有评论,来说两句吧...