《Android开发艺术探索》第4章 View的工作原理
本章代码GitHub地址:https://github.com/LittleFogCat/AndroidBookNote/tree/master/chapter04_view
4.0 要点
View的绘制流程
measure -> layout -> draw
常用回调
onAttach onVisibilityChanged onDetach
滑动处理
4.1 ViewRoot DecorView
首先是这张Android的窗口层级图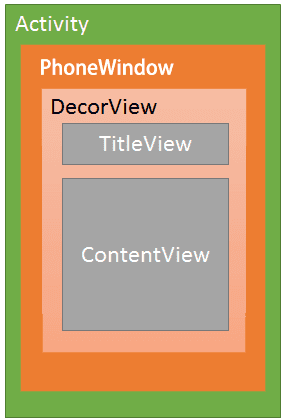
可以看到,在一个界面中,包含了一个Window,Window中包含了一个DecorView。DecorView其实是一个FrameLayout,一般包含了且仅包含一个竖直的LinearLayout,这个LinearLayout中又包含了一个TitleView和一个ContentView。我们调用setContentView(id)的时候,设置的就是这个ContentView的布局。
ViewRoot是WindowManager和DecorView之间的纽带。View的三大流程其实都是通过ViewRoot来完成的。
关于ViewRoot的来历,又是怎么成为WindowManager和DecorView的纽带的,书中只是一笔带过,这里来一探究竟。
4.1.*
顺着源码追踪,只看有用部分:
当ActivityThread收到一个Activity启动消息时,会调用handleLaunchActivity(ActivityClientRecord, Intent, String)方法,handleLaunchActivity方法中有以下几句:
WindowManagerGlobal.initialize();Activity a = performLaunchActivity(r, customIntent);handleResumeActivity(r.token, false, r.isForward,!r.activity.mFinished && !r.startsNotResumed, r.lastProcessedSeq, reason);
可以看到,handleLaunchActivity中调用了performLaunchActivity和handleResumeActivity两个方法。
在performLaunchActivity()中,Activity被创建(onCreate也是在这里调用的),并且通过Activity.attach()方法将Window和Activity绑定。
activity = mInstrumentation.newActivity(cl, component.getClassName(), r.intent);activity.attach(appContext, this, getInstrumentation(), r.token,r.ident, app, r.intent, r.activityInfo, title, r.parent,r.embeddedID, r.lastNonConfigurationInstances, config,r.referrer, r.voiceInteractor, window, r.configCallback);
在handleResumeActivity()方法中,DecorView会被添加到Window中。(同时这个方法里面也有一个performResumeActivity()方法,在这里调用Activity.onResume())。
最后,我们会调用Activity的makeVisible()方法,并通知AMS我们的Activity已经resume了。
ViewManager wm = a.getWindowManager();// 将DecorView添加到Window中,但此时其是不可见的wm.addView(decor, l);// ==> mDecor.setVisibility(View.VISIBLE);r.activity.makeVisible();ActivityManager.getService().activityResumed(token);
继续跟踪wm.addView(View, ViewGroup.LayoutParams),会在WindowManagerGlobal这个单例类中找到:
ViewRootImpl root;root = new ViewRootImpl(view.getContext(), display);root.setView(view, wparams, panelParentView);
这里的view即是decorView。至此,我们成功的建立起了WindowManager -> ViewRootImpl -> DecorView的关系。
4.2 MeasureSpec
4.2.1 MeasureSpec
网上讲MeasureSpec的有很多。简单的来讲,MeasureSpec就是这个View的大小(不准确,但是可以这样简化理解)。它是一个32位的整型,高2位代表SpecMode,低30位代表SpecSize。
SpecMode有三种:
- UNSPECIFIED 父容器不对View做限制。
- EXACTLY 精确测量模式,即View的最终大小。在View中设置具体数字大小,或者match_parent都是这个模式。
- AT_MOST 可用大小模式,View的大小不会超过这个值。对应的是wrap_content。
4.2.2 MeasureSpec和LayoutParams的对应关系
我们在LayoutParams中会定义View的宽高,即布局xml中的android:layout_width和android:layout_height属性。一般来讲,我们会设置match_parent,wrap_content或者具体的数值。
同时,我们会通过View的measure方法向其传递MeasureSpec。综合父布局的MeasureSpec和View的LayoutParam,我们可以计算出这个View的MeasureSpec。
抛开UNSPECIFIED不谈(一般不用),以下表格表示了如何通过二者确定View具体MeasureSpec的:
| LP \ 父SpecMode | EXACTLY | AT_MOST |
|---|---|---|
| 具体数值 | specMode: EXACTLY specSize: View定义的size | specMode: EXACTLY specSize: View定义的size |
| wrap_content | specMode: AT_MOST specSize: 父specSize | specMode: AT_MOST specSize: 父specSize |
| match_parent | specMode: EXACTLY specSize: 父specSize | specMode: AT_MOST specSize: 父specSize |
可以看出,除非将View的宽高设定为确定的数值,否则其是受到父容器的影响的。具体的measure过程在下一节讲到。
4.3 View的工作流程
View的工作流程主要指measuer、layout、draw。
measure测量View的宽高,layout确定View的位置和大小,draw将View绘制在屏幕上。
4.3.1 measure
View通过measure来测量大小。同时,ViewGroup除了测量自己,还会遍历子View并调用其measure方法。
之前我们已经知道,View的大小由MeasureSpec来决定,而MeasureSpec又是通过父布局的MeasureSpec和LayoutParam共同决定的。
通过查看源码,我们可以看到,View的measure过程主要是通过在measure(int, int)方法中调用onMeasure(int, int)进行的。而onMeasure()的默认实现只有一句:
protected void onMeasure(int widthMeasureSpec, int heightMeasureSpec) {setMeasuredDimension(getDefaultSize(getSuggestedMinimumWidth(), widthMeasureSpec),getDefaultSize(getSuggestedMinimumHeight(), heightMeasureSpec));}
我们在重写onMeasure方法的时候,必须要调用setMeasuredDimension(int measuredWidth, int measuredHeight)方法,否则系统会抛出异常。这个方法的主要目的是给View的mMeasuredWidth和mMeasuredWidth变量赋值。
也就是说,measure的结果就是,通过调用measure(int, int)方法,最终给View的mMeasuredWidth和mMeasuredWidth变量赋值,使得接下来的layout和draw流程顺利进行。
而measure(int, int)方法的两个参数是从何而来的呢?
在4.2.2中我们知道了,View的MeasureSpec是通过父布局的MeasureSpec和自身的LayoutParam来进行计算的,而这个过程是在父ViewGroup中就已经完成了的,如4.2.2中表格所示。也就是说,事实上,measure过程绝大多数工作是在父容器里面就已经完成了的。
在ViewGroup类中有一个getChildMeasureSpec(int spec, int padding, int childDimension)方法,在这里我们可以看到ViewGroup是怎么确定子View的measureSpec的,截取其中一段:
switch (specMode) {// Parent has imposed an exact size on uscase MeasureSpec.EXACTLY:if (childDimension >= 0) {resultSize = childDimension;resultMode = MeasureSpec.EXACTLY;} else if (childDimension == LayoutParams.MATCH_PARENT) {// Child wants to be our size. So be it.resultSize = size;resultMode = MeasureSpec.EXACTLY;} else if (childDimension == LayoutParams.WRAP_CONTENT) {// Child wants to determine its own size. It can't be// bigger than us.resultSize = size;resultMode = MeasureSpec.AT_MOST;}break;// Parent has imposed a maximum size on uscase MeasureSpec.AT_MOST:if (childDimension >= 0) {// Child wants a specific size... so be itresultSize = childDimension;resultMode = MeasureSpec.EXACTLY;} else if (childDimension == LayoutParams.MATCH_PARENT) {// Child wants to be our size, but our size is not fixed.// Constrain child to not be bigger than us.resultSize = size;resultMode = MeasureSpec.AT_MOST;} else if (childDimension == LayoutParams.WRAP_CONTENT) {// Child wants to determine its own size. It can't be// bigger than us.resultSize = size;resultMode = MeasureSpec.AT_MOST;}break;// Parent asked to see how big we want to becase MeasureSpec.UNSPECIFIED:if (childDimension >= 0) {// Child wants a specific size... let him have itresultSize = childDimension;resultMode = MeasureSpec.EXACTLY;} else if (childDimension == LayoutParams.MATCH_PARENT) {// Child wants to be our size... find out how big it should// beresultSize = View.sUseZeroUnspecifiedMeasureSpec ? 0 : size;resultMode = MeasureSpec.UNSPECIFIED;} else if (childDimension == LayoutParams.WRAP_CONTENT) {// Child wants to determine its own size.... find out how// big it should beresultSize = View.sUseZeroUnspecifiedMeasureSpec ? 0 : size;resultMode = MeasureSpec.UNSPECIFIED;}break;}
特别地,当View的宽(或者高)设置为wrap_content的时候,查看4.2.2的表格,我们可以看到,View的SpecMode是AT_MOST,而SpecSize是父布局剩余的尺寸。也就是说,我们最后给这个View赋值的测量大小,也是父布局剩余尺寸,这跟match_parent是一样的效果,不符合我们的预期。造成这个结果的原因是,父布局并不知道这个View应该是多大,所以只能传递父布局的SpecSize。所以当我们自定义View的时候,需要重写onMeasure方法,并在其中加入当View的SpecMode是AT_MOST时,我们期望的测量结果。例如,我们想设置wrap_content时的宽高是100px:
@Overrideprotected void onMeasure(int widthMeasureSpec, int heightMeasureSpec) {super.onMeasure(widthMeasureSpec, heightMeasureSpec);int widthSpecMode = MeasureSpec.getMode(widthMeasureSpec);int widthSpecSize = MeasureSpec.getSize(widthMeasureSpec);int heightSpecMode = MeasureSpec.getMode(widthMeasureSpec);int heightSpecSize = MeasureSpec.getSize(widthMeasureSpec);if (widthSpecMode == MeasureSpec.AT_MOST && heightMeasureSpec == MeasureSpec.AT_MOST) {setMeasuredDimension(100, 100);} else if (widthSpecMode == MeasureSpec.AT_MOST) {setMeasuredDimension(100, heightSpecSize);} else if (heightSpecMode == MeasureSpec.AT_MOST) {setMeasuredDimension(widthSpecSize, 100);}}
而ViewGroup的measure过程,除了要测量自身以外,还要测量各个子View,测量完之后再计算出ViewGroup最终的大小。而这个过程根据ViewGroup的不同,最终测量出来的大小也可能是不一样的,例如LinearLayout和RelativeLayout,他们的测量过程显然不可能相同,所以ViewGroup并没有默认实现measure过程,在自定义ViewGroup的时候,必须重写onMeasure方法,否则会导致无法显示。虽然ViewGroup提供了measureChildren(int, int)和measureChild(View, int, int)方法,可以简便的对子元素进行测量,
4.3.2 layout
在计算好了尺寸之后,我们需要把View挨个放进ViewGroup里,如同搭积木一般。这个过程就是layout。所以我们可以简单的认为,layout的过程是为ViewGroup“量身定制”的。
layout过程跟measure很类似,ViewGroup遍历所有的子View,计算出其应在的位置。如同measure的最终结果是将mMeasuredWidth和mMeasuredWidth变量赋值一般,layout的最终结果是给View的mLeft mTop mRight mBottom四个变量赋值。
在ViewGroup中,onLayout是一个抽象方法,需要我们自己实现,在其中放置我们的子View。举个简单的例子,我们要做个子元素竖直排列的布局,并且每个子元素间隔10px,重写ViewGroup的onLayout方法:
@Overrideprotected void onLayout(boolean changed, int l, int t, int r, int b) {int top = t;int count = getChildCount();for (int i = 0; i < count; i++) {final View child = getChildAt(i);int childLeft = l;int childTop = top;int childRight = childLeft + child.getMeasuredWidth();int childBottom = childTop + child.getMeasuredHeight();child.layout(childLeft, childTop, childRight, childBottom);top += child.getMeasuredHeight() + 10;}}
效果如下: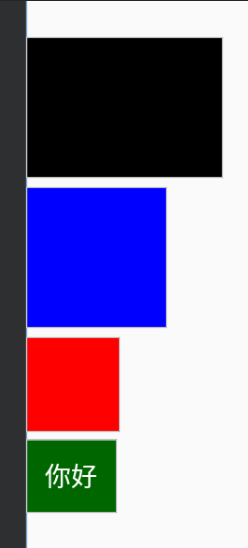
可以看到符合预期。
4.3.3 draw
一般情况下,draw分为以下几步:
- 绘制背景(drawBackground)
- 绘制自身(onDraw)
- 绘制子元素(dispatchDraw)
- 绘制装饰(scrollbars)
我们一般只关心自身的绘制,也就是说,重写onDraw方法就可以了。对于自定义View的绘制,最重要的莫过于Canvas和Paint的使用。
4.3.4 小结*
View的三大流程,不是并列关系,而是依赖、递进的关系。也就是说,对于父布局,必须先测量好每个子元素的大小,再确定他们每个的位置,最后才能绘制出他们的图像。即:
measure -> layout -> draw
4.4 自定义View和ViewGroup
最后来根据本章内容做一下自定义View、ViewGroup。
我的目标是这样的:
- 自定义View:外圈圆形,包裹了一个五角星。可以自定义圆形和五角星的颜色,以及五角星的旋转角度。(其实旋转可以使用
android:rotation属性的) - 自定义ViewGroup:将所有的子View从左到右,从上到下,依次排列。
4.4.1 自定义View:StarView
4.4.1.0 定义属性
首先创建包含五角星各项数据的实体类Star:
public class Star {/** * 五角星从中心到顶点的距离 */private double mCVLength;/** * 中心点的坐标 */private Point mCenter;/** * 五角星旋转的角度 */private double mRotate;/** * 五角星5个顶点坐标,顺序为:从最上方顶点开始,顺时针旋转的所有顶点。 */private Point[] mPoints = new Point[5];// ...}
略去其他部分,这里主要保存了五角星从中心到顶点的距离(大小)、中心点的坐标(位置)、五角星旋转的角度(角度),以及五个顶点的坐标(前三个值计算得到)。而我们等下在绘制图形的过程中,主要用到的就是这五个点的坐标。(至于是怎么求到的,则是高中知识,过程充满了血泪不表)
现在开始自定义StarView。新建StarView.java,继承自View。在style.xml中加入如下属性:
<declare-styleable name="StarView"><attr name="star_color" format="color" /><attr name="star_scale" format="float" /><attr name="star_rotate" format="float" /></declare-styleable>
分别代表五角星的颜色、五角星占圈内的比例、五角星的旋转角度。而圆圈背景则直接从background属性获取,然后再把背景设置成透明:
Drawable bgDrawable = getBackground();if (bgDrawable instanceof ColorDrawable) {mBgColor = ((ColorDrawable) bgDrawable).getColor();} else {mBgColor = Color.RED;}setBackgroundColor(0);
是不是很粗暴?
4.4.1.1 onMeasure
在onMeasure中,我们只是处理了对于wrap_content的判断:如果长(宽)是wrap_content,那么就将其设置为与宽(长)相等,即正方形(实际绘图区域,即去掉了padding之后的真实绘图区域)。如果二者皆是wrap_content,那么就均设为默认大小。
4.4.1.2 onDraw
首先,我们去除了各种padding之后,得到了真实的圆心坐标(cx, cy)、半径r。半径的值为真实绘图区域短边的一半。然后调用canvas.drawCircle()方法绘制出背景圆形。
然后,我们定义的Star类就登场了。
回顾一下,我们创建了Star对象之后,就可以获取它的5个顶点坐标。知道了坐标,我们就可以通过Path + canvas.DrawPath()来绘图了。先使用Path对象,按我们平时手工的方法画一个五角星,然后再drawPath填充颜色。代码如下:
// draw starStar star = getStar(mStarScale * r, cx, cy, mStarRotate);Star.Point points[] = star.getPoints();mPath.setFillType(Path.FillType.WINDING);mPath.moveTo(points[0].x, points[0].y);mPath.lineTo(points[3].x, points[3].y);mPath.lineTo(points[1].x, points[1].y);mPath.lineTo(points[4].x, points[4].y);mPath.lineTo(points[2].x, points[2].y);mPath.close();mPaint.setColor(mStarColor);canvas.drawPath(mPath, mPaint);
其中getStar()方法是为了避免在onDraw中创建对象。mPath.setFillType(Path.FillType.WINDING)允许我们完全填充这个路径内部。具体可以参考相关文章:https://blog.csdn.net/qq_30889373/article/details/78793086
4.4.1.3 完整代码
/** * 圆形背景,五角星图案的自定义View。 */public class StarView extends View {private static final String TAG = "StarView";private static final int DEFAULT_SIZE_PX = 128;private Paint mPaint = new Paint(Paint.ANTI_ALIAS_FLAG);private int mStarColor;private int mBgColor;private float mStarScale;private float mStarRotate;private Path mPath;public StarView(Context context) {this(context, null, 0);}public StarView(Context context, @Nullable AttributeSet attrs) {this(context, attrs, 0);}public StarView(Context context, @Nullable AttributeSet attrs, int defStyleAttr) {super(context, attrs, defStyleAttr);TypedArray a = context.obtainStyledAttributes(attrs, R.styleable.StarView);mStarColor = a.getColor(R.styleable.StarView_star_color, Color.YELLOW);mStarScale = a.getFloat(R.styleable.StarView_star_scale, 0.8f);mStarRotate = a.getFloat(R.styleable.StarView_star_rotate, 0);a.recycle();init();}private void init() {Drawable bgDrawable = getBackground();if (bgDrawable instanceof ColorDrawable) {mBgColor = ((ColorDrawable) bgDrawable).getColor();} else {mBgColor = Color.RED;}setBackgroundColor(0);mPath = new Path();}@Override@SuppressWarnings("SuspiciousNameCombination")protected void onMeasure(int widthMeasureSpec, int heightMeasureSpec) {super.onMeasure(widthMeasureSpec, heightMeasureSpec);int widthSpecMode = MeasureSpec.getMode(widthMeasureSpec);int widthSpecSize = MeasureSpec.getSize(widthMeasureSpec);int heightSpecMode = MeasureSpec.getMode(heightMeasureSpec);int heightSpecSize = MeasureSpec.getSize(heightMeasureSpec);// 对长宽为wrap_content的判断if (widthSpecMode == MeasureSpec.AT_MOST && heightSpecMode == MeasureSpec.AT_MOST) {setMeasuredDimension(DEFAULT_SIZE_PX, DEFAULT_SIZE_PX);} else if (widthSpecMode == MeasureSpec.AT_MOST) {int drawSize = heightSpecSize - getPaddingTop() - getPaddingBottom();setMeasuredDimension(drawSize + getPaddingLeft() + getPaddingRight(), heightSpecSize);} else if (heightSpecMode == MeasureSpec.AT_MOST) {int drawSize = widthSpecSize - getPaddingLeft() - getPaddingRight();setMeasuredDimension(widthSpecSize, drawSize + getPaddingTop() + getPaddingBottom());}}@Overrideprotected void onDraw(Canvas canvas) {super.onDraw(canvas);int width = getWidth();int height = getHeight();int paddingLeft = getPaddingLeft();int paddingRight = getPaddingRight();int paddingTop = getPaddingTop();int paddingBottom = getPaddingBottom();int realWidth = width - paddingLeft - paddingRight;int realHeight = height - paddingTop - paddingBottom;if (realWidth <= 0 || realHeight <= 0) {return;}float cx, cy, r; // 圆心坐标x,圆心坐标y,半径r = Math.min(realWidth, realHeight) / 2.0f;cx = paddingLeft + r;cy = paddingTop + r;// draw backgroundif (mBgColor != Color.TRANSPARENT) {mPaint.setColor(mBgColor);canvas.drawCircle(cx, cy, r, mPaint);}// draw starStar star = getStar(mStarScale * r, cx, cy, mStarRotate);Star.Point points[] = star.getPoints();mPath.setFillType(Path.FillType.WINDING);mPath.moveTo(points[0].x, points[0].y);mPath.lineTo(points[3].x, points[3].y);mPath.lineTo(points[1].x, points[1].y);mPath.lineTo(points[4].x, points[4].y);mPath.lineTo(points[2].x, points[2].y);mPath.close();mPaint.setColor(mStarColor);canvas.drawPath(mPath, mPaint);}/** * 由于onDraw中最好不要频繁的创建对象,所以使用临时的成员来保存Star。 */private Star mStarTemp;private Star getStar(double a, double cx, double cy, double rotate) {if (mStarTemp == null) {mStarTemp = new Star(a, cx, cy, rotate);} else {mStarTemp.setStar(a, cx, cy, rotate);}return mStarTemp;}}/** * 通过输入五角星的中心点坐标和顶点到中心的长度,计算出五角星每个顶点的坐标。 * <p> * Created by LittleFogCat on 2019/1/26. */@SuppressWarnings("WeakerAccess")public class Star {/** * 一些计算中常用的常数 */private static final double sin18 = sin(18);private static final double sin36 = sin(36);private static final double cos18 = cos(18);private static final double cos36 = cos(36);/** * 五角星从中心到顶点的距离 */private double mCVLength;/** * 中心点的坐标 */private Point mCenter;/** * 五角星旋转的角度 */private double mRotate;/** * 五角星5个顶点坐标,顺序为:从最上方顶点开始,顺时针旋转的所有顶点。 */private Point[] mPoints = new Point[5];/** * 构造函数,构造出一个正置无旋转的五角星。 * * @param a 五角星中心到顶点的距离 * @param cx 五角星中心坐标x * @param cy 五角星中心坐标y */public Star(double a, double cx, double cy) {this(a, cx, cy, 0);}/** * 主要构造函数。根据五角星中心坐标和中心到顶点的距离,计算出每个顶点的长度。 * * @param a 五角星中心到顶点的距离 * @param cx 五角星中心坐标x * @param cy 五角星中心坐标y * @param rotate 五角星旋转角度,0度为正置五角星 */public Star(double a, double cx, double cy, double rotate) {mCVLength = a;mCenter = new Point(cx, cy);mRotate = rotate;makeCoordinate();}public void setStar(double a, double cx, double cy, double rotate) {mCVLength = a;mCenter.x = (float) cx;mCenter.y = (float) cy;mRotate = rotate;makeCoordinate();}/** * 计算顶点坐标。 */private void makeCoordinate() {Point p[] = getPoints();final double x = mCenter.x;final double y = mCenter.y;final double a = mCVLength;if (mRotate == 0) {p[0] = new Point(x, y - a);p[1] = new Point(x + a * cos18, y - a * sin18);p[2] = new Point(x + a * sin36, y + a * cos36);p[3] = new Point(x - a * sin36, y + a * cos36);p[4] = new Point(x - a * cos18, y - a * sin18);} else {final double r = mRotate;for (int i = 0; i < 5; i++) {p[i] = new Point(x + a * sin(r + 72 * i), y - a * cos(r + 72 * i));}}}/** * 获取五角星的顶点坐标 * * @return 五角星的顶点坐标 */public Point[] getPoints() {if (mPoints == null || mPoints.length != 5) {mPoints = new Point[5];}return mPoints;}/** * {@link Math#sin(double)} 参数是弧度,这里转换为以度数为参数的函数 * * @param a degree * @return sin(a) */private static double sin(double a) {return Math.sin(Math.toRadians(a));}/** * {@link Math#cos(double)} 参数是弧度,这里转换为以度数为参数的函数 * * @param a degree * @return cos(a) */private static double cos(double a) {return Math.cos(Math.toRadians(a));}public static class Point {public float x, y;public Point() {}public Point(float x, float y) {this.x = x;this.y = y;}public Point(double x, double y) {this.x = (float) x;this.y = (float) y;}}}
4.4.2 自定义ViewGroup:FlowLayout
我们给他取了一个很好听的名字,FlowLayout流布局。实际上就是把子View挨个放。虽然写的时候感觉挺麻烦的,但是其实思路上面很简单,没什么复杂的地方。
4.4.2.0 onMeasure
只需要处理长(宽)是wrap_content的情况。思路很简单,挨个取出所有的子View:
- 如果宽是wrap_content,那么用变量保存最长行的宽度,本行宽度和本行剩余宽度;如果本行剩余宽度比这个子View小,那么就到下一行继续排,比较本行宽度和最长宽度;最后哪一行的宽度最宽,setMeasuredDimension的width就是它了(当然,不能超过parent的宽度);
- 如果高是wrap_content,那么和1中相同的排法,不同的就是记录每行最高的View高度,然后把他们全加起来,得到的就是总的高度了(当然,不能超过parent的高度);
- 如果宽高都是wrap_content,那么就是1和2的结合。
4.4.2.1 onLayout
排布方式已经在onMeasure中说过了,所以onLayout只需要简单的算一下子View的上下左右坐标即可。
需要注意的是,为了支持margin属性,我们需要自定义LayoutParams,继承自ViewGroup.MarginLayoutParams,然后重写generateLayoutParams()方法。
4.4.2.2 完整代码
public class FlowLayout extends ViewGroup {public FlowLayout(Context context) {super(context);init();}public FlowLayout(Context context, AttributeSet attrs) {super(context, attrs);init();}public FlowLayout(Context context, AttributeSet attrs, int defStyleAttr) {super(context, attrs, defStyleAttr);init();}private void init() {}@Overrideprotected void onMeasure(int widthMeasureSpec, int heightMeasureSpec) {super.onMeasure(widthMeasureSpec, heightMeasureSpec);int widthMode = MeasureSpec.getMode(widthMeasureSpec);int widthSize = MeasureSpec.getSize(widthMeasureSpec);int heightMode = MeasureSpec.getMode(heightMeasureSpec);int heightSize = MeasureSpec.getSize(heightMeasureSpec);final int childCount = getChildCount();measureChildrenWithMargins(widthMeasureSpec, heightMeasureSpec);if (childCount == 0) {setMeasuredDimension(0, 0);} else if (widthMode == MeasureSpec.AT_MOST && heightMode == MeasureSpec.AT_MOST) {int totalWidth = getPaddingLeft() + getPaddingRight();int totalHeight = getPaddingTop() + getPaddingBottom();int rowWidth = getPaddingLeft() + getPaddingRight();int rowHeight = 0;for (int i = 0; i < childCount; i++) {View child = getChildAt(i);int childWidth = child.getMeasuredWidth();int childHeight = child.getMeasuredHeight();if (widthSize - rowWidth < childWidth) { // 行剩余空间不足,需要换行totalHeight += childHeight;rowHeight = childHeight;rowWidth = childWidth + getPaddingLeft() + getPaddingRight();} else {rowWidth += childWidth;if (childHeight > rowHeight) {rowHeight = childHeight;totalHeight += childHeight - rowHeight;}}if (totalWidth < rowWidth) {totalWidth = rowWidth;}}setMeasuredDimension(totalWidth, totalHeight);} else if (widthMode == MeasureSpec.AT_MOST) {int totalWidth = getPaddingLeft() + getPaddingRight();int rowWidth = getPaddingLeft() + getPaddingRight();int rowHeight = getPaddingTop() + getPaddingBottom();for (int i = 0; i < childCount; i++) {View child = getChildAt(i);int childWidth = child.getMeasuredWidth();int childHeight = child.getMeasuredHeight();if (widthSize - rowWidth < childWidth) { // 行剩余空间不足,需要换行rowHeight = childHeight;rowWidth = childWidth + getPaddingLeft() + getPaddingRight();} else {rowWidth += childWidth;if (childHeight > rowHeight) {rowHeight = childHeight;}}if (totalWidth < rowWidth) {totalWidth = rowWidth;}}setMeasuredDimension(totalWidth, heightSize);} else if (heightMode == MeasureSpec.AT_MOST) {int totalHeight = getPaddingTop() + getPaddingBottom();int rowWidth = getPaddingLeft() + getPaddingRight();int rowHeight = 0;for (int i = 0; i < childCount; i++) {View child = getChildAt(i);int childWidth = child.getMeasuredWidth();int childHeight = child.getMeasuredHeight();if (widthSize - rowWidth < childWidth) { // 行剩余空间不足,需要换行totalHeight += childHeight;rowHeight = childHeight;rowWidth = childWidth + getPaddingLeft() + getPaddingRight();} else {rowWidth += childWidth;if (childHeight > rowHeight) {rowHeight = childHeight;totalHeight += childHeight - rowHeight;}}}setMeasuredDimension(widthSize, totalHeight);}}protected void measureChildrenWithMargins(int widthMeasureSpec, int heightMeasureSpec) {int widthSpecSize = MeasureSpec.getSize(widthMeasureSpec);int childCount = getChildCount();int widthUsed = getPaddingLeft() + getPaddingRight();int heightUsed = getPaddingTop() + getPaddingBottom();int rowHeight = 0;for (int i = 0; i < childCount; i++) {View child = getChildAt(i);LayoutParams lp = (LayoutParams) child.getLayoutParams();if (child.getVisibility() == View.GONE) {continue;}if (widthUsed + lp.width + lp.leftMargin + lp.rightMargin > widthSpecSize) {widthUsed = getPaddingLeft() + getPaddingRight();rowHeight = 0;}measureChildWithMargins(child, widthMeasureSpec, widthUsed, heightMeasureSpec, heightUsed);int measuredWidth = child.getMeasuredWidth();int measuredHeight = child.getMeasuredHeight();widthUsed += measuredWidth;if (measuredHeight > rowHeight) {rowHeight = measuredHeight;heightUsed += measuredHeight - rowHeight;}}}@Overrideprotected void onLayout(boolean changed, int l, int t, int r, int b) {int paddingLeft = getPaddingLeft();int paddingRight = getPaddingRight();int paddingTop = getPaddingTop();int paddingBottom = getPaddingBottom();final int childCount = getChildCount();int width = getMeasuredWidth();int height = getMeasuredHeight();int rowHeight = 0;int childTop = paddingTop;int childLeft = paddingLeft;for (int i = 0; i < childCount; i++) {final View child = getChildAt(i);if (child.getVisibility() != View.GONE) {int childWidth = child.getMeasuredWidth();int childHeight = child.getMeasuredHeight();LayoutParams lp = (LayoutParams) child.getLayoutParams();int left, top, right, bottom;if (childLeft + childWidth > width) { // 换行childTop += rowHeight;left = paddingLeft + lp.leftMargin;top = childTop + lp.topMargin;right = left + childWidth;bottom = top + childHeight;child.layout(left, top, right, bottom);childLeft = right + lp.rightMargin;rowHeight = childHeight + lp.topMargin + lp.bottomMargin;} else {left = childLeft + lp.leftMargin;top = childTop + lp.topMargin;right = left + childWidth;bottom = top + childHeight;child.layout(left, top, right, bottom);childLeft = right + lp.rightMargin;rowHeight = Math.max(rowHeight, childHeight + lp.topMargin + lp.bottomMargin);}}}}@Overridepublic ViewGroup.LayoutParams generateLayoutParams(AttributeSet attrs) {return new LayoutParams(getContext(), attrs);}@Overrideprotected ViewGroup.LayoutParams generateLayoutParams(ViewGroup.LayoutParams p) {return new LayoutParams(p);}public static class LayoutParams extends ViewGroup.MarginLayoutParams {public LayoutParams(Context c, AttributeSet attrs) {super(c, attrs);}public LayoutParams(int width, int height) {super(width, height);}public LayoutParams(MarginLayoutParams source) {super(source);}public LayoutParams(ViewGroup.LayoutParams source) {super(source);}}}
5 其他
本文同时发布于简书:https://www.jianshu.com/p/49b89104d828
本章GitHub地址:https://github.com/LittleFogCat/AndroidBookNote/tree/master/chapter04_view


还没有评论,来说两句吧...