TensorRT 5 开发者手册 中文版 使用深度学习框架(三-6)
原创作品,转载时请务必以超链接形式标明文章原始出处: http://www.dapalm.com/?p=206,作者:大数据,怕了么?
本手册为TensorRT 4.0.1.6 GA版英文手册翻译而来,主要作为备忘所用,分享出来以供更多开发者使用。TensorRT Developer Guide手册一共分为四个章节,主要内容在第二、三章,看懂这两章,写代码够用了。第一章为TensorRT综述,就是自吹有多牛逼。第四章为示例,介绍demo的代码结构及功能。开篇是目录,前三章每章为两到三篇,最后第四章示例,会拆分几个关键示例进行详细说明。
注意,2018年10月份,NVIDIA又更新TensorRT 5.0.2.6 Linux版本和TensorRT 5.0.1.3 Windows版,正式支持Windows10,经测试向下兼容Windows7也可以用。
本来这章应该是TensorRT4的第3章,在TensorRT5的手册上直接到了第8章,这里暂时先从第8章开始,继续翻译。有时间再补充前7章中与TensorRT4中增加的内容。
第8章
- 第8章 使用深度学习框架
- 8.1 框架支持的算子
- 8.2 使用TensorFlow
- 8.2.1 TensorFlow模型生成冻结图
- 8.2.2 Keras模型生成冻结图
- 8.2.3 冻结图转换为UFF
- 8.2.4 使用TensorFlow RNN权重
- 8.2.4.1 TensorRT支持的TensorFlow RNN单元
- 8.2.4.2 保持TensorFlow和TensorRT之间的模型一致性
- 8.2.4.3 工作流
- 8.2.4.4 转存(dumped)TensorFlow权重
- 8.2.4.5 加载转存权重
- 8.2.4.6 将权重转换为TensorRT格式
- 8.2.4.6.1 TensorFlow checkpoint存储格式
- 8.2.4.6.2 TensorFlow kernel张量存储格式
- 8.2.4.6.3 Kernel权重转换为TensorRT格式
- 8.2.4.6.4 TensorFlow Bias权重存储格式
- 8.2.4.6.5 Bias张量转换成TensorRT格式
- 8.2.4.7 BasicLSTMCell示例
- 8.2.4.7.1 BasicLSTMCell Kernel张量
- 8.2.4.7.2 BasicLSTMCell Bais张量
- 8.2.4.8 设置转换的权重和偏差
- 8.2.5 使用Graph Surgeon API预处理TensorFlow图
- 8.3 使用PyTorch和其他框架
第8章 使用深度学习框架
使用Python API,利用TensorFlow,Caffe或ONNX等兼容框架构建的模型使用TensorRT提供的解析器构建加速引擎。Python API还支持以NumPy兼容格式存储权重的框架,如PyTorch。
8.1 框架支持的算子
Caffe
Caffe框架支持的操作:
Convolution:3D,with or without biasPooling:Max, Average, Max_Average_blendInnerProductSoftmaxActivation: ReLu, Sigmoid,TanhLRNPowerElementWise: sum, product, maximum, subtraction,division, powerConcatenation: across channelDeconvolutionBatchNormalizationScaleCropReduction: sum,prod,max,min,avgReshapePermuteDropoutConcatElementWiseRNN: Input,Output,Forget,Update,Reset,Cell,HiddenUnary: exp,log,sqrt,recip,abs,negPaddingShuffleTopkmax,minGatherMatrix_MultiplyRagged_SoftmaxConstant: Uff模型的权值就是保存为常量类型RNN_v2Plugin: FasterRCNN fused plugin (RPN + ROI pooling). Normalize plugin. Permute plugin. PriorBox plugin. SSD DetectionOutput plugin. Concat plugin. YOLO PReLU Plugin. YOLO Reorg Plugin. YOLO Region Plugin.
TensorFlow
TensorFlow框架支持的算子:
PlaceholderConstAdd, Sub, Mul, Div, Minimum and MaximumBiasAddNegative, Abs, Sqrt, Rsqrt, Pow, Exp and Log注意:NvUffParser只支持Neg, Abs, Sqrt, Rsqrt, Exp和Log的常量节点FusedBatchNormReLU, TanH, and SigmoidSoftMaxMeanConcatV2ReshapeTransposeConv2DDepthwiseConv2dNativeConvTranspose2DMaxPoolAvgPoolPad
ONNX
ONNX解析器是一个开源项目,可以在GitHub:ONNX TensorRT中找到有关支持算子的最新信息。
8.2 使用TensorFlow
有关TensorFlow模型直接使用TensorRT的信息,请参阅:
- Python示例 - [9.2.2 end_to_end_tensorflow_mnist]
- TensorFlow框架中直接创建TensorRT引擎
8.2.1 TensorFlow模型生成冻结图
为了使用UFF命令行工具,TensorFlowGraph必须保存为.pd的冻结图文件,请参阅:
- TensorFlow模型生成冻结图的方法
- TensorFlow模型导出方法
注意:一般是在模型导出的过程中直接转换成冻结图
8.2.2 Keras模型生成冻结图
使用如下代码生成Keras模型的冻结图:
from keras.models import load_modelimport keras.backend as Kfrom tensorflow.python.framework import graph_iofrom tensorflow.python.tools import freeze_graphfrom tensorflow.core.protobuf import saver_pb2from tensorflow.python.training import saver as saver_libdef convert_keras_to_pb(keras_model, out_names, models_dir,model_filename):model = load_model(keras_model)K.set_learning_phase(0)sess = K.get_session()saver = saver_lib.Saver(write_version=saver_pb2.SaverDef.V2)checkpoint_path = saver.save(sess, 'saved_ckpt', global_step=0,latest_filename='checkpoint_state')graph_io.write_graph(sess.graph, '.', 'tmp.pb')freeze_graph.freeze_graph('./tmp.pb', '',False, checkpoint_path, out_names,"save/restore_all", "save/Const:0",models_dir+model_filename, False, "")
8.2.3 冻结图转换为UFF
使用如下示例代码将.pb冻结图转换成.uff格式文件:
convert-to-uff input_file [-o output_file] [-O output_node]convert-to-uff input_file -l #打印TensorFlow层
8.2.4 使用TensorFlow RNN权重
本节提供有关TensorFlow权重及其存储格式的信息。此外,以下部分将指导您如何从TensorFlow处理和解密RNN权重。这节主要内容是将各种训练框架下输出的模型权重转换成TensorRT格式(planner格式)
8.2.4.1 TensorRT支持的TensorFlow RNN单元
TensorRT中的循环神经网络层来自TensorFlow的MultiRNNCell算子。每一层由具有相同配置的多个子层组成,换句话说,隐藏和嵌入大小。完成该封装使得多个子层之间的内部连接可以从用户抽象出来(其实和DenseBlock、ResBlock一个意思,内部包含多个层)。当涉及更深层的网络时,这允许更简单的代码。
TensorRT支持四种不同的RNN层类型。这些层类型是RNN relu,RNN tanh,LSTM和GRU。与这些类型匹配的TensorFlow Cells是:
TensorRT RNN Relu/Tanh LayerBaiscRNNCells
- 允许的激活函数有:
tf.tanh和tf.nn.relu - 这是一个独立于平台的单元
TensorRT LSTM Layer
BasicLSTMCell
- 在TensorFlow中创建这个算子的实例时,
forget_bias必须设置为0。为了支持非0的遗忘偏置,需要通过添加一个参数化的遗忘偏置去转存TensorFlow的遗忘偏置。 - 这是一个独立于平台的单元
CudnnCompatibleLSTMCell
- 对
forget bias的条件和BasicLSTMCell一样 - 目前不支持peepholes(gate由当前输入xt、上一时刻隐藏状态ht-1、上一时刻单元状态ct-1),use_peepholes必须设置成False
- cudnn兼容
TensorRT GRU Layer
CudnnCompatibleGRUCell
- cudnn兼容
- 由于与标准的、平台独立的GRUCell不同,所以CudnnCompatibleGRUCell可以在TensorRT中正确使用
8.2.4.2 保持TensorFlow和TensorRT之间的模型一致性
对于未在TensorFlow RNN Cells Supported In TensorRT中列出的任何TensorFlow Cell,请参阅TensorRT API和TensorFlow API以确保Cell在数学上等同于TensorRT支持的Cell,并且存储格式与您期望的格式一致。 这样做的一个好方法是设计单元测试,使用TensorFlow作为正确输出来验证TensorRT的输出。
8.2.4.3 工作流
使用如下工作流来萃取和使用TensorFlow权重
Dump Weights
LoadWeights
ConvertWeights
SetWeights
8.2.4.4 转存(dumped)TensorFlow权重
Python脚本dumpTFWts.py可用于从给定的TensorFlow检查点转储所有变量和权重。 该脚本位于tensorrt / samples / common / dumpTFWts.py目录中。通过dumpTFWts.py -h获取有关此脚本用法的更多信息。
#!/usr/bin/python# Script to dump TensorFlow weights in TRT v1 and v2 dump format.# The V1 format is for TensorRT 4.0. The V2 format is for TensorRT 4.0 and later.import sysimport structimport argparsetry:import tensorflow as tffrom tensorflow.python import pywrap_tensorflowexcept ImportError as err:sys.stderr.write("""Error: Failed to import module ({})""".format(err))sys.exit()parser = argparse.ArgumentParser(description='TensorFlow Weight Dumper')parser.add_argument('-m', '--model', required=True, help='The checkpoint file basename, example basename(model.ckpt-766908.data-00000-of-00001) -> model.ckpt-766908')parser.add_argument('-o', '--output', required=True, help='The weight file to dump all the weights to.')parser.add_argument('-1', '--wtsv1', required=False, default=False, type=bool, help='Dump the weights in the wts v1.')opt = parser.parse_args()if opt.wtsv1:print "Outputting the trained weights in TensorRT's wts v1 format. This format is documented as:"print "Line 0: <number of buffers in the file>"print "Line 1-Num: [buffer name] [buffer type] [buffer size] <hex values>"else:print "Outputting the trained weights in TensorRT's wts v2 format. This format is documented as:"print "Line 0: <number of buffers in the file>"print "Line 1-Num: [buffer name] [buffer type] [(buffer shape{e.g. (1, 2, 3)}] <buffer shaped size bytes of data>"inputbase = opt.modeloutputbase = opt.outputdef float_to_hex(f):return hex(struct.unpack('<I', struct.pack('<f', f))[0])def getTRTType(tensor):if tf.as_dtype(tensor.dtype) == tf.float32:return 0if tf.as_dtype(tensor.dtype) == tf.float16:return 1if tf.as_dtype(tensor.dtype) == tf.int8:return 2if tf.as_dtype(tensor.dtype) == tf.int32:return 3print("Tensor data type of %s is not supported in TensorRT"%(tensor.dtype))sys.exit();try:# Open output fileif opt.wtsv1:outputFileName = outputbase + ".wts"else:outputFileName = outputbase + ".wts2"outputFile = open(outputFileName, 'w')# read vars from checkpointreader = pywrap_tensorflow.NewCheckpointReader(inputbase)var_to_shape_map = reader.get_variable_to_shape_map()# Record count of weightscount = 0for key in sorted(var_to_shape_map):count += 1outputFile.write("%s\n"%(count))# Dump the weights in either v1 or v2 formatfor key in sorted(var_to_shape_map):tensor = reader.get_tensor(key)file_key = key.replace('/','_')typeOfElem = getTRTType(tensor)val = tensor.shapeif opt.wtsv1:val = tensor.sizeprint("%s %s %s "%(file_key, typeOfElem, val))flat_tensor = tensor.flatten()outputFile.write("%s 0 %s "%(file_key, val))if opt.wtsv1:for weight in flat_tensor:hexval = float_to_hex(float(weight))outputFile.write("%s "%(hexval[2:]))else:outputFile.write(flat_tensor.tobytes())outputFile.write("\n");outputFile.close()except Exception as e: # pylint: disable=broad-exceptprint(str(e))if "corrupted compressed block contents" in str(e):print("It's likely that your checkpoint file has been compressed ""with SNAPPY.")if ("Data loss" in str(e) and(any([e in inputbase for e in [".index", ".meta", ".data"]]))):proposed_file = ".".join(inputbase.split(".")[0:-1])v2_file_error_template = """ It's likely that this is a V2 checkpoint and you need to provide the filename *prefix*. Try removing the '.' and extension. Try: inspect checkpoint --file_name = {}"""print(v2_file_error_template.format(proposed_file))
8.2.4.5 加载转存权重
//!//! \brief 加载权重到map容器.//!//! \param 权重文件路径, 权重文件必须由dumpTFWts.py脚本转换才能使用.//! \param 要提取的权重名称//!//! \return A map containing the extracted weights.//!//! \note Weight V2 files are in a very simple space delimited format.//! <number of buffers>//! for each buffer: [name] [type] [shape] <data as binary blob>\n//! Note: type is the integer value of the DataType enum in NvInfer.h.//!std::map<std::string, Weights> loadWeights(const std::string file, std::unordered_set<std::string> names){std::map<std::string, Weights> weightMap;std::ifstream input(file, std::ios_base::binary);assert(input.is_open() && "Unable to load weight file.");int32_t count;input >> count;assert(count > 0 && "Invalid weight map file.");while (count--){if (names.empty())break;Weights wt{ DataType::kFLOAT, nullptr, 0};// parse name and DataTypestd::string name;uint32_t type;input >> name >> std::dec >> type;wt.type = static_cast<DataType>(type);// extract shapestd::string temp, shape;std::getline(std::getline(input, temp, '('), shape, ')');// calculate count based on shapewt.count = 1;std::istringstream shapeStream(shape);while (std::getline(shapeStream, temp, ','))wt.count *= std::stoul(temp);size_t numOfBytes = samplesCommon::getElementSize(wt.type) * wt.count;// skip reading of weights if name is not in the set of names requested for extractionif (names.find(name) == names.end()){input.seekg(input.tellg() + static_cast<std::streamoff>(2 + numOfBytes));continue;}else{names.erase(name);}// Read weight valuesinput.seekg(input.tellg() + static_cast<std::streamoff>(1)); // skip space charchar* wtVals = static_cast<char*>(malloc(numOfBytes));input.read(wtVals, numOfBytes);input.seekg(input.tellg() + static_cast<std::streamoff>(1)); // skip new-line charwt.values = wtVals;weightMap[name] = wt;}input.close();return weightMap;}
这个函数通过设置需要提取的权重的名称,返回对应的权重map。
8.2.4.6 将权重转换为TensorRT格式
此时,我们已经准备好转换的权重,接着需要去执行以下步骤:
- 理解并使用TensorFlow checkpoint来获取张量
- 理解并使用张量来提取和重新格式化相关权重,并将它们设置为TensorRT相应层的权重
8.2.4.6.1 TensorFlow checkpoint存储格式
TensorFlow checkpoint可能有两种存储格式:
独立于平台的格式 - 由层分隔
- Cell_i_kernel
- Cell_i_bias
cuDNN兼容格式 - 由输入和循环分隔
- Cell_i_Candidate_Input_kernel
- Cell_i_Candidate_Hidden_kernel
换句话说,1.1 Cell_i_kernel 是 2.1 Cell_i_Candidate_Input_kernel 和 2.2 Cell_i_Candidate_Hidden_kernel 的串联形式. 因此, 存储格式2相对于存储格式1是一种更加精细的存储方式。
8.2.4.6.2 TensorFlow kernel张量存储格式
在存储checkpoint权重之前,TensorFlow先转置再将转置矩阵交错行的位置,交错方式在下届众描述。BaiscLSTMCell示例中提供一个图来进一步说明此格式。
基于层操作类型的门顺序转置的权重矩阵按以下顺序交错:
- RNN relu/tanh
a.输入门(i) - LSTM
a.输入门(i),状态门(c),遗忘门(g),输出门(o) - GRU
a.重置门(r),更新门(u)
8.2.4.6.3 Kernel权重转换为TensorRT格式
从TensorFlow格式转换权重可以分为两个步骤:
- 转换权重维度来调整交错格式,去成为更低的维度
- 转置权重来完全解除交错格式,让权重连续存储在存储器中
为了帮助正确执行这些转换,转换代码提供了reorderSubBuffers(),transposeSubBuffers(), and reshapeWeights()这些函数。
有关更多信息,请参阅include/NvUtil.h。
8.2.4.6.4 TensorFlow Bias权重存储格式
Bias张量简单地存储为以TensorFlow Kernel张量存储格式中指定的顺序连接的连续向量。如果checkpoint存储与平台无关,则TensorFlow通过将它们添加在一起,将循环和输入偏差合并为单个张量。否则,循环和输入偏差并存储在单独的张量中。
8.2.4.6.5 Bias张量转换成TensorRT格式
因为bias存储方式为连续向量,所以不需要应用任何转换,它与TensorRT格式是相同的。
8.2.4.7 BasicLSTMCell示例
8.2.4.7.1 BasicLSTMCell Kernel张量
为了理解这些张量存储的格式,让我们说明一个BasicLSTMCell的例子。图6说明了TensorFlow checkpoint中张量的样子。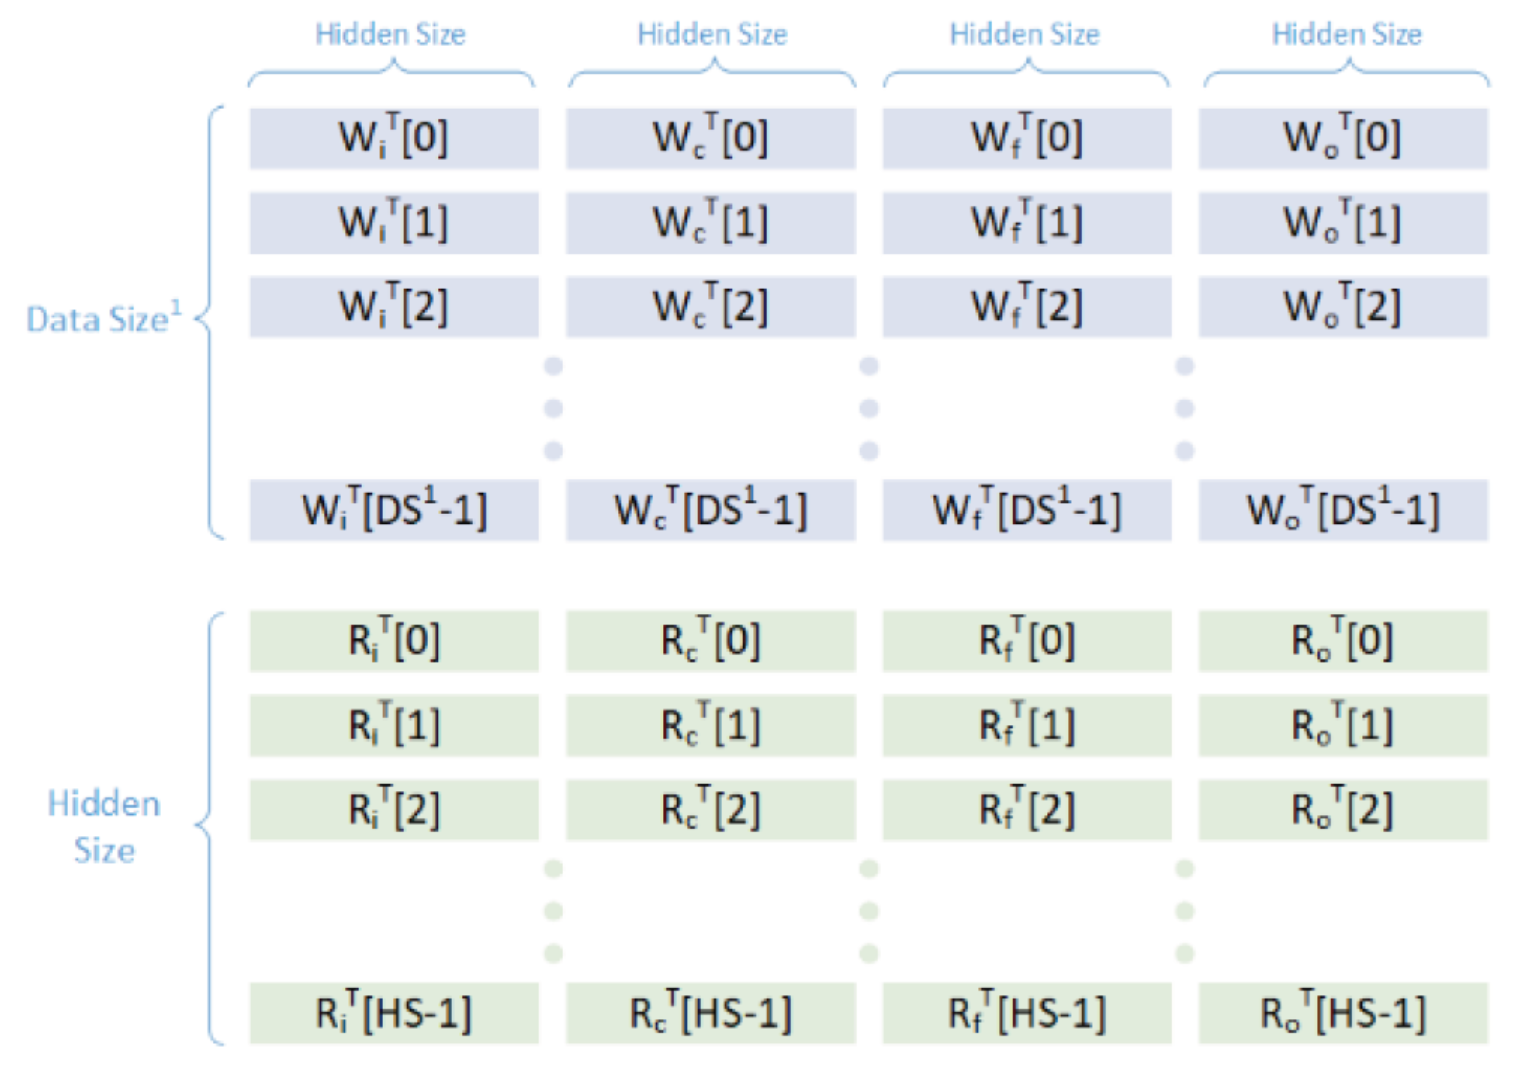
图6 TensorFlow checkpoint张量的存储格式对于第一层的DS/Data Size与隐藏层Size是不同的,对于以下所有子层,Data Size等于隐藏层Size
在图6中,W代表输入权重,R代表隐藏权重,DS代表数据大小,HS代表隐藏层大小。由于这是一个独立于平台的单元,因此输入门权重和隐藏门权重已经连接在一起。如果我们使用CudnnCompatibleLSTMCell,那么这些权重将被分成两个独立的张量。
使用前面讨论的转换程序,将得到转换的张量如图7所示。
8.2.4.7.2 BasicLSTMCell Bais张量
Bias张量的存储格式如下图
因为这是一个独立于平台的格式,所以上图W代表ElementWise将输入和循环偏置加在一起的结果。在存储张量之前,TensorFlow在内部执行此加法以节省内存。
这已经是我们需要的格式,因此,我们不需要进行任何转换。
8.2.4.8 设置转换的权重和偏差
准备好转换好的Weight和Bias就可以分別调用IRNNv2Layer::setWeightsForGate()和IRNNv2Layer::setBiasForGate()来设置TensorRT的权重和偏置。
实际的例子通常是训练、转储、转换、设置处理。更多信息参考sampleCharRNN例子。
8.2.5 使用Graph Surgeon API预处理TensorFlow图
Graph Surgeon APISurgeon翻译为“外科医生”很贴切,对TensorFlow Graph进行搜索、操作,类似外科手术,功能如下:
- 搜索
搜索功能允许您查找节点 - 操作
操作功能允许您修改,添加或删除节点
使用Graph Surgeon API,您可以将某些节点(或节点集)标记为图中的Plugin节点。这些插件可以是TensorRT自带的插件,也可以是您编写的插件。有关更多信息,请参阅使用自定义层扩展TensorRT。
如果您正在编写Plugin,请参阅有关如何实现IPluginExt和IPluignCreator类以及注册Plugin的详细信息,请参阅使用自定义层扩展TensorRT。
以下代码片段示例如何使用Graph Surgeon API将TensorFlow Leaky ReLU算子映射到TensorRT Leaky ReLU插件节点。
import graphsurgeon as gs# 创建leaky relu节点lrelu_node = gs.create_plugin_node(name=”trt_lrelu”, op=”LReLU_TRT”, negSlope=0.2)namespace_plugin_map = { “tf_lrelu” : lrelu_node }# 使用Graph surgeon API转换TensorFlow图,并保存到uff格式文件中dynamic_graph = gs.DynamicGraph(tf_lrelu.graph)dynamic_graph.collapse_namespaces(namespace_plugin_map)# 运行UFF转换器转换新的Graphuff_model = uff.from_tensorflow(dynamic_graph.as_graph_def(), ["trt_lrelu"], output_filename="test_lrelu.uff", text=True)
在上面的代码中,create_plugin_node方法中的op字段应该与注册的插件名称匹配。这使得UFF解析器能够使用该字段查找插件注册表,来将插件节点插入网络中。
有关Graph Surgeon API示例,请参阅C++ sampleUffSSD。
有关Graph Surgeon API的更多详细信息,请参阅Graph Surgeon API。
8.3 使用PyTorch和其他框架
将TensorRT与PyTorch和其他框架一起使用,涉及使用TensorRT API复制网络架构,然后从PyTorch(或具有NumPy兼容权重的任何其他框架)复制权重。有关将TensorRT与PyTorch模型一起使用的更多信息,请参阅:
- 9.2.3节network_api_pytorch_mnist Python示例
- 从TensorFlow和其他UFF兼容框架生成TensorRT引擎


")


还没有评论,来说两句吧...