Spring2.5整合ActiveMQ 5.2(P2P文本消息)
想找个Spring整合ActiveMQ可运行的实例,快速看看效果,可是很失望,网上例子都是抄来抄去,没源码(或者有源码运行不了),真TM没意思,看文档我自己实现个,不能运行你砍我!
不想把例子搞的太复杂,越简单越好!
项目环境:
JDK1.5
ActiveMQ5.2
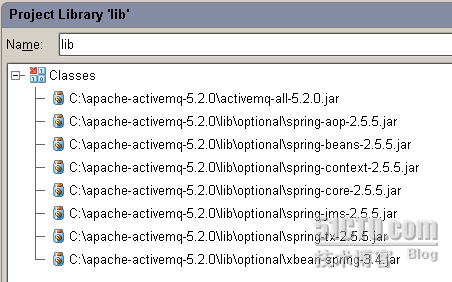
所用的包都是ActiveMQ自带的。引用的包如下图:
package stujms.p2ptxt;
import org.springframework.context.ApplicationContext;
import org.springframework.context.support.ClassPathXmlApplicationContext;
import org.springframework.jms.core.JmsTemplate;
import org.springframework.jms.core.MessageCreator;
import javax.jms.Destination;
import javax.jms.JMSException;
import javax.jms.Message;
import javax.jms.Session;
/**
* 消息发送者
*
* @author leizhimin 2009-8-13 17:01:48
*/
public class MySender {
public static void main(String[] args) {
ApplicationContext ctx = new ClassPathXmlApplicationContext( “/applicationContext.xml”);
JmsTemplate template = (JmsTemplate) ctx.getBean( “jmsTemplate”);
Destination destination = (Destination) ctx.getBean( “destination”);
template.send(destination, new MessageCreator() \{public Message createMessage(Session session) throws JMSException \{return session.createTextMessage( "发送消息:Hello ActiveMQ Text Message!");\}\});System.out.println( "成功发送了一条JMS消息");\}
}
package stujms.p2ptxt;
import org.springframework.context.ApplicationContext;
import org.springframework.context.support.ClassPathXmlApplicationContext;
import org.springframework.jms.core.JmsTemplate;
import javax.jms.Destination;
import javax.jms.JMSException;
import javax.jms.TextMessage;
/**
* 消息接收者
*
* @author leizhimin 2009-8-13 17:02:04
*/
public class MyReceiver {
public static void main(String[] args) throws JMSException {
ApplicationContext ctx = new ClassPathXmlApplicationContext( “/applicationContext.xml”);
JmsTemplate template = (JmsTemplate) ctx.getBean( “jmsTemplate”);
Destination destination = (Destination) ctx.getBean( “destination”);
while ( true) {
TextMessage txtmsg = (TextMessage) template.receive(destination);
if ( null != txtmsg)
System.out.println( “收到消息内容为: “ + txtmsg.getText());
else
break;
}
}
}
<? xml version =”1.0” encoding =”UTF-8” ?>
< beans xmlns =”http://www.springframework.org/schema/beans“ xmlns:xsi =”http://www.w3.org/2001/XMLSchema-instance“
xmlns:context =”http://www.springframework.org/schema/context“
xsi:schemaLocation=”http://www.springframework.org/schema/beans
http://www.springframework.org/schema/beans/spring-beans-2.5.xsd
http://www.springframework.org/schema/context
http://www.springframework.org/schema/context/spring-context-2.5.xsd“ >
<!-- 配置JMS连接工厂 \-->< bean id ="connectionFactory" class ="org.apache.activemq.spring.ActiveMQConnectionFactory" >< property name ="brokerURL" value ="tcp://localhost:61616" /></ bean ><!-- 配置JMS模版 \-->< bean id ="jmsTemplate" class ="org.springframework.jms.core.JmsTemplate" >< property name ="connectionFactory" ref ="connectionFactory" /></ bean ><!-- 发送消息的目的地(一个队列) \-->< bean id ="destination" class ="org.apache.activemq.command.ActiveMQQueue" ><!-- 设置消息队列的名字 \-->< constructor-arg index ="0" value ="HelloWorldQueue" /></ bean >
</ beans >
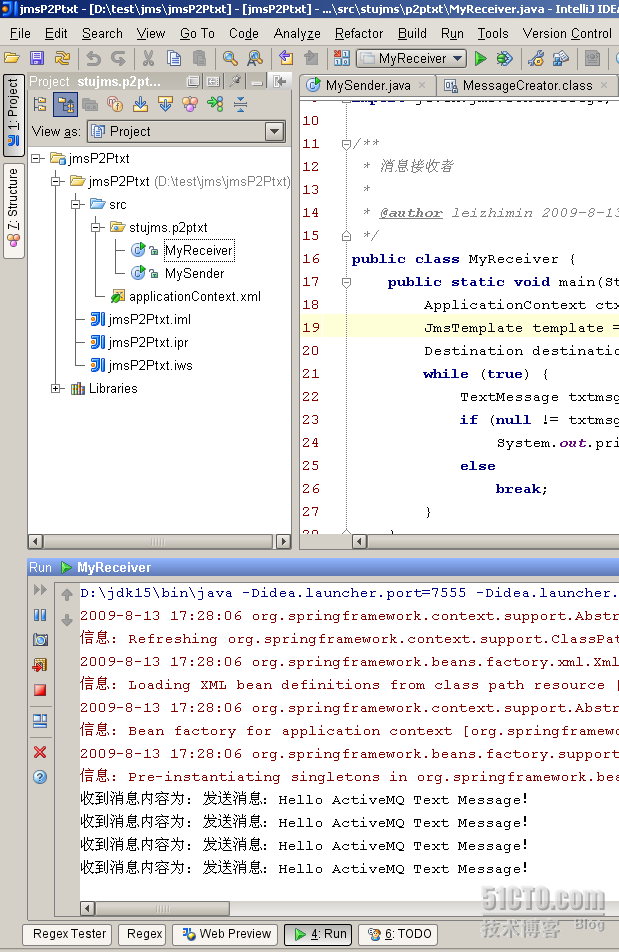
运行发送端三次:
成功发送了一条JMS消息
Process finished with exit code 0
然后再运行接收端一次:
收到消息内容为: 发送消息:Hello ActiveMQ Text Message!
收到消息内容为: 发送消息:Hello ActiveMQ Text Message!
收到消息内容为: 发送消息:Hello ActiveMQ Text Message!
继续测试发现,接收端接收一条消息后不退出程序,而是继续等待,一旦有消息发送过来,就获取到,然后输出!
发一张图看看:


(2)")


还没有评论,来说两句吧...