使用canvas制作一个移动端画板
概述
使用canvas做一个画板,代码里涵盖了一些canvas绘图的基本思想,各种工具的类也可以分别提出来用
详细
代码下载:http://www.demodashi.com/demo/10503.html
一、准备工作
1、如果不需要任何修改的话,直接使用dist文件夹内的文件即可
2、如果需要修改,需要安装node
3、打包js运行webpack 打包css运行gulp css 使用dist/index.html预览
4、学习es6与canvas基础知识,api
二、程序实现
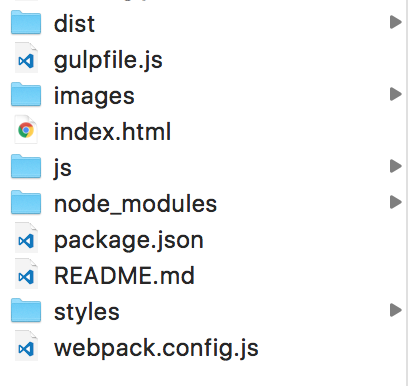
文件结构:
retina屏兼容
retina屏会使用多个物理像素渲染一个独立像素,导致一倍图在retina屏幕上模糊,canvas也是这样,所以我们应该把canvas画布的大小设为canvas元素大小的2或3倍。元素大小在css中设置
const canvas = selector('#canvas')const ctx = canvas.getContext('2d')const RATIO = 3const canvasOffset = canvas.getBoundingClientRect()canvas.width = canvasOffset.width * RATIOcanvas.height = canvasOffset.height * RATIO
坐标系转化
把相对于浏览器窗口的坐标转化为canvas坐标,需要注意的是,如果兼容了retina,需要乘上devicePixelRatio。后面所有出现的坐标,都要通过这个函数转化
function windowToCanvas (x, y) { return {x: (x - canvasOffset.left) * RATIO,y: (y - canvasOffset.top) * RATIO}}
不得不提的是,《HTML5 Canvas核心技术》有一个相同的函数,但是书上那个是错的(也有可能我看的那本是假书)
获取touch点的坐标
function getTouchPosition (e) {let touch = e.changedTouches[0]return windowToCanvas(touch.clientX, touch.clientY)}
画布状态的储存和恢复
进行绘图操作时,我们会频繁设置canvas绘图环境的属性(线宽,颜色等),大多数情况下我们只是临时设置,比如画蓝色的线段,又要画一个红色的正方形,为了不影响两个绘图操作,我们需要在每次绘制时,先保存环境属性(save),绘图完毕后恢复(restore)
ctx.save()ctx.fillStyle = "#333"ctx.strokeStyle = "#666"ctx.restore()
绘制表面的储存与恢复
主要用于临时性的绘图操作,比如用手指拖出一个方形时,首先要在touchstart事件里储存拖动开始时的绘制表面(getImageData),touchmove的事件函数中,首先要先恢复touch开始时的绘图表面(putImageData),再根据当前的坐标值画出一个方形,继续拖动时,刚才画出的方形会被事件函数的恢复绘图表面覆盖掉,在重新绘制一个方形,所以无论怎么拖动,我们看到的只是画了一个方形,下面是画板demo中方形工具的类
// 工具基础 宽度,颜色,是否在绘画中,是否被选中class Basic {constructor (width = RATIO, color = '#000') {this.width = widththis.color = colorthis.drawing = falsethis.isSelect = false}}class Rect extends Basic {constructor (width = RATIO, color = '#000') {super(width, color) this.startPosition = {x: 0,y: 0}this.firstDot = ctx.getImageData(0, 0, canvasWidth, canvasHeight)}begin (loc) {this.firstDot = ctx.getImageData(0, 0, canvasWidth, canvasHeight) //在这里储存绘图表面saveImageData(this.firstDot)Object.assign(this.startPosition, loc)ctx.save() // 储存画布状态ctx.lineWidth = this.widthctx.strokeStyle = this.color}draw (loc) {ctx.putImageData(this.firstDot, 0, 0) //恢复绘图表面,并开始绘制方形const rect = {x: this.startPosition.x <= loc.x ? this.startPosition.x : loc.x,y: this.startPosition.y <= loc.y ? this.startPosition.y : loc.y,width: Math.abs(this.startPosition.x - loc.x),height: Math.abs(this.startPosition.y - loc.y)}ctx.beginPath()ctx.rect(rect.x, rect.y, rect.width, rect.height)ctx.stroke()}end (loc) {ctx.putImageData(this.firstDot, 0, 0)const rect = {x: this.startPosition.x <= loc.x ? this.startPosition.x : loc.x,y: this.startPosition.y <= loc.y ? this.startPosition.y : loc.y,width: Math.abs(this.startPosition.x - loc.x),height: Math.abs(this.startPosition.y - loc.y)}ctx.beginPath()ctx.rect(rect.x, rect.y, rect.width, rect.height)ctx.stroke()ctx.restore() //恢复画布状态}bindEvent () {canvas.addEventListener('touchstart', (e) => {e.preventDefault()if (!this.isSelect) {return false}this.drawing = truelet loc = getTouchPosition(e)this.begin(loc)})canvas.addEventListener('touchmove', (e) => {e.preventDefault()if (!this.isSelect) {return false}if (this.drawing) {let loc = getTouchPosition(e)this.draw(loc)}})canvas.addEventListener('touchend', (e) => {e.preventDefault()if (!this.isSelect) {return false}let loc = getTouchPosition(e)this.end(loc)this.drawing = false})}}
椭圆的绘制方法(均匀压缩法)
原理是在压缩过的坐标系中绘制一个圆形,那看起来就是一个椭圆了。因为是通过拖动绘制椭圆,所以在我们拖动时,必然拖出了一个方形,那其实就是以方形的中心为圆心,较长边的一半为半径画圆,这个圆要画在压缩过的坐标系中,压缩比例就是较窄边与较长边的比,圆心的坐标也要根据压缩比例做坐标变换,圆形工具类代码如下
class Round extends Basic{constructor (width = RATIO, color = '#000') {super(width, color) this.startPosition = {x: 0,y: 0}this.firstDot = ctx.getImageData(0, 0, canvasWidth, canvasHeight)}drawCalculate (loc) {ctx.save()ctx.lineWidth = this.widthctx.strokeStyle = this.colorctx.putImageData(this.firstDot, 0, 0) //恢复绘图表面const rect = {width: loc.x - this.startPosition.x,height: loc.y - this.startPosition.y} // 计算方形的宽高(带有正负值)const rMax = Math.max(Math.abs(rect.width), Math.abs(rect.height)) // 选出较长边rect.x = this.startPosition.x + rect.width / 2 // 计算压缩前的圆心坐标rect.y = this.startPosition.y + rect.height / 2rect.scale = {x: Math.abs(rect.width) / rMax,y: Math.abs(rect.height) / rMax} // 计算压缩比例ctx.scale(rect.scale.x, rect.scale.y)ctx.beginPath()ctx.arc(rect.x / rect.scale.x, rect.y / rect.scale.y, rMax / 2, 0, Math.PI * 2)ctx.stroke()ctx.restore()}begin (loc) {this.firstDot = ctx.getImageData(0, 0, canvasWidth, canvasHeight) //储存绘图表面saveImageData(this.firstDot)Object.assign(this.startPosition, loc)}draw (loc) {this.drawCalculate(loc)}end (loc) {this.drawCalculate(loc)}bindEvent () {canvas.addEventListener('touchstart', (e) => {e.preventDefault()if (!this.isSelect) {return false}this.drawing = truelet loc = getTouchPosition(e)this.begin(loc)})canvas.addEventListener('touchmove', (e) => {e.preventDefault()if (!this.isSelect) {return false}if (this.drawing) {let loc = getTouchPosition(e)this.draw(loc)}})canvas.addEventListener('touchend', (e) => {e.preventDefault()if (!this.isSelect) {return false}let loc = getTouchPosition(e)this.end(loc)this.drawing = false})}}
撤销操作
上述例子中都有个 saveImageData() 函数,这个函数是把当前绘图表面储存在一个数组中,点击撤销的时候用于恢复上一步的绘图表面
const lastImageData = []function saveImageData (data) {(lastImageData.length == 5) && (lastImageData.shift()) // 上限为储存5步,太多了怕挂掉lastImageData.push(data)}document.getElementById("cancel").addEventListener('click', () => {if(lastImageData.length < 1) return falsectx.putImageData(lastImageData[lastImageData.length - 1], 0, 0)lastImageData.pop()})
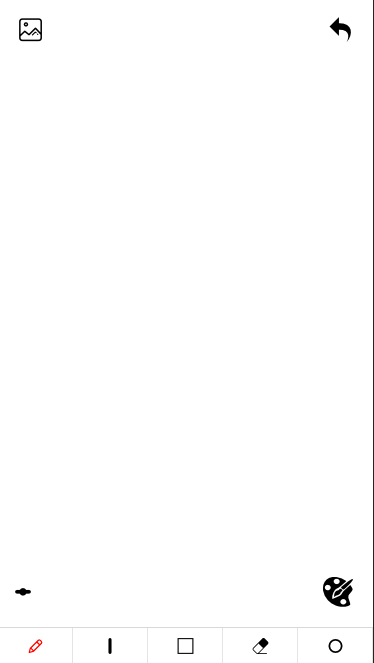
三、运行效果
点击目录里index.html
四、其他补充
还有一些简单地工具如线宽选择,调色板就不叙述了,有问题欢迎评论


")


还没有评论,来说两句吧...