RocketMQ源码解析一(NameServer启动流程)
RocketMQ版本4.6.0,记录自己看源码的过程
从启动类开始看
public class NamesrvStartup {// 不懂,应该跟日志,配置和命令行参数有关private static InternalLogger log;private static Properties properties = null;private static CommandLine commandLine = null;public static void main(String[] args) {main0(args);}public static NamesrvController main0(String[] args) {try {// 解析配置并创建NamesrvController这一核心处理请求组件NamesrvController controller = createNamesrvController(args);// 初始化并启动NamesrvController,创建netty服务器,请求处理器,后台定时任务等start(controller);String tip = "The Name Server boot success. serializeType=" + RemotingCommand.getSerializeTypeConfigInThisServer();log.info(tip);System.out.printf("%s%n", tip);return controller;} catch (Throwable e) {e.printStackTrace();System.exit(-1);}return null;}}
首先第一步就是解析配置并创建NamesrvController这一核心处理请求组件
public static NamesrvController createNamesrvController(String[] args) throws IOException, JoranException {System.setProperty(RemotingCommand.REMOTING_VERSION_KEY, Integer.toString(MQVersion.CURRENT_VERSION));//PackageConflictDetect.detectFastjson();Options options = ServerUtil.buildCommandlineOptions(new Options());commandLine = ServerUtil.parseCmdLine("mqnamesrv", args, buildCommandlineOptions(options), new PosixParser());if (null == commandLine) {System.exit(-1);return null;}// 创建两个核心配置,后面要根据这两个配置创建NamesrvControllerfinal NamesrvConfig namesrvConfig = new NamesrvConfig();final NettyServerConfig nettyServerConfig = new NettyServerConfig();// netty监听9876端口nettyServerConfig.setListenPort(9876);if (commandLine.hasOption('c')) {String file = commandLine.getOptionValue('c');if (file != null) {InputStream in = new BufferedInputStream(new FileInputStream(file));properties = new Properties();properties.load(in);MixAll.properties2Object(properties, namesrvConfig);MixAll.properties2Object(properties, nettyServerConfig);namesrvConfig.setConfigStorePath(file);System.out.printf("load config properties file OK, %s%n", file);in.close();}}if (commandLine.hasOption('p')) {InternalLogger console = InternalLoggerFactory.getLogger(LoggerName.NAMESRV_CONSOLE_NAME);MixAll.printObjectProperties(console, namesrvConfig);MixAll.printObjectProperties(console, nettyServerConfig);System.exit(0);}MixAll.properties2Object(ServerUtil.commandLine2Properties(commandLine), namesrvConfig);if (null == namesrvConfig.getRocketmqHome()) {System.out.printf("Please set the %s variable in your environment to match the location of the RocketMQ installation%n", MixAll.ROCKETMQ_HOME_ENV);System.exit(-2);}LoggerContext lc = (LoggerContext) LoggerFactory.getILoggerFactory();JoranConfigurator configurator = new JoranConfigurator();configurator.setContext(lc);lc.reset();configurator.doConfigure(namesrvConfig.getRocketmqHome() + "/conf/logback_namesrv.xml");log = InternalLoggerFactory.getLogger(LoggerName.NAMESRV_LOGGER_NAME);MixAll.printObjectProperties(log, namesrvConfig);MixAll.printObjectProperties(log, nettyServerConfig);// 根据上面的配置创建NamesrvControllerfinal NamesrvController controller = new NamesrvController(namesrvConfig, nettyServerConfig);// remember all configs to prevent discardcontroller.getConfiguration().registerConfig(properties);return controller;}
前面几行看不懂直接跳过,直接看这3行关键的代码:
// 创建两个核心配置,后面要根据这两个配置创建NamesrvControllerfinal NamesrvConfig namesrvConfig = new NamesrvConfig();final NettyServerConfig nettyServerConfig = new NettyServerConfig();// netty监听9876端口nettyServerConfig.setListenPort(9876);
这里应该可以猜测是为创建NamesrvController提供一些配置,看看NamesrvConfig和NettyServerConfig是什么
public class NamesrvConfig {private static final InternalLogger log = InternalLoggerFactory.getLogger(LoggerName.NAMESRV_LOGGER_NAME);// rocketmq的主目录,通过读取ROCKETMQ_HOME环境变量private String rocketmqHome = System.getProperty(MixAll.ROCKETMQ_HOME_PROPERTY,System.getenv(MixAll.ROCKETMQ_HOME_ENV));// kv配置文件的路径private String kvConfigPath = System.getProperty("user.home")+ File.separator+ "namesrv"+ File.separator+ "kvConfig.json";// namesrv自己的配置文件路径private String configStorePath = System.getProperty("user.home")+ File.separator+ "namesrv"+ File.separator+ "namesrv.properties";private String productEnvName = "center";private boolean clusterTest = false;private boolean orderMessageEnable = false;}
这里主要配置一些路径,对于理解主线流程帮助不大,可以跳过。
public class NettyServerConfig implements Cloneable {// 监听端口,但nameserver改为了9876private int listenPort = 8888;// 工作线程private int serverWorkerThreads = 8;// netty的public线程池的线程数量private int serverCallbackExecutorThreads = 0;// 这是netty的IO线程池的线程数量,默认是3,这里的线程是负责解析网络请求的// 它这里的线程解析完网络请求之后,就会把请求转发给work线程来处理private int serverSelectorThreads = 3;private int serverOnewaySemaphoreValue = 256;private int serverAsyncSemaphoreValue = 64;// 如果一个网络连接空闲超过120s,就会被关闭private int serverChannelMaxIdleTimeSeconds = 120;private int serverSocketSndBufSize = NettySystemConfig.socketSndbufSize;private int serverSocketRcvBufSize = NettySystemConfig.socketRcvbufSize;private boolean serverPooledByteBufAllocatorEnable = true;/** * make make install * * * ../glibc-2.10.1/configure \ --prefix=/usr \ --with-headers=/usr/include \ * --host=x86_64-linux-gnu \ --build=x86_64-pc-linux-gnu \ --without-gd */private boolean useEpollNativeSelector = false;}
这是对NettyServer的一些配置信息,由于对netty不了解,所以这里也可以先跳过。
接下来的一些解析配置也不是很懂,就跳过了,直接看创建NamesrvController
// 根据上面的配置创建NamesrvControllerfinal NamesrvController controller = new NamesrvController(namesrvConfig, nettyServerConfig);
可以看到是根据上面的两个核心配置创建的
public NamesrvController(NamesrvConfig namesrvConfig, NettyServerConfig nettyServerConfig) {this.namesrvConfig = namesrvConfig;this.nettyServerConfig = nettyServerConfig;this.kvConfigManager = new KVConfigManager(this);this.routeInfoManager = new RouteInfoManager();this.brokerHousekeepingService = new BrokerHousekeepingService(this);this.configuration = new Configuration(log,this.namesrvConfig, this.nettyServerConfig);this.configuration.setStorePathFromConfig(this.namesrvConfig, "configStorePath");}
创建的同时会对里面的一些管理器组件进行创建,供后续使用。
看入口方法,NameSrvController创建完成后就该进行初始化并启动,创建netty服务器,请求处理器,后台定时任务等。
public static NamesrvController start(final NamesrvController controller) throws Exception {if (null == controller) {throw new IllegalArgumentException("NamesrvController is null");}// 进行初始化,创建netty服务器,请求处理器,后台定时任务等boolean initResult = controller.initialize();if (!initResult) {controller.shutdown();System.exit(-3);}Runtime.getRuntime().addShutdownHook(new ShutdownHookThread(log, new Callable<Void>() {@Overridepublic Void call() throws Exception {controller.shutdown();return null;}}));// 其实就是启动netty服务器controller.start();return controller;}
这里面关键步骤就两步,初始化和启动,先看如何初始化NamesrvController:
public boolean initialize() {// 无关紧要,跳过this.kvConfigManager.load();// 创建netty serverthis.remotingServer = new NettyRemotingServer(this.nettyServerConfig, this.brokerHousekeepingService);// 默认请求处理器的线程池this.remotingExecutor =Executors.newFixedThreadPool(nettyServerConfig.getServerWorkerThreads(), new ThreadFactoryImpl("RemotingExecutorThread_"));// 注册默认请求处理器this.registerProcessor();// 每隔10s定时扫描broker状态的,看是否还存活着this.scheduledExecutorService.scheduleAtFixedRate(new Runnable() {@Overridepublic void run() {NamesrvController.this.routeInfoManager.scanNotActiveBroker();}}, 5, 10, TimeUnit.SECONDS);// 忽略不重要代码return true;}
这里面分为4步:
1、创建netty server,毕竟namesrv要作为服务端来接受broker,producer以及consumer的请求的,所以使用之前创建好的配置来创建netty server
public NettyRemotingServer(final NettyServerConfig nettyServerConfig,final ChannelEventListener channelEventListener) {super(nettyServerConfig.getServerOnewaySemaphoreValue(), nettyServerConfig.getServerAsyncSemaphoreValue());this.serverBootstrap = new ServerBootstrap();this.nettyServerConfig = nettyServerConfig;this.channelEventListener = channelEventListener;// 忽略看不懂的代码}
这里面最重要的一行代码就是this.serverBootstrap = new ServerBootstrap()。ServerBootstrap是netty里面的一个核心类,可以看作是netty的服务器,在监听9876端口。
2、创建一个默认请求处理器的线程池,用来处理没有专门处理器的请求,至于何谓专门,下面会介绍,但在namesrv中,就这一个处理器线程池,所以其实在namesrv,所有的请求都是由该线程池处理的。
3、注册默认请求处理器,跟上一步说明一样,namesrv只有这一个处理器。
private void registerProcessor() {if (namesrvConfig.isClusterTest()) {this.remotingServer.registerDefaultProcessor(new ClusterTestRequestProcessor(this, namesrvConfig.getProductEnvName()),this.remotingExecutor);} else {// 向netty服务器注册默认的请求处理组件this.remotingServer.registerDefaultProcessor(new DefaultRequestProcessor(this), this.remotingExecutor);}}
4、创建一个定时器,每隔10s定时扫描broker状态的,看是否还存活着,挂了就移除相关broker的信息
/** * 扫描发生故障的broker,即默认120s没有更新心跳时间,则表示该broker挂了,需要将该broker路由信息移除 */public void scanNotActiveBroker() {// 迭代brokerLiveTable,判断每个broker的心跳时间跟当前时间的间隔Iterator<Entry<String, BrokerLiveInfo>> it = this.brokerLiveTable.entrySet().iterator();while (it.hasNext()) {Entry<String, BrokerLiveInfo> next = it.next();long last = next.getValue().getLastUpdateTimestamp();// 默认超过120s就表示broker挂了if ((last + BROKER_CHANNEL_EXPIRED_TIME) < System.currentTimeMillis()) {RemotingUtil.closeChannel(next.getValue().getChannel());it.remove();log.warn("The broker channel expired, {} {}ms", next.getKey(), BROKER_CHANNEL_EXPIRED_TIME);// 移除与该broker所有的信息,有点复杂,只知道移除所有有关broker信息就行了this.onChannelDestroy(next.getKey(), next.getValue().getChannel());}}}
这里面的一些实例变量等后面解析broker发送心跳时再具体说明。
最后就是启动NamesrvController这一组件:
public void start() throws Exception {this.remotingServer.start();if (this.fileWatchService != null) {this.fileWatchService.start();}}
其实就是启动Netty服务器,至于启动细节,看不懂。
好了,到这里,namesrv服务就算是启动成功了,总的来说,namesrv的代码还是比较简单的。
总结一下,就是先解析相关配置,创建namesrvConfig和nettyServerConfig这两个核心配置,根据这两个配置创建NamesrvController这一 核心组件,创建出来以后对该组件进行初始化,包括创建netty服务器,请求处理器,请求线程池,后台定时任务等,最后启动NamesrvController,其实就是启动netty服务器。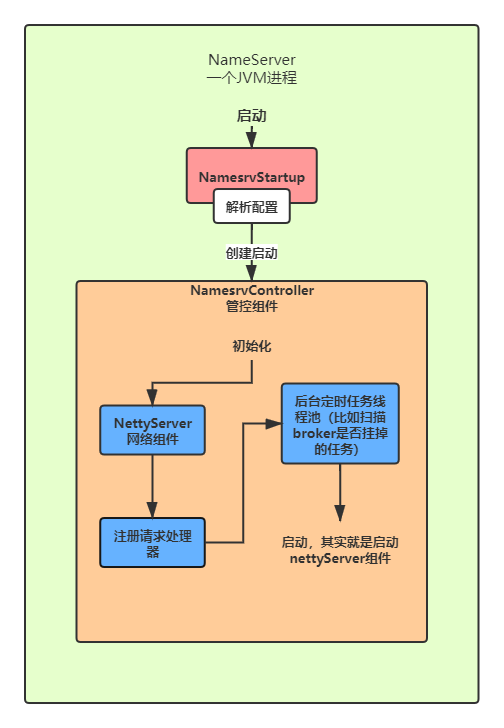
下面就要开始研究NameServer启动成功后,Broker是如何启动的,如果向NameServer进行注册,如何进行心跳,NameServer是如何管理Broker的。
参考资料
《儒猿技术窝——从 0 开始带你成为消息中间件实战高手》


还没有评论,来说两句吧...