第十四章:Java_网络编程
网络编程概述:
Java是 Internet 上的语言,它从语言级上提供了对网络应用程序的支持,程序员能够很容易开发常见的网络应用程序。
Java提供的网络类库,可以实现无痛的网络连接,联网的底层细节被隐藏在 Java 的本机安装系统里,由 JVM 进行控制。并且 Java 实现了一个跨平台的网络库,程序员面对的是一个统一的网络编程环境。
1.要想实现网络传输,需要考虑的问题有哪些?
1.1 如何才能准确的定位网络上的一台主机?
1.2 如何才能进行可靠的、高效的数据传输?
2.Java如何实现的网络通信
2.1使用IP地址—定位一台主机 使用端口号—定位一个应用 ===>InetAddress类
①如何创建一个InetAddress的对象?getByName(“”); 比如:InetAddress inet = InetAddress.getByName(“192.168.10.165”);
②如何获取本机的一个InetAddress的对象?getLocalHost()
③域名:getHostName() ip:getHostAddress()- 2.2对应有协议
通讯要素1:IP 和 端口号
IP 地址:InetAddress
唯一的标识 Internet 上的计算机
本地回环地址(hostAddress):127.0.0.1 主机名(hostName):localhost
不易记忆
端口号标识正在计算机上运行的进程(程序)
不同的进程有不同的端口号
被规定为一个 16 位的整数 0~65535。其中,0~1023被预先定义的服务通信占用(如MySql占用端口3306,http占用端口80等)。除非我们需要访问这些特定服务,否则,就应该使用 1024~65535 这些端口中的某一个进行通信,以免发生端口冲突。
端口号与IP地址的组合得出一个网络套接字。
通讯要素2:网络通信协议
网络通信协议
计算机网络中实现通信必须有一些约定,即通信协议,对速率、传输代码、代码结构、传输控制步骤、出错控制等制定标准。
通信协议分层的思想
由于结点之间联系很复杂,在制定协议时,把复杂成份分解成一些简单的成份,再将它们复合起来。最常用的复合方式是层次方式,即同层间可以通信、上一层可以调用下一层,而与再下一层不发生关系。各层互不影响,利于系统的开发和扩展。
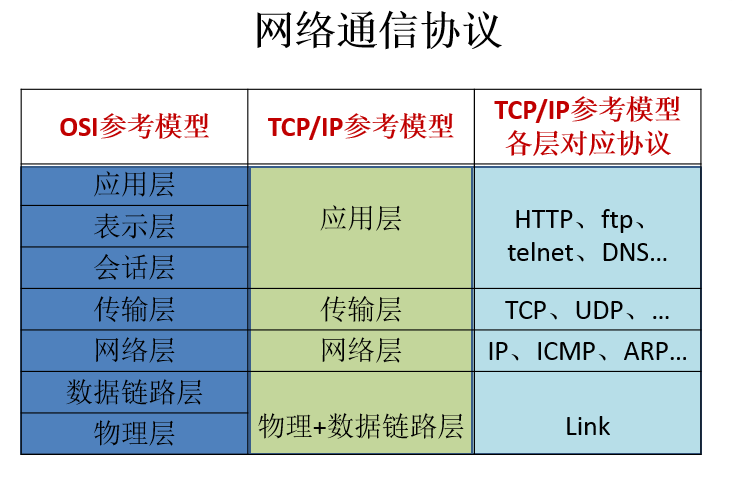
TCP/IP协议簇
- 传输层协议中有两个非常重要的协议:
传输控制协议TCP(Transmission Control Protocol)
用户数据报协议UDP(User Datagram Protocol)。- TCP/IP 以其两个主要协议:传输控制协议(TCP)和网络互联协议(IP)而得名,实际上是一组协议,包括多个具有不同功能且互为关联的协议。
- IP(Internet Protocol)协议是网络层的主要协议,支持网间互连的数据通信。
- TCP/IP协议模型从更实用的角度出发,形成了高效的四层体系结构,即物理链路层、IP层、传输层和应用层。
TCP和UDP
- TCP协议:
使用TCP协议前,须先建立TCP连接,形成传输数据通道
传输前,采用“三次握手”方式,是可靠的
TCP协议进行通信的两个应用进程:客户端、服务端
在连接中可进行大数据量的传输
传输完毕,需释放已建立的连接,效率低- UDP协议:
将数据、源、目的封装成数据包,不需要建立连接
每个数据报的大小限制在64K内
因无需连接,故是不可靠的
发送数据结束时无需释放资源,速度快
TCP的编程: Socket ServerSocket
例子:
1.客户端发送内容给服务端,服务端将内容打印到控制台上。
//TCP编程例一:客户端给服务端发送信息。服务端输出此信息到控制台上//网络编程实际上就是Socket的编程public class TestTCP1 {// 客户端@Testpublic void client() {Socket socket = null;OutputStream os = null;try {// 1.创建一个Socket的对象,通过构造器指明服务端的IP地址,以及其接收程序的端口号socket = new Socket(InetAddress.getByName("127.0.0.1"), 9090);// 2.getOutputStream():发送数据,方法返回OutputStream的对象os = socket.getOutputStream();// 3.具体的输出过程os.write("我是客户端,请多关照".getBytes());} catch (IOException e) {// TODO Auto-generated catch blocke.printStackTrace();} finally {// 4.关闭相应的流和Socket对象if (os != null) {try {os.close();} catch (IOException e) {// TODO Auto-generated catch blocke.printStackTrace();}}if (socket != null) {try {socket.close();} catch (IOException e) {// TODO Auto-generated catch blocke.printStackTrace();}}}}// 服务端@Testpublic void server() {ServerSocket ss = null;Socket s = null;InputStream is = null;try {// 1.创建一个ServerSocket的对象,通过构造器指明自身的端口号ss = new ServerSocket(9090);// 2.调用其accept()方法,返回一个Socket的对象s = ss.accept();// 3.调用Socket对象的getInputStream()获取一个从客户端发送过来的输入流is = s.getInputStream();// 4.对获取的输入流进行的操作byte[] b = new byte[20];int len;while ((len = is.read(b)) != -1) {String str = new String(b, 0, len);System.out.print(str);}System.out.println("收到来自于" + s.getInetAddress().getHostAddress()+ "的连接");} catch (IOException e) {// TODO Auto-generated catch blocke.printStackTrace();} finally {// 5.关闭相应的流以及Socket、ServerSocket的对象if (is != null) {try {is.close();} catch (IOException e) {// TODO Auto-generated catch blocke.printStackTrace();}}if (s != null) {try {s.close();} catch (IOException e) {// TODO Auto-generated catch blocke.printStackTrace();}}if (ss != null) {try {ss.close();} catch (IOException e) {// TODO Auto-generated catch blocke.printStackTrace();}}}}}
2.客户端发送内容给服务端,服务端给予反馈。
//TCP编程例二:客户端给服务端发送信息,服务端将信息打印到控制台上,同时发送“已收到信息”给客户端public class TestTCP2 {//客户端@Testpublic void client(){Socket socket = null;OutputStream os = null;InputStream is = null;try {socket = new Socket(InetAddress.getByName("127.0.0.1"),8989);os = socket.getOutputStream();os.write("我是客户端".getBytes());//shutdownOutput():执行此方法,显式的告诉服务端发送完毕!socket.shutdownOutput();is = socket.getInputStream();byte[] b = new byte[20];int len;while((len = is.read(b)) != -1){String str = new String(b,0,len);System.out.print(str);}} catch (IOException e) {// TODO Auto-generated catch blocke.printStackTrace();}finally{if(is != null){try {is.close();} catch (IOException e) {// TODO Auto-generated catch blocke.printStackTrace();}}if(os != null){try {os.close();} catch (IOException e) {// TODO Auto-generated catch blocke.printStackTrace();}}if(socket != null){try {socket.close();} catch (IOException e) {// TODO Auto-generated catch blocke.printStackTrace();}}}}//服务端@Testpublic void server(){ServerSocket ss = null;Socket s = null;InputStream is = null;OutputStream os = null;try {ss = new ServerSocket(8989);s = ss.accept();is = s.getInputStream();byte[] b = new byte[20];int len;while((len = is.read(b)) != -1){String str = new String(b,0,len);System.out.print(str);}os = s.getOutputStream();os.write("我已收到你的情意".getBytes());} catch (IOException e) {// TODO Auto-generated catch blocke.printStackTrace();}finally{if(os != null){try {os.close();} catch (IOException e) {// TODO Auto-generated catch blocke.printStackTrace();}}if(is != null){try {is.close();} catch (IOException e) {// TODO Auto-generated catch blocke.printStackTrace();}}if(s != null){try {s.close();} catch (IOException e) {// TODO Auto-generated catch blocke.printStackTrace();}}if(ss != null){try {ss.close();} catch (IOException e) {// TODO Auto-generated catch blocke.printStackTrace();}}}}}
3.从客户端发送文件给服务端,服务端保存到本地。并返回“发送成功”给客户端。并关闭相应的连接。
//TCP编程例三:从客户端发送文件给服务端,服务端保存到本地。并返回“发送成功”给客户端。并关闭相应的连接。//如下的程序,处理异常时,要使用try-catch-finally!!本例仅为了书写方便~public class TestTCP3 {@Testpublic void client()throws Exception{//1.创建Socket的对象Socket socket = new Socket(InetAddress.getByName("127.0.0.1"), 9898);//2.从本地获取一个文件发送给服务端OutputStream os = socket.getOutputStream();FileInputStream fis = new FileInputStream(new File("1.jpg"));byte[] b = new byte[1024];int len;while((len = fis.read(b)) != -1){os.write(b,0,len);}socket.shutdownOutput();//3.接收来自于服务端的信息InputStream is = socket.getInputStream();byte[] b1 = new byte[1024];int len1;while((len1 = is.read(b1)) != -1){String str = new String(b1,0,len1);System.out.print(str);}//4.关闭相应的流和Socket对象is.close();os.close();fis.close();socket.close();}@Testpublic void server() throws Exception{//1.创建一个ServerSocket的对象ServerSocket ss = new ServerSocket(9898);//2.调用其accept()方法,返回一个Socket的对象Socket s = ss.accept();//3.将从客户端发送来的信息保存到本地InputStream is = s.getInputStream();FileOutputStream fos = new FileOutputStream(new File("3.jpg"));byte[] b = new byte[1024];int len;while((len = is.read(b)) != -1){fos.write(b, 0, len);}System.out.println("收到来自于" + s.getInetAddress().getHostAddress() + "的文件");//4.发送"接收成功"的信息反馈给客户端OutputStream os = s.getOutputStream();os.write("你发送的图片我已接收成功!".getBytes());//5.关闭相应的流和Socket及ServerSocket的对象os.close();fos.close();is.close();s.close();ss.close();}}
UDP的编程: DatagramSocket DatagramPacket
//UDP编程的实现public class TestUDP {// 发送端@Testpublic void send() {DatagramSocket ds = null;try {ds = new DatagramSocket();byte[] b = "你好,我是要发送的数据".getBytes();//创建一个数据报:每一个数据报不能大于64k,都记录着数据信息,发送端的IP、端口号,以及要发送到//的接收端的IP、端口号。DatagramPacket pack = new DatagramPacket(b, 0, b.length,InetAddress.getByName("127.0.0.1"), 9090);ds.send(pack);}catch (IOException e) {// TODO Auto-generated catch blocke.printStackTrace();}finally{if(ds != null){ds.close();}}}// 接收端@Testpublic void rceive() {DatagramSocket ds = null;try {ds = new DatagramSocket(9090);byte[] b = new byte[1024];DatagramPacket pack = new DatagramPacket(b, 0, b.length);ds.receive(pack);String str = new String(pack.getData(), 0, pack.getLength());System.out.println(str);}catch (IOException e) {// TODO Auto-generated catch blocke.printStackTrace();}finally{if(ds != null){ds.close();}}}}
URL的编程:统一资源定位符一个URL的对象,对应着互联网上一个资源。
我们可以通过URL的对象调用其相应的方法,将此资源读取(“下载”)
//URL:统一资源定位符,一个URL的对象,对应着互联网上一个资源。//我们可以通过URL的对象调用其相应的方法,将此资源读取(“下载”)public class TestURL {public static void main(String[] args) throws Exception {//1.创建一个URL的对象URL url = new URL("http://127.0.0.1:8080/examples/HelloWorld.txt?a=b");//File file = new File("文件的路径");/* * public String getProtocol( ) 获取该URL的协议名 public String getHost( ) 获取该URL的主机名 public String getPort( ) 获取该URL的端口号 public String getPath( ) 获取该URL的文件路径 public String getFile( ) 获取该URL的文件名 public String getRef( ) 获取该URL在文件中的相对位置 public String getQuery( ) 获取该URL的查询名 */// System.out.println(url.getProtocol());// System.out.println(url.getHost());// System.out.println(url.getPort());// System.out.println(url.getFile());// System.out.println(url.getRef());// System.out.println(url.getQuery());//如何将服务端的资源读取进来:openStream()InputStream is = url.openStream();byte[] b = new byte[20];int len;while((len = is.read(b)) != -1){String str = new String(b,0,len);System.out.print(str);}is.close();//如果既有数据的输入,又有数据的输出,则考虑使用URLConnectionURLConnection urlConn = url.openConnection();InputStream is1 = urlConn.getInputStream();FileOutputStream fos = new FileOutputStream(new File("abc.txt"));byte[] b1 = new byte[20];int len1;while((len1 = is1.read(b1)) != -1){fos.write(b1, 0, len1);}fos.close();is1.close();}}
小结
- 位于网络中的计算机具有唯一的IP地址,这样不同的主机可以互相区分。
- 客户端-服务器是一种最常见的网络应用程序模型。服务器是一个为其客户端提供某种特定服务的硬件或软件。客户机是一个用户应用程序,用于访问某台服务器提供的服务。端口号是对一个服务的访问场所,它用于区分同一物理计算机上的多个服务。套接字用于连接客户端和服务器,客户端和服务器之间的每个通信会话使用一个不同的套接字。TCP协议用于实现面向连接的会话。
- Java 中有关网络方面的功能都定义在 java.net 程序包中。Java 用 InetAddress 对象表示 IP 地址,该对象里有两个字段:主机名(String) 和 IP 地址(int)。
- Java 中有关网络方面的功能都定义在 java.net 程序包中。Java 用 InetAddress 对象表示 IP 地址,该对象里有两个字段:主机名(String) 和 IP 地址(int)。
- 类 URL 和 URLConnection 提供了最高级网络应用。URL 的网络资源的位置来同一表示 Internet 上各种网络资源。通过URL对象可以创建当前应用程序和 URL 表示的网络资源之间的连接,这样当前程序就可以读取网络资源数据,或者把自己的数据传送到网络上去。


")
")
AxureRP8基础操作")
集成jedis访问redis集群")


还没有评论,来说两句吧...