es集群安装
]官网下载es
https://artifacts.elastic.co/downloads/elasticsearch/elasticsearch-7.12.0-linux-x86_64.tar.gz
集群环境机器准备
| ip | 监听端口 | 主机名 | 系统 | es实例名 | es版本 |
| 10.10.164.1 | 9200/9300 | elsearch | Centos6 | node-1 | 7.12.0 |
| 10.10.164.2 | 9200/9300 | elsearch | Centos6 | node-2 | 7.12.0 |
| 10.10.164.3 | 9200/9300 | elsearch | Centos6 | node-3 | 7.12.0 |
每一台服务器都需要操作。
在/opt下创建es 把下载好后把安装包放入cd /opt#创建es目录mkdir escd es#下载安装包wget https://artifacts.elastic.co/downloads/elasticsearch/elasticsearch-7.12.0-linux-x86_64.tar.gz#解压tar -vxf elasticsearch-7.12.0-linux-x86_64.tar.gz#修改解压后的文件名为 elasticsearch-a,(为了方便区分根据节点名)mv elasticsearch-7.4.0 elasticsearch-1# 创建数据存储目录mkdir -p /opt/es/elasticsearch-a/data# 创建日志存储目录mkdir -p /opt/es/elasticsearch-a/logs#注:这里为了区分是es的多个节点,#第1台的目录文件夹为 elasticsearch-1#第2台的目录文件夹为 elasticsearch-2#第3台的目录文件夹为 elasticsearch-3
节点node-1配置
进入到es安装目录下的config文件夹中,修改elasticsearch.yml 文件
# ======================== Elasticsearch Configuration =========================## NOTE: Elasticsearch comes with reasonable defaults for most settings.# Before you set out to tweak and tune the configuration, make sure you# understand what are you trying to accomplish and the consequences.## The primary way of configuring a node is via this file. This template lists# the most important settings you may want to configure for a production cluster.## Please consult the documentation for further information on configuration options:# https://www.elastic.co/guide/en/elasticsearch/reference/index.html## ---------------------------------- Cluster -----------------------------------## Use a descriptive name for your cluster:##配置es的集群名称,同一个集群中的多个节点使用相同的标识#如果在同一网段下有多个集群,就可以用这个属性来区分不同的集群。cluster.name: my-cluster## ------------------------------------ Node ------------------------------------## Use a descriptive name for the node:##节点名称node.name: node-1#是不是有资格竞选主节点node.master: true## Add custom attributes to the node:##node.attr.rack: r1## ----------------------------------- Paths ------------------------------------## Path to directory where to store the data (separate multiple locations by comma):##数据存储路径path.data: /opt/es/data## Path to log files:##日志存储路径path.logs: /opt/es/logs## ----------------------------------- Memory -----------------------------------## Lock the memory on startup:##ES默认开启了内存地址锁定,为了避免内存交换提高性能。但是Centos6不支持SecComp功能,启动会报错,所以需要将其设置为false#bootstrap.memory_lock: true## Make sure that the heap size is set to about half the memory available# on the system and that the owner of the process is allowed to use this# limit.## Elasticsearch performs poorly when the system is swapping the memory.## ---------------------------------- Network -----------------------------------## By default Elasticsearch is only accessible on localhost. Set a different# address here to expose this node on the network:##节点所绑定的IP地址,并且该节点会被通知到集群中的其他节点#通过指定相同网段的其他节点会加入该集群中 0.0.0.0任意IP都可以访问elasticsearchnetwork.host: 10.10.164.1bootstrap.system_call_filter: false## By default Elasticsearch listens for HTTP traffic on the first free port it# finds starting at 9200. Set a specific HTTP port here:##作为数据节点node.data: true#对外提供服务的http端口,默认为9200http.port: 9200# 是否支持跨域http.cors.enabled: true# *表示支持所有域名http.cors.allow-origin: "*"#内部节点之间沟通端口transport.tcp.port: 9300#设置是否压缩TCP传输时的数据,默认为falsetransport.tcp.compress: true#network.publish_host:10.10.164.1cluster.routing.allocation.disk.threshold_enabled: false## For more information, consult the network module documentation.## --------------------------------- Discovery ----------------------------------## Pass an initial list of hosts to perform discovery when this node is started:# The default list of hosts is ["127.0.0.1", "[::1]"]##es7.x 之后新增的配置,写入候选主节点的设备地址,在开启服务后可以被选为主节点discovery.seed_hosts: ["10.10.164.1:9300", "10.10.164.2:9300","10.10.164.3:9300"]## Bootstrap the cluster using an initial set of master-eligible nodes:##es7.x 之后新增的配置,初始化一个新的集群时需要此配置来选举mastercluster.initial_master_nodes: ["node-1", "node-2","node-3"]## For more information, consult the discovery and cluster formation module documentation.## ---------------------------------- Various -----------------------------------## Require explicit names when deleting indices:##action.destructive_requires_name: true
节点node-2配置
# ======================== Elasticsearch Configuration =========================## NOTE: Elasticsearch comes with reasonable defaults for most settings.# Before you set out to tweak and tune the configuration, make sure you# understand what are you trying to accomplish and the consequences.## The primary way of configuring a node is via this file. This template lists# the most important settings you may want to configure for a production cluster.## Please consult the documentation for further information on configuration options:# https://www.elastic.co/guide/en/elasticsearch/reference/index.html## ---------------------------------- Cluster -----------------------------------## Use a descriptive name for your cluster:##配置es的集群名称,同一个集群中的多个节点使用相同的标识#如果在同一网段下有多个集群,就可以用这个属性来区分不同的集群。cluster.name: my-cluster## ------------------------------------ Node ------------------------------------## Use a descriptive name for the node:##节点名称node.name: node-2#是不是有资格竞选主节点node.master: true## Add custom attributes to the node:##node.attr.rack: r1## ----------------------------------- Paths ------------------------------------## Path to directory where to store the data (separate multiple locations by comma):##数据存储路径path.data: /opt/es/data## Path to log files:##日志存储路径path.logs: /opt/es/logs## ----------------------------------- Memory -----------------------------------## Lock the memory on startup:##ES默认开启了内存地址锁定,为了避免内存交换提高性能。但是Centos6不支持SecComp功能,启动会报错,所以需要将其设置为false#bootstrap.memory_lock: true## Make sure that the heap size is set to about half the memory available# on the system and that the owner of the process is allowed to use this# limit.## Elasticsearch performs poorly when the system is swapping the memory.## ---------------------------------- Network -----------------------------------## By default Elasticsearch is only accessible on localhost. Set a different# address here to expose this node on the network:##节点所绑定的IP地址,并且该节点会被通知到集群中的其他节点#通过指定相同网段的其他节点会加入该集群中 0.0.0.0任意IP都可以访问elasticsearchnetwork.host: 10.10.164.2bootstrap.system_call_filter: false## By default Elasticsearch listens for HTTP traffic on the first free port it# finds starting at 9200. Set a specific HTTP port here:##作为数据节点node.data: true#对外提供服务的http端口,默认为9200http.port: 9200# 是否支持跨域http.cors.enabled: true# *表示支持所有域名http.cors.allow-origin: "*"#内部节点之间沟通端口transport.tcp.port: 9300#设置是否压缩TCP传输时的数据,默认为falsetransport.tcp.compress: true#network.publish_host:10.10.164.2cluster.routing.allocation.disk.threshold_enabled: false## For more information, consult the network module documentation.## --------------------------------- Discovery ----------------------------------## Pass an initial list of hosts to perform discovery when this node is started:# The default list of hosts is ["127.0.0.1", "[::1]"]##es7.x 之后新增的配置,写入候选主节点的设备地址,在开启服务后可以被选为主节点discovery.seed_hosts: ["10.10.164.1:9300", "10.10.164.2:9300","10.10.164.3:9300"]## Bootstrap the cluster using an initial set of master-eligible nodes:##es7.x 之后新增的配置,初始化一个新的集群时需要此配置来选举mastercluster.initial_master_nodes: ["node-1", "node-2","node-3"]## For more information, consult the discovery and cluster formation module documentation.## ---------------------------------- Various -----------------------------------## Require explicit names when deleting indices:##action.destructive_requires_name: true
节点node-3配置
# ======================== Elasticsearch Configuration =========================## NOTE: Elasticsearch comes with reasonable defaults for most settings.# Before you set out to tweak and tune the configuration, make sure you# understand what are you trying to accomplish and the consequences.## The primary way of configuring a node is via this file. This template lists# the most important settings you may want to configure for a production cluster.## Please consult the documentation for further information on configuration options:# https://www.elastic.co/guide/en/elasticsearch/reference/index.html## ---------------------------------- Cluster -----------------------------------## Use a descriptive name for your cluster:##配置es的集群名称,同一个集群中的多个节点使用相同的标识#如果在同一网段下有多个集群,就可以用这个属性来区分不同的集群。cluster.name: my-cluster## ------------------------------------ Node ------------------------------------## Use a descriptive name for the node:##节点名称node.name: node-3#是不是有资格竞选主节点node.master: true## Add custom attributes to the node:##node.attr.rack: r1## ----------------------------------- Paths ------------------------------------## Path to directory where to store the data (separate multiple locations by comma):##数据存储路径path.data: /opt/es/data## Path to log files:##日志存储路径path.logs: /opt/es/logs## ----------------------------------- Memory -----------------------------------## Lock the memory on startup:##ES默认开启了内存地址锁定,为了避免内存交换提高性能。但是Centos6不支持SecComp功能,启动会报错,所以需要将其设置为false#bootstrap.memory_lock: true## Make sure that the heap size is set to about half the memory available# on the system and that the owner of the process is allowed to use this# limit.## Elasticsearch performs poorly when the system is swapping the memory.## ---------------------------------- Network -----------------------------------## By default Elasticsearch is only accessible on localhost. Set a different# address here to expose this node on the network:##节点所绑定的IP地址,并且该节点会被通知到集群中的其他节点#通过指定相同网段的其他节点会加入该集群中 0.0.0.0任意IP都可以访问elasticsearchnetwork.host: 10.10.164.3bootstrap.system_call_filter: false## By default Elasticsearch listens for HTTP traffic on the first free port it# finds starting at 9200. Set a specific HTTP port here:##作为数据节点node.data: true#对外提供服务的http端口,默认为9200http.port: 9200# 是否支持跨域http.cors.enabled: true# *表示支持所有域名http.cors.allow-origin: "*"#内部节点之间沟通端口transport.tcp.port: 9300#设置是否压缩TCP传输时的数据,默认为falsetransport.tcp.compress: true#network.publish_host:10.10.164.3cluster.routing.allocation.disk.threshold_enabled: false## For more information, consult the network module documentation.## --------------------------------- Discovery ----------------------------------## Pass an initial list of hosts to perform discovery when this node is started:# The default list of hosts is ["127.0.0.1", "[::1]"]##es7.x 之后新增的配置,写入候选主节点的设备地址,在开启服务后可以被选为主节点discovery.seed_hosts: ["10.10.164.1:9300", "10.10.164.2:9300","10.10.164.3:9300"]## Bootstrap the cluster using an initial set of master-eligible nodes:##es7.x 之后新增的配置,初始化一个新的集群时需要此配置来选举mastercluster.initial_master_nodes: ["node-1", "node-2","node-3"]## For more information, consult the discovery and cluster formation module documentation.## ---------------------------------- Various -----------------------------------## Require explicit names when deleting indices:##action.destructive_requires_name: true
启动用户与赋权
groupadd elsearchuseradd elsearch -g elsearch -p elasticsearch #useradd [user name] -g [group name] -p [password]chown -R elsearch:elsearch elasticsearch #chown -R [user name:group name] 该用户所分配有权限的目录su elsearch #切换账户cd elasticsearch/bin #进入你的elasticsearch目录下的bin目录./elasticsearchElasticSearch后台启动命令./elasticsearch -d查看后台命令是否启动成功ps aux|grep elasticsearch
同启动1节点一致,分别再次启动 2节点、3节点
查看集群状态
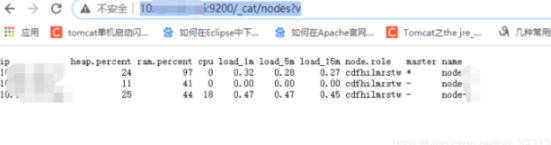
查看集群节点
http://IP:9200/_cat/nodes?v
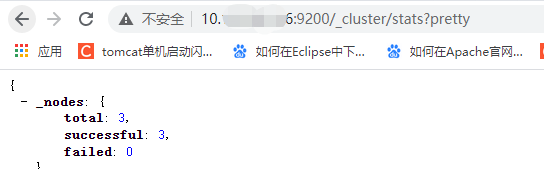
查看集群状态
http://IP:9201/_cluster/stats?pretty
安装遇到的问题
https://blog.csdn.net/qq_39313596/article/details/107513482?ops_request_misc=%257B%2522request%255Fid%2522%253A%2522161768618216780255218764%2522%252C%2522scm%2522%253A%252220140713.130102334..%2522%257D&request_id=161768618216780255218764&biz_id=0&utm_medium=distribute.pc_search_result.none-task-blog-2~all~baidu_landing_v2~default-1-107513482.first_rank_v2_pc_rank_v29&utm_term=es+hlvy
JVM设置官网
https://www.elastic.co/guide/en/elasticsearch/reference/current/jvm-options.html


还没有评论,来说两句吧...