JAVA项目:Java实现飞扬的小鸟(Flappy Bird)
飞扬的小鸟(Flappy Bird)
需求描述
游戏加载完毕点击界面即可开始游戏。
鼠标点击控制小鸟飞行,或者通过键盘控制小鸟的前后上下也可以,不要撞到管道哦!
控制好小鸟越过障碍飞得更远,获得更高的积分。
使用的技术点
- 变量
- 分支语句
- 循环语句
- 面向对象
- 异常处理
- Random随机数
- StringBuffer字符串操作
- IO操作
- 多线程
- swing组件
- 。。。。
需求分析
代码实现
1、实现界面背景
step1:首先新建一个class表示背景类BackGround。我们要在该类中,加载背景图片。
创建一个包pics,里面先存放背景图:bg.png。
先定义一个常量类Constant,专门用于存储程序中的常量。
代码实现:
package com.ruby.demo;/*** 常量类* @author ruby**/public class Constant {// 图片路径public static String PATH_PIC = "/pics/";// 背景图片路径public static String PATH_BACKGROUND = PATH_PIC + "bg.png";}
然后创建BackGround类:
代码实现:
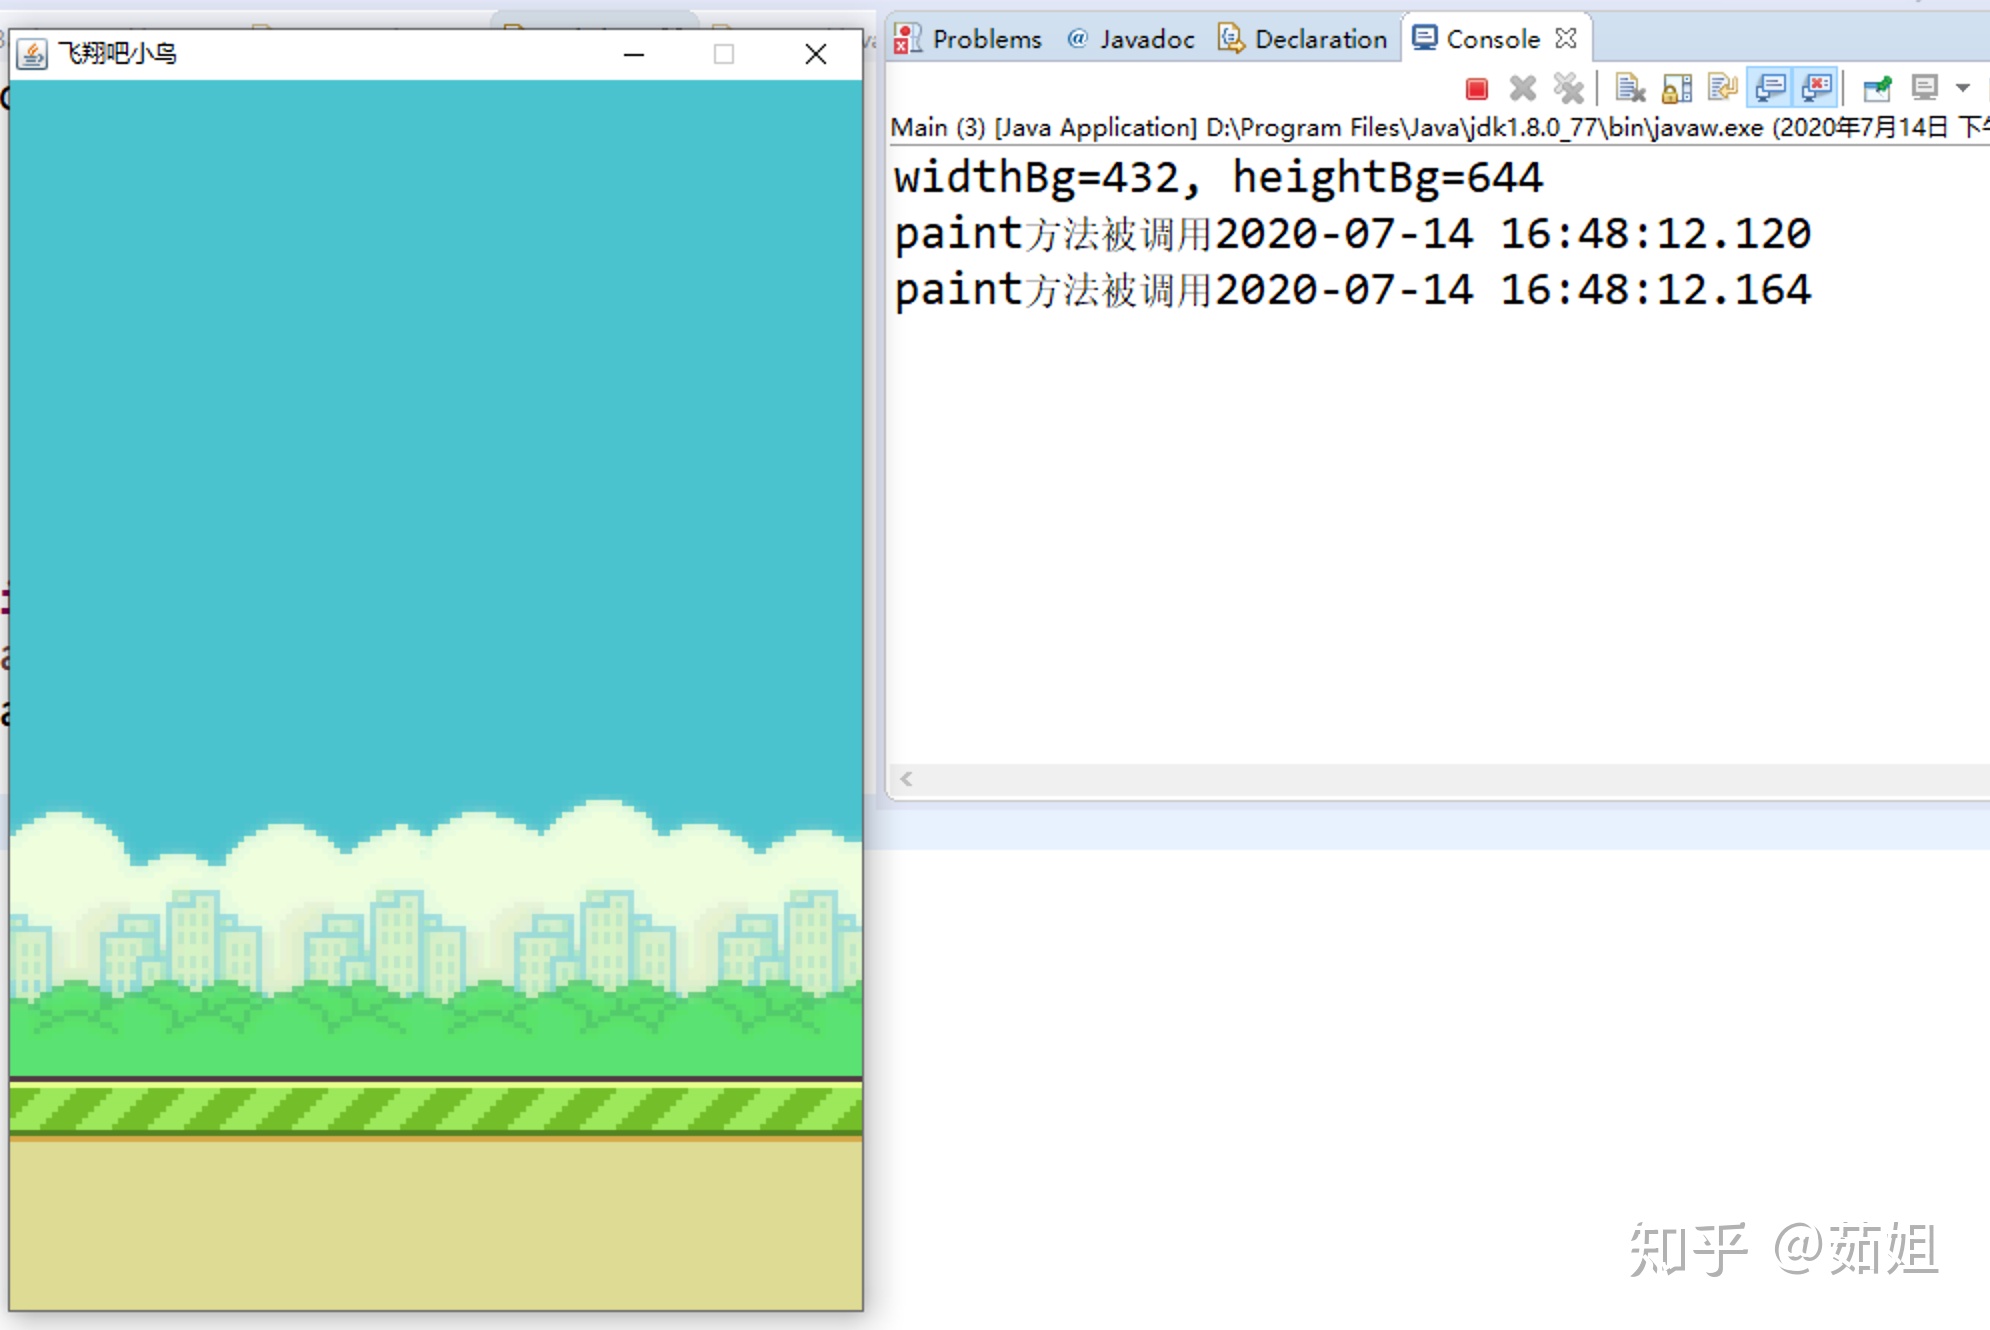
package com.ruby.demo;import java.awt.image.BufferedImage;import java.io.IOException;import javax.imageio.ImageIO;/*** step1:背景类:单例模式** @author ruby**/public class BackGround {public BufferedImage img = null;// 背景图片public int width = 0;// 背景的宽度public int height = 0;// 背景的高度private static BackGround instance = null;private BackGround() {try {// ImageIO用于加载图片资源// this.getClass().getResource根据当前路径加载图片img = ImageIO.read(this.getClass().getResource(Constant.PATH_BACKGROUND));// 获取背景图片长度和高度width = img.getWidth();// 获取图片的宽度height = img.getHeight();// 获取图片的宽度System.out.println("widthBg=" + width + ", heightBg=" + height);} catch (IOException e) {e.printStackTrace();}}// 实现线程安全的懒汉式public static BackGround getInstance() {if (instance == null) {instance = new BackGround();}return instance;}}
代码实现:
package com.ruby.demo;import java.awt.image.BufferedImage;import java.io.IOException;import javax.imageio.ImageIO;/*** step1:背景类:单例模式** @author ruby**/public class BackGround {public BufferedImage img = null;// 背景图片public int width = 0;// 背景的宽度public int height = 0;// 背景的高度private static BackGround instance = null;private BackGround() {try {// ImageIO用于加载图片资源// this.getClass().getResource根据当前路径加载图片img = ImageIO.read(this.getClass().getResource(Constant.PATH_BACKGROUND));// 获取背景图片长度和高度width = img.getWidth();// 获取图片的宽度height = img.getHeight();// 获取图片的宽度System.out.println("widthBg=" + width + ", heightBg=" + height);} catch (IOException e) {e.printStackTrace();}}// 实现线程安全的懒汉式public static BackGround getInstance() {if (instance == null) {instance = new BackGround();}return instance;}}
说明:
- 整个项目只有这一个背景,所以可以设计为单例模式。
- 通过getResource()方法加载图片资源。
step2:然后创建一个面板类,上面用于实现背景,小鸟等。GamePanel
这里主要重写paint()方法,将背景图片,显示到面板上。
代码实现:
package com.ruby.demo;import java.awt.Graphics;import java.awt.Image;import java.awt.event.MouseAdapter;import java.awt.event.MouseEvent;import java.io.IOException;import java.text.SimpleDateFormat;import java.util.Date;import javax.imageio.ImageIO;import javax.swing.JPanel;/*** step2:自定义JPanel类的子类** @author ruby**/public class GamePanel extends JPanel {private BackGround bg = null;// 声明背景对象/** 构造函数*/public GamePanel() {// 单例模式声明背景对象和地面对象bg = BackGround.getInstance();}/*** 当前面板中绘制组件(加载图片等)** paint方法会在初始化以及最小和最大化时自动调用该方法(即窗口发生变化时,jvm都会自动调用该方法用于绘制面板)*/@Overridepublic void paint(Graphics g) {super.paint(g);System.out.println("paint方法被调用" + getCurrentTime());// Graphics对象绘制背景图案g.drawImage(bg.img, 0, 0, null);}// 获取当前时间public String getCurrentTime() {Date day = new Date();SimpleDateFormat df = new SimpleDateFormat("yyyy-MM-dd HH:mm:ss.SSS");return df.format(day);}}
step3:创建一个窗体类GameFrame,里面添加刚刚创建的GamePanel对象。
但是首先要在Constant常量类中,设置一些常量:
代码:
// 界面参数public static String GAME_TITLE = "飞翔吧小鸟";public static int WINDOW_WIDTH = 432;public static int WINDOW_HEIGHT = 644;
代码实现:
package com.ruby.demo;import javax.swing.JFrame;/*** step3:窗体* @author ruby**/public class GameFrame extends JFrame {// 初始化窗体public void initFrame() {// 设置窗口标题setTitle(Constant.GAME_TITLE);// 设置窗口大小setSize(Constant.WINDOW_WIDTH, Constant.WINDOW_HEIGHT);// 添加PanelGamePanel panel = new GamePanel();add(panel);// 设置窗口坐标setLocationRelativeTo(null);// 设置窗口可见setVisible(true);// 设置窗口大小不可调整setResizable(false);// 监听窗口关闭,程序结束setDefaultCloseOperation(JFrame.EXIT_ON_CLOSE);}}
step4:创建Main类,表示程序的入口:
代码实现:
package com.ruby.demo;/*** 程序的入口* @author ruby**/public class Main {public static void main(String[] args) {GameFrame frame = new GameFrame();frame.initFrame();}}
运行效果:
2、实现地面移动
思路:
首先得先在Constant常量类中,添加地面的图片路径,并且将地面图片拷贝到pics资源目录下。
// 地面图片路径public static String PATH_GROUND = PATH_PIC + "ground.png";
然后创建Ground类:
然后创建Ground类:
package com.ruby.demo;import java.awt.image.BufferedImage;import java.io.IOException;import javax.imageio.ImageIO;/*** step1:地面类** @author ruby**/public class Ground {public BufferedImage img = null;// 地面图片public int x, y;// 地面绘制的起始坐标public int width = 0;// 地面的宽度public int height = 0;// 地面的高度private static Ground instance = null;private Ground() {try {// 单例模式BackGround bg = BackGround.getInstance();// ImageIO用于加载图片资源// this.getClass().getResource根据当前路径加载图片img = ImageIO.read(this.getClass().getResource(Constant.PATH_GROUND));// 获取地面图片的长度和高度width = img.getWidth();// 获取图片的宽度height = img.getHeight();// 获取图片的宽度x = 0;y = bg.height - height;// 背景高度与地面图片高度的差值就是地面图片的起始Y坐标System.out.println("widthGround=" + width + ", heightGround=" + height);System.out.println("x=" + x + ", y=" + y);} catch (IOException e) {e.printStackTrace();}}// 实现懒汉式public static Ground getInstance() {if (instance == null) {instance = new Ground();}return instance;}}
说明:在该类中要计算出地面的坐标点x和y。
x为0即可,而y的值为背景图片的高度减去地面图片的高度。
然后添加一个地面移动的方法:
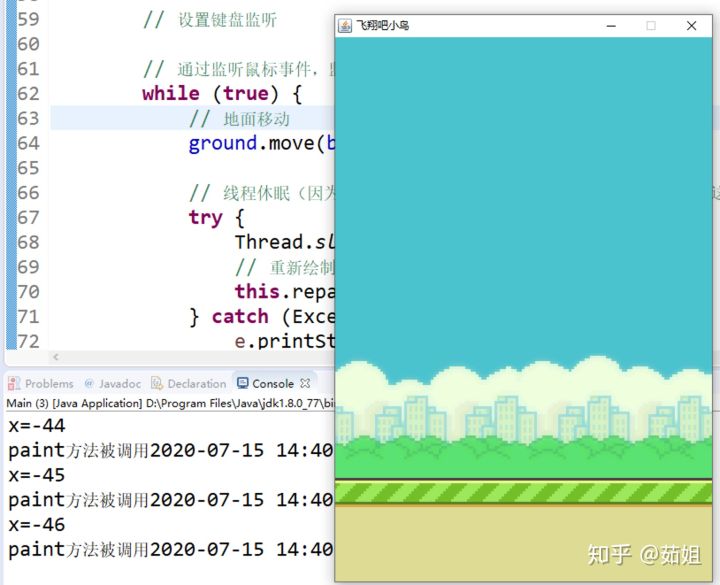
// 地面移动public void move(BackGround bg) {x--;if (x == bg.width +9 - width) {// 9为修正值,根据地面移动效果调整该数值,保证图片移动自然流畅。是地面图片中条纹间距的一半数值。x = 0;}System.out.println("x=" + x);}
所谓的运动地面,就是就是修改x的值,地面向左侧移动,所以x—。
然后要修改GamePanel中的paint()方法,绘制地面:
@Overridepublic void paint(Graphics g) {super.paint(g);System.out.println("paint方法被调用" + getCurrentTime());// Graphics对象绘制背景图案g.drawImage(bg.img, 0, 0, null);// 绘制地面g.drawImage(ground.img, ground.x, ground.y, null);}
然后在GamePanel类中添加一个新增的方法action(),表示游戏的动作,我们需要设置一个死循环,来让地面不停的移动。
多久移动一次呢,我们可以设置一个速度,其实就表示游戏的速度,可以初始化一个常量,每当过一关,游戏的速度可以适当的增加。
现在定义一个常量:
public static int MOVE_SPEED = 40;// 地面及柱子移动初始速度。当积分累加,速度会递增
在GamePanel类中添加一个变量speed,表示速度:
private int speed = 0;// 柱子和地面的移动速度
修改GamePanel()构造方法:
// 初始化速度speed = Constant.MOVE_SPEED;
然后添加一个action()方法,
public void action() {// 设置鼠标监听// 设置键盘监听// 通过监听鼠标事件,监听到state的变化,无限循环,不断切换状态while (true) {// 地面移动ground.move(bg);// 线程休眠(因为是无限循环,下一次循环开始需要一段休息时间,这样才能让程序有缓冲的执行时间)try {Thread.sleep(1000 / speed);// 调节游戏速度// 重新绘制(重新调用面板paint方法)this.repaint();} catch (Exception e) {e.printStackTrace();}}}
为了不让地面移动太快,频繁的绘制界面,我们需要让程序睡眠一下,这个睡眠的时间,其实表示游戏的速度,就是地面和柱子移动的速度。
然后在GameFrame的initFrame()方法中,调用action()方法:
// 面板运行panel.action();
运行效果:
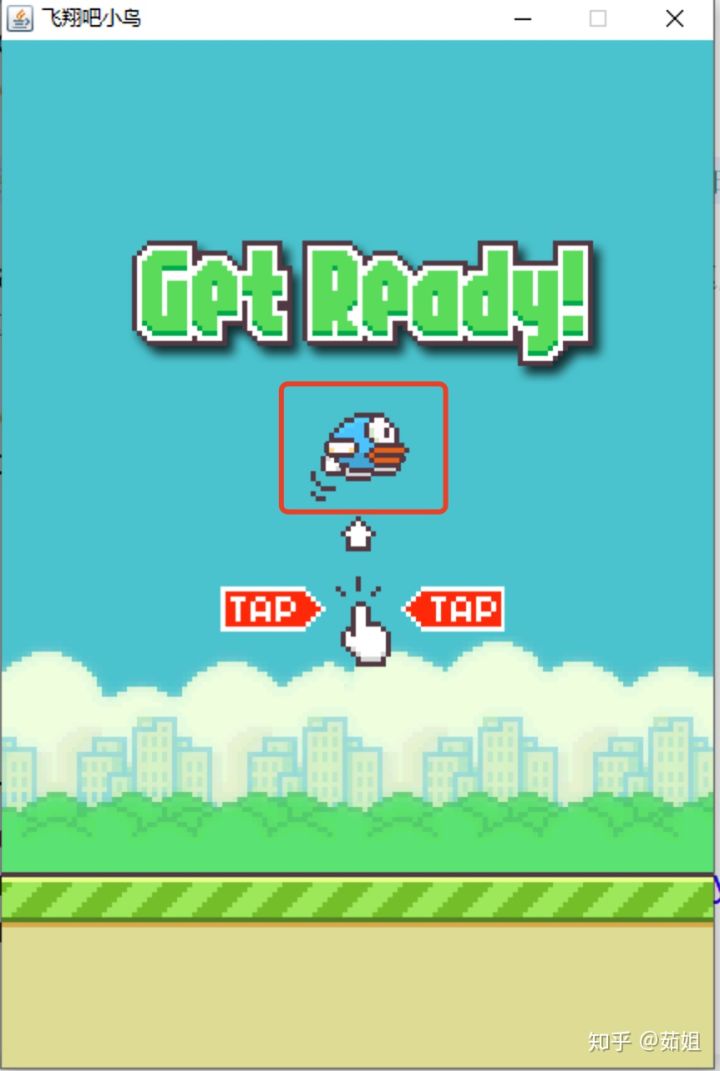
3、显示开始和结束
思路:整个游戏分为3个状态:游戏开始前,开始玩,游戏结束。定义一个变量state,0表示未开始,1表示玩ing,2表示game over,游戏结束。
当游戏未开始状态,显示开始图片。
点击开始游戏后,可以玩,当小鸟撞到地面或者天空或者柱子,游戏结束。
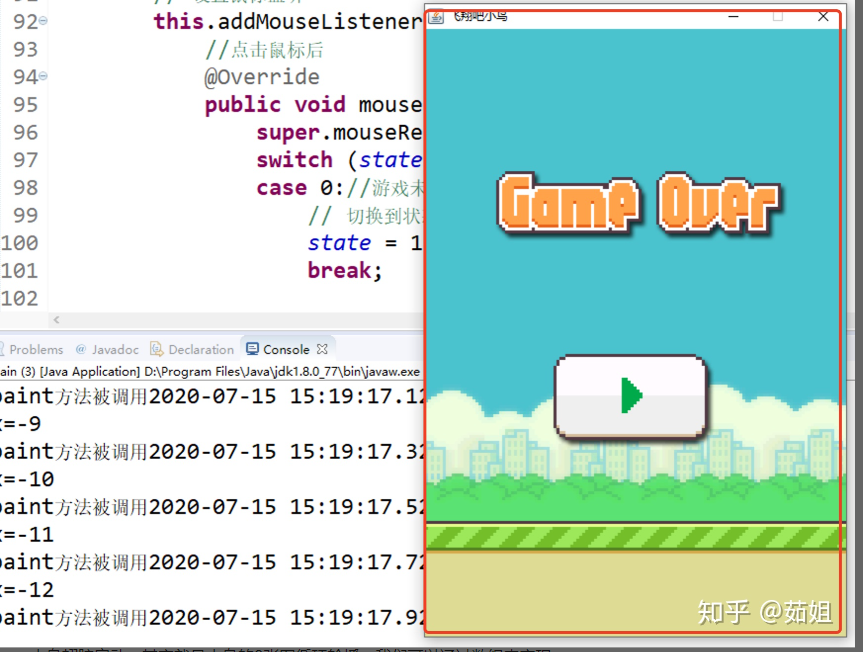
游戏结束时,显示结束图片。
在GamePanel类中,添加一个变量state
private static int state = 0;// 游戏状态,0表示游戏未开始,1表示游戏正在进行,2表示游戏结束
然后在构造方法中,初始化state的状态,以及加载开始和结束的图片:
/** 构造函数*/public GamePanel() {// 初始化数据// 单例模式声明背景对象和地面对象bg = BackGround.getInstance();ground = Ground.getInstance();// state = 0表示游戏未开始state = 0;try {// 加载开始和结束图片imgStart = ImageIO.read(this.getClass().getResource(Constant.PATH_START));imgOver = ImageIO.read(this.getClass().getResource(Constant.PATH_GAMEOVER));} catch (IOException e) {e.printStackTrace();}}
同时将两张图片,添加到pics目录下,并且在Constant类中,添加常量值:
public static String PATH_START = PATH_PIC + "start.png";public static String PATH_GAMEOVER = PATH_PIC + "gameover.png";
修改绘图的方法paint(),先绘制背景,然后根据状态不同,绘制不同的图案,最后绘制地面:
@Overridepublic void paint(Graphics g) {super.paint(g);System.out.println("paint方法被调用" + getCurrentTime());// Graphics对象绘制背景图案g.drawImage(bg.img, 0, 0, null);// 根据状态,绘制不同的图案if (state == 0) {//游戏未开始// 游戏未开始时,绘制开始图案及小鸟g.drawImage(imgStart, 0, 0, null);} else if (state == 1) {// 游戏开始后} else if (state == 2) {// 游戏结束// 游戏结束时,绘制结束图案g.drawImage(imgOver, 0, 0, null);}// 绘制地面g.drawImage(ground.img, ground.x, ground.y, null);}
修改action()方法,添加鼠标事件:
public void action() {// 设置鼠标监听this.addMouseListener(new MouseAdapter() {//点击鼠标后@Overridepublic void mouseReleased(MouseEvent e) {super.mouseReleased(e);switch (state) {case 0://游戏未开始// 切换到状态1时的数据state = 1;break;case 1://开始游戏state = 2;//...break;case 2://游戏结束//游戏结束后,更改状态为0,可以继续下一次游戏state = 0;break;default:break;}}});// 设置键盘监听//....}
运行效果:
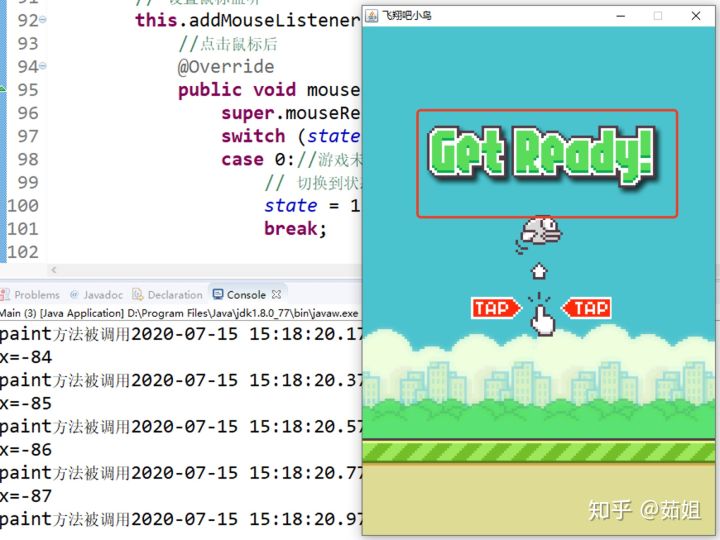
点击一下,开始游戏,再点一下结束游戏,效果如图:
开始游戏的时候,小鸟是灰色的,我们希望小鸟能一直扇动翅膀。
小鸟翅膀扇动,其实就是小鸟的8张图循环轮播。我们可以通过数组来实现。
现在Constant类中定义小鸟的图片数量,以及小鸟的初始位置:
public static int BIRD_PIC_COUNT = 8;// 小鸟皮肤个数public static int BIRD_POSITION_X = 190;// 小鸟初始化坐标public static int BIRD_POSITION_Y = 220;
然后创建一个小鸟类Bird:
package com.ruby.demo;import java.awt.image.BufferedImage;import java.io.IOException;import javax.imageio.ImageIO;/*** 小鸟类** @author ruby**/public class Bird {public BufferedImage img = null;// 小鸟图片public BufferedImage imgs[] = new BufferedImage[Constant.BIRD_PIC_COUNT];// 数组,存储所有小鸟图案public static int index = 0;// 当前皮肤的序号public int x, y;// 初始坐标public int width = 0;// 小鸟的宽度public int height = 0;// 小鸟的高度public Bird() {try {for (int i = 0; i < 8; i++) {imgs[i] = ImageIO.read(getClass().getResource(Constant.PATH_PIC + i + ".png"));}img = imgs[0];// 获取小鸟的宽度和高度width = img.getWidth();height = img.getHeight();// 初始化小鸟的坐标位置x = Constant.BIRD_POSITION_X;y = Constant.BIRD_POSITION_Y;} catch (IOException e) {e.printStackTrace();}}}
添加一个小鸟扇动翅膀的方法:
// 小鸟飞翔的图片切换public void fly() {index++;// 小鸟图形切换的频率,index/x,x越大,翅膀切换频率越慢img = imgs[index / 6 % Constant.BIRD_PIC_COUNT];if (index == 6 * Constant.BIRD_PIC_COUNT) {index = 0;}}
然后在GamePanel类中添加小鸟对象,
private Bird bird = null;// 声明小鸟对象
并在构造方法中初始化:
// 声明小鸟对象bird = new Bird();
修改paint()方法,在未开始游戏的时候,就要绘制小鸟了:
// 根据状态,绘制不同的图案if (state == 0) {// 游戏未开始// 游戏未开始时,绘制开始图案及小鸟g.drawImage(imgStart, 0, 0, null);g.drawImage(bird.img, bird.x, bird.y, null);} else if (state == 1) {// 游戏开始后} else if (state == 2) {// 游戏结束// 游戏结束时,绘制结束图案g.drawImage(imgOver, 0, 0, null);}
修改action()方法,在循环中,除了移动地面外,还要让小鸟扇动翅膀:
// 通过监听鼠标事件,监听到state的变化,无限循环,不断切换状态while (true) {// 地面移动ground.move(bg);bird.fly();// 线程休眠(因为是无限循环,下一次循环开始需要一段休息时间,这样才能让程序有缓冲的执行时间)try {Thread.sleep(1000 / speed);// 调节游戏速度// 重新绘制(重新调用面板paint方法)this.repaint();} catch (Exception e) {e.printStackTrace();}}
运行结果:
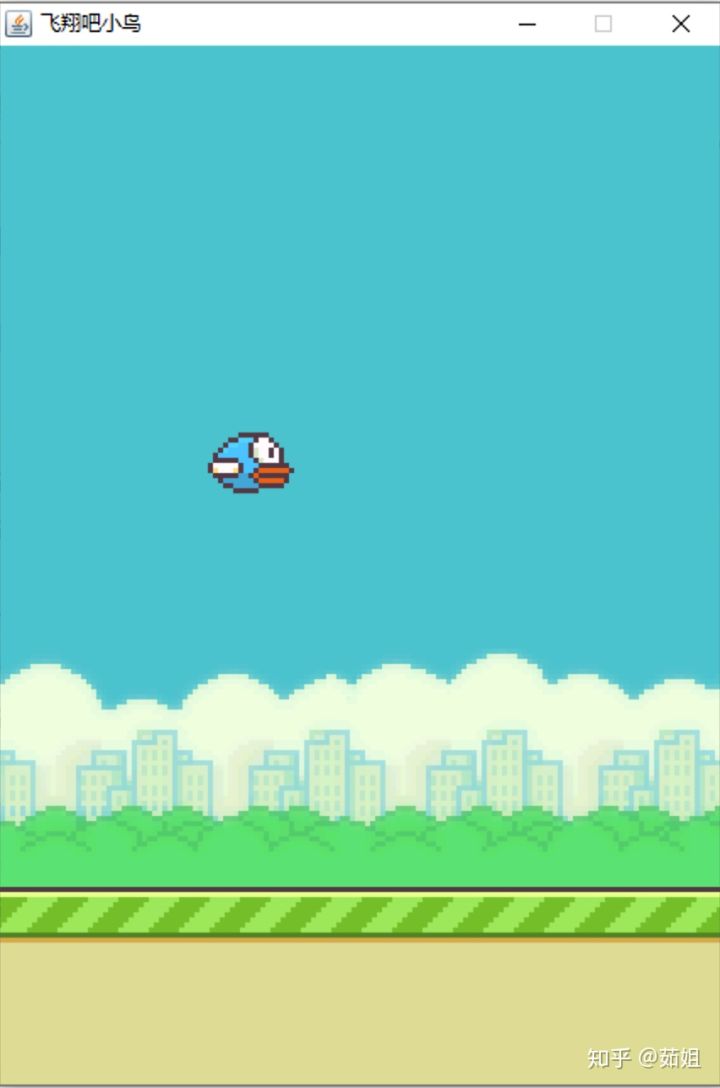
4、游戏开始
游戏开始后,小鸟就要移动了。还要添加上下两根柱子,柱子向左侧移动,通过点击鼠标,让小鸟上下移动,来躲避柱子。
小鸟上下飞动
我们现在实现小鸟的部分:
游戏开始时,小鸟在距离屏幕左侧120左右的位置就可以:
在Constant类中定义,游戏开始时小鸟的位置:
public static int BIRD_FLY_POSITION_X = 120;// 小鸟开始飞翔时初始坐标
首先修改action()中,case 0里,先修改小鸟的位置
public void action() {// 设置鼠标监听this.addMouseListener(new MouseAdapter() {// 点击鼠标后@Overridepublic void mouseReleased(MouseEvent e) {super.mouseReleased(e);switch (state) {case 0:// 游戏未开始// 切换到状态1时的数据state = 1;bird.x = Constant.BIRD_FLY_POSITION_X;// 小鸟飞的初始x坐标break;.....}
然后在paint()方法中,state如果为1,代表游戏开始,应该绘制小鸟和两根柱子,我们先画小鸟:
else if (state == 1) {// 游戏开始后//绘制小鸟和两根柱子g.drawImage(bird.img, bird.x, bird.y, null);}
运行效果:
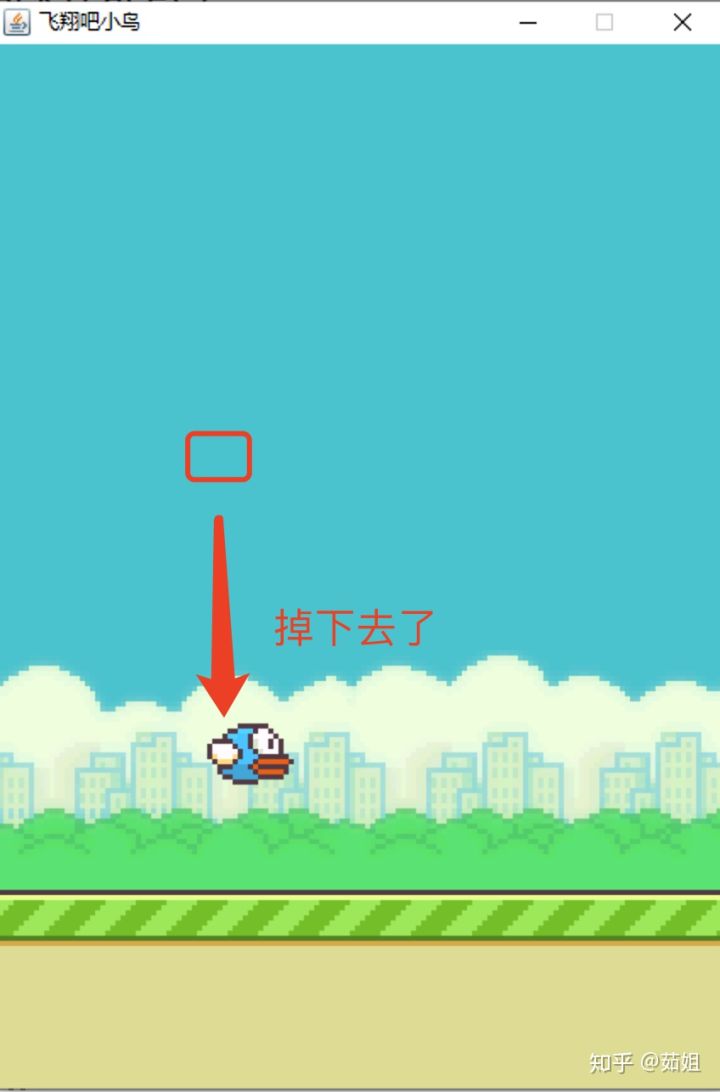
小鸟默认会向下掉,要考虑重力加速度。当点击鼠标的时候,会向上移动。
先在Constant提供常量:
public static double GRAVITATIONAL_ACCELERATION = 9.8;public static double DOWN_TIME = 0.18; // 小鸟自然下降的时长
在小鸟Bird类中,提供一些变量:
public double g = Constant.GRAVITATIONAL_ACCELERATION; // 重力加速度public double v = 0;// 下降速度public double t = Constant.DOWN_TIME;// 下降时间public double h;// 下降的距离
再添加两个方法:down()表示下降
// 小鸟自然下降public void down() {v = v - g * t; // 末速度Vt=Vo-gth = v * t - g * t * t / 2; // 位移h=Vot-gt²/2y = y - (int) h;}
然后修改action()方法:
while (true) {// 地面移动ground.move(bg);bird.fly();if(state == 0){}else if(state == 1){bird.down();//小鸟下降}else if(state == 2){}// 线程休眠(因为是无限循环,下一次循环开始需要一段休息时间,这样才能让程序有缓冲的执行时间)try {Thread.sleep(1000 / speed);// 调节游戏速度// 重新绘制(重新调用面板paint方法)this.repaint();} catch (Exception e) {e.printStackTrace();}}
运行结果:
当点击鼠标时,小鸟会向上飞,每次向上20。先在Constant中添加一个常量:
public static double UP_SPEED = 20;// 上升的速度
在Bird中,再添加一个方法:
// 上升,点鼠标或点键盘向上键public void up() {v = Constant.UP_SPEED;}
修改action(),在鼠标抬起的事件中,如果state为1,那么要调用up()方法,让小鸟上升:
...public void mouseReleased(MouseEvent e) {super.mouseReleased(e);switch (state) {case 0:// 游戏未开始// 切换到状态1时的数据state = 1;bird.x = Constant.BIRD_FLY_POSITION_X;// 小鸟飞的初始x坐标break;case 1:// 开始游戏// 当状态1时,小鸟点击向上移动bird.up();break;...
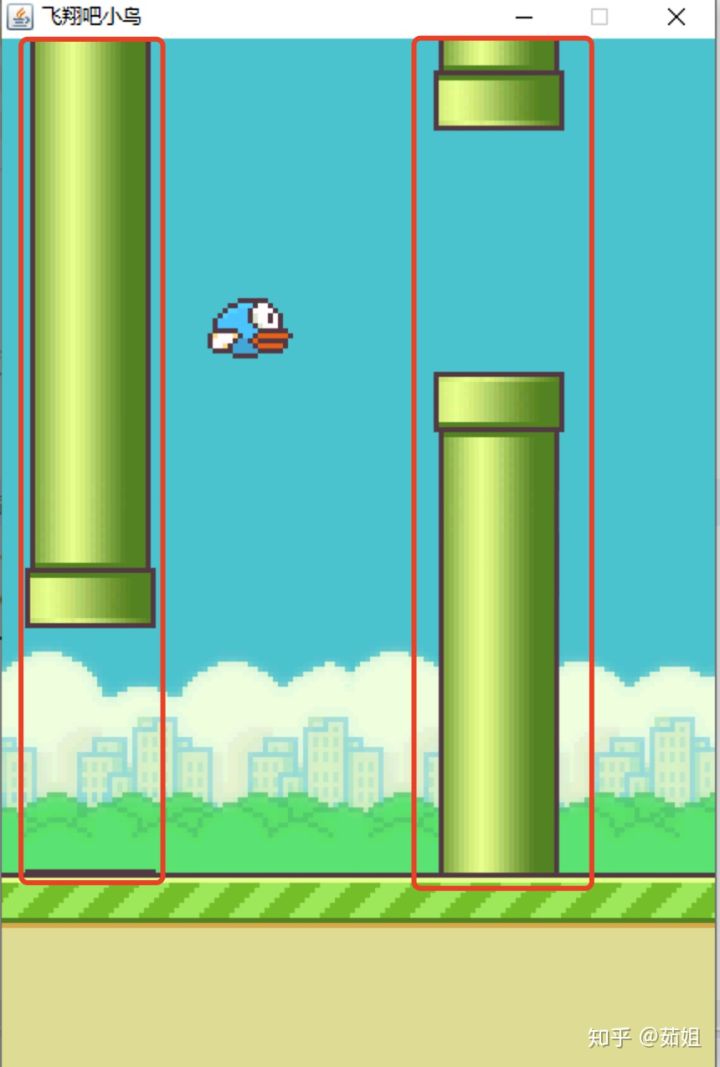
柱子左右移动
首先在pics下放图片资源pillar.png。然后在Constant类中,添加常量:
// 柱子参数public static String PATH_PILLAR = PATH_PIC + "pillar.png";public static int PILLAR_GAP = 144;// 柱子通道距离public static int PILLAR_DISTANCE = 244;// 柱子间距
然后创建柱子类Pillar类:
package com.ruby.demo;import java.awt.image.BufferedImage;import java.io.IOException;import java.util.Random;import javax.imageio.ImageIO;/*** 柱子类 其中构造方法中需要背景对象和地面对象** @author ruby**/public class Pillar {public BufferedImage img;// 图片public int x, y;// 坐标public int width = 0;// 柱子宽度public int height = 0;// 柱子高度Random random = new Random();// 一个生成随机数的对象private int max, min = 0;// 为了保证柱子通道能够完全显示在屏幕上,所以存在柱子在Y坐标的最大值和最小值public Pillar(BackGround bg, Ground ground) {try {img = ImageIO.read(getClass().getResource(Constant.PATH_PILLAR));width = img.getWidth();height = img.getHeight();System.out.println("柱子width=" + width + ",height=" + height);x = bg.width;max = (height - Constant.PILLAR_GAP) / 2;min = (height - Constant.PILLAR_GAP) / 2 - (bg.height - Constant.PILLAR_GAP - ground.height);y = -(min + random.nextInt(max - min));// System.out.println("y=" + y);} catch (IOException e) {e.printStackTrace();}}}
小鸟闯关的柱子,每隔244间距,就要再产生一根柱子。柱子的高度通过随机数来产生,先计算出柱子的高度:柱子图片高度-柱子通道距离114,然后除以2。柱子的最小高度,就是柱子的高度减去背景图高度-地面高度-通道距离。
柱子的y坐标,就因该是柱子的高度和柱子最小高度之间的随机数。
再添加一个移动柱子的方法:
// 柱子移动,游戏一旦开始则柱子移动public void move(BackGround bg) {x--;if (x == -width) {x = bg.width;y = -(min + random.nextInt(max - min));// System.out.println("y=" + y);}}
然后修改GamePanel类,创建2个柱子对象,因为游戏界面中,最多出现2根柱子。然后再构造方法中,实例化两个柱子对象,并设置x坐标,柱子是从游戏界面右侧,移入到游戏界面上,所以第一个柱子的x值为游戏界面的宽度,第二个柱子要再加柱子间距。
// 声明两个柱子,并分别设置柱子的起始X坐标p1 = new Pillar(bg, ground);p1.x = bg.width;p2 = new Pillar(bg, ground);p2.x = bg.width + Constant.PILLAR_DISTANCE;
修改paint()方法,游戏开始后,绘制柱子:
else if (state == 1) {// 游戏开始后// 绘制小鸟和两根柱子g.drawImage(bird.img, bird.x, bird.y, null);g.drawImage(p1.img, p1.x, p1.y, null);g.drawImage(p2.img, p2.x, p2.y, null);}
然后再action()的循环里,调用两个柱子的移动方法:
while (true) {// 地面移动ground.move(bg);bird.fly();if (state == 0) {} else if (state == 1) {// 游戏开始。地面移动、柱子移动、小鸟飞并自然下降bird.down();p1.move(bg);p2.move(bg);} else if (state == 2) {}// 线程休眠(因为是无限循环,下一次循环开始需要一段休息时间,这样才能让程序有缓冲的执行时间)try {Thread.sleep(1000 / speed);// 调节游戏速度// 重新绘制(重新调用面板paint方法)this.repaint();} catch (Exception e) {e.printStackTrace();}}
运行结果:
5、计算得分
然后在Constant类中,添加和得分相关的常量:
// 得分信息的字体大小及坐标public static int FONT_SIZE = 20;public static int SCORE_X = 20;public static int SCORE_Y = 40;
在GamePanel中定义score,表示分数,然后在paint()方法中,绘制分数:
// 绘制文字Font font = new Font(Font.SERIF, Font.ITALIC, Constant.FONT_SIZE);//字体,倾斜,大小g.setFont(font);g.setColor(Color.white);// 这里font和color导包都导java.awtg.drawString("得分:" + score, Constant.SCORE_X, Constant.SCORE_Y);
要想统计分数,得先计算小鸟的各种碰撞,首先在小鸟的类中,添加一个是否碰撞地面的方法,其实就是检测小鸟y的值:
// 碰撞检测// 掉落到地面时public boolean hitGround(BackGround bg, Ground ground) {if (y + height >= (bg.height - ground.height)) {return true;}return false;}
再添加一个检测是否碰撞天空的方法,就是游戏界面的顶部:
// 碰撞到舞台顶部时public boolean hitSky() {if (y <= 0) {return true;}return false;}
再添加一个检测碰撞柱子的方法:
// 碰到柱子时的检测public boolean hitPillar(Pillar p) {// x方向小鸟和柱子碰撞的条件if ((x + width) >= p.x && x <= p.x + p.width) {if (y <= p.y + (p.height - Constant.PILLAR_GAP) / 2|| y >= p.y + (p.height + Constant.PILLAR_GAP) / 2 - height) {return true;}}return false;}
要判断小鸟的横向上,碰撞柱子。
在小鸟类里添加一个方法:
// 碰到柱子时的检测public boolean hitPillar(Pillar p) {// x方向小鸟和柱子碰撞的条件if ((x + width) >= p.x && x <= p.x + p.width) {if (y <= p.y + (p.height - Constant.PILLAR_GAP) / 2|| y >= p.y + (p.height + Constant.PILLAR_GAP) / 2 - height) {return true;}}return false;}
再添加一个积分的方法:
// 增加积分,通过柱子通道后调用该方法public boolean addScore(Pillar p) {// System.out.println("x=" + x + ",p.x=" + p.x);if (x == p.x + p.width) {return true;}return false;}
然后在GamePanel类中修改action()方法:
while (true) {if (state == 0) {// 游戏未开始。地面移动,小鸟展翅ground.move(bg);bird.fly();} else if (state == 1) {// 游戏开始。地面移动、柱子移动、小鸟飞并自然下降ground.move(bg);p1.move(bg);p2.move(bg);bird.fly();bird.down();// 碰到地面、天空、柱子都显示游戏结束。if (bird.hitGround(bg, ground) || bird.hitSky() || bird.hitPillar(p1) || bird.hitPillar(p2)) {state = 2;} else {// 小鸟每通过一个竹子通道,累计积分,并提高柱子和地面移动速度。if (bird.addScore(p1) || bird.addScore(p2)) {score++;// 每通过一个柱子,速度会递增speed += 2;// System.out.println("speed=" + speed);}}}
然后修改鼠标事件的监听:
public void mousePressed(MouseEvent e) {// TODO Auto-generated method stubsuper.mousePressed(e);switch (state) {case 0:// 切换到状态1时的数据state = 1;bird.x = Constant.BIRD_FLY_POSITION_X;// 小鸟飞的初始x坐标musicThread = new MusicThread();musicThread.start();break;case 1:// 当状态1时,小鸟点击向上移动bird.up();break;case 2:// 切换到状态0时的数据musicThread.stopBGM();state = 0;score = 0;// 重置小鸟的位置bird.x = Constant.BIRD_POSITION_X;bird.y = Constant.BIRD_POSITION_Y;bird.v = 0;// 重置柱子的坐标p1.x = bg.width;p2.x = bg.width + Constant.PILLAR_DISTANCE;// System.out.println("p1==" + p1 + ", p2==" + p2);break;default:break;}}
当游戏结束的时候,要初始化小鸟和柱子的数据。
6、添加小鸟的键盘事件
在Constant中添加常量:
public static int DISTANCE_PER_PRESS = 10;// 每点一次鼠标或键盘,移动的位置
然后在小鸟类中,添加键盘的上下左右事件方法:
// 后退,点键盘向左键public void backward() {x -= Constant.DISTANCE_PER_PRESS;}// 前进,点键盘向右键public void foward() {x += Constant.DISTANCE_PER_PRESS;}// 点击键盘下降,点键盘向下键public void pressdown() {y += Constant.DISTANCE_PER_PRESS;}
然后在action()中,添加鼠标事件监听:
// 设置键盘监听事件this.addKeyListener(new KeyAdapter() {@Overridepublic void keyPressed(KeyEvent e) {super.keyPressed(e);switch (e.getKeyCode()) {case KeyEvent.VK_UP:bird.up();break;case KeyEvent.VK_RIGHT:bird.foward();break;case KeyEvent.VK_LEFT:bird.backward();break;case KeyEvent.VK_DOWN:bird.pressdown();break;}}});
注意,最后要在GameFrame中,可以响应键盘事件:
// 让该Frame中的panel聚焦,可以响应键盘事件panel.requestFocus();
7、添加背景音乐
先准备一首背景音乐,然后在src上创建一个音乐的资源目录music,并将音乐文件拷贝进去:
然后倒入音频播放的jar包:
在Constant中添加常量:
//音乐路径public static String PATH_MUSIC = "/music/";public static String PATH_BGM = PATH_MUSIC + "Ari_Pulkkinen-Funky_Theme.mp3";//music/Ari Pulkkinen-Funky Theme.mp3
然后创建一个线程类,播放音乐,再提供一个停止播放的方法:
package com.ruby.demo;import java.io.InputStream;import javazoom.jl.decoder.JavaLayerException;import javazoom.jl.player.Player;// 播放音乐class MusicThread extends Thread {Player player = null;@Overridepublic void run() {// 继承线程类后,重写run方法,播放音乐的代码// 1.加载音频文件得到输入流InputStream inputStream = this.getClass().getResourceAsStream(Constant.PATH_BGM);try {// 2.创建Player对象,播放音乐player = new Player(inputStream);player.play();} catch (JavaLayerException e) {e.printStackTrace();}}public void stopBGM(){if(player != null){player.close();}}}
然后在GamePanel里创建MusicThread对象,用于播放和停止音乐,在action()中修改代码:
this.addMouseListener(new MouseAdapter() {// 点击鼠标后@Overridepublic void mouseReleased(MouseEvent e) {super.mouseReleased(e);switch (state) {case 0:// 游戏未开始// 切换到状态1时的数据state = 1;bird.x = Constant.BIRD_FLY_POSITION_X;// 小鸟飞的初始x坐标musicThread = new MusicThread();musicThread.start();break;case 1:// 开始游戏// 当状态1时,小鸟点击向上移动bird.up();break;case 2:// 游戏结束// 游戏结束后,更改状态为0,可以继续下一次游戏musicThread.stopBGM();state = 0;score = 0;// 重置小鸟的位置bird.x = Constant.BIRD_POSITION_X;bird.y = Constant.BIRD_POSITION_Y;bird.v = 0;// 重置柱子的坐标p1.x = bg.width;p2.x = bg.width + Constant.PILLAR_DISTANCE;break;default:break;}}});
在state为0时,开始播放音乐,当时游戏结束state为2时,停止音乐。


还没有评论,来说两句吧...