OpenCVSharp入门教程 基础篇⑤——GaussianBlur高斯模糊算法
文章目录
- 一、前文
- 二、GaussianBlur高斯模糊算法流程
- 三、界面布局
- 四、功能实现
- 4.1 打开图片
- 4.2 GaussianBlur高斯模糊—源码
- 4.3 GaussianBlur高斯模糊—参数讲解
- 五、运行效果图
一、前文
Gaussian Blur,高斯模糊
减少图像噪声以及降低细节层次
高斯平滑也用于计算机视觉算法中的预先处理阶段,以增强图像在不同比例大小下的图像效果(参见尺度空间表示以及尺度空间实现)。 从数学的角度来看,图像的高斯模糊过程就是图像与正态分布做卷积。由于正态分布又叫作高斯分布,所以这项技术就叫作高斯模糊。
二、GaussianBlur高斯模糊算法流程

其中r是模糊半径,σ是正态分布的标准偏差。
在二维空间中,这个公式生成的曲面的等高线是从中心开始呈正态分布的同心圆。
分布不为零的像素组成的卷积矩阵与原始图像做变换。每个像素的值都是周围相邻像素值的加权平均。
原始像素的值有最大的高斯分布值,所以有最大的权重,相邻像素随着距离原始像素越来越远,其权重也越来越小。
三、界面布局
- 一个
Label - N个
Button - 三个
Picture
四、功能实现
4.1 打开图片
private void openFileBtn_Click(object sender, EventArgs e){OpenFileDialog openfiledialog = new OpenFileDialog();openfiledialog.Filter = "PNG Files (*.png)|*.png|JPG Files (*.jpg)|*.jpg|GIF Files (*.gif)|*.gif";openfiledialog.RestoreDirectory = true;if (openfiledialog.ShowDialog() == DialogResult.OK){Console.WriteLine(openfiledialog.FileName);fileName = openfiledialog.FileName;//Mat src = new Mat("foo.png", LoadMode.Color);Mat src = new Mat(fileName);//Mat src = new Mat(fileName, ImreadModes.Color);var frameBitmap = BitmapConverter.ToBitmap(src);pictureBox1.Image?.Dispose();pictureBox1.Image = frameBitmap;}}
4.2 GaussianBlur高斯模糊—源码
private void GaussianBlurBtn_Click(object sender, EventArgs e){mInput = new Mat(fileName);blur = new Mat(mInput.Rows, mInput.Cols, MatType.CV_8UC4);Size ksize = new OpenCvSharp.Size(5, 5);Point anchor = new Point(3, 3);BorderTypes borderType = BorderTypes.Constant;//Cv2.Blur(mInput, blur, ksize, anchor, borderType); //模糊Cv2.GaussianBlur(mInput, blur, ksize, 0); //高斯模糊srcPictureBox.Image = BitmapConverter.ToBitmap(mInput);grayPictureBox.Image = BitmapConverter.ToBitmap(blur);}
4.3 GaussianBlur高斯模糊—参数讲解
//// 摘要:// Blurs an image using a Gaussian filter.//// 参数:// src:// input image; the image can have any number of channels, which are processed independently,// but the depth should be CV_8U, CV_16U, CV_16S, CV_32F or CV_64F.//// dst:// output image of the same size and type as src.//// ksize:// Gaussian kernel size. ksize.width and ksize.height can differ but they both must// be positive and odd. Or, they can be zero’s and then they are computed from sigma*// .//// sigmaX:// Gaussian kernel standard deviation in X direction.//// sigmaY:// Gaussian kernel standard deviation in Y direction; if sigmaY is zero, it is set// to be equal to sigmaX, if both sigmas are zeros, they are computed from ksize.width// and ksize.height, respectively (see getGaussianKernel() for details); to fully// control the result regardless of possible future modifications of all this semantics,// it is recommended to specify all of ksize, sigmaX, and sigmaY.//// borderType:// pixel extrapolation methodpublic static void GaussianBlur(InputArray src, OutputArray dst, Size ksize, double sigmaX, double sigmaY = 0, BorderTypes borderType = BorderTypes.Reflect101);
ksize,高斯内核大小,ksize.width和ksize.height必须是正奇数,两者可以不相同,值越大越模糊sigmaX,Y轴方向的标准差,值越大越模糊sigmaY,X轴方向的标准差,值越大越模糊
五、运行效果图
- 从左到右
- 第一张是原图
- 第二张是GaussianBlur高斯模糊结果图
Size ksize = new OpenCvSharp.Size(3, 3);
Size ksize = new OpenCvSharp.Size(5, 5);
Size ksize = new OpenCvSharp.Size(15, 15);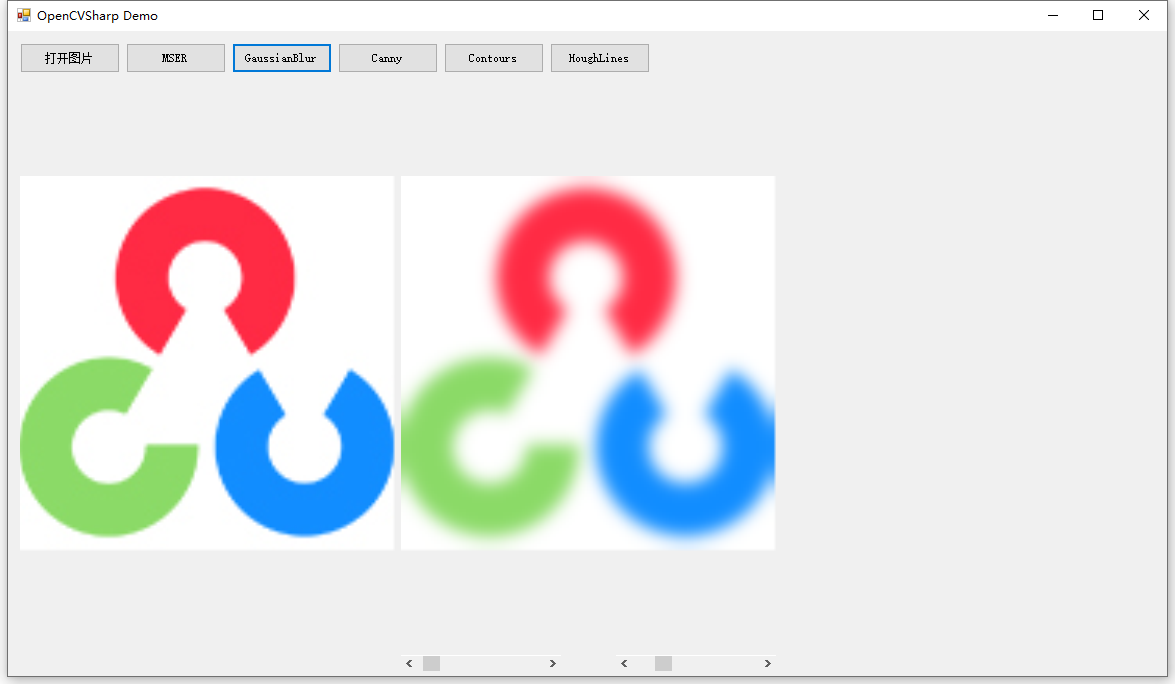
觉得好,就一键三连呗(点赞+收藏+关注)


")

、正则re.sub()")


还没有评论,来说两句吧...