Springboot集成Redis(Jedis+RedisTemplate)
talk is cheap,show you my code
源码:springboot-redis-crud
方法一:使用jedis(Jedis是Redis官方推荐的面向Java的操作Redis的客户端,详细文档可见jedis文档)
0.当然,首先你要先安装redis数据库,不会安装的自行百度(ubuntu:apt-get install redis-server)
1.创建Springboot项目
2.在pom文件中导入jedis和fastjason的依赖(因为redis存储的方式为二进制存储,所以使用fastjson进行序列化)
<!-- https://mvnrepository.com/artifact/redis.clients/jedis --><dependency><groupId>redis.clients</groupId><artifactId>jedis</artifactId><version>2.9.3</version></dependency><!-- https://mvnrepository.com/artifact/com.alibaba/fastjson --><dependency><groupId>com.alibaba</groupId><artifactId>fastjson</artifactId><version>1.2.50</version></dependency>
3.在application.properties中配置redis相关参数
#redisredis.host=127.0.0.1redis.port=6379redis.password=#你自己的数据库密码,默认为空redis.timeout=2000redis.poolMaxTotal=10redis.poolMaxIdle=10reids.poolMaxWait=3redis.db=0
4.创建redis包,在包下新建RedisConfig类
package com.wantao.jedis.redis;import lombok.Data;import org.springframework.boot.context.properties.ConfigurationProperties;import org.springframework.stereotype.Component;/** * Redis的配置类 */@Component@ConfigurationProperties(prefix = "redis")@Datapublic class RedisConfig {private String host;private int port;private String password;private int timeout;private int poolMaxTotal;private int poolMaxIdle;private int poolMaxWait;private int db;}
5.在包下新建RedisPoolFactory类,用来获取JedisPool对象,进而通过jedisPool.getResource()方法获得Jedis对象
package com.wantao.jedis.redis;import org.springframework.beans.factory.annotation.Autowired;import org.springframework.context.annotation.Bean;import org.springframework.stereotype.Component;import redis.clients.jedis.JedisPool;import redis.clients.jedis.JedisPoolConfig;/** *创建RedisPool对象 */@Componentpublic class RedisPoolFactory {@Autowiredprivate RedisConfig redisConfig;@Beanpublic JedisPool getJedisPool(){JedisPoolConfig jedisPoolConfig=new JedisPoolConfig();jedisPoolConfig.setMaxIdle(redisConfig.getPoolMaxIdle());jedisPoolConfig.setMaxWaitMillis(redisConfig.getPoolMaxWait());jedisPoolConfig.setMaxTotal(redisConfig.getPoolMaxTotal());JedisPool jp=new JedisPool(jedisPoolConfig,redisConfig.getHost(),redisConfig.getPort(),redisConfig.getTimeout(),redisConfig.getPassword(),redisConfig.getDb());return jp;}}
6.在包下新建RedisService类,通过Jedis操纵Redis
package com.wantao.jedis.redis;import com.alibaba.fastjson.JSON;import org.springframework.beans.factory.annotation.Autowired;import org.springframework.beans.factory.annotation.Value;import org.springframework.stereotype.Service;import redis.clients.jedis.Jedis;import redis.clients.jedis.JedisPool;/** * 通过Jedis操作Redis */@Servicepublic class RedisService {@AutowiredJedisPool jedisPool;/** * 获取对象 * @param key * @param clazz * @param <T> * @return */public <T> T get(String key, Class<T> clazz) {Jedis jedis = null;try {jedis = jedisPool.getResource();String str = jedis.get(key);T t = stringToBean(str, clazz);return t;}finally {closeJedis(jedis);}}/** * 设置对象 * @param key * @param value * @param <T> * @return */public <T> boolean set(String key,T value){Jedis jedis=null;try {jedis=jedisPool.getResource();String str=beanToString(value);if (str==null||str.length()<=0){return false;}jedis.set(key,str);return true;}finally {closeJedis(jedis);}}/** * 删除 * @param key * @return */public boolean delete(String key){Jedis jedis=null;try{jedis=jedisPool.getResource();long ret=jedis.del(key);return ret>0;}finally {closeJedis(jedis);}}/** * 判断key是否存在 * @param key * @param <T> * @return */public <T> boolean exists(String key){Jedis jedis=null;try{jedis=jedisPool.getResource();return jedis.exists(key);}finally {closeJedis(jedis);}}/** * 增加值 * @param key * @param <T> * @return */public<T> Long incr(String key){Jedis jedis=null;try{jedis=jedisPool.getResource();return jedis.incr(key);}finally {closeJedis(jedis);}}/** * 减少值 * @param key * @param <T> * @return */public<T> Long decr(String key){Jedis jedis=null;try{jedis=jedisPool.getResource();return jedis.decr(key);}finally {closeJedis(jedis);}}/** * 关闭jedis * @param jedis */private void closeJedis(Jedis jedis) { //用完记得要关闭if (jedis != null) {jedis.close();}}/** * 将String转换为其他对象 * * @param str * @param clazz * @param <T> * @return */private <T> T stringToBean(String str, Class<T> clazz) {if (str == null || str.length() <= 0 || clazz == null) {return null;}if (clazz == int.class || clazz == Integer.class) {return (T) Integer.valueOf(str);} else if (clazz == String.class) {return (T) str;} else if (clazz == long.class || clazz == Long.class) {return (T) Long.valueOf(str);} else {return JSON.toJavaObject(JSON.parseObject(str), clazz);}}/** * 将其他对象转换为String * @param value * @param <T> * @return */private <T> String beanToString(T value) {if (value == null) {return null;}Class<?> clazz = value.getClass();if (clazz == int.class || clazz == Integer.class) {return "" + value;} else if (clazz == String.class) {return (String) value;} else if (clazz == long.class || clazz == Long.class) {return "" + value;} else {return JSON.toJSONString(value);}}}
7.建立result包,新建Result类,将返回的json封装,更好的展示
package com.wantao.jedis.result;import lombok.Data;import lombok.NoArgsConstructor;import java.util.HashMap;import java.util.Map;/** * 返回的Json数据封装 */@Data@NoArgsConstructorpublic class Result{private Integer code;private String msg;private Map<String, Object> data = new HashMap<String, Object>();/** * 成功时调用 * 默认状态码:200 */public static Result success() {Result result = new Result();result.setCode(200);result.setMsg("处理成功");return result;}/** * 失败时调用 * 默认状态码:500 */public static Result error() {Result result = new Result();result.setCode(500);result.setMsg("处理失败");return result;}/** * 设置数据 * @param key * @param value * @return */public Result add(String key,Object value){this.data.put(key,value);return this;}}
8.创建controller包,新建JedisController类(这里就只调用get,set方法进行测试)
package com.wantao.jedis.controller;import com.wantao.jedis.redis.RedisService;import com.wantao.jedis.result.Result;import org.springframework.beans.factory.annotation.Autowired;import org.springframework.stereotype.Controller;import org.springframework.web.bind.annotation.GetMapping;import org.springframework.web.bind.annotation.ResponseBody;@Controllerpublic class JedisController {@Autowiredprivate RedisService redisService;@GetMapping("/set")@ResponseBodypublic Result set(){redisService.set("girlfriend","sakura");return Result.success();}@GetMapping("/get")@ResponseBodypublic Result get(){String str=redisService.get("girlfriend",String.class);return Result.success().add("girlfriend",str);}}
结果截图:
set:
get:
查看redis数据库,看是否将数据插入: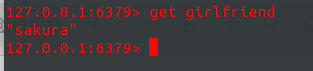
方法二:使用RedisTemplate
(RedisTemplate是SpringDataRedis中对JedisApi的高度封装。
SpringDataRedis相对于Jedis来说可以方便地更换Redis的Java客户端,比Jedis多了自动管理连接池的特性,方便与其他Spring框架进行搭配使用如:SpringCache)
1.创建springboot项目
2.在pom文件中导入spring-boot-starter-data-redis依赖
<dependency><groupId>org.springframework.boot</groupId><artifactId>spring-boot-starter-data-redis</artifactId></dependency>
3.在application.properties中配置redis相关的属性
#redisspring.redis.host=127.0.0.1spring.redis.port=6379spring.redis.password=#你自己的redis密码,默认为空spring.redis.timeout=2000spring.redis.jedis.pool.max-active=10spring.redis.jedis.pool.max-idle=10spring.redis.jedis.pool.max-wait=3spring.redis.database=0
4创建redis包,新建RedisUtil类,用来创建RedisTemplate或者StringRedisTemplate对象(RedisTemplate和StringRedisTemplate的区别)
package com.wantao.redistemplate.redis;import com.fasterxml.jackson.annotation.JsonAutoDetect;import com.fasterxml.jackson.annotation.PropertyAccessor;import com.fasterxml.jackson.databind.ObjectMapper;import org.springframework.context.annotation.Bean;import org.springframework.context.annotation.Configuration;import org.springframework.data.redis.connection.RedisConnectionFactory;import org.springframework.data.redis.core.RedisTemplate;import org.springframework.data.redis.core.StringRedisTemplate;import org.springframework.data.redis.serializer.Jackson2JsonRedisSerializer;import org.springframework.data.redis.serializer.StringRedisSerializer;/** * StringRedisTemplate与RedisTemplate区别点 * 两者的关系是StringRedisTemplate继承RedisTemplate。 * * 两者的数据是不共通的;也就是说StringRedisTemplate只能管理StringRedisTemplate里面的数据,RedisTemplate只能管理RedisTemplate中的数据。 * * 其实他们两者之间的区别主要在于他们使用的序列化类: * RedisTemplate使用的是JdkSerializationRedisSerializer 存入数据会将数据先序列化成字节数组然后在存入Redis数据库。 * * StringRedisTemplate使用的是StringRedisSerializer * * 使用时注意事项: * 当你的redis数据库里面本来存的是字符串数据或者你要存取的数据就是字符串类型数据的时候,那么你就使用StringRedisTemplate即可。 * 但是如果你的数据是复杂的对象类型,而取出的时候又不想做任何的数据转换,直接从Redis里面取出一个对象,那么使用RedisTemplate是更好的选择。 */@Configurationpublic class RedisUtil {//两种reidsTemplate根据场景自由选择@Beanpublic RedisTemplate<Object, Object> redisTemplate(RedisConnectionFactory connectionFactory) {RedisTemplate<Object, Object> template = new RedisTemplate<>();template.setConnectionFactory(connectionFactory);//使用Jackson2JsonRedisSerializer来序列化和反序列化redis的value值(默认使用JDK的序列化方式)Jackson2JsonRedisSerializer serializer = new Jackson2JsonRedisSerializer(Object.class);ObjectMapper mapper = new ObjectMapper();mapper.setVisibility(PropertyAccessor.ALL, JsonAutoDetect.Visibility.ANY);mapper.enableDefaultTyping(ObjectMapper.DefaultTyping.NON_FINAL);serializer.setObjectMapper(mapper);template.setValueSerializer(serializer);//使用StringRedisSerializer来序列化和反序列化redis的key值template.setKeySerializer(new StringRedisSerializer());template.afterPropertiesSet();return template;}@Beanpublic StringRedisTemplate stringRedisTemplate(RedisConnectionFactory factory) {StringRedisTemplate stringRedisTemplate = new StringRedisTemplate();stringRedisTemplate.setConnectionFactory(factory);return stringRedisTemplate;}}
5.建立result包,新建Result类,将返回的json封装,更好的展示
package com.wantao.redistemplate.result;import lombok.Data;import lombok.NoArgsConstructor;import java.util.HashMap;import java.util.Map;/** * 返回的Json数据封装 */@Data@NoArgsConstructorpublic class Result {private Integer code;private String msg;private Map<String, Object> data = new HashMap<String, Object>();/** * 成功时调用 * 默认状态码:200 */public static Result success() {Result result = new Result();result.setCode(200);result.setMsg("处理成功");return result;}/** * 失败时调用 * 默认状态码:500 */public static Result error() {Result result = new Result();result.setCode(500);result.setMsg("处理失败");return result;}/** * 设置数据 * @param key * @param value * @return */public Result add(String key,Object value){this.data.put(key,value);return this;}}
6.创建controller包,新建redisTemplateController,进行get,set方法测试
package com.wantao.redistemplate.controller;import com.wantao.redistemplate.redis.RedisService;import com.wantao.redistemplate.result.Result;import org.springframework.beans.factory.annotation.Autowired;import org.springframework.stereotype.Controller;import org.springframework.web.bind.annotation.GetMapping;import org.springframework.web.bind.annotation.ResponseBody;@Controllerpublic class redisTemplateController {@Autowiredprivate RedisService redisService;@GetMapping("/set")@ResponseBodypublic Result set(){redisService.set("boyfriend","selenium");return Result.success();}@GetMapping("/get")@ResponseBodypublic Result get(){String str=redisService.get("boyfriend");return Result.success().add("boyfriend",str);}}
测试截图:
set: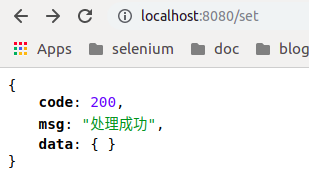
get:
在redis中查看: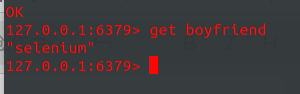
源码:springboot-redis-crud


还没有评论,来说两句吧...