Linux企业实战-Haproxy实现动静分离
1.Haproxy实现动态界面与静态界面分离
注意:此实验是在上一篇博客的基础上做的
(1)配置haproxy服务器
在server1:
[root@server1 html]# vim /etc/haproxy/haproxy.cfg屏蔽掉上一篇博客添加的内容(配置文件尾部内容)修改相关内容如下:62 #---------------------------------------------------------------------63 frontend westos *:8064 acl url_static path_beg -i /images /javascript /stylesheets65 acl url_static path_end -i .jpg .png .gif6667 use_backend static if url_static68 default_backend app6970 #---------------------------------------------------------------------71 # static backend for serving up images, stylesheets and such72 #---------------------------------------------------------------------73 backend static74 balance roundrobin75 server static 172.25.1.3:80 check7677 #---------------------------------------------------------------------78 # round robin balancing between the various backends79 #---------------------------------------------------------------------80 backend app81 #balance roundrobin82 server web1 172.25.1.2:80 check83 server web2 172.25.1.1:8000 check #backup84 # server app3 127.0.0.1:5003 check
(2)配置动态页面服务器server1
下载安装apache,编辑测试页面并修改端口:
[root@server1 ~]# yum install httpd -y[root@server1 ~]# cd /var/www/html/[root@server1 html]# vim index.html[root@server1 html]# cat index.htmlserver1
由于server1同样也是haproxy代理服务器,为了防止端口冲突,将server1的htppd端口改为8000
[root@server1 html]# vim /etc/httpd/conf/httpd.conf修改端口号为800041 #Listen 12.34.56.78:8042 Listen 8000[root@server1 html]# systemctl start httpd.service[root@server1 html]# systemctl restart haproxy.service
到此实现server1与server2的动态界面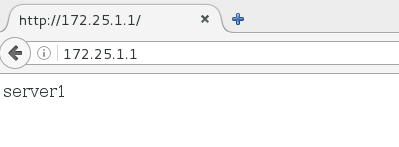
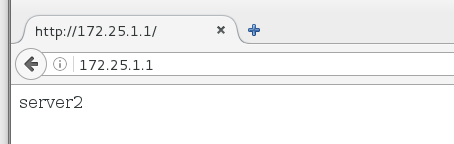
(3)将server1设为backup状态
即server2服务器处于正常状态则只能访问到server2,若server2出现故障,server1顶上
[root@server1 html]# vim /etc/haproxy/haproxy.cfg修改如下80 backend app81 #balance roundrobin82 server web1 172.25.1.2:80 check83 server web2 172.25.1.1:8000 check backup[root@server1 html]# systemctl restart haproxy.service
测试访问172.25.1.1,则刷新页面内容不变,一直是server2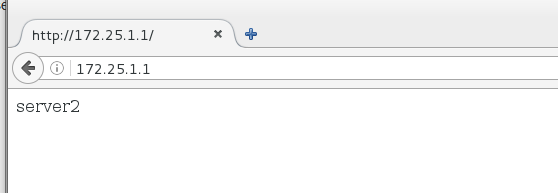
[root@server2 ~]# systemctl stop httpd.service
再次刷新变为server1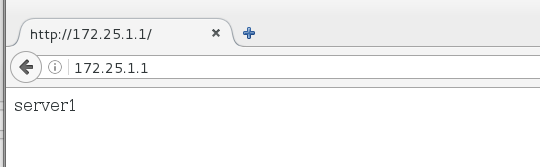
(4) 配置静态页面服务器server3
创建images目录并存储一张图片
[root@server3 ~]# cd /var/www/html/[root@server3 html]# pwd/var/www/html[root@server3 html]# mkdir images[root@server3 images]# ls1.png[root@server3 ~]# systemctl start httpd
测试静态页面:浏览器输入172.25.1.1/images可以看到server3服务器apache下的访问目录


还没有评论,来说两句吧...