Kotlin协程源码分析-8 拦截器
前言
协程拦截器ContinuationInterceptor作用:
- 线程切换
- hook结果(一般用不到)
我们开发Swing或者Android更新UI需要在特定的线程上进行操作,那么这里就涉及线程的切换问题,那么我们看看ContinuationInterceptor在本章中如何使用和源码分析。
简单案例
class MyContinuation() : Continuation<String> {override val context: CoroutineContext = EmptyCoroutineContextoverride fun resumeWith(result: Result<String>) {log("MyContinuation resumeWith 结果 = ${result.getOrNull()}")}}suspend fun demo() = suspendCoroutine<String> {c ->thread(name = "demo1创建的线程") {log("demo 调用resume回调")c.resume("hello")}}suspend fun demo2() = suspendCoroutine<String> {c ->thread(name = "demo2创建的线程") {log("demo2 调用resume回调")c.resume("world")}}fun testInterceptor() {// 假设下面的lambda需要在UI线程运行val suspendLambda = suspend {log("demo 运行前")val resultOne = demo()log("demo 运行后")val resultTwo = demo2()log("demo2 运行后")//拼接结果resultOne + resultTwo}val myContinuation = MyContinuation()thread(name = "一个新的线程") {suspendLambda.startCoroutine(myContinuation)}}fun log(msg: String) {println("[${Thread.currentThread().name}] ${msg}")}
输出:
[一个新的线程] demo 运行前[demo1创建的线程] demo 调用resume回调[demo1创建的线程] demo 运行后[demo2创建的线程] demo2 调用resume回调[demo2创建的线程] demo2 运行后[demo2创建的线程] MyContinuation resumeWith 结果 = helloworld
首先我们先我们先明白上面的输出打印的时所在的线程状态。suspendLambda会在编译时创建一个状态机函数,而这个函数的调用依靠外部调用Continuation.resume函数进行运行,那么这个状态机运行的线程自然会恢复在Continuation.resume调用线程,如果你看完前几章节的内容理解这个并不难。
假设我们期望suspendLambda只运行在Ui线程该如何实现?这里直接使用ContinuationInterceptor即可。
我们这里创建如下对象:
class MyCoroutineDispatch : AbstractCoroutineContextElement(ContinuationInterceptor), ContinuationInterceptor {override fun <T> interceptContinuation(continuation: Continuation<T>): Continuation<T> {log("interceptContinuation")return MyInterceptorContinuation<T>(continuation.context, continuation)}override fun releaseInterceptedContinuation(continuation: Continuation<*>) {super.releaseInterceptedContinuation(continuation)log("releaseInterceptedContinuation " + continuation::class.java.simpleName)}class MyInterceptorContinuation<T>(override val context: CoroutineContext,val continuation: Continuation<T>) : Continuation<T> {override fun resumeWith(result: Result<T>) {//获取Android主线程的Looper,进而切换主线程Handler(Looper.getMainLooper()).post {log("MyInterceptorContinuation resume")continuation.resumeWith(result)}}}}
然后MyContinuation上下文改用MyCoroutineDispatch即可
class MyContinuation() : Continuation<String> {//这里不在使用空上下文override val context: CoroutineContext = MyCoroutineDispatch()override fun resumeWith(result: Result<String>) {log("MyContinuation resumeWith 结果 = ${result.getOrNull()}")}}
最后看下完整的代码
class MyCoroutineDispatch : AbstractCoroutineContextElement(ContinuationInterceptor), ContinuationInterceptor {override fun <T> interceptContinuation(continuation: Continuation<T>): Continuation<T> {log("interceptContinuation")return MyInterceptorContinuation<T>(continuation.context, continuation)}override fun releaseInterceptedContinuation(continuation: Continuation<*>) {super.releaseInterceptedContinuation(continuation)log("releaseInterceptedContinuation " + continuation::class.java.simpleName)}class MyInterceptorContinuation<T>(override val context: CoroutineContext,val continuation: Continuation<T>) : Continuation<T> {override fun resumeWith(result: Result<T>) {//获取Android主线程的Looper,进而切换主线程Handler(Looper.getMainLooper()).post {log("MyInterceptorContinuation resume")continuation.resumeWith(result)}}}}class MyContinuation() : Continuation<String> {//这里不在使用空上下文override val context: CoroutineContext = MyCoroutineDispatch()override fun resumeWith(result: Result<String>) {log("MyContinuation resumeWith 结果 = ${result.getOrNull()}")}}suspend fun demo() = suspendCoroutine<String> {c ->thread(name = "demo1创建的线程") {log("demo 调用resume回调")c.resume("hello")}}suspend fun demo2() = suspendCoroutine<String> {c ->thread(name = "demo2创建的线程") {log("demo2 调用resume回调")c.resume("world")}}fun testInterceptor() {// 假设下面的lambda需要在UI线程运行val suspendLambda = suspend {log("demo 运行前")val resultOne = demo()log("demo 运行后")val resultTwo = demo2()log("demo2 运行后")//拼接结果resultOne + resultTwo}val myContinuation = MyContinuation()thread(name = "一个新的线程") {suspendLambda.startCoroutine(myContinuation)}}fun log(msg: String) {Log.e("TAG","[${Thread.currentThread().name}] ${msg}")}
对应输出:
[一个新的线程] interceptContinuation[main] MyInterceptorContinuation resume[main] demo 运行前[demo1创建的线程] demo 调用resume回调[main] MyInterceptorContinuation resume[main] demo 运行后[demo2创建的线程] demo2 调用resume回调[main] MyInterceptorContinuation resume[main] demo2 运行后[main] releaseInterceptedContinuation MyInterceptorContinuation[main] MyContinuation resumeWith 结果 = helloworld
看到输出后总算看到我们期待的那样suspendLambda输出在main/ui线程
分析源码
MyCoroutineDispatch分析
我们来看MyCoroutineDispatch 类声明
class MyCoroutineDispatch :AbstractCoroutineContextElement(ContinuationInterceptor),ContinuationInterceptor {}
我们继承AbstractCoroutineContextElement类,并实现了ContinuationInterceptor接口,我们分别看看各自的用处。AbstractCoroutineContextElement 的声明:
public abstract class AbstractCoroutineContextElement(public override val key: Key<*>) : Element
可以看到了有实现了Element接口,Element接口是什么?
public interface Element : CoroutineContext {public val key: Key<*>public override operator fun <E : Element> get(key: Key<E>): E? =@Suppress("UNCHECKED_CAST")if (this.key == key) this as E else nullpublic override fun <R> fold(initial: R, operation: (R, Element) -> R): R =operation(initial, this)public override fun minusKey(key: Key<*>): CoroutineContext =if (this.key == key) EmptyCoroutineContext else this}
原来这个Element是前面文章介绍上下文相关的东西,简单来说就是可以放入某个协程上下文中的链表存储的对象。而Element本身也是一个上下文对象。在上下文中可以用get函数或者[]操作符获取对应的存储对象。
所以这个MyCoroutineDispatch可以当做上下文使用,并且也可以放入其他上下文存储,自身的key是ContinuationInterceptor。所以他可以放入MyContinuation中做上下文对象。
再看看ContinuationInterceptor
public interface ContinuationInterceptor : CoroutineContext.Element {companion object Key : CoroutineContext.Key<ContinuationInterceptor>public fun <T> interceptContinuation(continuation: Continuation<T>): Continuation<T>public fun releaseInterceptedContinuation(continuation: Continuation<*>) {/* do nothing by default */}
ContinuationInterceptor是一个拦截规范,interceptContinuation传入一个原始continuation对象,然后返回一个代理的Continuation,然后在代理Continuation中进行现场切换。如果不返回代理continuation,直接返回原始continuation 即可。当状态机结束的时候releaseInterceptedContinuation会被调用,参数是interceptContinuation返回的对象。
获取拦截器流程
回过头再看看下面的代码
fun testInterceptor() {// 假设下面的lambda需要在UI线程运行val suspendLambda = suspend {log("demo 运行前")val resultOne = demo()log("demo 运行后")val resultTwo = demo2()log("demo2 运行后")//拼接结果resultOne + resultTwo}val myContinuation = MyContinuation()thread(name = "一个新的线程") {suspendLambda.startCoroutine(myContinuation)}}
suspendLambda会被转化为SuspendLambda,SuspendLambda有继承ContinuationImpl
那么来看看这个ContinuationImpl类
internal abstract class ContinuationImpl(completion: Continuation<Any?>?,private val _context: CoroutineContext?) : BaseContinuationImpl(completion) {constructor(completion: Continuation<Any?>?) : this(completion, completion?.context)public override val context: CoroutineContextget() = _context!!@Transientprivate var intercepted: Continuation<Any?>? = nullpublic fun intercepted(): Continuation<Any?> =intercepted?: (context[ContinuationInterceptor]?.interceptContinuation(this) ?: this).also {intercepted = it }protected override fun releaseIntercepted() {val intercepted = interceptedif (intercepted != null && intercepted !== this) {context[ContinuationInterceptor]!!.releaseInterceptedContinuation(intercepted)}this.intercepted = CompletedContinuation // just in case}}
我们注意下context获取方式
internal abstract class ContinuationImpl(completion: Continuation<Any?>?,private val _context: CoroutineContext?) : BaseContinuationImpl(completion) {//使用传入completion的上下文作为ContinuationImpl的上下文。//MyContinuation是completion,而MyContinuation的上下文MyCoroutineDispatch//MyCoroutineDispatch就是我们创建的拦截器constructor(completion: Continuation<Any?>?): this(completion, completion?.context)//wepublic override val context: CoroutineContextget() = _context!!}
我们在来看看个函数intercepted
//ContinuationImpl.kt@Transientprivate var intercepted: Continuation<Any?>? = nullpublic fun intercepted(): Continuation<Any?> =//如果拦截器为空那么会做如下三步//1.上下文中获取可以为ContinuationInterceptor的拦截器//2.调用拦截器interceptContinuation函数获取一个代理Continuation对象。所以拦截器的interceptContinuation只会调用一次//3.保存拦截器返回的代理Continuation对象后面方便再次获取就不需要再次调用interceptContinuationintercepted?: (context[ContinuationInterceptor]?.interceptContinuation(this) ?: this).also {//保存获取的拦截器intercepted = it}
我们我们最后看看什么时候第一次调用intercepted的代码。
public fun <T> (suspend () -> T).startCoroutine(completion: Continuation<T>) {createCoroutineUnintercepted(completion).intercepted().resume(Unit)}
启动协程的时候回获取一次拦截器,然后用拦截器返回代理Continuation 的resume
再来看看我们的写的拦截器:
class MyCoroutineDispatch : AbstractCoroutineContextElement(ContinuationInterceptor), ContinuationInterceptor {//intercepted()第一次调用的会调用到这里override fun <T> interceptContinuation(continuation: Continuation<T>): Continuation<T> {log("interceptContinuation")//返回一个代理Continuation对象return MyInterceptorContinuation<T>(continuation.context, continuation)}override fun releaseInterceptedContinuation(continuation: Continuation<*>) {super.releaseInterceptedContinuation(continuation)log("releaseInterceptedContinuation " + continuation::class.java.simpleName)}class MyInterceptorContinuation<T>(override val context: CoroutineContext,val continuation: Continuation<T>) : Continuation<T> {override fun resumeWith(result: Result<T>) {//获取Android主线程的Looper,进而切换主线程Handler(Looper.getMainLooper()).post {log("MyInterceptorContinuation resume")//回调原始的Continuation对象continuation.resumeWith(result)}}}}
当调用启动协程的时候回调用拦截器的代理Continuation对象的resumeWith,然后在Ui线程回调原始Continuation对象。
我们再看看我的挂起函数demo又是怎么切换回ui线程
suspend fun demo() = suspendCoroutine<String> {c ->thread(name = "demo1创建的线程") {log("demo 调用resume回调")c.resume("hello")}}
在正常不启用拦截器的情况会回调suspendLambda在demo1创建的线程线程回调。但是我们发现启用拦截器后被在ui线程回调。而真正做切换的逻辑在suspendCoroutine这个lambda表达式上。
public suspend inline fun <T> suspendCoroutine(crossinline block: (Continuation<T>) -> Unit): T =suspendCoroutineUninterceptedOrReturn {c: Continuation<T> ->val safe = SafeContinuation(c.intercepted())//返回拦截器的代理的Continuation对象block(safe)safe.getOrThrow()}
这里我们便知道答案。demo()函数拿到的Continuation会经过一层拦截器代理对象,一切便自然解释的通了。
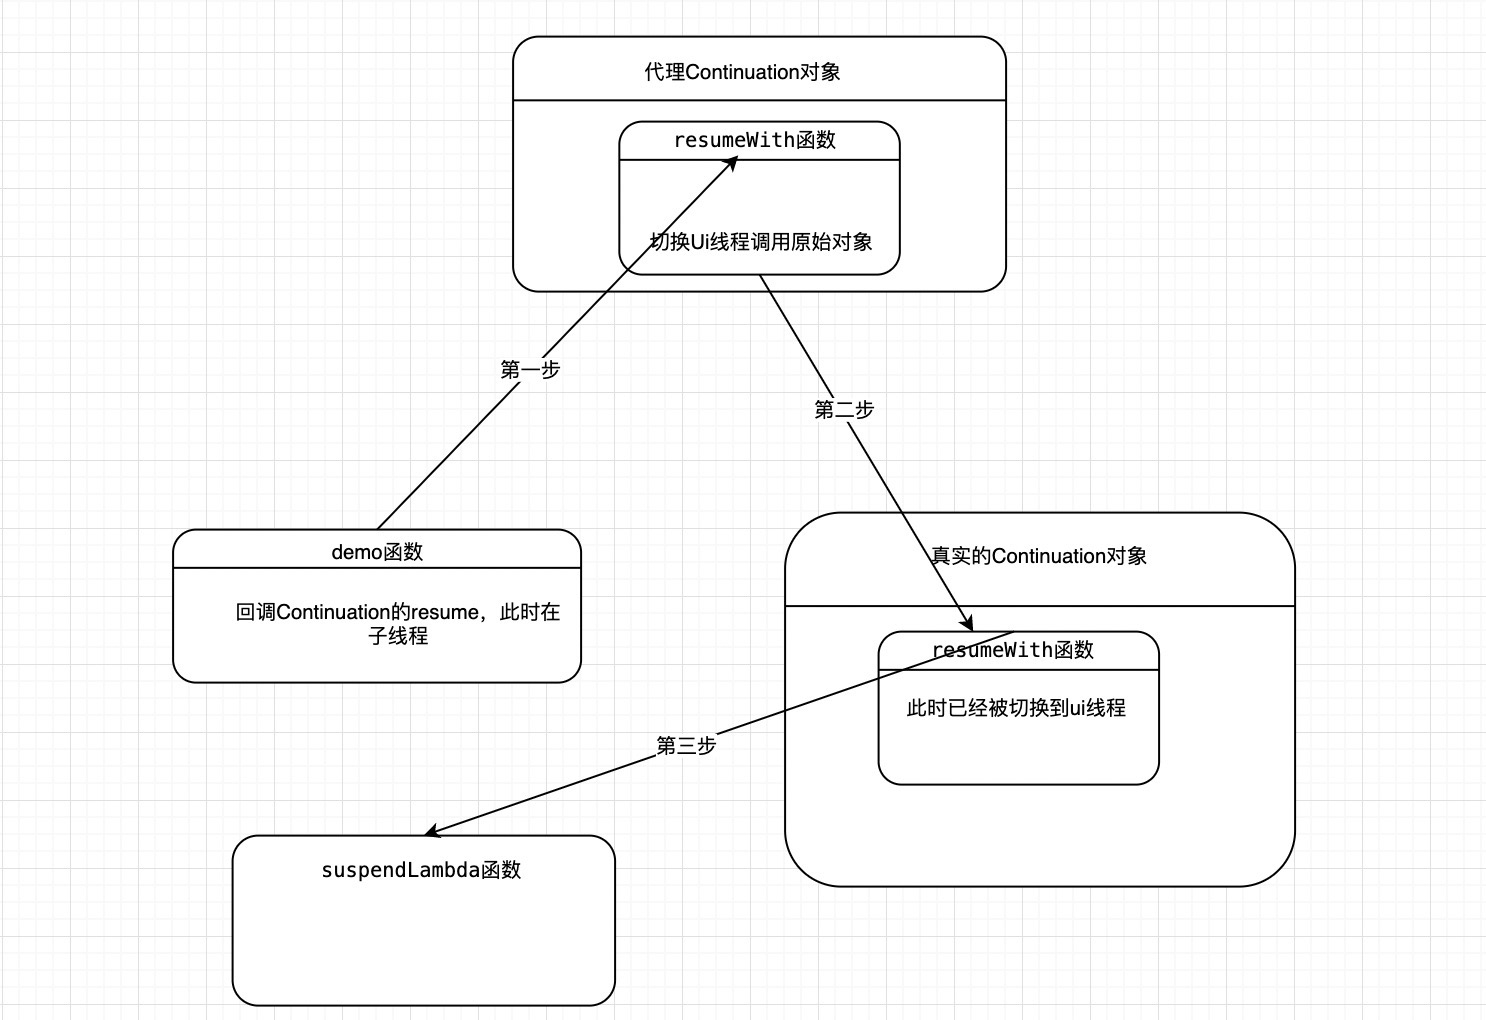
我们画个图来总结下。
总的来说:拦截器返回一个代理Continuation对象给挂起函数,当挂起函数恢复的时候,恢复代理Continuation的resume函数,最后代理Continuation对象切换指定的线程在回调原始的Continuation对象


还没有评论,来说两句吧...