Kotlin协程核心库分析-1 Dispatchers
从本篇文章开始讲解
Kotlin标准库的源码分析
请添加如下依赖
implementation 'org.jetbrains.kotlinx:kotlinx-coroutines-core:1.3.4'
Dispatchers
基础概念:Dispatchers 是一个标准库中帮我们封装了切换线程的帮助类,可以简单理解为一个线程池。
public actual object Dispatchers {@JvmStaticpublic actual val Default: CoroutineDispatcher = createDefaultDispatcher()@JvmStaticpublic actual val Main: MainCoroutineDispatcher get() = MainDispatcherLoader.dispatcher@JvmStaticpublic actual val Unconfined: CoroutineDispatcher = kotlinx.coroutines.Unconfinedpublic val IO: CoroutineDispatcher = DefaultScheduler.IO}
上面定义了四种不同的线程池
Default默认的线程池一般用于计算型任务。注意它和IO共享线程池,只不过限制了最大并发数不同Main所谓的Ui线程,在Android中进行UI绘制的线程,或者Swing中invokeLater。此处根据平台实现,利用serviceLoader加载Unconfined未定义的线程,使用这个启动的协程会立即在当前的线程执行,并且遇到第一个挂起点后根据其挂起点回调线程决定后续的代码在哪运行。(后文再讲)IO一个用于经常IO操作的线程池,告并行量。与Default共享线程池
Unconfined 线程池说明
由于这个线程池比较特殊,所以举例说明下,后面直接撸源码。
直接看Demo和输出吧
class MyContinuation() : Continuation<String> {override val context: CoroutineContext = Dispatchers.Unconfinedoverride fun resumeWith(result: Result<String>) {log("MyContinuation resumeWith 结果 = ${result.getOrNull()}")}}suspend fun demo() = suspendCoroutine<String> {c ->thread(name = "自己创建的线程") {TimeUnit.SECONDS.sleep(1)log("demo 调用resume回调")c.resume("hello")}}fun main() {Thread.currentThread().name = "非Ui线程"Thread.currentThread().stateval suspendLambda = suspend {log("demo 运行前")val resultOne = demo()log("demo 运行后")//拼接结果resultOne}SwingUtilities.invokeLater {}val myContinuation = MyContinuation()suspendLambda.startCoroutine(myContinuation)TimeUnit.HOURS.sleep(1111)}fun log(msg: String) {println("[${Thread.currentThread().name}] ${msg}")}
输出:
[非Ui线程] demo 运行前[自己创建的线程] demo 调用resume回调[自己创建的线程] demo 运行后[自己创建的线程] MyContinuation resumeWith 结果 = hello
由于比较简单我这里直接总结下:
由于Dispatchers.Unconfined未定义线程池,所以执行的时候默认在启动线程。遇到第一个挂起点,之后由调用resume的线程决定恢复协程的线程。这块不理解可以看博主前几篇核心库文章。
CoroutineDispatcher 对象
之前的文章https://blog.csdn.net/qfanmingyiq/article/details/105181027 写到:如果要创建一个线程调度器,需要实现一个ContinuationInterceptor对象。而CoroutineDispatcher是kotlin标准对ContinuationInterceptor一个封装。
来看下声明
public abstract class CoroutineDispatcher :AbstractCoroutineContextElement(ContinuationInterceptor), ContinuationInterceptor {//是否切换线程,这个不重要public open fun isDispatchNeeded(context: CoroutineContext): Boolean = true//返回一个Continuation代理对象进行切换协程线程。public final override fun <T> interceptContinuation(continuation: Continuation<T>): Continuation<T> =DispatchedContinuation(this, continuation)}
我们这里只需要关注一个interceptContinuation函数返回了一个DispatchedContinuation对象,其中包含两个参数,第一个CoroutineDispatcher对象,第二个被代理的对象。
此类的声明(已删减部分代码):
internal class DispatchedContinuation<in T>(@JvmField val dispatcher: CoroutineDispatcher,@JvmField val continuation: Continuation<T>//被代理的原始对象) : DispatchedTask<T>(MODE_ATOMIC_DEFAULT), CoroutineStackFrame, Continuation<T> by continuation {override fun resumeWith(result: Result<T>) {val context = continuation.contextval state = result.toState()if (dispatcher.isDispatchNeeded(context)) {_state = stateresumeMode = MODE_ATOMIC_DEFAULT//看着,当挂起函数切换线程的时候又把回调给了dispatcher//dispatcher就是传入的CoroutineDispatcher。dispatcher.dispatch(context, this)} else {executeUnconfined(state, MODE_ATOMIC_DEFAULT) {withCoroutineContext(this.context, countOrElement) {continuation.resumeWith(result)}}}}}
我们只需要聚焦一行代码而已:
dispatcher.dispatch(context, this)
dispatch(context, this)函数声明:
class CoroutineDispatcher{fun dispatch(context: CoroutineContext, block: Runnable)}
我们注意看第二个参数Runable,我们DispatchedContinuation调用时传入的this参数,证明自己实现Runnable接口。
我们看下DispatchedContinuation接口实现链吧: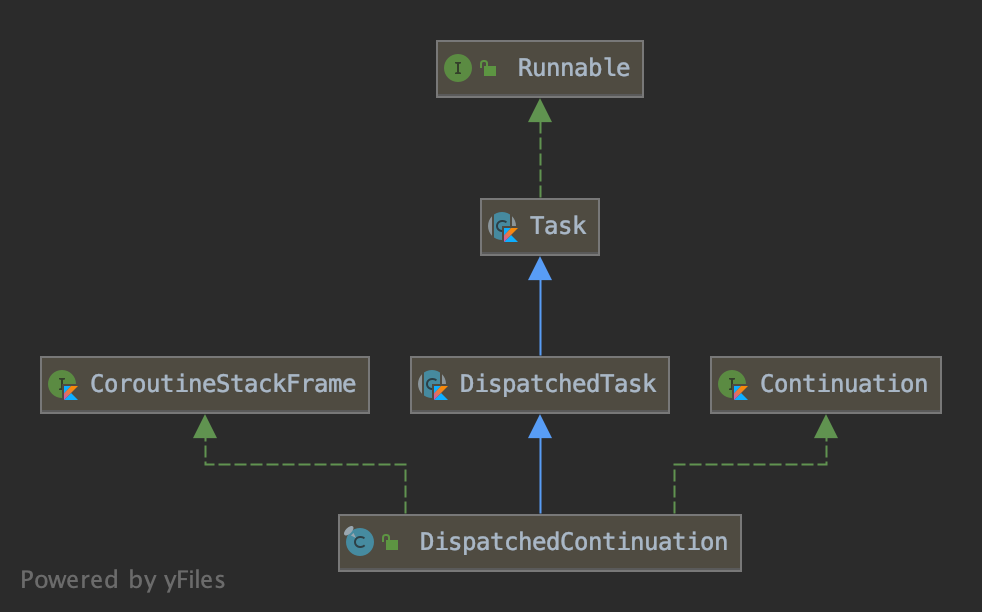
这里需要注意DispatchedContinuation继承了Task类,而Task又实现了Runable接口。
在继承链中DispatchedTask是实现了Runable具体方法
internal abstract class DispatchedTask<in T>(@JvmField public var resumeMode: Int) : SchedulerTask(){//调用dispatcher.dispatch(context, this) 最终会在在某个线程中回调下面的run方法public final override fun run() {val taskContext = this.taskContextvar fatalException: Throwable? = nulltry {val delegate = delegate as DispatchedContinuation<T>val continuation = delegate.continuationval context = continuation.contextval state = takeState() // NOTE: Must take state in any case, even if cancelledwithCoroutineContext(context, delegate.countOrElement) {val exception = getExceptionalResult(state)val job = if (resumeMode.isCancellableMode) context[Job] else nullif (exception == null && job != null && !job.isActive) {val cause = job.getCancellationException()cancelResult(state, cause)continuation.resumeWithStackTrace(cause)} else {if (exception != null) continuation.resumeWithException(exception)//看这 ,回调原始的Continuation对象,完成线程切换else continuation.resume(getSuccessfulResult(state))}}} catch (e: Throwable) {// This instead of runCatching to have nicer stacktrace and debug experiencefatalException = e} finally {val result = runCatching {taskContext.afterTask() }handleFatalException(fatalException, result.exceptionOrNull())}}}
我们可以看到最终run方法会回调原始的Continuation完成一个协程的线程切换。
我们画一个时序图吧(内部Dispatch.IO 也可以是其他的线程池这里只是举例):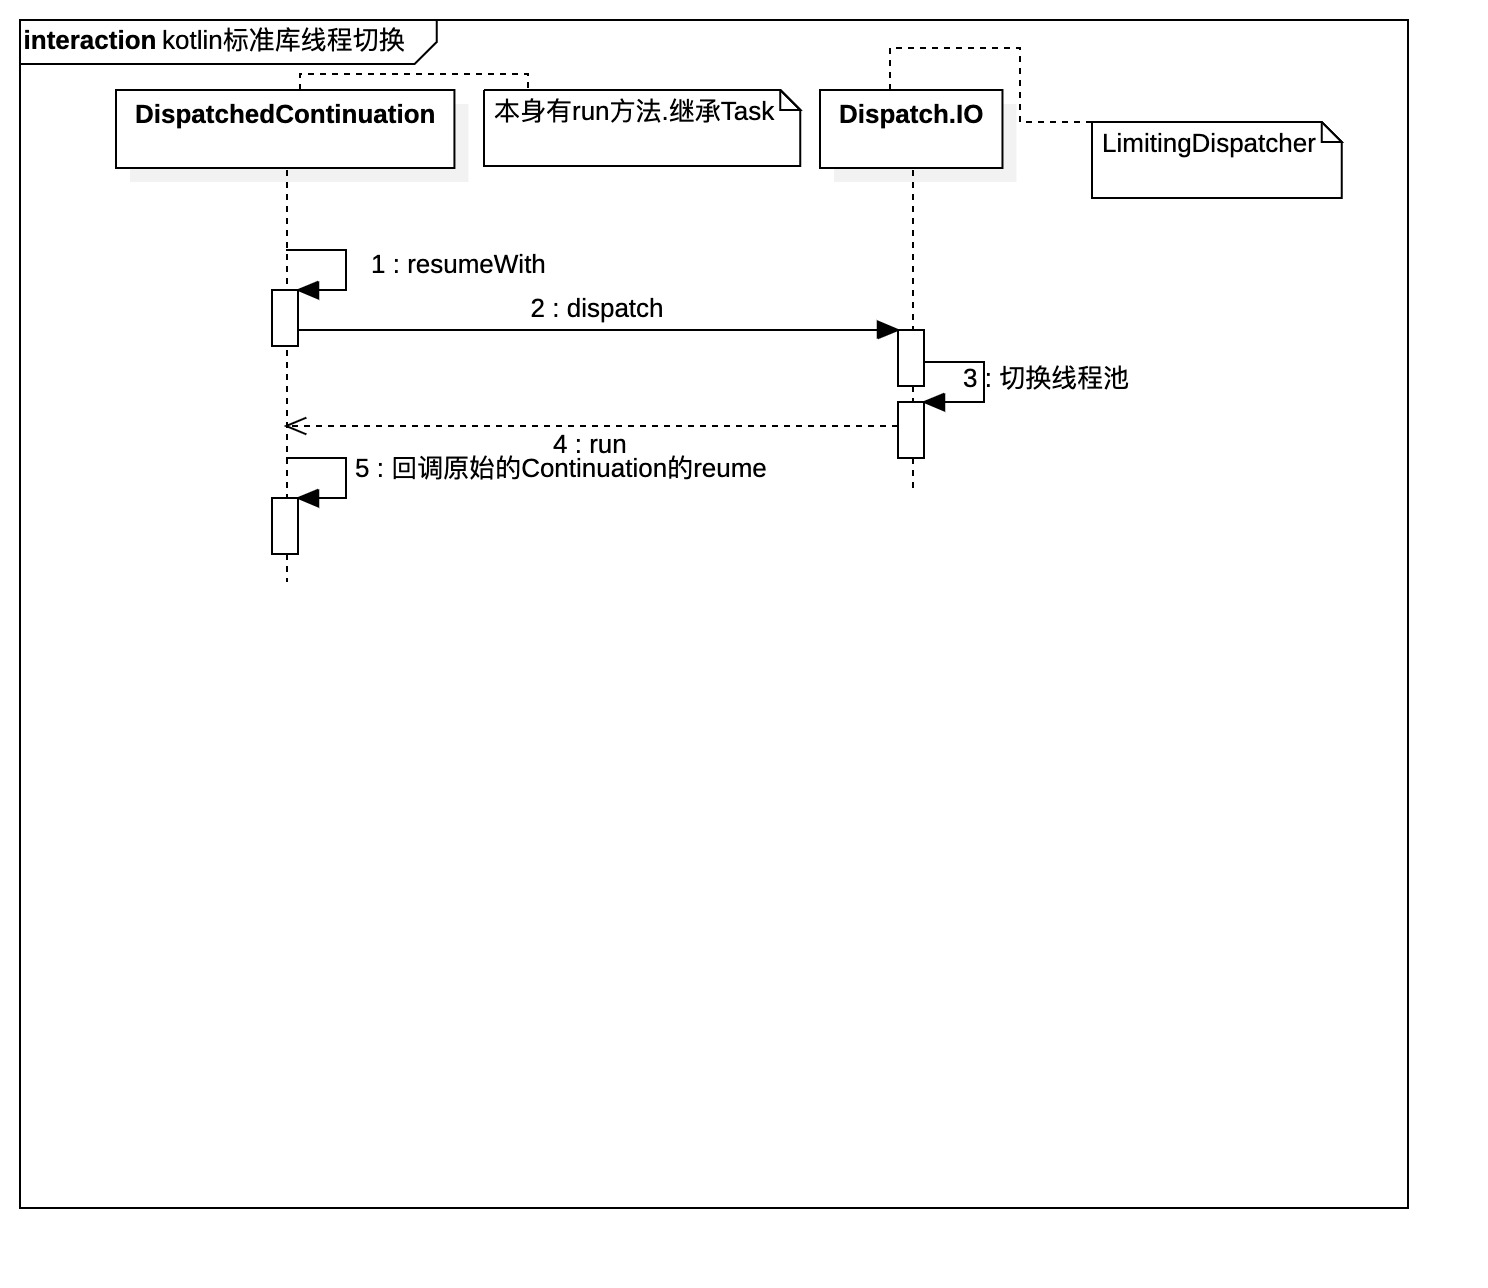
总的来说Dispatchers内部的几个线程池(IO,Default等)只是内部做了一个线程池然后切换回调。
IO 线程池源码说明
这里不贴使用Demo,直接撸源码。如果想测试的同学可以把《Unconfined 线程池说明》这一节的代码稍微改一下即可。
我们看下IO线程池的声明
@JvmStaticpublic val IO: CoroutineDispatcher = DefaultScheduler.IO
跟进DefaultScheduler看看
//Tip DefaultScheduler其实也用于 Dispatchers.Defaultinternal object DefaultScheduler : ExperimentalCoroutineDispatcher() {//Dispatchers.IO实例对象。设置最大的并发数,然后创建一个CoroutineDispatcher返回val IO = blocking(systemProp(IO_PARALLELISM_PROPERTY_NAME, 64.coerceAtLeast(AVAILABLE_PROCESSORS)))}
tip: Dispatchers.Default 其实也是用DefaultScheduler对象,而Dispatchers.IO只是使用DefaultScheduler内部的一个属性对象(IO)而已,本质会共享DefaultScheduler父类创建的线程
继续
public fun blocking(parallelism: Int = BLOCKING_DEFAULT_PARALLELISM): CoroutineDispatcher {//创建一个CoroutineDispatcher,请注意this对象是DefaultSchedulerreturn LimitingDispatcher(this, parallelism, TASK_PROBABLY_BLOCKING)}
看下LimitingDispatcher声明:
private class LimitingDispatcher(val dispatcher: ExperimentalCoroutineDispatcher,val parallelism: Int,override val taskMode: Int) : ExecutorCoroutineDispatcher(), TaskContext, Executor {private val queue = ConcurrentLinkedQueue<Runnable>()private val inFlightTasks = atomic(0)override val executor: Executorget() = thisoverride fun execute(command: Runnable) = dispatch(command, false)override fun close(): Unit = error("Close cannot be invoked on LimitingBlockingDispatcher")override fun dispatch(context: CoroutineContext, block: Runnable) = dispatch(block, false)//线程切换的回调private fun dispatch(block: Runnable, tailDispatch: Boolean) {var taskToSchedule = blockwhile (true) {val inFlight = inFlightTasks.incrementAndGet()//判断当前运行的task数量,如果小于数量,直接放入线程池队列中if (inFlight <= parallelism) {dispatcher.dispatchWithContext(taskToSchedule, this, tailDispatch)return}// 放入阻塞队列中等候下次取出queue.add(taskToSchedule)if (inFlightTasks.decrementAndGet() >= parallelism) {return}taskToSchedule = queue.poll() ?: return}}}
我们只需要关注下面的函数
dispatch(block: Runnable, tailDispatch: Boolean)
函数内部只是判断了最大并发数量,然后如果没有达到最大的并发数量回调构造参数的dispatcher的dispatchWithContext函数进行内部的线程切换,这里dispatcher就是DefaultScheduler对象,现在大家理解为什么Dispatchs.IO与Dispatchs.Default共享线程池了。
我们继续看下DefaultScheduler.dispatchWithContext函数对应实现(内部由父亲ExperimentalCoroutineDispatcher实现)。
//ExperimentalCoroutineDispatcher.ktinternal fun dispatchWithContext(block: Runnable, context: TaskContext, tailDispatch: Boolean) {try {coroutineScheduler.dispatch(block, context, tailDispatch)} catch (e: RejectedExecutionException) {// Context shouldn't be lost here to properly invoke before/after taskDefaultExecutor.enqueue(coroutineScheduler.createTask(block, context))}}
可以看到任务有分发到了一个coroutineScheduler属性对象上
@InternalCoroutinesApiopen class ExperimentalCoroutineDispatcher(private val corePoolSize: Int,private val maxPoolSize: Int,private val idleWorkerKeepAliveNs: Long,private val schedulerName: String = "CoroutineScheduler") : ExecutorCoroutineDispatcher() {private var coroutineScheduler = createScheduler()private fun createScheduler() = CoroutineScheduler(corePoolSize, maxPoolSize, idleWorkerKeepAliveNs, schedulerName)}
可以看出Dispatchs.IO和Dispatchs.Default核心线程切换逻辑位于CoroutineScheduler这个类上。
我们这里慢慢开始讲讲这个类
CoroutineScheduler 线程池管理对象
我们首先看两个属性globalCpuQueue和globalBlockingQueue,这两个对象是一个集合对象,简单来说就是一个队列,内部存储了线程池要执行的任务,每个任务被封装成Task,我们前面说过DispatchedContinuation继承Task。
internal class CoroutineScheduler(@JvmField val corePoolSize: Int,@JvmField val maxPoolSize: Int,@JvmField val idleWorkerKeepAliveNs: Long = IDLE_WORKER_KEEP_ALIVE_NS,@JvmField val schedulerName: String = DEFAULT_SCHEDULER_NAME) : Executor, Closeable {@JvmFieldval globalCpuQueue = GlobalQueue()@JvmFieldval globalBlockingQueue = GlobalQueue()private fun addToGlobalQueue(task: Task): Boolean {return if (task.isBlocking) {globalBlockingQueue.addLast(task)} else {globalCpuQueue.addLast(task)}}
简单看下这个GlobalQueue
internal class GlobalQueue : LockFreeTaskQueue<Task>(singleConsumer = false)
LockFreeTaskQueue<T>:
一个线程安全的链表,用于存放任务队列,内部采用CAS和链表结构完成.CAS使用了kotlin的便捷库https://github.com/Kotlin/kotlinx.atomicfu。
val queue = LockFreeTaskQueue<String>(false)queue.addLast("a")queue.addLast("b")val one = queue.removeFirstOrNull()val two = queue.removeFirstOrNull()val three = queue.removeFirstOrNull()println("one ${one} two ${two} three ${three}")
输出:
one a two b three null
CoroutineScheduler既然是一个线程池管理对象,必然内部会创建多个Thread然后休眠自旋保证存活然后唤醒调度任务(线程池基本实现,这块不了解的同学可以看看JDK的实现,kotlin协程实现也差不多)。
CoroutineScheduler创建和管理的Thread是一个Worker对象,简单看下核心的实现方法
internal class CoroutineScheduler{//注意是一个internal修饰的内部类,主要作用是用来获取globalCpuQueue和globalBlockingQueue队列任务,然后执行internal inner class Worker private constructor() : Thread() {init {//必然是个守护进程isDaemon = true}//转到runWorker()override fun run() = runWorker()//内部要进行自旋转休眠,有任务的时候唤醒private fun runWorker() {var rescanned = false//一个while自旋转while (!isTerminated && state != WorkerState.TERMINATED) {//取出CoroutineScheduler的globalCpuQueue和globalBlockingQueue任务val task = findTask(mayHaveLocalTasks)if (task != null) {rescanned = falseminDelayUntilStealableTaskNs = 0L//队列不为空那么取出task运行,task就是DispatchedContinuation对象//这里会回调DispatchedContinuation的run方法。这里进步跟进去了executeTask(task)continue} else {mayHaveLocalTasks = false}if (minDelayUntilStealableTaskNs != 0L) {if (!rescanned) {rescanned = true} else {rescanned = falsetryReleaseCpu(WorkerState.PARKING)interrupted()LockSupport.parkNanos(minDelayUntilStealableTaskNs)minDelayUntilStealableTaskNs = 0L}continue}//休眠线城市内部采用LockSupport.park()休眠,在外部也会在适当时候//LockSupport.unPark()唤醒线程tryPark()}tryReleaseCpu(WorkerState.TERMINATED)}}}
CoroutineScheduler 调度流程分析
我们前面讲到 任务调度会最终调用到CoroutineScheduler.dispatch函数
//ExperimentalCoroutineDispatcher.ktinternal fun dispatchWithContext(block: Runnable, context: TaskContext, tailDispatch: Boolean) {try {coroutineScheduler.dispatch(block, context, tailDispatch)} catch (e: RejectedExecutionException) {DefaultExecutor.enqueue(coroutineScheduler.createTask(block, context))}}
跟进
internal class CoroutineScheduler(@JvmField val corePoolSize: Int,@JvmField val maxPoolSize: Int,@JvmField val idleWorkerKeepAliveNs: Long = IDLE_WORKER_KEEP_ALIVE_NS,@JvmField val schedulerName: String = DEFAULT_SCHEDULER_NAME) : Executor, Closeable {fun dispatch(block: Runnable, taskContext: TaskContext = NonBlockingContext, tailDispatch: Boolean = false) {trackTask()val task = createTask(block, taskContext)val currentWorker = currentWorker()val notAdded = currentWorker.submitToLocalQueue(task, tailDispatch)if (notAdded != null) {//把Task放入CoroutineScheduler的队列中if (!addToGlobalQueue(notAdded)) {throw RejectedExecutionException("$schedulerName was terminated")}}val skipUnpark = tailDispatch && currentWorker != nullif (task.mode == TASK_NON_BLOCKING) {if (skipUnpark) returnsignalCpuWork()} else {// 然后唤醒或者创建一个线程运行Task的run函数signalBlockingWork(skipUnpark = skipUnpark)}}}
上面的函数简单就是下面的代码
internal class CoroutineScheduler(@JvmField val corePoolSize: Int,@JvmField val maxPoolSize: Int,@JvmField val idleWorkerKeepAliveNs: Long = IDLE_WORKER_KEEP_ALIVE_NS,@JvmField val schedulerName: String = DEFAULT_SCHEDULER_NAME) : Executor, Closeable {fun dispatch(block: Runnable, taskContext: TaskContext = NonBlockingContext, tailDispatch: Boolean = false) {//添加一个任务到队列addToGlobalQueue(block)// 然后唤醒或者创建一个线程运行Task的run函数signalBlockingWork(skipUnpark = skipUnpark)}}
看下比较重要signalBlockingWork函数
internal class CoroutineScheduler(@JvmField val corePoolSize: Int,@JvmField val maxPoolSize: Int,@JvmField val idleWorkerKeepAliveNs: Long = IDLE_WORKER_KEEP_ALIVE_NS,@JvmField val schedulerName: String = DEFAULT_SCHEDULER_NAME) : Executor, Closeable {private fun signalBlockingWork(skipUnpark: Boolean) {val stateSnapshot = incrementBlockingTasks()if (skipUnpark) return//由于此时CoroutineScheduler并没有一个Thread所以此处不会唤醒线程所以返回falseif (tryUnpark()) return//创建一个thread去执行taskif (tryCreateWorker(stateSnapshot)) returntryUnpark()}}
最后看看tryCreateWorker
internal class CoroutineScheduler{private fun tryCreateWorker(state: Long = controlState.value): Boolean {val created = createdWorkers(state)val blocking = blockingTasks(state)val cpuWorkers = (created - blocking).coerceAtLeast(0)if (cpuWorkers < corePoolSize) {//创建一个线程val newCpuWorkers = createNewWorker()//在创建一个,用于任务窃取,可以类比forkjoin,反正可以简单理解就是一个优化机制,提高效率所以多创建一个线程if (newCpuWorkers == 1 && corePoolSize > 1) createNewWorker()if (newCpuWorkers > 0) return true}return false}/***创建一个对象Worker对象然后启动这个线程**/private fun createNewWorker(): Int {synchronized(workers) {if (isTerminated) return -1val state = controlState.valueval created = createdWorkers(state)val blocking = blockingTasks(state)val cpuWorkers = (created - blocking).coerceAtLeast(0)if (cpuWorkers >= corePoolSize) return 0if (created >= maxPoolSize) return 0val newIndex = createdWorkers + 1require(newIndex > 0 && workers[newIndex] == null)//创建一个Threadval worker = Worker(newIndex)workers[newIndex] = workerrequire(newIndex == incrementCreatedWorkers())//启动线程worker.start()return cpuWorkers + 1}}}
之后便是在指定的线程中回调Task(DispatchedContinuation)的run函数。
我们总结下Dispatchers的IO和Default就是把Task放入CoroutineScheduler的队列中,然后由指定的线程调度Task的run函数。
请注意Dispatchers的IO和Default共享线程池,只是运行并发数不同。


 and (utf8_unicode_ci,IMPLICIT) for operation '=")


还没有评论,来说两句吧...