Pytorch 张量
日萌社" class="reference-link"> 日萌社
日萌社
人工智能AI:Keras PyTorch MXNet TensorFlow PaddlePaddle 深度学习实战(不定时更新)
Pytorch中数据-张量
目标
- 知道张量和Pytorch中的张量
- 知道pytorch中如何创建张量
- 知道pytorch中tensor的重要属性
- 知道pytorch中tensor的如何修改
- 知道pytorch中的cuda tensor
- 掌握pytorch中tensor的常用数学运算
1. 张量Tensor
张量是一个统称,其中包含很多类型:
- 0阶张量:标量、常数,0-D Tensor
- 1阶张量:向量,1-D Tensor
- 2阶张量:矩阵,2-D Tensor
- 3阶张量
- …
- N阶张量
2. Pytorch中创建张量
从已有的数据中创建张量
从列表中创建
torch.tensor([[1., -1.], [1., -1.]])
tensor([[ 1.0000, -1.0000],[ 1.0000, -1.0000]])
使用numpy中的数组创建tensor
torch.tensor(np.array([[1, 2, 3], [4, 5, 6]]))
tensor([[ 1, 2, 3],[ 4, 5, 6]])
创建固定张量
torch.ones([3,4])创建3行4列的全为1的tensortorch.zeros([3,4])创建3行4列的全为0的tensortorch.ones_like(tensor)torch.zeros_like(tensor)创建与tensor相同形状和数据类型的值全为1/0的tensortorch.empty(3,4)创建3行4列的空的tensor,会用无用数据进行填充(手工填充torch.fill_)
在一定范围内创建序列张量
torch.arange(start, end, step)从start到end以step为步长取值生成序列torch.linspace(start, end, number_steps)从start到end之间等差生成number_steps个数字组成序列torch.logspace(start, end, number_steps, base=10)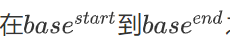 之间等比生成number_steps个数字组成序列
创建随机张量
torch.rand([3,4])创建3行4列的随机值的tensor,随机值的区间是[0, 1)>>> torch.rand(2, 3)tensor([[ 0.8237, 0.5781, 0.6879],[ 0.3816, 0.7249, 0.0998]])
torch.randint(low=0,high=10,size=[3,4])创建3行4列的随机整数的tensor,随机值的区间是[low, high)>>> torch.randint(3, 10, (2, 2))tensor([[4, 5],[6, 7]])
torch.randn([3,4])创建3行4列的随机数的tensor,随机值的分布式均值为0,方差为1
3. Pytorch中tensor的属性
获取tensor中的数据
tensor.item() 当tensor中只有一个元素时
In [10]: a = torch.tensor(np.arange(1))
In [11]: a
Out[11]: tensor([0])In [12]: a.item()
Out[12]: 0转化为numpy数组
In [55]: z.numpy()
Out[55]:
array([[-2.5871205],[ 7.3690367],[-2.4918075]], dtype=float32)
获取形状:
tensor.size()tensor.shapeIn [72]: xOut[72]:tensor([[ 1, 2],[ 3, 4],[ 5, 10]], dtype=torch.int32)In [73]: x.size()Out[73]: torch.Size([3, 2])
获取数据类型
tensor.dtypeIn [80]: x.dtypeOut[80]: torch.int32
tensor中的数据类型非常多,常见类型如下:
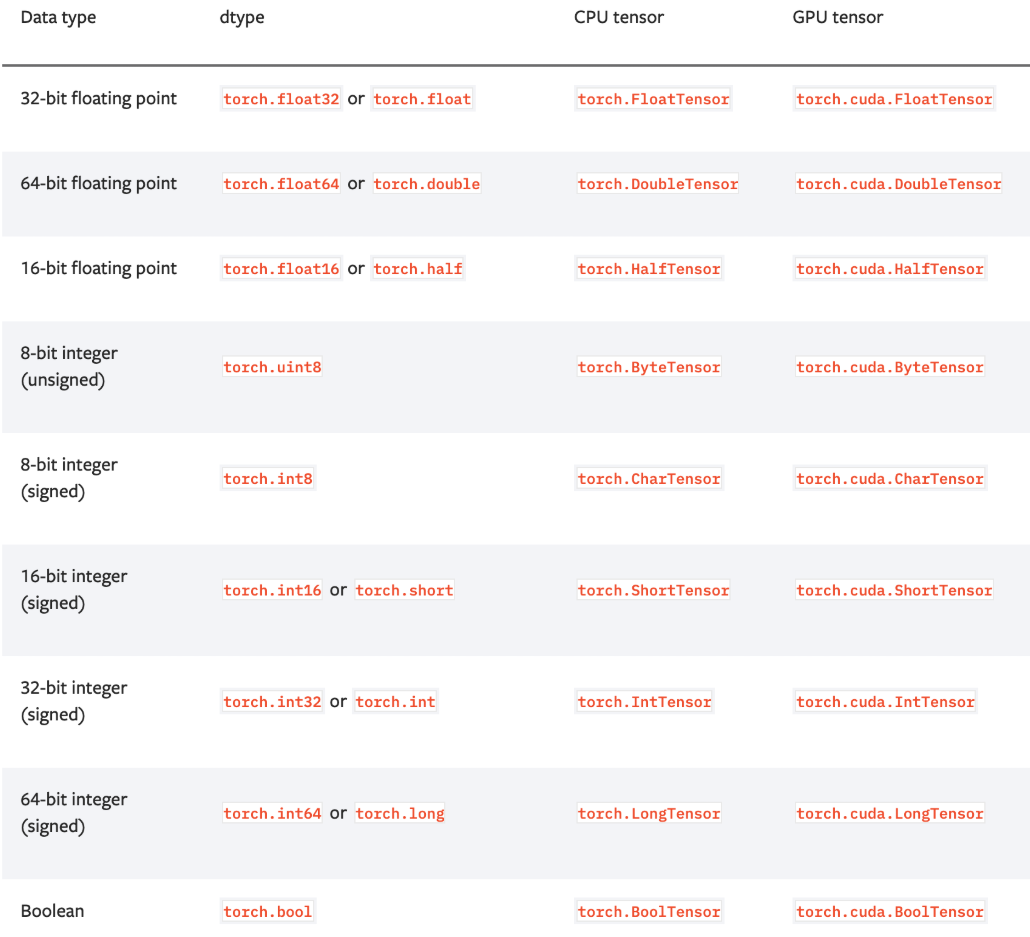
- 上图中的Tensor types表示这种type的tensor是其实例
获取阶数:
tensor.dim()In [77]: x.dim()Out[77]: 2
4.tensor的修改
形状改变:
tensor.view((3,4))类似numpy中的reshapeIn [76]: x.view(2,3)
Out[76]:
tensor([[ 1, 2, 3],[ 4, 5, 10]], dtype=torch.int32)
tensor.t()或tensor.transpose(dim0, dim1)转置In [79]: x.t()Out[79]:tensor([[ 1, 3, 5],[ 2, 4, 10]], dtype=torch.int32)
tensor.permute变更tensor的轴(多轴转置)需求:把[4,2,3]转置成[3,4,2],如果使用transpose 需要转两次: [4,2,3] ->[4,3,2]->[3,4,2]
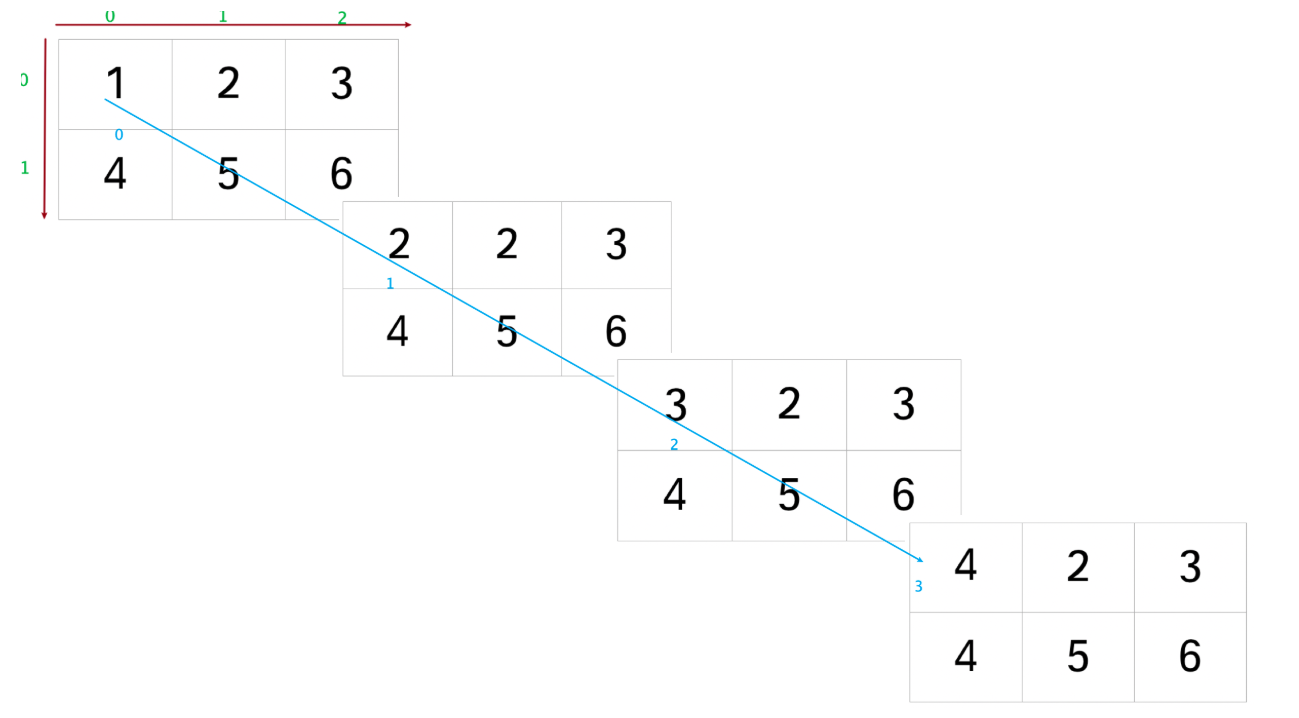
In [61]: b1Out[61]:tensor([[[1., 2., 3.],[4., 5., 6.]],[[2., 2., 3.],[4., 5., 6.]],[[3., 2., 3.],[4., 5., 6.]],[[4., 2., 3.],[4., 5., 6.]]])In [62]: b1.size()Out[62]: torch.Size([4, 2, 3])In [63]: b2 = b1.transpose(1,2) # 把下标为1,和2的轴互换In [64]: b2Out[64]:tensor([[[1., 4.],[2., 5.],[3., 6.]],[[2., 4.],[2., 5.],[3., 6.]],[[3., 4.],[2., 5.],[3., 6.]],[[4., 4.],[2., 5.],[3., 6.]]])In [65]: b2.size()Out[65]: torch.Size([4, 3, 2])
In [65]: b2.size()Out[65]: torch.Size([4, 3, 2])In [66]: b3 = b2.transpose(0,1)In [67]: b3Out[67]:tensor([[[1., 4.],[2., 4.],[3., 4.],[4., 4.]],[[2., 5.],[2., 5.],[2., 5.],[2., 5.]],[[3., 6.],[3., 6.],[3., 6.],[3., 6.]]])In [68]: b3.size()Out[68]: torch.Size([3, 4, 2])
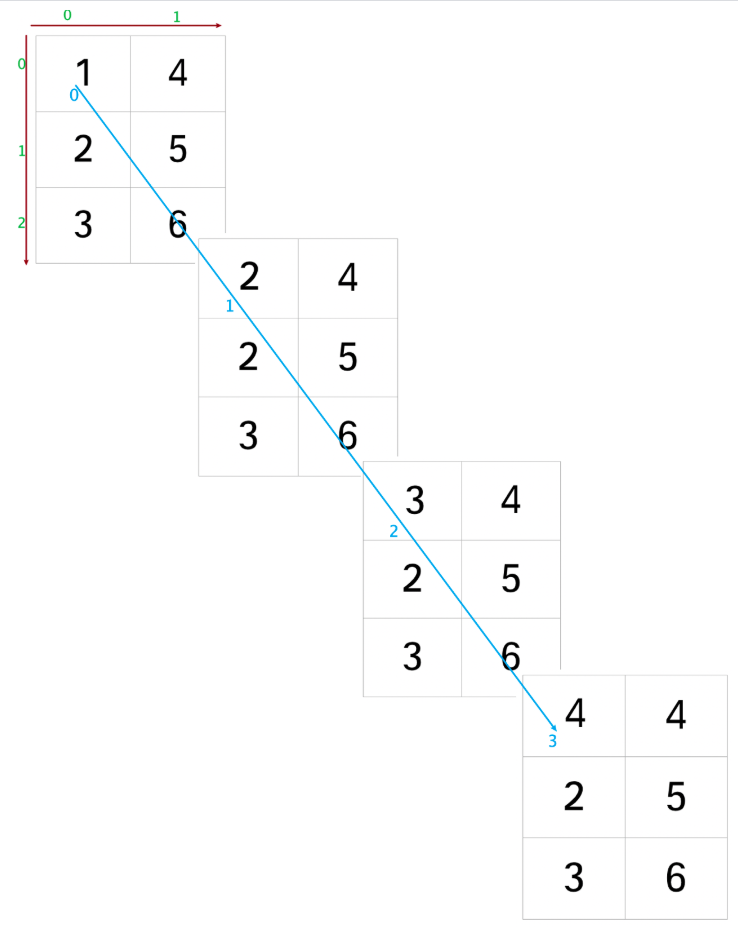
如果使用permute,把[4,2,3]变成[3,4,2]只需要调用一次
In [70]: b1.permute(2,0,1)Out[70]:tensor([[[1., 4.],[2., 4.],[3., 4.],[4., 4.]],[[2., 5.],[2., 5.],[2., 5.],[2., 5.]],[[3., 6.],[3., 6.],[3., 6.],[3., 6.]]])
tensor.unsqueeze(dim)tensor.squeeze()填充或者压缩维度# tensor.squeeze() 默认去掉所有长度是1的维度,# 也可以填入维度的下标,指定去掉某个维度In [82]: aOut[82]:tensor([[[1],[2],[3]]])In [83]: a.size()Out[83]: torch.Size([1, 3, 1])In [84]: a.squeeze()Out[84]: tensor([1, 2, 3])In [85]: a.squeeze(0)Out[85]:tensor([[1],[2],[3]])In [86]: a.squeeze(2)Out[86]: tensor([[1, 2, 3]])In [87]:## 如果需要扩充tensor的维度In [74]: a = torch.tensor([1,2,3])In [75]: a.size()Out[75]: torch.Size([3])In [76]: a.unsqueeze(0)Out[76]: tensor([[1, 2, 3]])In [77]: a.size()Out[77]: torch.Size([3])In [78]: a.unsqueeze(1) # [3,1]Out[78]:tensor([[1],[2],[3]])
类型的指定或修改
创建数据的时候指定类型
In [88]: torch.ones([2,3],dtype=torch.float32)Out[88]:tensor([[1., 1., 1.],[1., 1., 1.]])
改变已有tensor的类型
In [17]: aOut[17]: tensor([1, 2], dtype=torch.int32)In [18]: a.type(torch.float)Out[18]: tensor([1., 2.])In [19]: a.double()Out[19]: tensor([1., 2.], dtype=torch.float64)
tensor的切片
In [101]: xOut[101]:tensor([[1.6437, 1.9439, 1.5393],[1.3491, 1.9575, 1.0552],[1.5106, 1.0123, 1.0961],[1.4382, 1.5939, 1.5012],[1.5267, 1.4858, 1.4007]])In [102]: x[:,1]Out[102]: tensor([1.9439, 1.9575, 1.0123, 1.5939, 1.4858])
切片赋值
In [12]: x[:, 1]Out[12]: tensor([1.9439, 1.9575, 1.0123, 1.5939, 1.4858])In [13]: x[:, 1] = 1In [14]: x[:, 1]Out[14]: tensor([1., 1., 1., 1., 1.])
注意:切片数据内存不连续
In [87]: a = torch.randn(2,3,4)In [88]: aOut[88]:tensor([[[ 0.6204, 0.9294, 0.6449, -2.0183],[-1.1809, 0.4071, -1.0827, 1.7154],[ 0.0431, 0.6646, 2.0386, 0.0777]],[[ 0.0052, -0.1531, -0.7470, -0.8283],[-0.1547, 0.3123, -0.6279, -0.0132],[-0.0527, -1.2305, 0.7089, -0.4231]]])In [89]: a[:,:1,:2]Out[89]:tensor([[[ 0.6204, 0.9294]],[[ 0.0052, -0.1531]]])In [90]: a[:,:1,:2].view(1,4)---------------------------------------------------------------------------RuntimeError: view size is not compatible with input tensor's size and stride (at least one dimension spans across two contiguous subspaces). Use .reshape(...) instead.In [91]: a[:,:1,:2].reshape(1,4)Out[91]: tensor([[ 0.6204, 0.9294, 0.0052, -0.1531]])
5. CUDA Tensor
什么是CUDA?
CUDA(Compute Unified Device Architecture):CUDA™是一种由NVIDIA推出的通用并行计算架构,该架构使GPU能够解决复杂的计算问题(GPU,或者叫做显卡,如果没有cuda这个框架,就只能完成图形渲染)。
如何使pytorch能够调用cuda框架(使用gpu完成深度学习计算)?
1.本机需要有一个NVIDIA的gpu
2.本机需要安装一个适配的gpu驱动
3.本机需要安装一个与该gpu适配的CUDA框架
4.在python环境中安装gpu版本pytorch
如何判断当前环境中的pytorch能否调用cuda框架进行计算?
torch.cuda这个模块增加了对CUDA tensor的支持,能够在cpu和gpu上使用相同的方法操作tensortorch.cuda.is_available()
如何把cpu tensor转换成 cuda tensor
通过
.to方法能够把一个tensor转移到另外一个设备(比如从CPU转到GPU)device = torch.device(“cuda:0” if torch.cuda.is_available() else “cpu”)
if torch.cuda.is_available():
device = torch.device("cuda") # cuda device对象y = torch.ones_like(x, device=device) # 创建一个在cuda上的tensorx = x.to(device) # 使用方法把x转为cuda的tensorz = x + yprint(z)print(z.to("cpu", torch.double)) # .to方法也能够同时设置类型
tensor([1.9806], device=’cuda:0’)
tensor([1.9806], dtype=torch.float64)
6. tensor的常用数学运算
tensor.addtensor.subtensor.abstensor.mmIn [204]: a = torch.tensor([1,2,3])In [205]: b = torch.tensor(1)In [206]: a.add(b)Out[206]: tensor([2, 3, 4])In [207]: a.sub(b)Out[207]: tensor([0, 1, 2])In [212]: c = torch.randn((3,))In [213]: cOut[213]: tensor([ 0.5161, -0.1732, 1.0162])In [214]: c.abs()Out[214]: tensor([0.5161, 0.1732, 1.0162])In [215]: cOut[215]: tensor([ 0.5161, -0.1732, 1.0162])In [254]: a = torch.randn([3,4])In [255]: b = torch.randn([4, 5])In [256]: a.mm(b)Out[256]:tensor([[ 0.6888, 0.4304, -0.5489, 0.3615, -1.1690],[ 1.0890, -1.0391, -0.3717, -0.4045, 3.4404],[ 0.9885, 0.1720, -0.2117, -0.1694, -0.5460]])
注意:tensor之间元素级别的数学运算同样适用广播机制。
In [145]: a = torch.tensor([[1,2], [3,4]])In [146]: b = torch.tensor([1,2])In [147]: a + bOut[147]:tensor([[2, 4],[4, 6]])In [148]: c = torch.tensor([[1,],[2]])In [149]: a + cOut[149]:tensor([[2, 3],[5, 6]])
简单函数运算
torch.exptorch.sintorch.cosIn [109]: torch.exp(torch.tensor([0, np.log(2)]))Out[109]: tensor([1., 2.])In [110]: torch.tensor([0, np.log(2)]).exp()Out[110]: tensor([1., 2.])In [111]: torch.sin(torch.tensor([0, np.pi]))Out[111]: tensor([ 0.0000e+00, -8.7423e-08])In [112]: torch.cos(torch.tensor([0, np.pi]))Out[112]: tensor([ 1., -1.])
in-place 原地操作
tensor.add_tensor.sub_tensor.abs_In [224]: aOut[224]: tensor([1, 2, 3])In [225]: bOut[225]: tensor(1)In [226]: a.add(b)Out[226]: tensor([2, 3, 4])In [227]: aOut[227]: tensor([1, 2, 3])In [228]: a.add_(b)Out[228]: tensor([2, 3, 4])In [229]: aOut[229]: tensor([2, 3, 4])In [236]: c.abs()Out[236]: tensor([0.5161, 0.1732, 1.0162])In [237]: cOut[237]: tensor([ 0.5161, -0.1732, 1.0162])In [238]: c.abs_()Out[238]: tensor([0.5161, 0.1732, 1.0162])In [239]: cOut[239]: tensor([0.5161, 0.1732, 1.0162])In [240]: c.zero_()Out[240]: tensor([0., 0., 0.])In [241]: cOut[241]: tensor([0., 0., 0.])
统计操作
tensor.max,tensor.min,tensor.mean,tensor.mediantensor.argmaxIn [242]: a
Out[242]: tensor([ 0.5161, -0.1732, 1.0162])In [243]: a.max()
Out[243]: tensor(1.0162)In [246]: a
Out[246]:
tensor([[ 0.3337, -0.5011, -1.4319, -0.6633],[ 0.6620, 1.3154, -0.9129, 0.4685],[ 0.3203, -1.6496, 1.1967, -0.3174]])
In [247]: a.max()
Out[247]: tensor(1.3154)In [248]: a.max(dim=0)
Out[248]:
torch.return_types.max(
values=tensor([0.6620, 1.3154, 1.1967, 0.4685]),
indices=tensor([1, 1, 2, 1]))In [249]: a.max(dim=0)[0]
Out[249]: tensor([0.6620, 1.3154, 1.1967, 0.4685])In [250]: a.max(dim=0)[1]
Out[250]: tensor([1, 1, 2, 1])In [251]: a.argmax()
Out[251]: tensor(5)In [252]: a.argmax(dim=0)
Out[252]: tensor([1, 1, 2, 1])
通过前面的学习,可以发现torch的各种操作几乎和numpy一样
更多tensor的操作,参考 https://pytorch.org/docs/stable/tensors.html
7 Variable
在一些旧版本中的pytorch代码中,还可能会见到一个Variable类(from torch.autograd import Variable),基本上和tensor的用法是一样的。


----Fork/Join框架")


还没有评论,来说两句吧...