libevent、libev、libuv、libhv、boost.asio、poco、muduo七种echo-server实现对比
https://github.com/ithewei/libhv/tree/master/echo-servers 中包含libevent、libev、libuv、libhv、boost.asio、poco、muduo七种echo-server实现,感兴趣的可以看看
- libevent、libev、libuv、libhv、boost.asio、poco、muduo七种echo-server实现对比
libhv中的宏艺术
- C语言宏基础知识
- golang defer 宏实现
- java synchronized 一行宏实现
- http模块(包含http、https、http2、grpc、RESTful API)
- 日志模块
- libhv应用程序框架
- libhv事件循环使用入门
- libhv如何实现跨平台的
- libhv多线程同步相关知识
- 跨平台socket编程
- 如何编写兼容IPv6的网络程序
- c语言如何实现c++的继承
- libhv事件循环逻辑
IO与timer的完美结合
- 设置连接超时
- 设置keepalive超时
- 设置心跳
- libhv完美结合openssl
- master-worker 多进程|多线程模型
libhv简介
libhv是一个跨平台的类似libevent、libev、libuv的异步事件驱动库,但提供了更加接近原生的API接口和更加丰富的协议。libhv已被awesome-c收录。 libhv已广泛实用在公司的IOT平台、http API服务之中,正确性、稳定性、可扩展性、性能都有保证,完全开源,请放心使用。
项目地址:https://github.com/ithewei/libhv.git
码云镜像:https://gitee.com/ithewei/libhv.git
QQ技术交流群:739352073
libhv博客专栏:https://hewei.blog.csdn.net/category_9866493.html
注:libhv每日一学博文为QQ群里的libhv每日一学技术分享整理所得,方便新老朋友查阅学习,该博文每隔几日会同步更新一次。
http模块(包含http、https、http2、grpc、RESTful API)
http编译测试,包含web service、indexof service、api service (支持RESTful API)
ContentType支持application/json、application/x-www-form-urlencoded、multipart/form-data的构造和解析
git clone https://github.com/ithewei/libhv.gitcd libhvmake httpd curlbin/httpd -hbin/httpd -d#bin/httpd -c etc/httpd.conf -s restart -dps aux | grep httpd# http web servicebin/curl -v localhost:8080# http indexof servicebin/curl -v localhost:8080/downloads/# http api servicebin/curl -v localhost:8080/pingbin/curl -v localhost:8080/echo -d "hello,world!"bin/curl -v localhost:8080/query?page_no=1\&page_size=10bin/curl -v localhost:8080/kv -H "Content-Type:application/x-www-form-urlencoded" -d 'user=admin&pswd=123456'bin/curl -v localhost:8080/json -H "Content-Type:application/json" -d '{"user":"admin","pswd":"123456"}'bin/curl -v localhost:8080/form -F "user=admin pswd=123456"bin/curl -v localhost:8080/upload -F "file=@LICENSE"bin/curl -v localhost:8080/test -H "Content-Type:application/x-www-form-urlencoded" -d 'bool=1&int=123&float=3.14&string=hello'bin/curl -v localhost:8080/test -H "Content-Type:application/json" -d '{"bool":true,"int":123,"float":3.14,"string":"hello"}'bin/curl -v localhost:8080/test -F 'bool=1 int=123 float=3.14 string=hello'# RESTful API: /group/:group_name/user/:user_idbin/curl -v -X DELETE localhost:8080/group/test/user/123# webbench (linux only)make webbenchbin/webbench -c 2 -t 60 localhost:8080
libhv提供的httpd性能可媲美nginx

indexof service目录服务效果图:

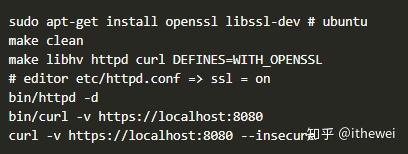
https编译测试,集成了openssl库(修改config.mk中WITH_OPENSSL=yes)
http2编译测试,集成了nghttp2库
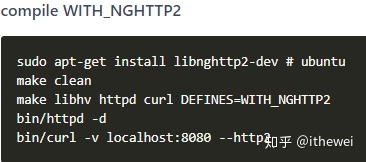
注:以下是模拟HTTP1的打印结果,HTTP2是二进制协议,采用了HPACK头部压缩和帧的概念

通过libhv库编写http API是如此简单,支持RESTful API,并且可扩展成多进程/多线程模型 下面贴出最基础的body用法,其它ContentType用法见examples/httpd/
#include "HttpServer.h"int main() {HttpService service;service.base_url = "/v1/api";service.POST("/echo", [](HttpRequest* req, HttpResponse* res) {res->body = req->body;return 200;});http_server_t server;server.port = 8080;server.service = &service;http_server_run(&server);return 0;}
日志模块

libhv应用程序框架
libhv提供了命令行解析、INI配置文件解析、日志文件、pid文件、信号处理等创建一个应用程序的常用模块
参考examples/hmain_test.cpp,讲解这些模块使用方法
测试示例:
make testbin/test -hbin/test -vbin/test -tbin/test -dps aux | grep testbin/test -s statusbin/test -s stopps aux | grep testbin/test -s start -dps aux | grep testbin/test -s restart -dps aux | grep test
流程图:

libhv事件循环使用入门
参考examples/loop.c、examples/timer.c、examples/tcp.c、examples/udp.c、examples/nc.c
make tcp udp ncbin/tcp 1111bin/nc 127.0.0.1 1111bin/udp 2222bin/nc -u 127.0.0.1 2222make hloop_testbin/hloop_testbin/nc 127.0.0.1 10514
TCP echo server示例代码
#include "hloop.h"void on_close(hio_t* io) {}void on_recv(hio_t* io, void* buf, int readbytes) {hio_write(io, buf, readbytes);}void on_accept(hio_t* io) {hio_setcb_close(io, on_close);hio_setcb_read(io, on_recv);hio_read(io);}int main(int argc, char** argv) {if (argc < 2) {printf("Usage: cmd port\n");return -10;}int port = atoi(argv[1]);hloop_t* loop = hloop_new(0);hio_t* listenio = hloop_create_tcp_server(loop, "0.0.0.0", port, on_accept);if (listenio == NULL) {return -20;}hloop_run(loop);hloop_free(&loop);return 0;}
流程图:

libevent、libev、libuv、libhv、boost.asio、poco、muduo七种echo-server实现对比
https://github.com/ithewei/libhv/tree/master/echo-servers中包含libevent、libev、libuv、libhv、boost.asio、poco、muduo七种echo-server实现,感兴趣的可以看看
编译测试步骤见README.md 中的echo-servers/benchmark
# ubuntu16.04sudo apt install libevent-dev libev-dev libuv1-dev libboost-dev libboost-system-dev libasio-dev libpoco-dev# muduo install => https://github.com/chenshuo/muduo.gitcd echo-servers./build.sh./benchmark.sh
压力测试结果图:
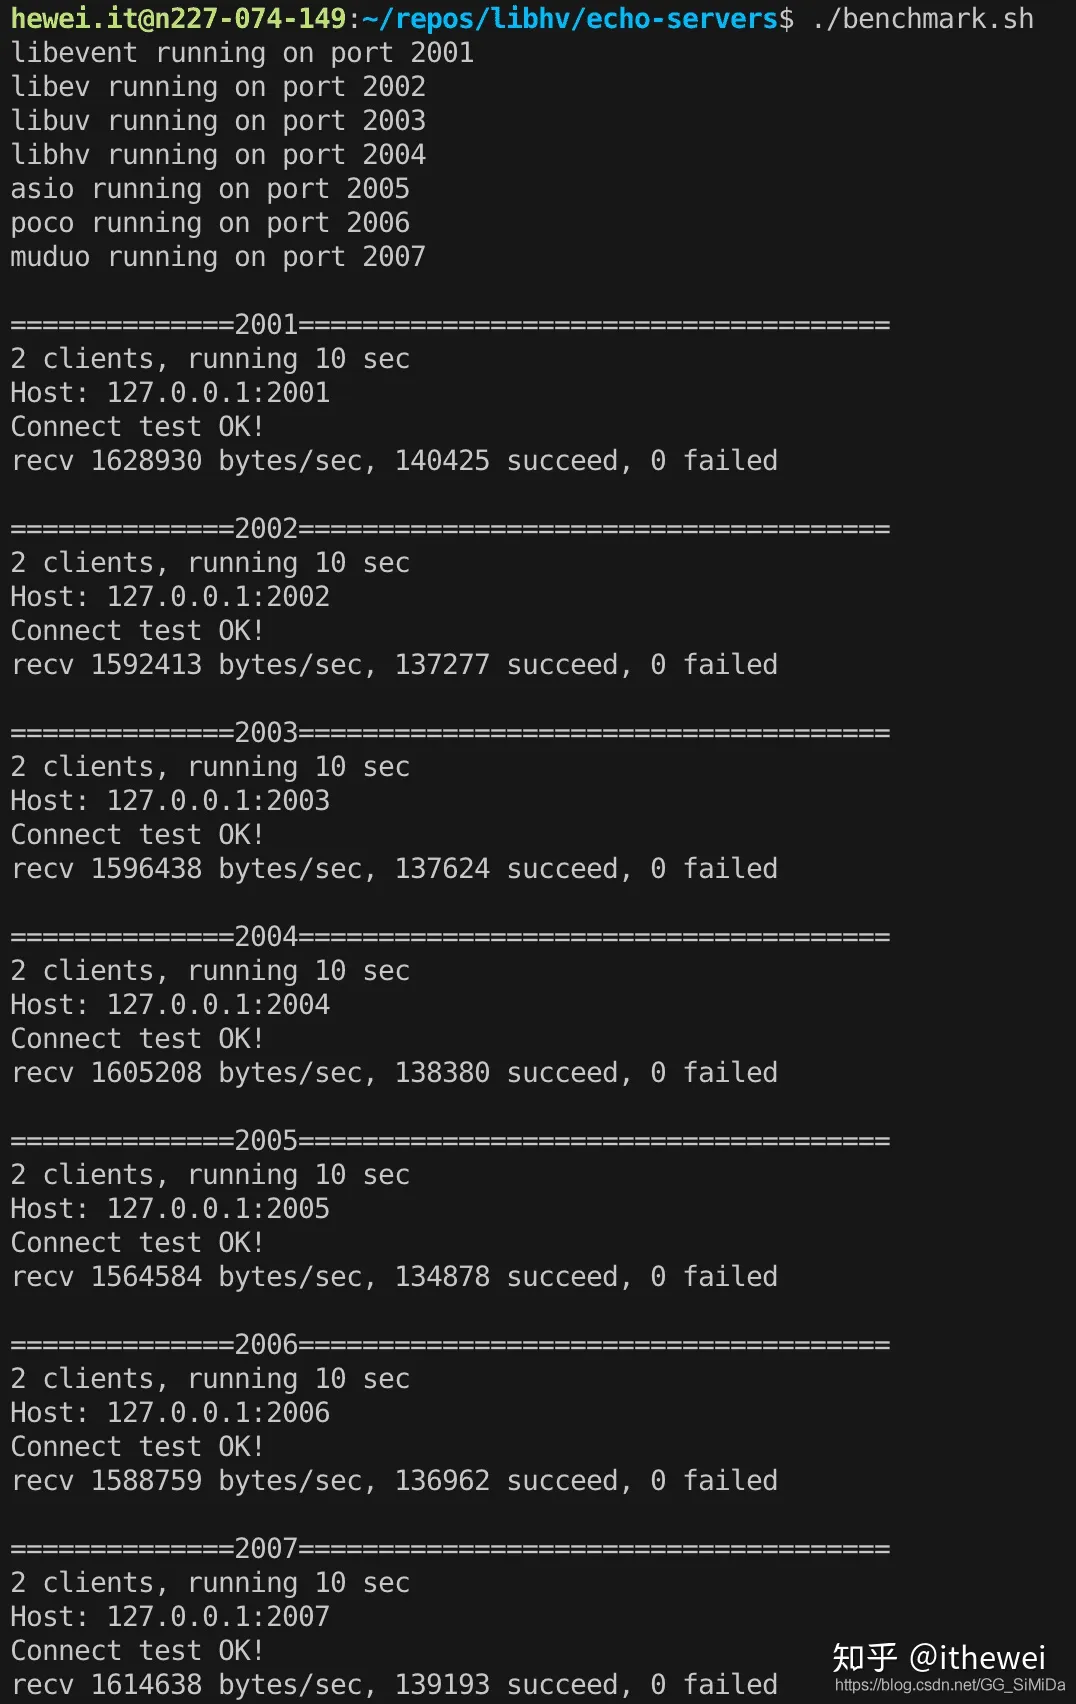
注:客户端和服务端位于同一台电脑,有一定随机性,仅供参考,总的来说,这几个库性能接近,都将IO多路复用用到了极致。
libhv如何实现跨平台的
主要靠两个文件:
1、./configure生成的hconfig.h configure脚本中检测头文件、函数是否存在定义相应宏(如HAVE_PTHREAD_H、HAVE_GETTIMEOFDAY)
2、base/hplatform.h中 操作系统宏:(如_WIN32、__linux__等) 编译器宏:(如__GNUC__、__clang__、_MSC_VER等) CPU体系结构宏:(如__i386__、__x86_64__、__arm__、__aarch64__等) 编程语言宏:__cplusplus
以获取当前本地日期时间为例,见base/htime.c

libhv中的宏艺术
C语言宏基础知识
宏是C/C++语言的一大特色,它将一个标识符定义为一个字符串,在预处理阶段源程序中的该标识符均以指定的字符串来代替,使用宏可以使代码更加简洁和增强可读性。
#define <宏名> (<参数表>) <宏体>#undef <宏名>#ifdef <宏名>...#else...#endif//define中的三个特殊符号:#,##,#@#define STRCAT(x,y) x##y //连接x和y成一个字符串#define TOCHAR(x) #@x //给x加上单引号#define TOSTR(x) #x //给x加上双引号
以base/herr.h、base/herr.c中对错误码定义为例:
#define FOREACH_ERR_COMMON(F) \F(0, OK, "OK") \F(1000, UNKNOWN, "Unknown error") \\F(1001, NULL_PARAM, "Null parameter") \F(1002, NULL_POINTER, "Null pointer") \F(1003, NULL_DATA, "Null data") \F(1004, NULL_HANDLE, "Null handle") \\F(1011, INVALID_PARAM, "Invalid parameter")\F(1012, INVALID_POINTER, "Invalid pointer") \F(1013, INVALID_DATA, "Invalid data") \F(1014, INVALID_HANDLE, "Invalid handle") \F(1015, INVALID_JSON, "Invalid json") \F(1016, INVALID_XML, "Invalid xml") \F(1017, INVALID_FMT, "Invalid format") \F(1018, INVALID_PROTOCOL, "Invalid protocol") \F(1019, INVALID_PACKAGE, "Invalid package") \#define FOREACH_ERR(F) \FOREACH_ERR_COMMON(F) \FOREACH_ERR_FUNC(F) \FOREACH_ERR_SERVICE(F) \FOREACH_ERR_GRPC(F) \#undef ERR_OK // prevent conflictenum {#define F(errcode, name, errmsg) ERR_##name = errcode,FOREACH_ERR(F)#undef F};// errcode => errmsgconst char* hv_strerror(int err) {if (err > 0 && err <= SYS_NERR) {return strerror(err);}switch (err) {#define F(errcode, name, errmsg) \case errcode: return errmsg;FOREACH_ERR(F)#undef Fdefault:return "Undefined error";}}
hv_strerror中宏替换后实际上是很多个case errcode: return errmsg;,添加一个错误码定义只需在头文件见中添加即可,无需改动源文件,代码更简洁,可扩展性更好
golang defer 宏实现
defer在作用域释放时做一些清理工作,可避免return前漏做,或者到处是调用清理函数,或者乱用goto导致的可读性差 等问题 见base/hscope.h,此头文件中还定义了很多利用作用域和RAII机制释放资源的模板类型,感兴趣的可以看看,用在自己项目中
// same as golang deferclass Defer {public:Defer(Function&& fn) : _fn(std::move(fn)) {}~Defer() { if(_fn) _fn();}private:Function _fn;};#define defer(code) Defer STRINGCAT(_defer_, __LINE__)([&](){code});
测试代码见unittest/defer_test.cpp
java synchronized 一行宏实现
#define synchronized(lock) for (std::lock_guard<std::mutex> _lock_(lock), *p = &_lock_; p != NULL; p = NULL)
测试代码见unittest/synchronized_test.cpp
libhv多线程同步相关知识
见base/hthread.h base/hmutex.h unittest/hmutex_test.c


pthread和hmutex对应的宏就不贴出来了,请自行查阅base/hmutex.h 编译运行单元测试
make unittestbin/hmutex_test
跨平台socket编程
Windows网络编程和Unix网络编程区别:
- 头文件和库文件不同;
- Windows下需要调用WSAStartup初始化;
- 获取错误码方式不同,以及错误码不同,Windows错误码以WSA开头
- Unix下没有closesocket;
- 设置发送超时和接受超时参数类型要求不同;
- 设置非阻塞方式不同;
- 非阻塞connect返回值不同;


如何编写兼容IPv6的网络程序

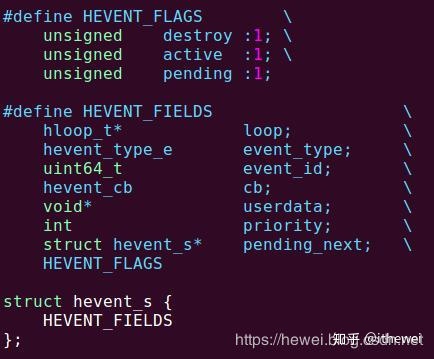
c语言如何实现c++的继承
使用宏即可实现,原理如下
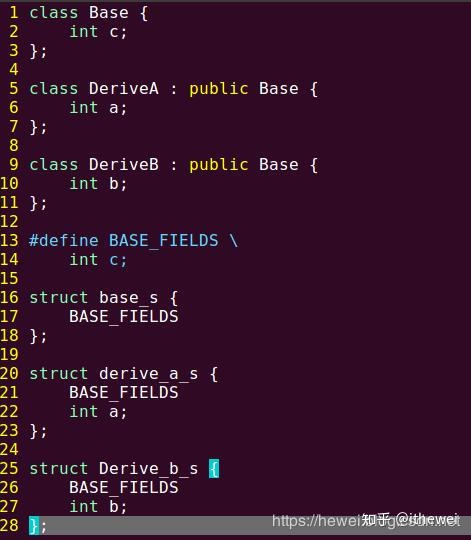
libhv中就应用了这种技巧,见event/hloop.h、event/hevent.h

libhv事件循环逻辑
int hloop_run(hloop_t* loop) {loop->status = HLOOP_STATUS_RUNNING;while (loop->status != HLOOP_STATUS_STOP) {if (loop->status == HLOOP_STATUS_PAUSE) {msleep(PAUSE_TIME);hloop_update_time(loop);continue;}++loop->loop_cnt;if (loop->nactives == 0) break;hloop_process_events(loop);if (loop->flags & HLOOP_FLAG_RUN_ONCE) {break;}}loop->status = HLOOP_STATUS_STOP;loop->end_hrtime = gethrtime();if (loop->flags & HLOOP_FLAG_AUTO_FREE) {hloop_cleanup(loop);SAFE_FREE(loop);}return 0;}
调用hloop_run后,我们就进入了libhv的事件循环,很简单,就是while循环中调用hloop_process_events处理各类事件

具体各类事件是如何处理的,感兴趣的可以研究源码
IO与timer的完美结合
设置连接超时
// connect timeout => hclose_cbHV_EXPORT void hio_set_connect_timeout(hio_t* io, int timeout_ms DEFAULT(HIO_DEFAULT_CONNECT_TIMEOUT));
设置keepalive超时
一段时间内无数据收发,自动断开连接
// keepalive timeout => hclose_cbHV_EXPORT void hio_set_keepalive_timeout(hio_t* io, int timeout_ms DEFAULT(HIO_DEFAULT_KEEPALIVE_TIMEOUT));
设置心跳
每隔一段时间触发发送心跳包回调
/*void send_heartbeat(hio_t* io) {static char buf[] = "PING\r\n";hio_write(io, buf, 6);}hio_set_heartbeat(io, 3000, send_heartbeat);*/typedef void (*hio_send_heartbeat_fn)(hio_t* io);// heartbeat interval => hio_send_heartbeat_fnHV_EXPORT void hio_set_heartbeat(hio_t* io, int interval_ms, hio_send_heartbeat_fn fn);
libhv完美结合openssl
libhv中使用openssl库实现TCP加密通信,这是几乎所有异步IO通信库都没有做的一点,而且libhv中开启SSL特别简单,仅需两个API
1、初始化全局的SSL_CTX,见base/ssl_ctx.h
int ssl_ctx_init(const char* crt_file, const char* key_file, const char* ca_file);
2、启用SSL,见event/hloop.h
int hio_enable_ssl(hio_t* io);
libhv中的https即是最好的例子:
sudo apt-get install openssl libssl-dev # ubuntu下安装openssl依赖make cleanmake WITH_OPENSSL=yes修改配置文件etc/httpd.conf => ssl = onbin/httpd -dbin/curl -v https://localhost:8080curl -v https://localhost:8080 --insecure
master-worker 多进程|多线程模型
大多数库提供了ThreadPool线程池实现多线程模型 nginx中则实现了master-workers多进程模型 多线程的好处是数据共享以及跨平台性好(windows下实现多进程可不好做) 多进程的好处是一个worker进程崩溃了,不影响其它worker进程正常工作
libhv中提供了hthread_create创建线程,和spawn_proc(封装了fork)衍生进程 并封装了master-workers模型,见utils/hmian.h中定义的master_workers_run函数 给定一个工作函数(包含一个事件循环),可自由扩展成多进程 or 多线程 or 多进程|多线程 三种模式 http_server_run即是调用了master_worker_run实现的,见效果图:

简单说下master_workers_run的实现:


最后,如果你看到了这里,觉得该项目不错的,请github 上star下,支持下国内开源,感谢!
C++第三方常用网络库 - 爱谈天的软骨头 - 博客园
libevent、libev、libuv、libhv、asio、poco、muduo - 知乎
【Web开发】C++实现Web服务器(libevent,libcurl,libuv,poco)_爱看书的小沐的博客-CSDN博客_c++web开发


Spring Cloud 学习笔记之Spring Cloud Stream")


")


还没有评论,来说两句吧...