springboot 3 下连接 mysql 数据库以及整合 mybatis-plus
测试示例
在 Springboot 3.x版本下整合 mysql 以及mybatis-plus,并进行简单测试,解决实现过程中所遇到的常见 Bug。
引入依赖
<!-- 数据库驱动 --><dependency><groupId>mysql</groupId><artifactId>mysql-connector-java</artifactId></dependency><!-- lombok --><dependency><groupId>org.projectlombok</groupId><artifactId>lombok</artifactId></dependency><!-- mybatis-plus 3.5.3 才支持 spring boot 3--><dependency><groupId>com.baomidou</groupId><artifactId>mybatis-plus-boot-starter</artifactId><version>3.5.3</version></dependency>
配置 application.yml
# mysql 配置datasource:driver-class-name: com.mysql.cj.jdbc.Driverurl: jdbc:mysql://localhost:3306/community?useSSL=false&serverTimezone=UTC&useUnicode=true&characterEncoding=utf8username: rootpassword: yumuingtype: com.zaxxer.hikari.HikariDataSourcehikari:maximum-pool-size: 15minimum-idle: 5idle-timeout: 30000# mybatis-plus 配置mybatis-plus:configuration:map-underscore-to-camel-case: trueauto-mapping-behavior: fulllog-impl: org.apache.ibatis.logging.stdout.StdOutImpluse-generated-keys: truemapper-locations: classpath*:mapper/**/*Mapper.xmltype-aliases-package: top.yumuing.community.entity
创建 MySQL 数据库
创建 community 数据库,运行以下 SQL 代码完成数据表创建:
INSERT INTO user (id, name, email) VALUES(1, 'Jone', 'test1@baomidou.com'),(2, 'Jack','test2@baomidou.com'),(3, 'Tom','test3@baomidou.com'),(4, 'Sandy', 'test4@baomidou.com'),(5, 'Billie','test5@baomidou.com');Query OK, 5 rows affected (0.01 sec)Records: 5 Duplicates: 0 Warnings: 0mysql> DROP TABLE IF EXISTS `user`;CREATE TABLE `user` (`id` int DEFAULT NULL,`name` varchar(20) COLLATE utf8_unicode_ci DEFAULT NULL,`age` int DEFAULT NULL) ENGINE=InnoDB DEFAULT CHARSET=utf8 COLLATE=utf8_unicode_ci;
测试 MySQL 连接
@ResourceDataSource dataSource;@Testvoid contextLoadsOne() throws Exception{System.out.println("获取的数据库连接为:"+dataSource.getConnection());}
控制台输出以下内容即为 MySQL 连接配置成功:
获取的数据库连接为:HikariProxyConnection@54056059 wrapping com.mysql.cj.jdbc.ConnectionImpl@5611bba
测试整合 Mybatis-plus 简单配置
@Resourceprivate UserMapper userMapper;@Testvoid contextLoadsTwo() {List<User> list = userMapper.selectList(null);list.forEach(item-> System.out.println(item));}
控制台输出以下内容即为配置 Mybatis-plus 成功
User(id=1, name=张三, age=20)User(id=2, name=李四, age=22)User(id=3, name=王五, age=30)
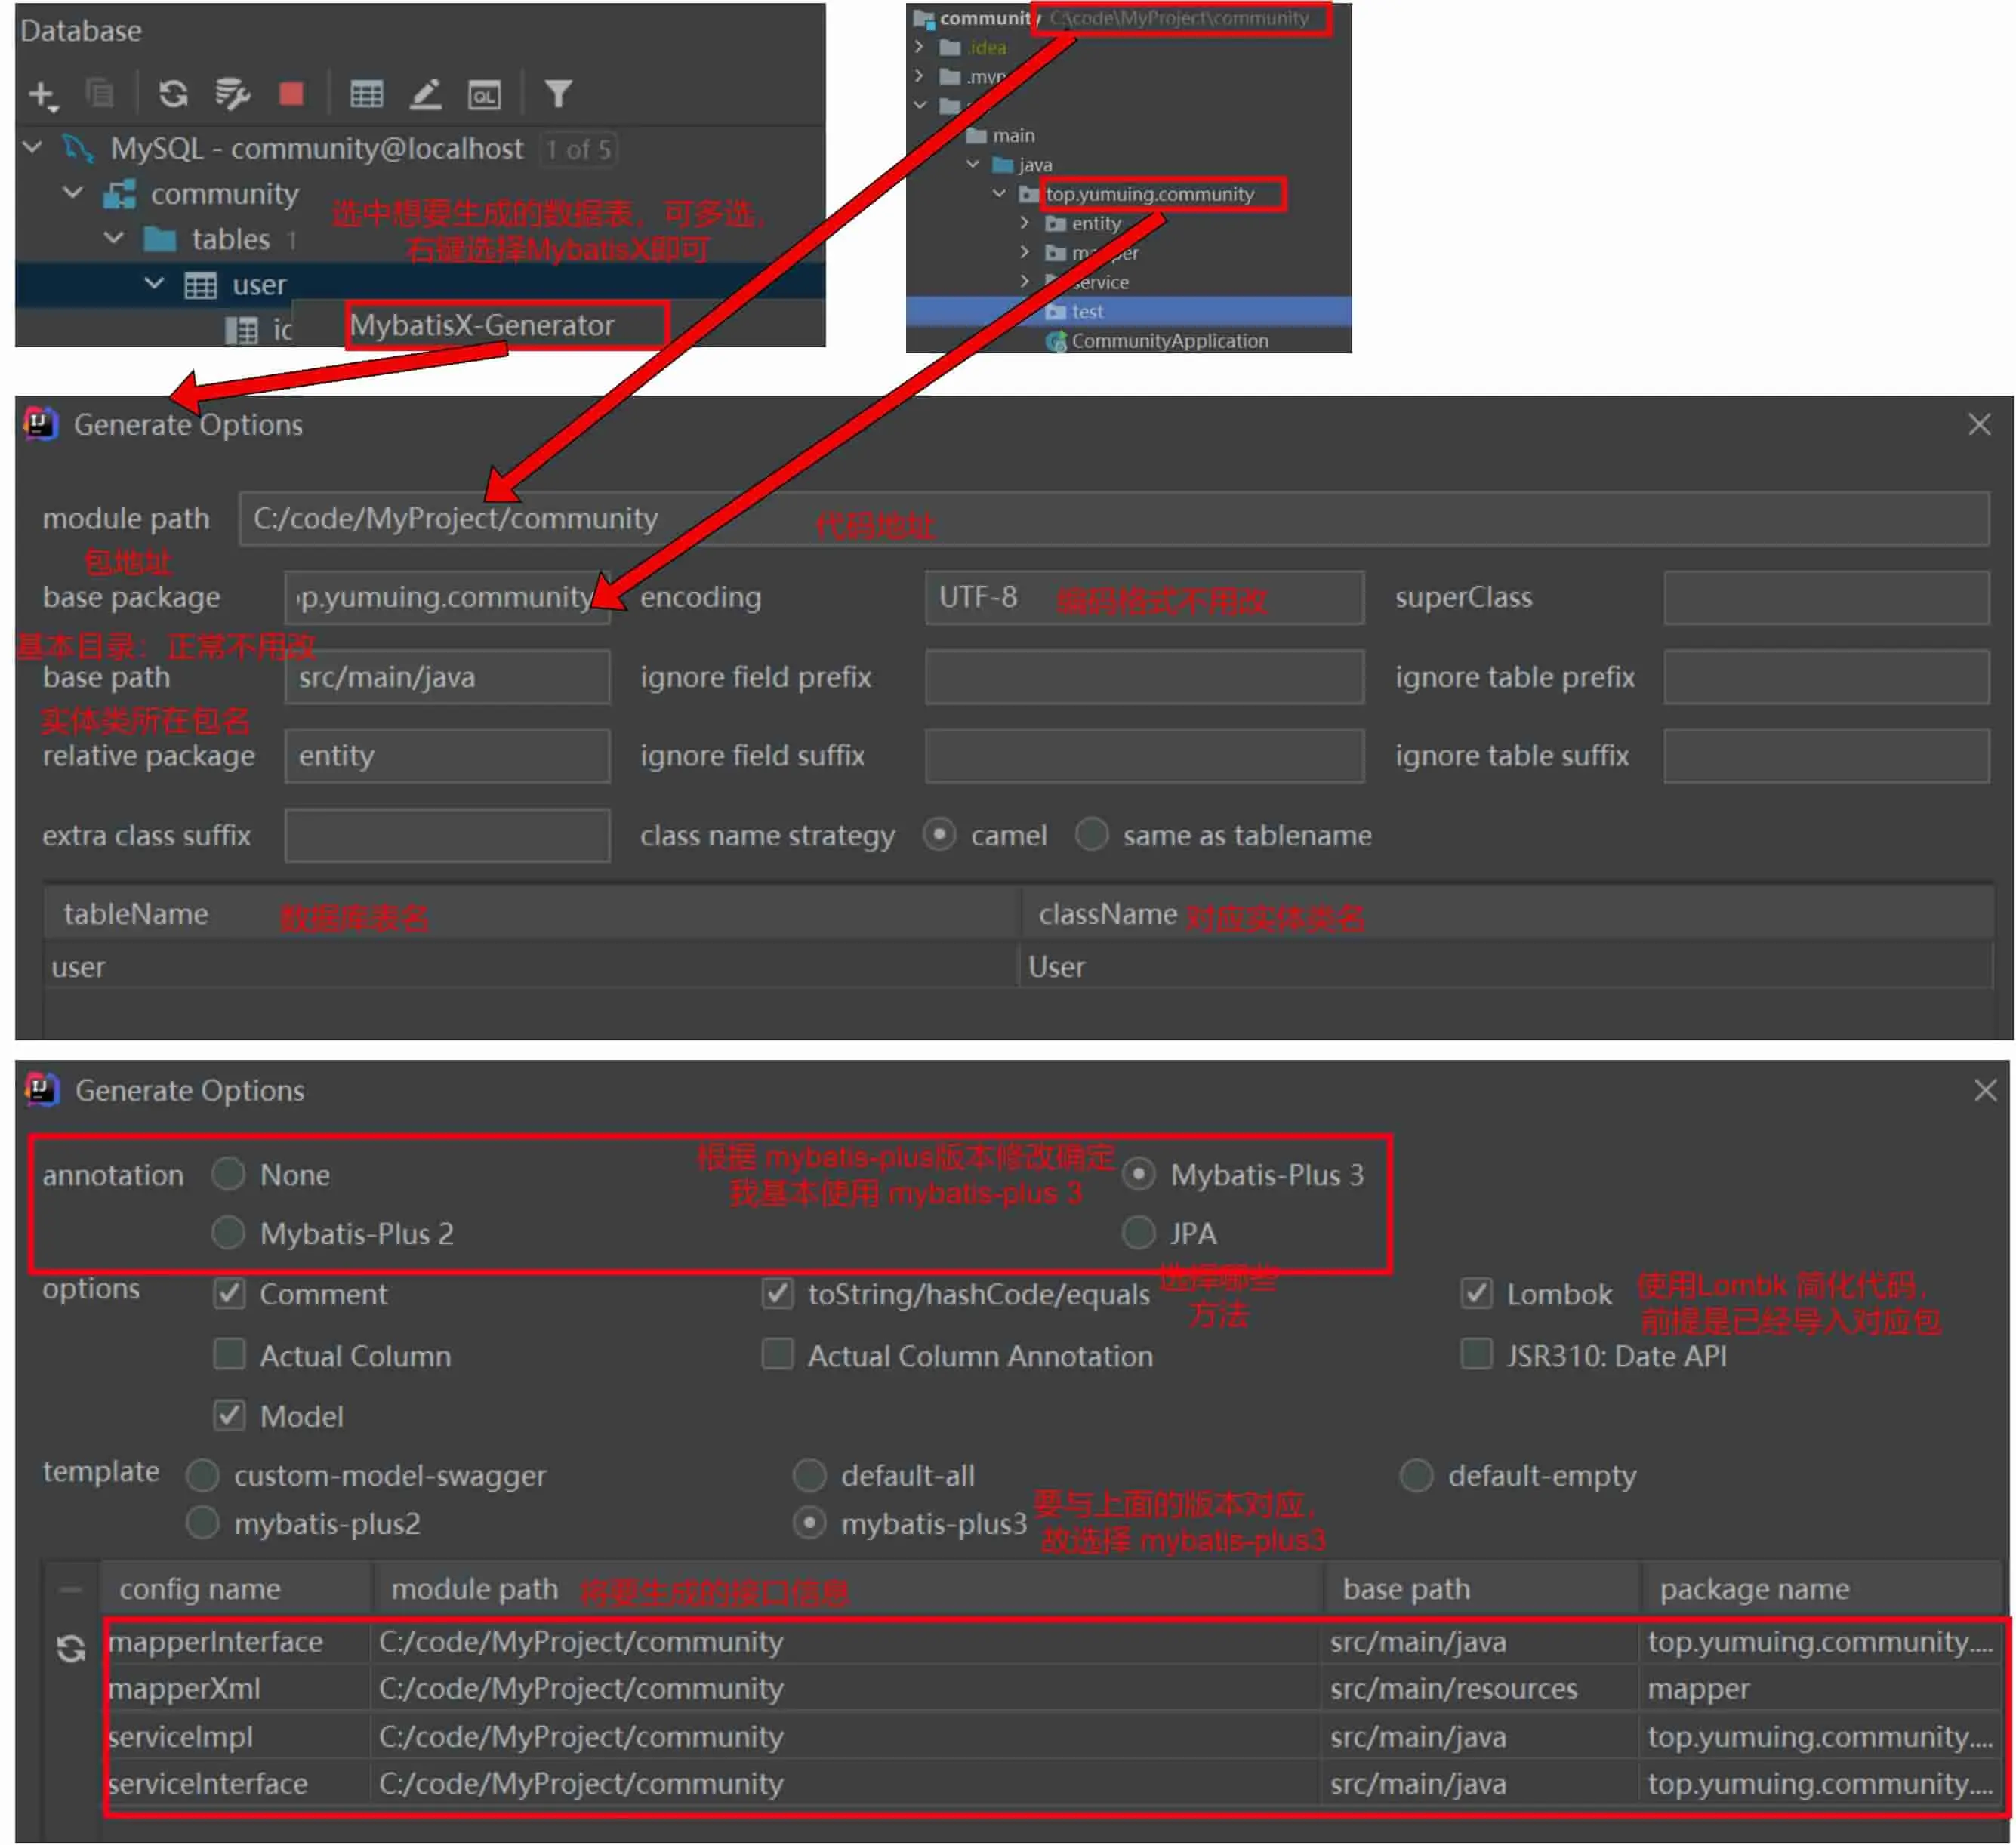
当然,我们也可以使用 MybatisX 插件对 mapper.class、mapper.xml、service.class、serviceImpl.class 进行生成,步骤如下:
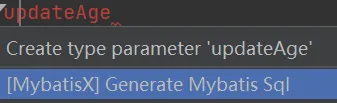
并且,我们也能够使用 MybatisX 插件实现 xml 文件中,mapper 对应的 SQL 代码,在 mapper.class 中写出想要在 xml 中生成代码的方法名,一定要以 select、insert、update等等进行开头,之后就会有对应提示,选中即可,完成后,往前几格子,方法名变红,选择报错点右键选中以下内容即可生成相关代码:
xml 文件中 selectAllByIdOrderByAge 生成代码如下:
<sql id="Base_Column_List">id,name,age</sql><select id="selectAllByIdOrderByAge" resultMap="BaseResultMap">select<include refid="Base_Column_List"/>from userwhereid = #{id,jdbcType=NUMERIC}order by age</select>
测试代码如下:
@Testvoid cotextLoadsFour(){List<User> users = userMapper.selectAllByIdOrderByAge(3);users.forEach(item-> System.out.println(item));}
Bug 总结
Property ‘sqlSessionFactory’ or ‘sqlSessionTemplate’ are required
springboot 3版本整合 mybatis 3.0.5版本控制台报错 Property ‘sqlSessionFactory’ or ‘sqlSessionTemplate’ are required,NestedIOException 这个类在 Spring 6 版本中直接删除了。对的,直接删除了。而 MyBatis 老版本还没有同步更新,所以直接就报红了。而整合 mybatis 的 mybatis-plus 自然也会报红。
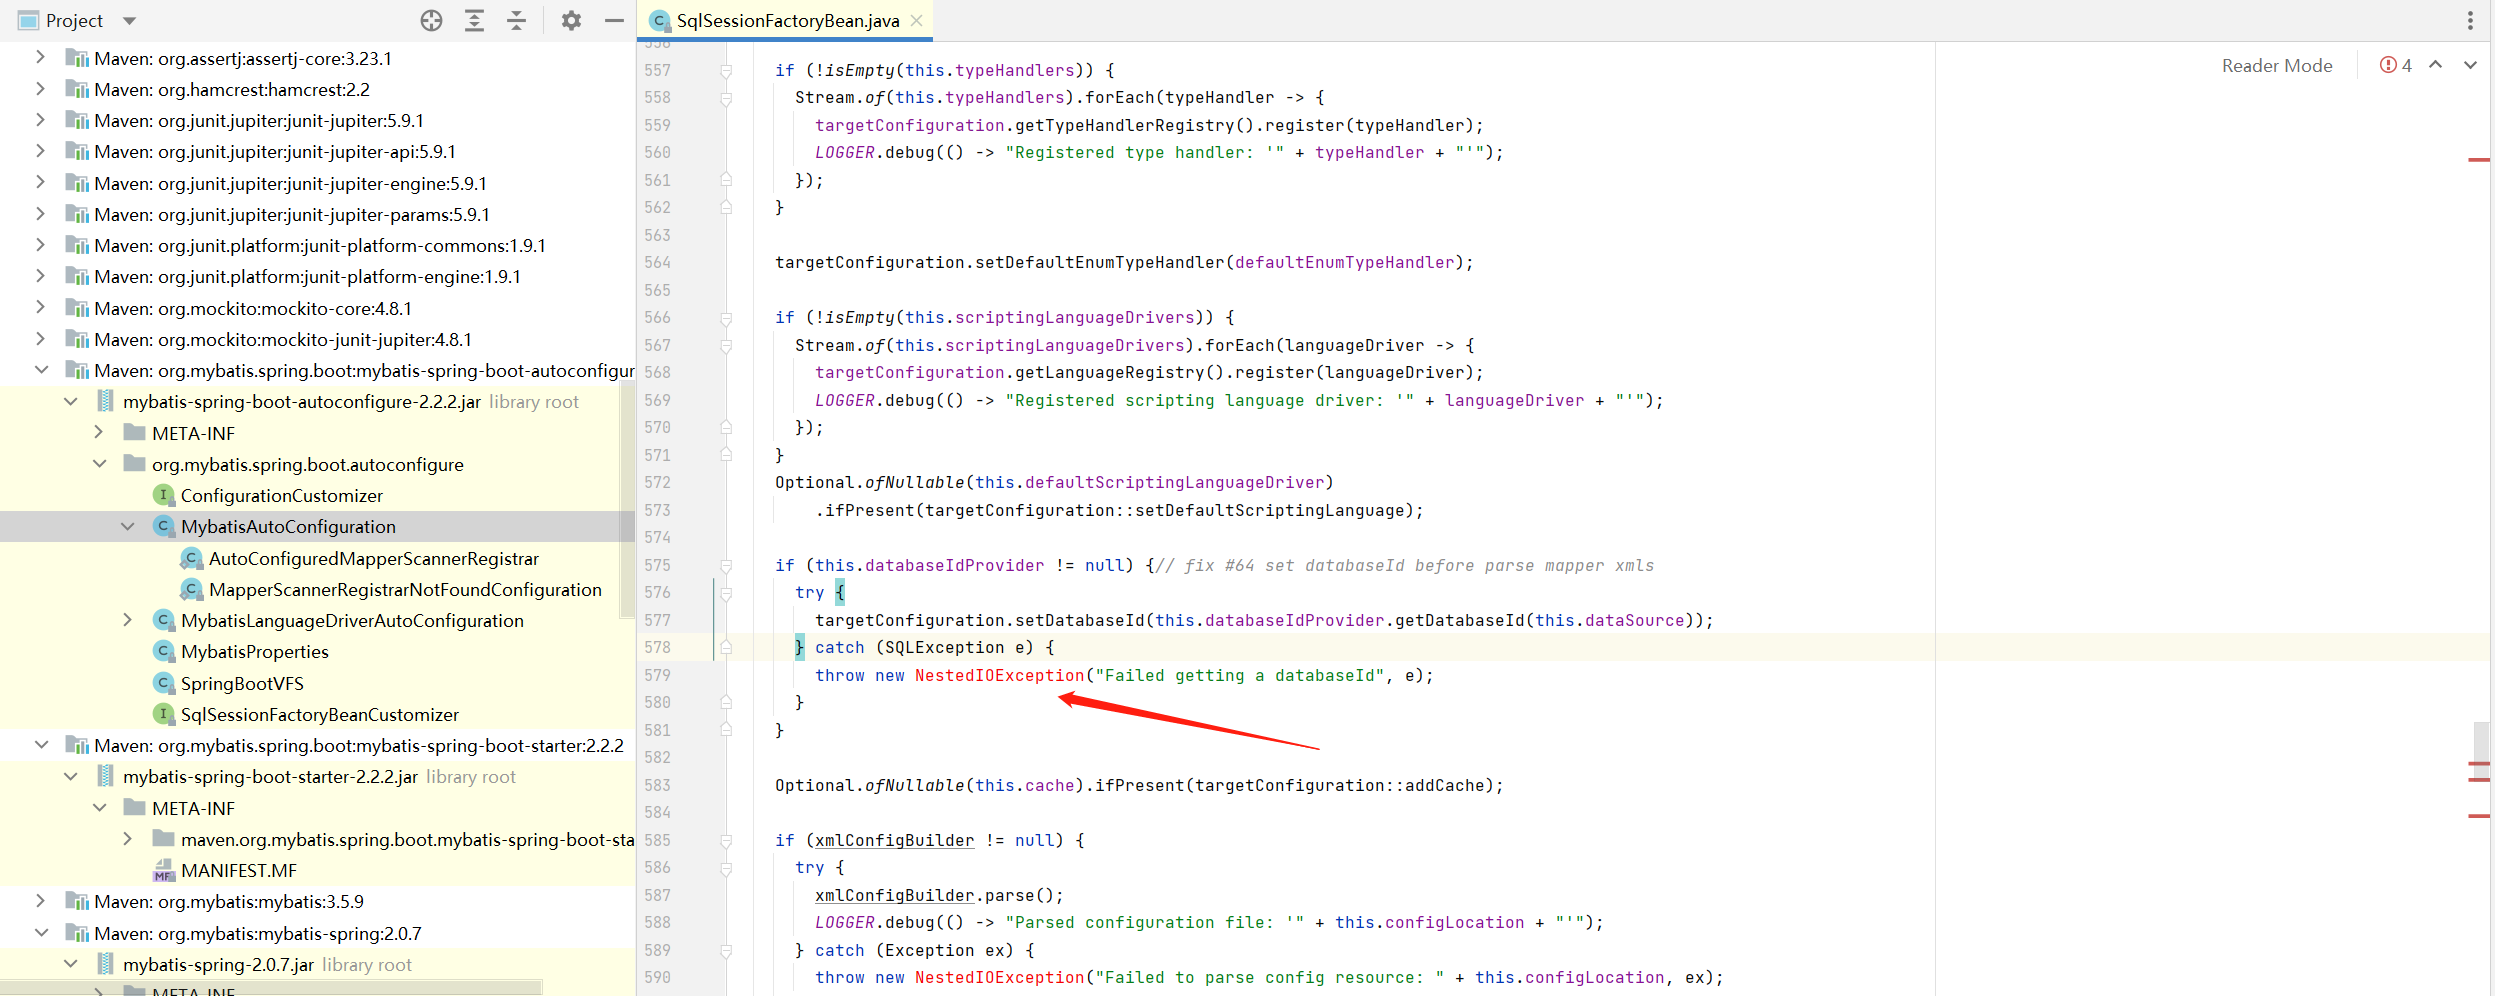
2022 年 11 月26 日凌晨,mybatis-spring-boot 正式发布 3.0.0 版本,完全支持 Spring Boot 3 了。mybatis-plus 也在 2022.12.28 的 3.5.3 支持了 Spring Boot 3 。最好解决办法就是升级版本。
Could not autowire. No beans of ‘DataSource’ type found
- 检查项目结构,主启动类位置是否正确
- 把自动装配@Autowired换成@Resource
Driver com.mysql.jdbc.Driver claims to not accept jdbcUrl
该报错是配置文件路径错误,重点检查url路径,3306后的 test 为数据库名,注意修改成数据库已有数据库名
mysql8.x版本URL为 jdbc //localhost:3306/test?useSSL=false&serverTimezone=UTC&useUnicode=true&characterEncoding=utf8
Cannot resolve method ‘assertEquals’ in ‘Assert’
在测试方法中,使用该方法报错,没引入 import org.junit.Assert; 的Assert 包,解决方法如下:
引入 junit 依赖
<dependency><groupId>junit</groupId><artifactId>junit</artifactId><version>4.12</version></dependency>
- 导入正确包 import org.junit.Assert; 的Assert
Injection of resource dependencies failed
测试方法控制台输出:Injection of resource dependencies failed
确定报错对象为 userMapper,发现没有指定 MapperScan,解决如下:
在启动类加入:@MapperScan(“top.yumuing.community.mapper”) 即可
Could not autowire. No beans of ‘DataSource’ type found.
编译报错:Could not autowire. No beans of ‘DataSource’ type found. 代码如下:
@AutowiredDataSource dataSource;
修改 @Autowired 为 @Resource 即可解决
Could not autowire. No beans of ‘UserMapper’ type found.
@Autowiredprivate UserMapper userMapper;
修改 @Autowired 为 @Resource 即可解决


还没有评论,来说两句吧...