使用 PHP 和 MySQL 的投票和投票系统
Poll and Voting System with PHP and MySQL
在本教程中,我们将使用 PHP 和 MySQL 创建一个安全的投票和投票系统,您可以使用它以一种固执己见的方式与您的听众交流。
您将学习如何创建投票、实施投票系统、删除投票以及填充已发布投票的列表。
在投票创建阶段,我们将能够指定任意数量的答案,因为所有答案都将存储在单独的数据库表中。一个表将专用于投票,我们可以存储与投票相关的数据(标题、描述等),另一个用于存储所有答案,然后将两个表关联以填充列表。
高级包包括附加功能和源代码的下载链接。
内容
入门
- 您将在本教程中学到什么
- 要求
- 文件结构和设置
- 创建数据库和设置表
- 创建样式表 (CSS3)
使用 PHP 创建投票和投票系统
- 功能
- 索引页
- 创建页面
- 投票页面
- 结果页面
- 删除页面
1. 入门
在我们开始编写民意调查和投票系统之前,需要满足一些要求。我们需要安装开发工具并为我们的应用设置文件结构。
1.1。您将在本教程中学到什么
- 表单设计— 使用 HTML5 和 CSS3 设计投票和投票应用程序。
- 投票系统— 使用 PHP 和 MySQL 创建一个有效的投票系统(创建投票、删除投票和查看投票)。
- 投票系统——每次投票将包含用户可以选择投票并随后查看结果的答案。
- MySQL 数据库交互— 使用 PHP PDO 接口与 MySQL 数据库交互。在创建阶段输入的所有数据都将存储在 MySQL 数据库中。
- 基本模板系统——我们将为我们的应用程序创建一个基本模板系统,其中包括页眉和页脚功能。然后可以在我们创建的所有页面上实现这些功能。这样我们就不必一遍又一遍地编写相同的代码。
1.2. 要求
- 下载并安装XAMPP — XAMPP 是一个 Web 服务器,其中包括 Web 开发人员的基本软件(PHP、MySQL、Apache 等)。如果您已经安装了开发服务器,请跳过此步骤。
1.3. 文件结构和设置
导航到您的 XAMPP htdocs目录(通常位于C:\xampp\htdocs)并创建以下文件和目录:
文件结构
\— phppoll
|— functions.php
|— index.php
|— create.php
|— vote.php
|— result.php
|— delete.php
|— style.css
每个文件将包含以下内容:
- functions.php — 函数文件将包含模板和数据库连接函数。
- index.php — 索引页面将包含已发布的民意调查列表和导航按钮。
- create.php — 创建页面将包含表单输入字段,我们可以使用它来创建新的投票。
- vote.php — 投票页面将包含投票答案和投票选项。
- result.php — 结果页面将显示指定投票的结果,而每个答案将显示投票数和百分比条。
- style.css — 投票和投票系统的样式表 (CSS3)。
2. 创建数据库和设置表
如果你已经安装了 XAMPP,你可以使用phpMyAdmin创建 MySQL 数据库。虽然,您需要确保启动 Web 服务器:打开 XAMPP 控制面板并单击 Apache 和 MySQL 的启动按钮。
- 在浏览器中导航到http://localhost/phpmyadmin/。
单击顶部的SQL选项卡并执行以下 SQL 语句:
CREATE TABLE IF NOT EXISTS
polls(`id` int(11) NOT NULL AUTO_INCREMENT,`title` text NOT NULL,`description` text NOT NULL,PRIMARY KEY (`id`)
) ;
INSERT INTO
polls(id,title,description) VALUES (1, ‘What’’s your favorite programming language?’, ‘’);CREATE TABLE IF NOT EXISTS
poll_answers(`id` int(11) NOT NULL AUTO_INCREMENT,`poll_id` int(11) NOT NULL,`title` text NOT NULL,`votes` int(11) NOT NULL DEFAULT '0',PRIMARY KEY (`id`)
) ;
INSERT INTO
poll_answers(id,poll_id,title,votes) VALUES (1, 1, ‘PHP’, 0), (2, 1, ‘Python’, 0), (3, 1, ‘C#’, 0), (4, 1, ‘Java’, 0);
在 phpMyAdmin 中,我们的数据库应如下所示:

每个表和与其关联的列的摘要:
民意调查表——该表将包含与我们创建的民意调查相关的信息(标题和描述)。
- id — 投票的唯一 ID,将自动递增。
- title — 投票的标题,可以是问题等。
- description — 轮询的描述,在创建阶段是可选的。
poll_answers表 - 该表将包含我们创建的民意调查的所有答案。
- id — 唯一 ID,将自动递增。
- poll_id — 投票 ID,将与 polls 表中的id列相关联。这就是我们可以关联两个表的方式。
- title — 投票答案的标题。
- 票数——答案的票数。
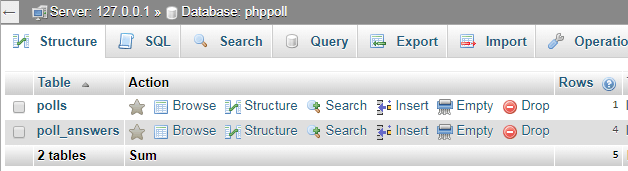
为确保数据库已成功导入,您可以检查phpMyAdmin — 单击左侧导航面板中的数据库名称,您应该会看到以下内容:
3. 创建样式表 (CSS3)
样式表将格式化我们的投票和投票系统的结构,并使其看起来更有吸引力。将以下 CSS 代码添加到style.css文件中:
* {box-sizing: border-box;font-family: -apple-system, BlinkMacSystemFont, "segoe ui", roboto, oxygen, ubuntu, cantarell, "fira sans", "droid sans", "helvetica neue", Arial, sans-serif;font-size: 16px;-webkit-font-smoothing: antialiased;-moz-osx-font-smoothing: grayscale;}body {background-color: #FFFFFF;margin: 0;}.navtop {background-color: #3f69a8;height: 60px;width: 100%;border: 0;}.navtop div {display: flex;margin: 0 auto;width: 1000px;height: 100%;}.navtop div h1, .navtop div a {display: inline-flex;align-items: center;}.navtop div h1 {flex: 1;font-size: 24px;padding: 0;margin: 0;color: #ecf0f6;font-weight: normal;}.navtop div a {padding: 0 20px;text-decoration: none;color: #c5d2e5;font-weight: bold;}.navtop div a i {padding: 2px 8px 0 0;}.navtop div a:hover {color: #ecf0f6;}.content {width: 1000px;margin: 0 auto;}.content h2 {margin: 0;padding: 25px 0;font-size: 22px;border-bottom: 1px solid #ebebeb;color: #666666;}.home .create-poll {display: inline-block;text-decoration: none;background-color: #38b673;font-weight: bold;font-size: 14px;border-radius: 5px;color: #FFFFFF;padding: 10px 15px;margin: 15px 0;}.home .create-poll:hover {background-color: #32a367;}.home table {width: 100%;padding-top: 30px;border-collapse: collapse;}.home table thead {background-color: #ebeef1;border-bottom: 1px solid #d3dae0;}.home table thead td {padding: 10px;font-weight: bold;color: #767779;font-size: 14px;}.home table tbody tr {border-bottom: 1px solid #d3dae0;}.home table tbody tr:nth-child(even) {background-color: #fbfcfc;}.home table tbody tr:hover {background-color: #376ab7;}.home table tbody tr:hover td {color: #FFFFFF;}.home table tbody tr:hover td:nth-child(1) {color: #FFFFFF;}.home table tbody tr td {padding: 10px;}.home table tbody tr td:nth-child(1) {color: #a5a7a9;}.home table tbody tr td.actions {padding: 8px;text-align: right;}.home table tbody tr td.actions .view, .home table tbody tr td.actions .edit, .home table tbody tr td.actions .trash {display: inline-flex;text-align: right;text-decoration: none;color: #FFFFFF;padding: 10px 12px;border-radius: 5px;}.home table tbody tr td.actions .trash {background-color: #b73737;}.home table tbody tr td.actions .trash:hover {background-color: #a33131;}.home table tbody tr td.actions .edit {background-color: #37afb7;}.home table tbody tr td.actions .edit:hover {background-color: #319ca3;}.home table tbody tr td.actions .view {background-color: #37b770;}.home table tbody tr td.actions .view:hover {background-color: #31a364;}.update form {padding: 15px 0;display: flex;flex-flow: column;width: 400px;}.update form label {display: inline-flex;width: 100%;padding: 10px 0;margin-right: 25px;}.update form input, .update form textarea {padding: 10px;width: 100%;margin-right: 25px;margin-bottom: 15px;border: 1px solid #cccccc;}.update form textarea {height: 200px;}.update form input[type="submit"] {display: block;background-color: #38b673;border: 0;font-weight: bold;font-size: 14px;color: #FFFFFF;cursor: pointer;width: 200px;margin-top: 15px;border-radius: 5px;}.update form input[type="submit"]:hover {background-color: #32a367;}.delete .yesno {display: flex;}.delete .yesno a {display: inline-block;text-decoration: none;background-color: #38b673;font-weight: bold;color: #FFFFFF;padding: 10px 15px;margin: 15px 10px 15px 0;border-radius: 5px;}.delete .yesno a:hover {background-color: #32a367;}.poll-vote form {display: flex;flex-flow: column;}.poll-vote form label {padding-bottom: 10px;}.poll-vote form input[type="radio"] {transform: scale(1.1);}.poll-vote form input[type="submit"], .poll-vote form a {display: inline-block;padding: 8px;border-radius: 5px;background-color: #38b673;border: 0;font-weight: bold;font-size: 14px;color: #FFFFFF;cursor: pointer;width: 150px;margin-top: 15px;}.poll-vote form input[type="submit"]:hover, .poll-vote form a:hover {background-color: #32a367;}.poll-vote form a {text-align: center;text-decoration: none;background-color: #37afb7;margin-left: 5px;}.poll-vote form a:hover {background-color: #319ca3;}.poll-result .wrapper {display: flex;flex-flow: column;}.poll-result .wrapper .poll-question {width: 50%;padding-bottom: 5px;}.poll-result .wrapper .poll-question p {margin: 0;padding: 5px 0;}.poll-result .wrapper .poll-question p span {font-size: 14px;}.poll-result .wrapper .poll-question .result-bar {display: flex;height: 25px;min-width: 5%;background-color: #38b673;border-radius: 5px;font-size: 14px;color: #FFFFFF;justify-content: center;align-items: center;}
随意自定义它或使用您自己的样式表。
4. 使用 PHP 创建投票和投票系统
我们终于可以开始用 PHP 编写我们的投票和投票系统了。
4.1。功能
functions.php文件将包含模板和数据库连接函数,我们可以在我们创建的所有页面中实现它们。
编辑functions.php文件并添加:
<?phpfunction pdo_connect_mysql() {// Update the details below with your MySQL details$DATABASE_HOST = 'localhost';$DATABASE_USER = 'root';$DATABASE_PASS = '';$DATABASE_NAME = 'phppoll';try {return new PDO('mysql:host=' . $DATABASE_HOST . ';dbname=' . $DATABASE_NAME . ';charset=utf8', $DATABASE_USER, $DATABASE_PASS);} catch (PDOException $exception) {// If there is an error with the connection, stop the script and display the error.exit('Failed to connect to database!');}}
每次我们想要连接到我们的 MySQL 数据库时,我们所要做的就是执行上面的函数,如下所示:
pdo_connect_mysql();
如果您遇到与 MySQL 的连接问题,您很可能必须更新数据库变量以反映您的 MySQL 凭据和数据库名称。如果您使用 XAMPP,则不必更改变量。
之后添加:
// Template header, feel free to customize it, but DO NOT INDENT THE PHP CODEfunction template_header($title) {// DO NOT INDENT THE BELOW PHP CODE OR YOU WILL ENCOUNTER ISSUESecho <<<EOT<!DOCTYPE html><html><head><meta charset="utf-8"><title>$title</title><link href="style.css" rel="stylesheet" type="text/css"><link rel="stylesheet" href="https://use.fontawesome.com/releases/v5.7.1/css/all.css"></head><body><nav class="navtop"><div><h1>Voting & Poll System</h1><a href="index.php"><i class="fas fa-poll-h"></i>Polls</a></div></nav>EOT;}
我们模板的标题功能,包括文档的标题部分和将出现在每个页面上的顶部导航栏。我们还包括Font Awesome库,这是一个免费的图标库(我们将在我们的应用程序中使用的图标)。
之后添加:
// Template footerfunction template_footer() {// DO NOT INDENT THE PHP CODEecho <<<EOT</body></html>EOT;}
模板页脚功能,基本上就是文档的结尾:关闭 HTML 标签等。
现在,如果我们想创建一个新页面,我们可以实现如下代码:
<?php// examplepage.phpinclude 'functions.php';$pdo = pdo_connect_mysql();?><?=template_header('Example Page')?><p>Hello World! Welcome to my custom page!</p><?=template_footer()?>
太棒了,对吧?现在我们不必在所有 PHP 文件中包含相同的模板函数代码和连接函数代码,因为我们所要做的就是执行该函数。
请注意,以下代码:
<?=template_footer()?>
是以下的简短版本:
<?php echo template_footer(); ?>
这就是我们将要使用的所有创建的函数。
4.2. 索引页
索引页面将包含所有填充的民意调查列表以及我们可以用来查看和删除民意调查的按钮。
编辑index.php文件并添加:
<?php// Include the function fileinclude 'functions.php';// Connect to MySQL$pdo = pdo_connect_mysql();// MySQL query that retrieves all the polls and poll answers$stmt = $pdo->query('SELECT p.*, GROUP_CONCAT(pa.title ORDER BY pa.id) AS answers FROM polls p LEFT JOIN poll_answers pa ON pa.poll_id = p.id GROUP BY p.id');$polls = $stmt->fetchAll(PDO::FETCH_ASSOC);?>
上面的代码将从我们的数据库表中检索所有投票和投票答案,然后我们可以随后以 HTML 表格格式填充列表。
之后添加:
<?=template_header('Polls')?><div class="content home"><h2>Polls</h2><p>Welcome to the home page! You can view the list of polls below.</p><a href="create.php" class="create-poll">Create Poll</a><table><thead><tr><td>#</td><td>Title</td><td>Answers</td><td></td></tr></thead><tbody><?php foreach($polls as $poll): ?><tr><td><?=$poll['id']?></td><td><?=$poll['title']?></td><td><?=$poll['answers']?></td><td class="actions"><a href="vote.php?id=<?=$poll['id']?>" class="view" title="View Poll"><i class="fas fa-eye fa-xs"></i></a><a href="delete.php?id=<?=$poll['id']?>" class="trash" title="Delete Poll"><i class="fas fa-trash fa-xs"></i></a></td></tr><?php endforeach; ?></tbody></table></div><?=template_footer()?>
首先,我们从执行模板头函数开始上面的代码(模板头()),然后使用foreach循环迭代轮询并将它们填充到 HTML 表中,最后,我们使用模板页脚函数 (模板页脚()).
通过表中的 HTML 锚链接,您可以看到我们将传递 ID 参数(使用 GET 请求)到vote.php和delete.php页面。这是 PHP 代码如何知道用户在表格中单击了哪个投票的方式。
提示:要在 PHP 中创建自定义 GET 请求,您可以将参数附加到 URL 中的 PHP 文件,例如:contact.php?name=david&email=david@codeshack.io.
如果我们导航到http://localhost/phppoll/index.php,我们应该看到以下内容:
http://localhost/phppoll/index.php
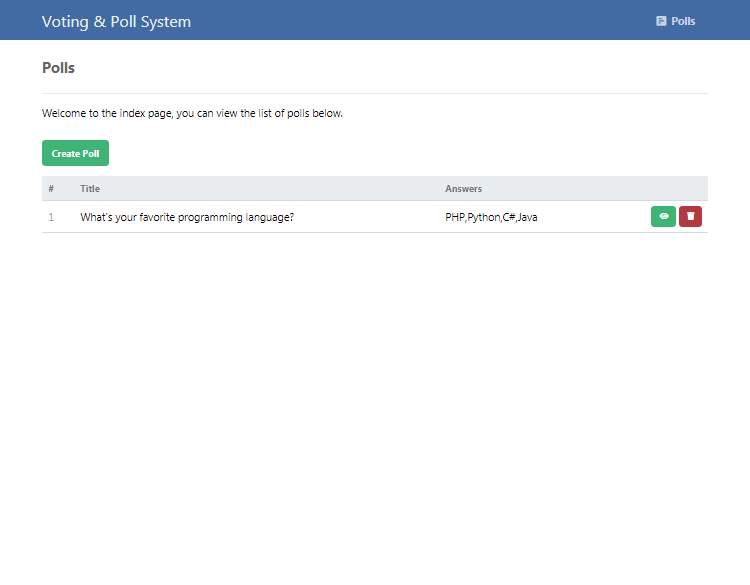
我们现在可以查看在索引页面上创建的投票列表。不要担心按钮不起作用,因为我们尚未创建与它们关联的页面。
4.3. 创建页面
创建页面我们可以使用 HTML 表单和输入字段来创建新的投票,在服务器端,我们可以使用 PHP 和 MySQL 将新记录插入到我们的数据库表中,但是,要做到这一点,我们首先需要使用 PHP 执行 POST 请求。
编辑create.php文件并添加:
<?phpinclude 'functions.php';$pdo = pdo_connect_mysql();$msg = '';
我们将需要使用 MySQL 并使用我们之前创建的模板函数。因此,我们必须包含functions.php文件。这$味精变量将是给用户的输出消息。
之后添加:
// Check if POST data is not emptyif (!empty($_POST)) {// Post data not empty insert a new record// Check if POST variable "title" exists, if not default the value to blank, basically the same for all variables$title = isset($_POST['title']) ? $_POST['title'] : '';$description = isset($_POST['description']) ? $_POST['description'] : '';// Insert new record into the "polls" table$stmt = $pdo->prepare('INSERT INTO polls (title, description) VALUES (?, ?)');$stmt->execute([ $title, $description ]);// Below will get the last insert ID, this will be the poll id$poll_id = $pdo->lastInsertId();// Get the answers and convert the multiline string to an array, so we can add each answer to the "poll_answers" table$answers = isset($_POST['answers']) ? explode(PHP_EOL, $_POST['answers']) : '';foreach($answers as $answer) {// If the answer is empty there is no need to insertif (empty($answer)) continue;// Add answer to the "poll_answers" table$stmt = $pdo->prepare('INSERT INTO poll_answers (poll_id, title) VALUES (?, ?)');$stmt->execute([ $poll_id, $answer ]);}// Output message$msg = 'Created Successfully!';}?>
上面的代码只有在用户点击 HTML 表单中的提交按钮时才会执行,因为它是一个 POST 请求。如果 POST 变量不为空,则在polls和poll_answers表中插入一条新记录——插入poll_answers表中的记录数取决于用户指定的答案数。
我们不仅可以插入新记录,而且还可以保护用户输入,因为准备好的语句将防止 SQL 注入。如果我们使用准备好的语句,我们不需要转义用户输入。
添加之后:
<?=template_header('Create Poll')?><div class="content update"><h2>Create Poll</h2><form action="create.php" method="post"><label for="title">Title</label><input type="text" name="title" id="title" placeholder="Title" required><label for="description">Description</label><input type="text" name="description" id="description" placeholder="Description"><label for="answers">Answers (per line)</label><textarea name="answers" id="answers" placeholder="Description" required></textarea><input type="submit" value="Create"></form><?php if ($msg): ?><p><?=$msg?></p><?php endif; ?></div><?=template_footer()?>
还记得我们之前创建的索引模板吗?我们在技术上使用相同的页眉和页脚函数来构建我们的 HTML 模板。
我们在上面创建的表单可以用来将新记录插入到我们的数据库表中。PHP POST 变量名称反映了 HTML 表单中元素的名称。forms 方法设置为 post,因为我们需要发出 POST 请求。
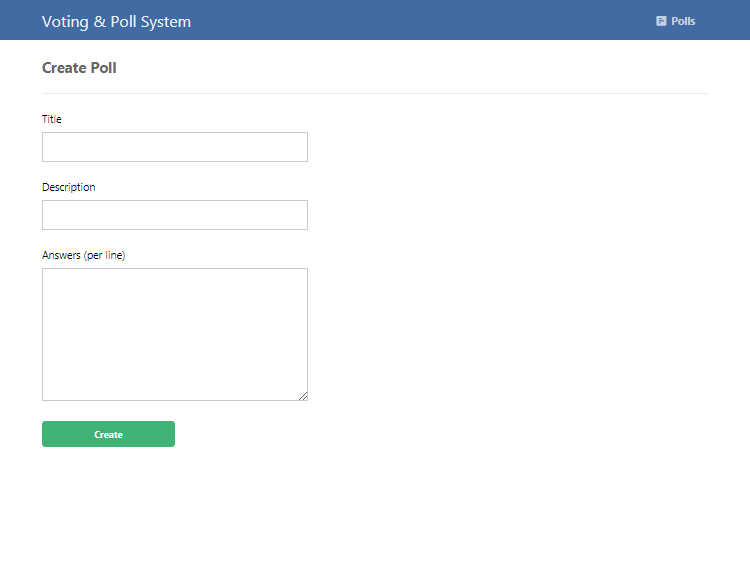
现在,如果我们单击索引页面上的Create Poll按钮,我们将看到以下内容:
http://localhost/phppoll/create.php
这就是我们在数据库表中插入新记录所需要做的一切。
4.4. 投票页面
在投票页面上,用户将能够看到指定投票的填充答案列表,并可以选择投票。他们也可以在不投票的情况下看到结果。
编辑vote.php文件并添加:
<?phpinclude 'functions.php';// Connect to MySQL$pdo = pdo_connect_mysql();// If the GET request "id" exists (poll id)...if (isset($_GET['id'])) {// MySQL query that selects the poll records by the GET request "id"$stmt = $pdo->prepare('SELECT * FROM polls WHERE id = ?');$stmt->execute([ $_GET['id'] ]);// Fetch the record$poll = $stmt->fetch(PDO::FETCH_ASSOC);// Check if the poll record exists with the id specifiedif ($poll) {// MySQL query that selects all the poll answers$stmt = $pdo->prepare('SELECT * FROM poll_answers WHERE poll_id = ?');$stmt->execute([ $_GET['id'] ]);// Fetch all the poll anwsers$poll_answers = $stmt->fetchAll(PDO::FETCH_ASSOC);// If the user clicked the "Vote" button...if (isset($_POST['poll_answer'])) {// Update and increase the vote for the answer the user voted for$stmt = $pdo->prepare('UPDATE poll_answers SET votes = votes + 1 WHERE id = ?');$stmt->execute([ $_POST['poll_answer'] ]);// Redirect user to the result pageheader('Location: result.php?id=' . $_GET['id']);exit;}} else {exit('Poll with that ID does not exist.');}} else {exit('No poll ID specified.');}?>
为了使投票页面正常工作,ID参数必须在 URL 中指定(vote.php?id=2 等)。如果ID参数存在,我们可以通过ID列(投票表)和poll_id列(poll_answers 表)。
我们不仅发出 GET 请求,而且还发出 POST 请求——只有当用户选择一个答案并单击“投票”按钮时,这将随后更新该特定答案的投票(MySQL UPDATE 查询)。在成功的 POST 请求后,用户将被重定向到结果页面 (result.php)。
之后添加:
<?=template_header('Poll Vote')?><div class="content poll-vote"><h2><?=$poll['title']?></h2><p><?=$poll['description']?></p><form action="vote.php?id=<?=$_GET['id']?>" method="post"><?php for ($i = 0; $i < count($poll_answers); $i++): ?><label><input type="radio" name="poll_answer" value="<?=$poll_answers[$i]['id']?>"<?=$i == 0 ? ' checked' : ''?>><?=$poll_answers[$i]['title']?></label><?php endfor; ?><div><input type="submit" value="Vote"><a href="result.php?id=<?=$poll['id']?>">View Result</a></div></form></div><?=template_footer()?>
上面的模板将迭代每个答案并填充我们 HTML 表单所需的输入单选字段。
如果我们单击索引页面上测试投票旁边的眼睛图标,我们将看到以下内容:
http://localhost/phppoll/vote.php?id=1
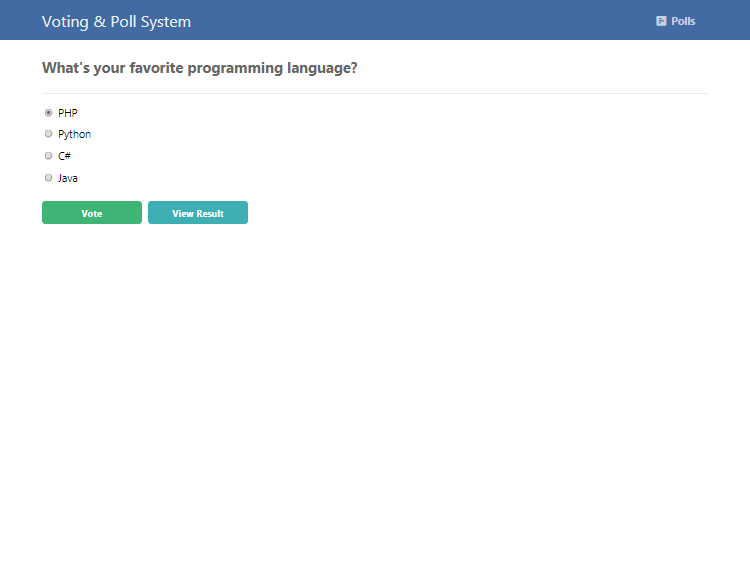
我们现在可以对我们创建的民意调查进行投票。
4.5. 结果页面
在结果页面上,用户可以查看填充的答案列表以及投票数。
编辑result.php文件并添加:
<?phpinclude 'functions.php';// Connect to MySQL$pdo = pdo_connect_mysql();// If the GET request "id" exists (poll id)...if (isset($_GET['id'])) {// MySQL query that selects the poll records by the GET request "id"$stmt = $pdo->prepare('SELECT * FROM polls WHERE id = ?');$stmt->execute([ $_GET['id'] ]);// Fetch the record$poll = $stmt->fetch(PDO::FETCH_ASSOC);// Check if the poll record exists with the id specifiedif ($poll) {// MySQL Query that will get all the answers from the "poll_answers" table ordered by the number of votes (descending)$stmt = $pdo->prepare('SELECT * FROM poll_answers WHERE poll_id = ? ORDER BY votes DESC');$stmt->execute([ $_GET['id'] ]);// Fetch all poll answers$poll_answers = $stmt->fetchAll(PDO::FETCH_ASSOC);// Total number of votes, will be used to calculate the percentage$total_votes = 0;foreach($poll_answers as $poll_answer) {// Every poll answers votes will be added to total votes$total_votes += $poll_answer['votes'];}} else {exit('Poll with that ID does not exist.');}} else {exit('No poll ID specified.');}?>
与投票页面类似,我们需要检索 ID GET 参数(result.php?id=2 等),然后我们可以从数据库中检索投票结果——按投票数排序(降序)。使用 foreach 循环迭代答案,并相应地计算总票数。
之后添加:
<?=template_header('Poll Results')?><div class="content poll-result"><h2><?=$poll['title']?></h2><p><?=$poll['description']?></p><div class="wrapper"><?php foreach ($poll_answers as $poll_answer): ?><div class="poll-question"><p><?=$poll_answer['title']?> <span>(<?=$poll_answer['votes']?> Votes)</span></p><div class="result-bar" style= "width:<?=@round(($poll_answer['votes']/$total_votes)*100)?>%"><?=@round(($poll_answer['votes']/$total_votes)*100)?>%</div></div><?php endforeach; ?></div></div><?=template_footer()?>
上面的模板将迭代答案并以 HTML 格式填充它们以及投票数和百分比条。
导航到测试投票,您可以单击投票或单击查看结果按钮,随后您应该会看到如下内容:
http://localhost/
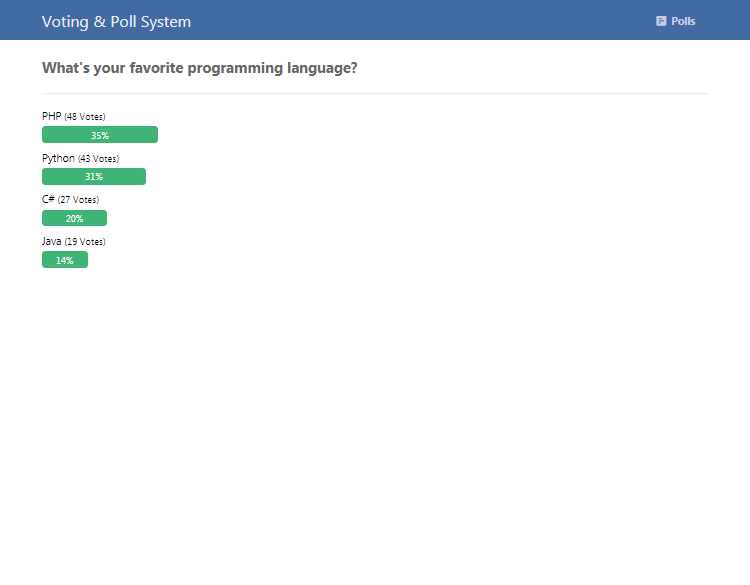
这基本上就是你如何填充投票结果并使用一些 CSS 魔法来创建百分比栏。
4.6. 删除页面
在删除页面上,我们将能够删除投票——我们将包含一个确认信息,这样用户就不会意外删除错误的投票。
编辑delete.php文件并添加:
<?phpinclude 'functions.php';$pdo = pdo_connect_mysql();$msg = '';// Check that the poll ID existsif (isset($_GET['id'])) {// Select the record that is going to be deleted$stmt = $pdo->prepare('SELECT * FROM polls WHERE id = ?');$stmt->execute([ $_GET['id'] ]);$poll = $stmt->fetch(PDO::FETCH_ASSOC);if (!$poll) {exit('Poll doesn\'t exist with that ID!');}// Make sure the user confirms beore deletionif (isset($_GET['confirm'])) {if ($_GET['confirm'] == 'yes') {// User clicked the "Yes" button, delete record$stmt = $pdo->prepare('DELETE FROM polls WHERE id = ?');$stmt->execute([ $_GET['id'] ]);// We also need to delete the answers for that poll$stmt = $pdo->prepare('DELETE FROM poll_answers WHERE poll_id = ?');$stmt->execute([ $_GET['id'] ]);// Output msg$msg = 'You have deleted the poll!';} else {// User clicked the "No" button, redirect them back to the home/index pageheader('Location: index.php');exit;}}} else {exit('No ID specified!');}?>
如果投票 ID 已指定且存在于我们的投票表中,我们可以提示用户是否要删除投票。如果他们选择Yes,投票将与投票答案一起被永久删除。将使用 DELETE 语句从polls和poll_answers数据库表中删除数据。
之后添加:
<?=template_header('Delete')?><div class="content delete"><h2>Delete Poll #<?=$poll['id']?></h2><?php if ($msg): ?><p><?=$msg?></p><?php else: ?><p>Are you sure you want to delete poll #<?=$poll['id']?>?</p><div class="yesno"><a href="delete.php?id=<?=$poll['id']?>&confirm=yes">Yes</a><a href="delete.php?id=<?=$poll['id']?>&confirm=no">No</a></div><?php endif; ?></div><?=template_footer()?>
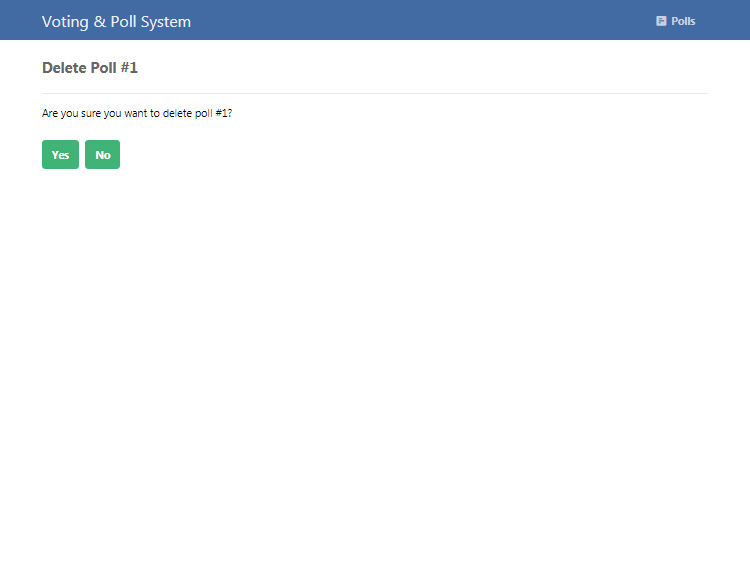
上面的代码是删除页面的模板。如果我们导航到索引页面并单击我们的一项民意调查旁边的垃圾桶图标,我们将看到如下内容:
http://localhost/phppoll/delete.php?id=1
结论
恭喜!您现在已经成功地使用 PHP 和 MySQL 创建了一个投票和投票系统。
接下来是什么?考虑实施一种身份验证功能,限制某些用户创建和删除投票,或为投票和投票系统实施您自己的功能。
如果您喜欢这篇文章,请考虑在社交媒体网站上分享它,因为我们收到的访问者越多,我们可以创建的内容就越多。


完整思路,并用代码封装排序函数")


‘ 出错问题的解决方法")


还没有评论,来说两句吧...