目录
1,案例1:表格隔行换色
2,案例2:鼠标移入粉色,移出原色【基础+】
2.1:需求说明
2.2:前置知识:鼠标移入移出事件
2.3:前置拓展知识:this关键字
2.4:分析&实现
1,案例1:表格隔行换色
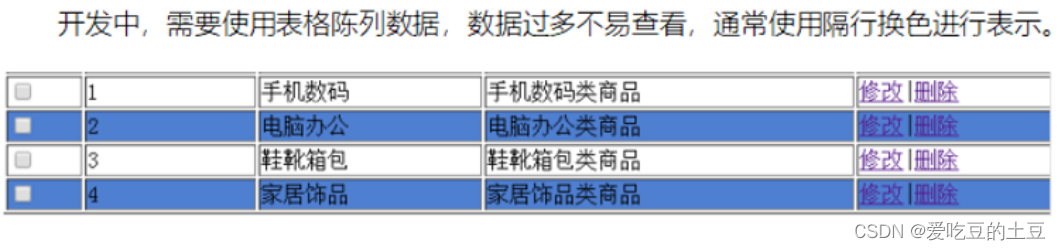
要达到以上效果,仅需要将第二行,第四行tr标签获取到,更改其样式属性即可
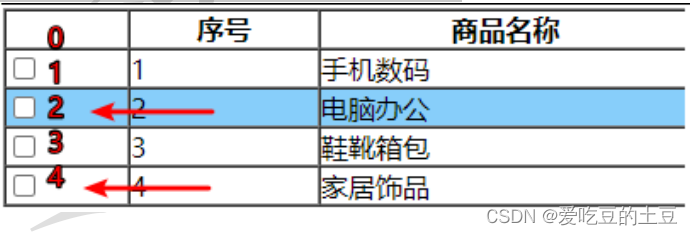
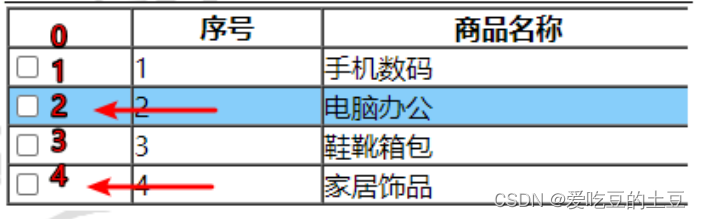
分析:
关键点:
- 获取到指定的tr (遍历时跳过0索引,让偶数索引的元素进行变色)
document.getElementsByTagName(“tr”);
2.修改tr对象 className
元素对象.className=”blue”;
步骤:
//1、获取所有的tr
//2、遍历tr数组,跳过0索引,只需要偶数索引,让偶数索引改变className
代码实现:
| <script>
//一、页面加载完成时,编写要进行的操作
window.onload = function (ev) {
//二、隔行换色操作
//1、获取所有的tr
var trArr = document.getElementsByTagName(“tr”);
//2、遍历tr数组,跳过0索引,只需要偶数索引,让偶数索引改变className
for (var i = 1; i <trArr.length ; i++) {
if(i%2==0){
trArr[i].className= “blue”;
}
}
}
</script> |
1,获取到指定的tr(遍历时跳过0索引,让偶数索引的元素进行变色)
document.getElementsByTagName(“tr”)
2,修改tr对象className 元素对象.className=”blue”
2,案例2:鼠标移入粉色,移出原色【基础+】
2.1:需求说明


分析:
关键点:
- 鼠标移入、移出事件
onmouseover
onmouseout
- 自定义数据保存
2.2:前置知识:鼠标移入移出事件
目标:掌握鼠标移入、移出事件基本绑定方式
掌握事件DOM绑定方式
路径:
- 鼠标移入、移出事件
- DOM方式绑定事件
讲解:
| <!DOCTYPE html>
<html lang=”en”>
<head>
<meta charset=”UTF-8”>
<title>Title</title>
<script>
/
onmouseover 移入
onmouseout 移出
/
function run1() {
var d1 = document.getElementById(“d1”);
d1.style = “width:100px;height: 100px;background-color: blue;”;
}
function run2() {
var d1 = document.getElementById(“d1”);
d1.style = “width:100px;height: 100px;background-color: pink;”;
}
</script>
</head>
<body>
<!—
移入:蓝色
移出:改回粉色
—>
<div id=”d1” style=”width:100px;height: 100px;background-color: pink;“ onmouseover=”run1()“ onmouseout=”run2()“></div>
</body>
</html> |
小结:
onmouseover:鼠标移入再触发事件
onmouseout:鼠标移出再触发事件
DOM绑定方式:
| <!DOCTYPE html>
<html lang=”en”>
<head>
<meta charset=”UTF-8”>
<title>Title</title>
<script>
//需求:在页面加载完成时,为d1元素绑定鼠标移入移出事件
window.onload = function (ev) {
var d1 = document.getElementById(“d1”);
/d1.onmouseover = function (ev1) {
run1();
};/
d1.onmouseover = run1;
d1.onmouseout = run2;
}
function run1() {
var d1 = document.getElementById(“d1”);
d1.style = “width:100px;height: 100px;background-color: blue;”;
}
function run2() {
var d1 = document.getElementById(“d1”);
d1.style = “width:100px;height: 100px;background-color: pink;”;
}
</script>
</head>
<body>
<!—
移入:蓝色
移出:改回粉色
—>
<div id=”d1” style=”width:100px;height: 100px;background-color: pink;“></div>
</body>
</html> |
小结:
DOM绑定方式,不修改HTML前提下,对HTML元素进行页面加载完成时,进行事件绑定。
绑定格式:
- 元素.事件 = function(){};
- 元素.事件 = 方法名;
2.3:前置拓展知识:this关键字
目标:1、掌握this关键字用法
2、掌握this关键字存储自定义数据
路径:
- this关键字常见使用
- this关键字在事件中的应用
- this关键字如何存储自定义数据
讲解:
this关键字常见使用
this当前对象。
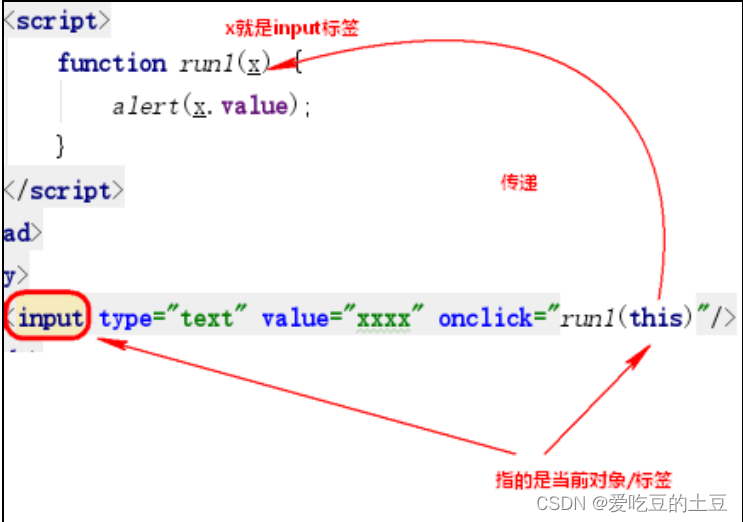
this关键字在事件中的应用:
this关键字如何存储自定义数据
对象[“key”]=”value”;
this[“key”]=”value”;
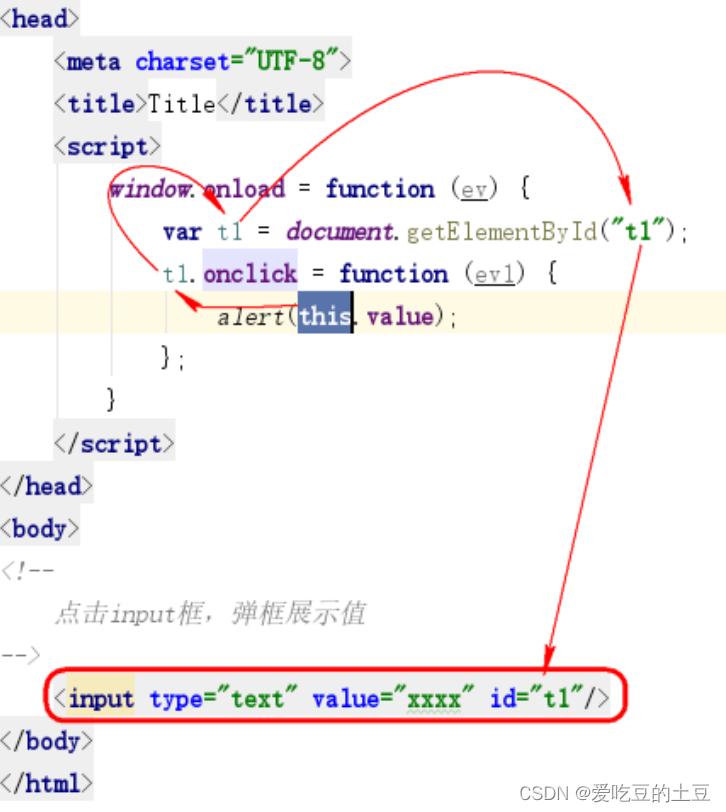
| <!DOCTYPE html>
<html lang=”en”>
<head>
<meta charset=”UTF-8”>
<title>Title</title>
<script>
window.onload = function (ev) {
var t1 = document.getElementById(“t1”);
t1[“username”] = “金雪”;
t1.onclick = function (ev1) {
alert(this[“username”]);
};
}
</script>
</head>
<body>
<!—
点击input框,展示自定义属性数据(页面加载完成时进行保存)
—>
<input type=”text” value=”xxxx” id=”t1”/>
</body>
</html> |
小结:
写在HTML属性中,可以在DOM绑定的事件中。
this[“key”]=”value”;
2.4:分析&实现
- 步骤:
1、页面加载完成时,获取所有的tr
2、遍历所有tr,除了0索引。
3、遍历中:索引奇数保存white样式,索引偶数保存blue样式
4、遍历中:每遍历一个tr,绑定鼠标移入和移出事件
5、鼠标移入事件:先保存之前的class值,再赋予新的class值:pink
6、鼠标移出事件:获取原来的class值,赋予class
- 代码实现:
| <style>
.white{
background-color: white;
}
.blue{
background-color: lightskyblue;
}
.pink{
background-color: pink;
}
</style>
<script>
//1、页面加载完成时,获取所有的tr
window.onload = function (ev) {
var trArr = document.getElementsByTagName(“tr”);
//2、遍历所有tr,除了0索引。
for (var i = 1; i <=trArr.length ; i++) {
var tr = trArr[i];
//3、遍历中:索引奇数保存white样式,索引偶数保存blue样式
if(i%2!=0){
tr.className = “white”;
}else{
tr.className = “blue”;
}
//4、遍历中:每遍历一个tr,绑定鼠标移入和移出事件
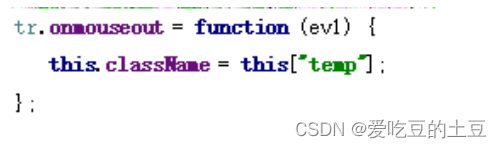
//5、鼠标移入事件:先保存之前的class值,再赋予新的class值:pink
tr.onmouseover = function (ev1) {
this[“temp”] = this.className;
this.className = “pink”;
};
//6、鼠标移出事件:获取原来的class值,赋予class
tr.onmouseout = function (ev1) {
this.className = this[“temp”];
};
}
}
</script> |
dom方式绑定事件时,可以进行批量绑定


还没有评论,来说两句吧...