使用IDEA创建Springboot集成swagger超详细
什么是swagger?它有哪些注解?
Swagger介绍
OpenAPI规范(OpenAPI Specification 简称OAS)是Linux基金会的一个项目,试图通过定义一种用来描述API格 式或API定义的语言,来规范RESTful服务开发过程,目前版本是V3.0,并且已经发布并开源在github上。 (https://github.com/OAI/OpenAPI-Specification) Swagger是全球最大的OpenAPI规范(OAS)API开发工具框架,支持从设计和文档到测试和部署的整个API生命周 期的开发。 (https://swagger.io/) Spring Boot 可以集成Swagger,生成Swagger接口,Spring Boot是Java领域的神器,它是Spring项目下快速构建 项目的框架。
常用Swagger注解
在Java类中添加Swagger的注解即可生成Swagger接口,常用Swagger注解如下:
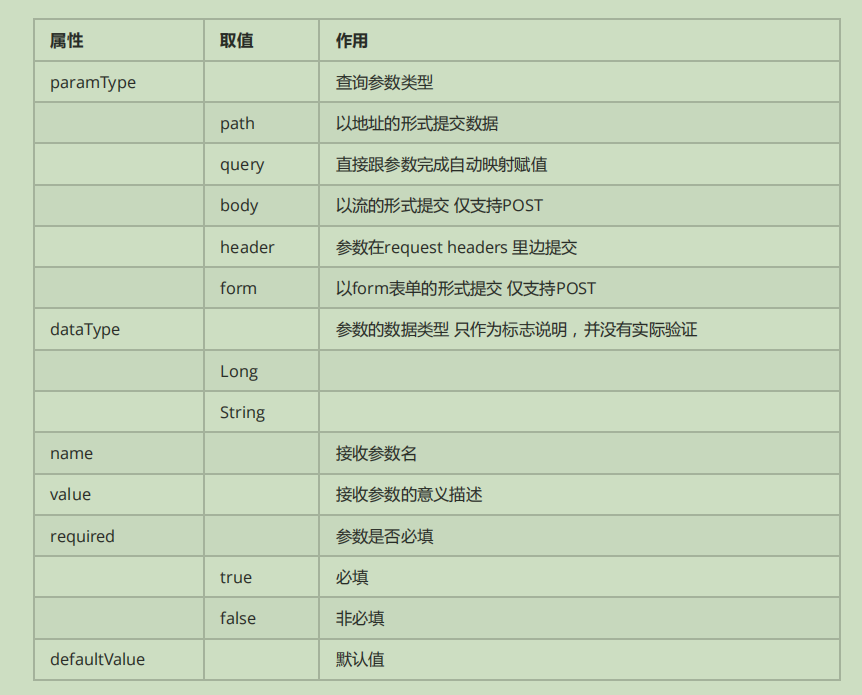
@Api:修饰整个类,描述Controller的作用
@ApiOperation:描述一个类的一个方法,或者说一个接口
@ApiParam:单个参数描述
@ApiModel:用对象来接收参数
@ApiModelProperty:用对象接收参数时,描述对 象的一个字段
@ApiResponse:HTTP响应其中1个描述
@ApiResponses:HTTP响应整体描述
@ApiIgnore:使用 该注解忽略这个API
@ApiError :发生错误返回的信息
@ApiImplicitParam:一个请求参数
@ApiImplicitParams:多个请求参数
@ApiImplicitParam属性:
使用IDEA创建一个Springboot项目
1、首先选择file->New->Project到项目创建页面

2、我们选择Maven点击Next然后来到了下面这个页面
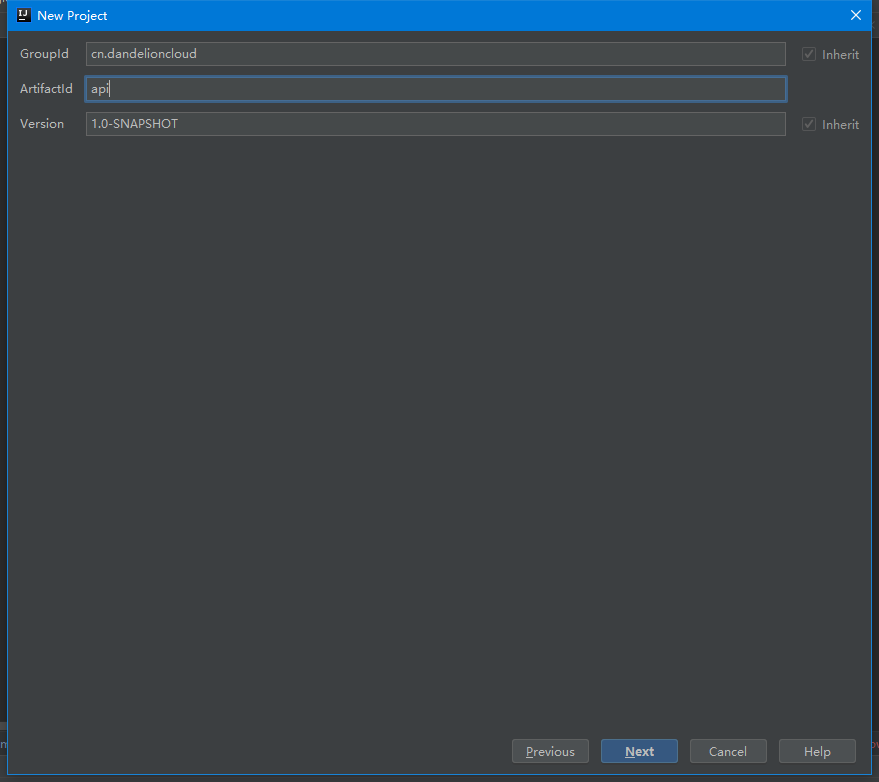
GroupId命名规范一般以cn或者com开头,第二个公司的名称dandelioncloud,我的网站是蒲公英云域名是dandelioncloud.cn所以这里我就使用cn.dandelioncloud
ArtifactId可以填写项目名称,例如demo我这里就不写完整的demo了因为是和swagger集成所以这里只写api
3、修改项目名称以及项目存放地址
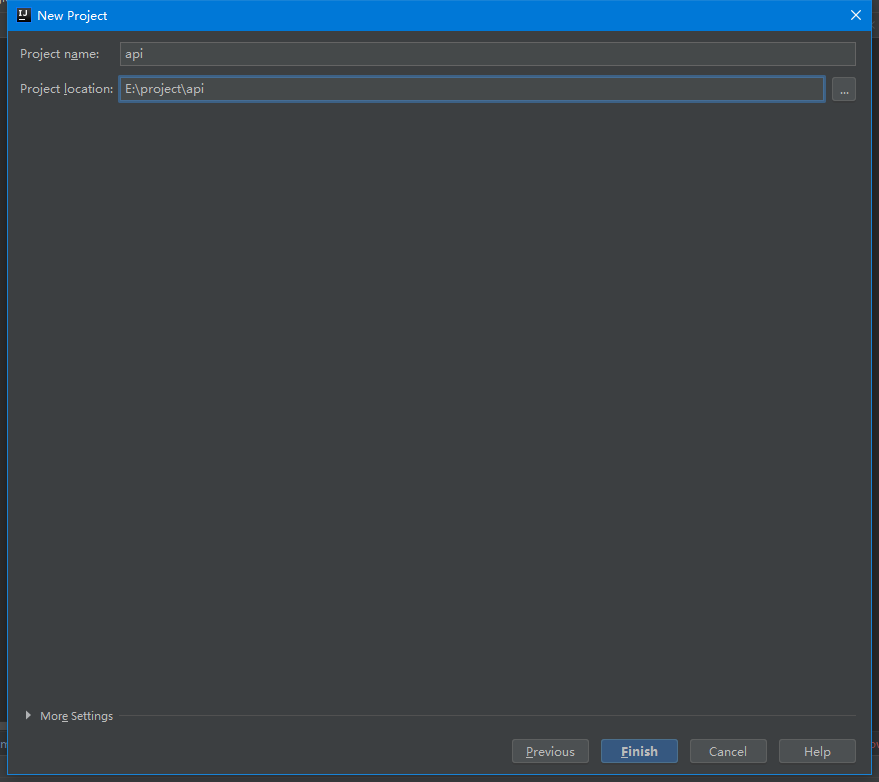
projectname是项目的名称。这里我就用api不更改。
project location项目的存放地址。也就是说这个项目放在哪个路径下。我这里就放E盘的project下
然后直接选择完成,我这里选择new Windows 。新建一个窗口。
4、创建好的项目初始化完成后如下图

pom.xml的配置
1、Springboot的配置
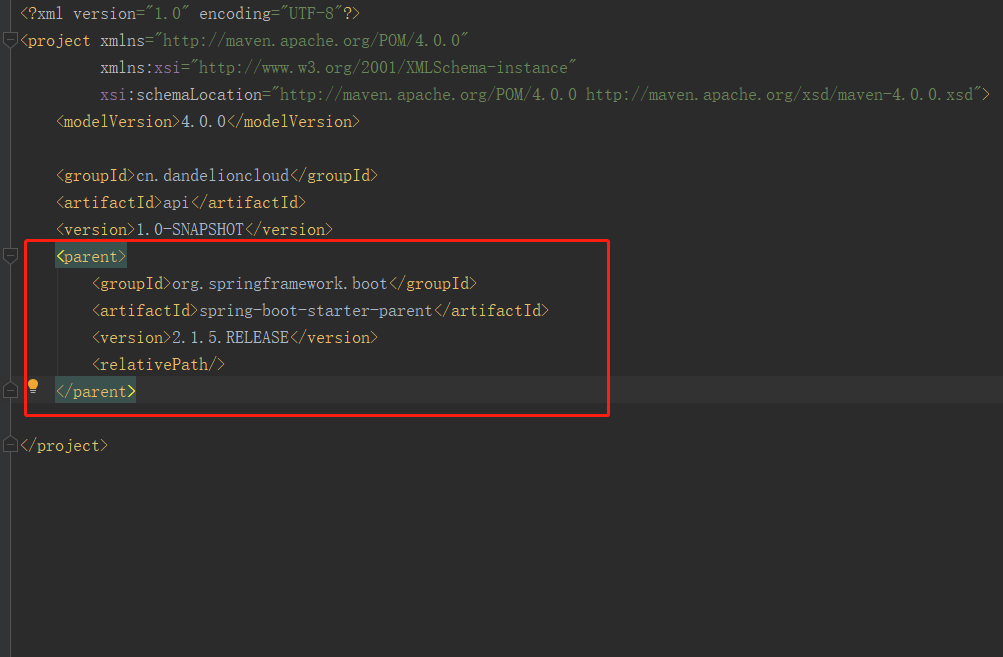
因为我们创建项目用的是Maven创建的所以现在只是Maven项目只有加上这段代码才是完整的Springboot项目
<parent><groupId>org.springframework.boot</groupId><artifactId>spring-boot-starter-parent</artifactId><version>2.1.5.RELEASE</version><relativePath/></parent>
2、集成swagger需要的相关依赖

上图中完整的依赖
<dependencies><dependency><groupId>org.springframework.boot</groupId><artifactId>spring-boot-starter-web</artifactId></dependency><dependency><groupId>io.springfox</groupId><artifactId>springfox-swagger2</artifactId><version>2.6.1</version></dependency><dependency><groupId>io.springfox</groupId><artifactId>springfox-swagger-ui</artifactId><version>2.6.1</version></dependency><dependency><groupId>com.fasterxml.jackson.core</groupId><artifactId>jackson-core</artifactId><version>2.6.5</version></dependency><dependency><groupId>com.fasterxml.jackson.core</groupId><artifactId>jackson-databind</artifactId><version>2.6.5</version></dependency><dependency><groupId>com.fasterxml.jackson.core</groupId><artifactId>jackson-annotations</artifactId><version>2.6.5</version></dependency></dependencies>
创建项目启动项
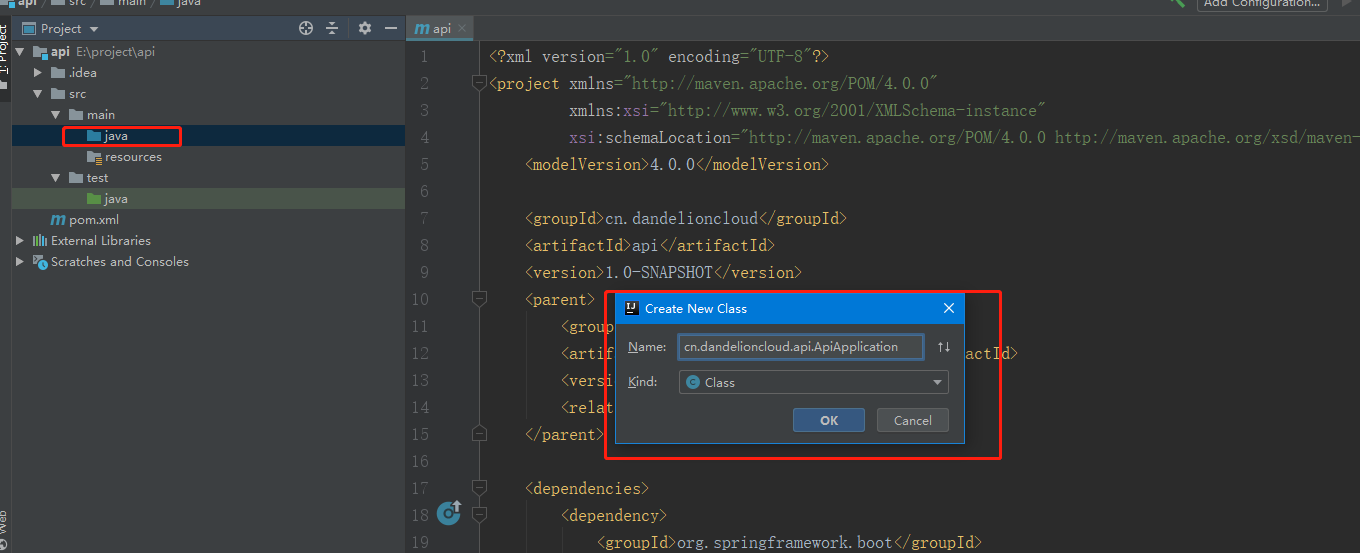
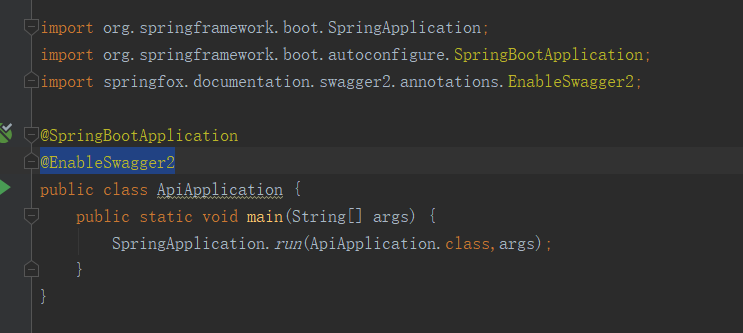
创建APIApplication启动类
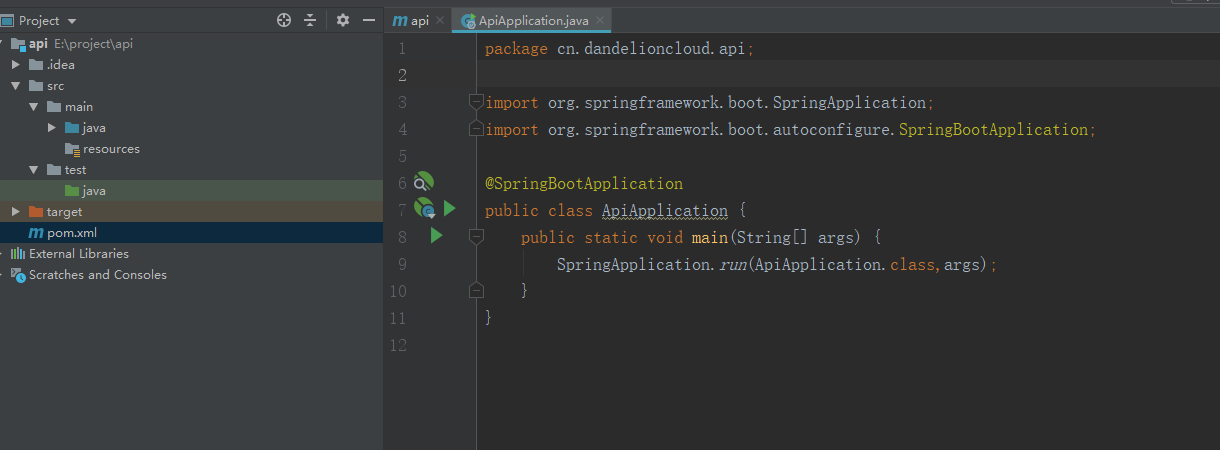
package cn.dandelioncloud.api;import org.springframework.boot.SpringApplication;import org.springframework.boot.autoconfigure.SpringBootApplication;@SpringBootApplicationpublic class ApiApplication {public static void main(String[] args) {SpringApplication.run(ApiApplication.class,args);}}
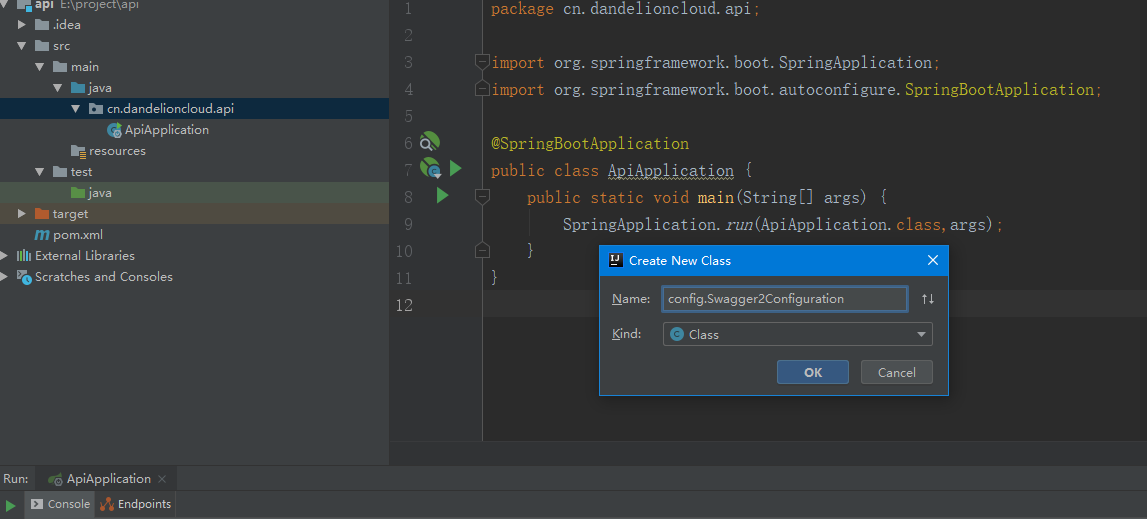
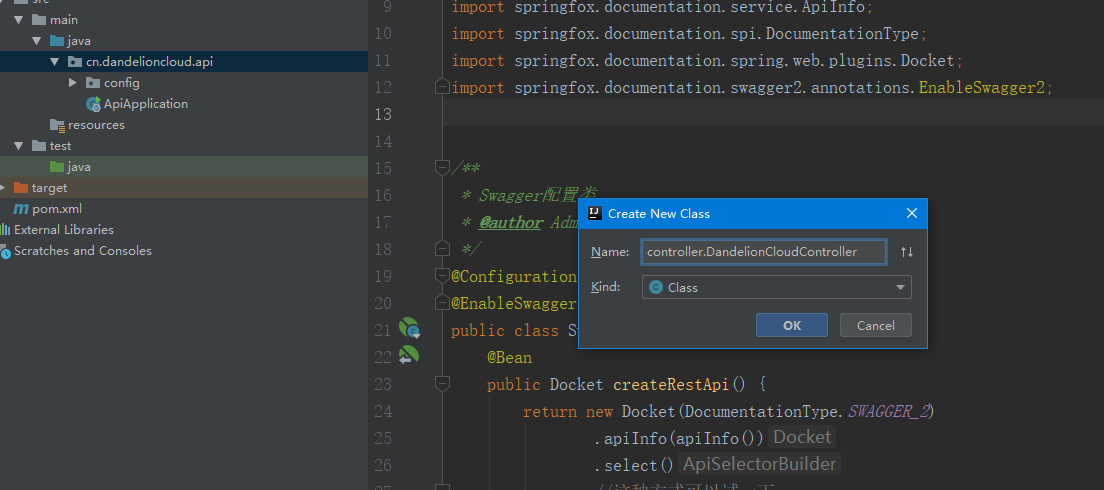
创建swagger配置类
配置类代码效果图
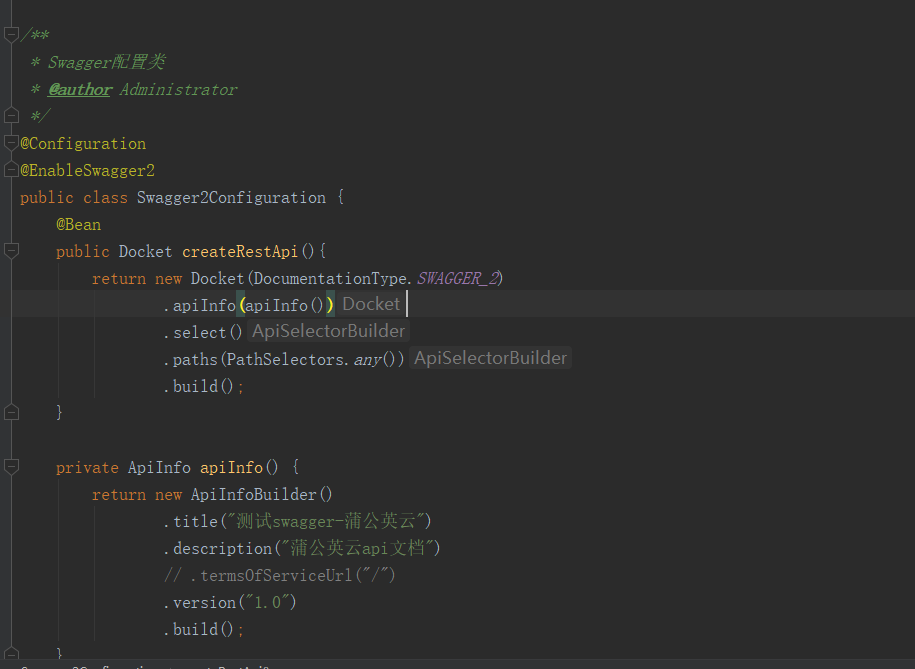
package cn.dandelioncloud.api.config;import org.springframework.context.annotation.Bean;import org.springframework.context.annotation.ComponentScan;import org.springframework.context.annotation.Configuration;import io.swagger.annotations.ApiOperation;import springfox.documentation.builders.ApiInfoBuilder;import springfox.documentation.builders.PathSelectors;import springfox.documentation.builders.RequestHandlerSelectors;import springfox.documentation.service.ApiInfo;import springfox.documentation.spi.DocumentationType;import springfox.documentation.spring.web.plugins.Docket;import springfox.documentation.swagger2.annotations.EnableSwagger2;/*** Swagger配置类* @author Administrator*/@Configuration@EnableSwagger2public class Swagger2Configuration {@Beanpublic Docket createRestApi(){return new Docket(DocumentationType.SWAGGER_2).apiInfo(apiInfo()).select().paths(PathSelectors.any()).build();}private ApiInfo apiInfo() {return new ApiInfoBuilder().title("测试swagger-蒲公英云").description("蒲公英云api文档")// .termsOfServiceUrl("/").version("1.0").build();}}
创建一个接口用来测试Swagger接口文档
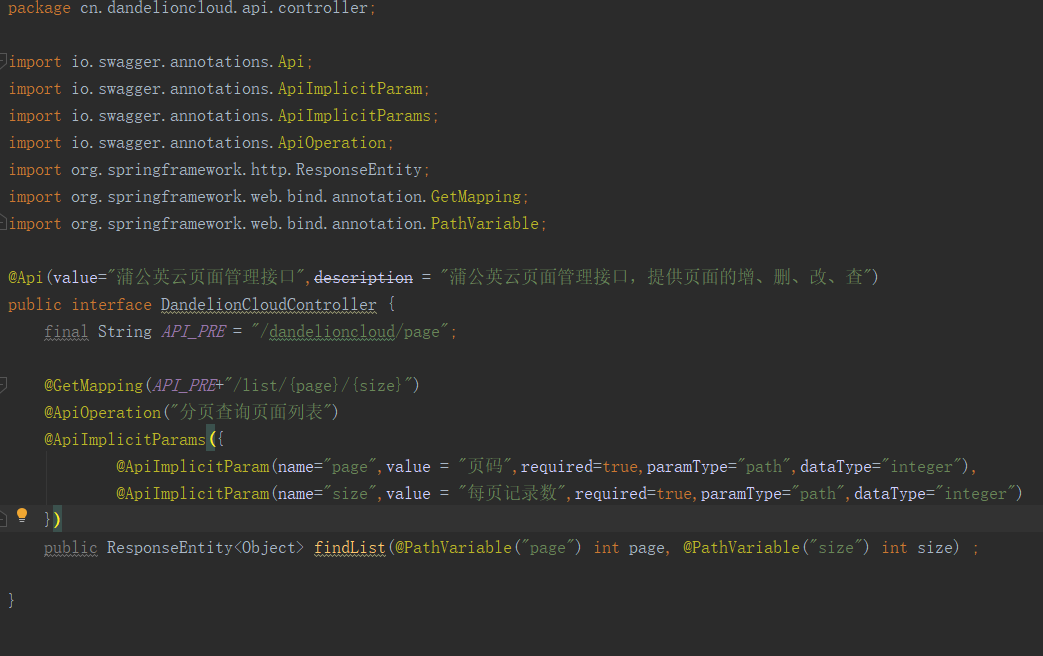
package cn.dandelioncloud.api.controller;import io.swagger.annotations.Api;import io.swagger.annotations.ApiImplicitParam;import io.swagger.annotations.ApiImplicitParams;import io.swagger.annotations.ApiOperation;import org.springframework.http.ResponseEntity;import org.springframework.web.bind.annotation.GetMapping;import org.springframework.web.bind.annotation.PathVariable;@Api(value="蒲公英云页面管理接口",description = "蒲公英云页面管理接口,提供页面的增、删、改、查")public interface DandelionCloudController {final String API_PRE = "/dandelioncloud/page";@GetMapping(API_PRE+"/list/{page}/{size}")@ApiOperation("分页查询页面列表")@ApiImplicitParams({@ApiImplicitParam(name="page",value = "页码",required=true,paramType="path",dataType="integer"),@ApiImplicitParam(name="size",value = "每页记录数",required=true,paramType="path",dataType="integer")})public ResponseEntity<Object> findList(@PathVariable("page") int page, @PathVariable("size") int size) ;}
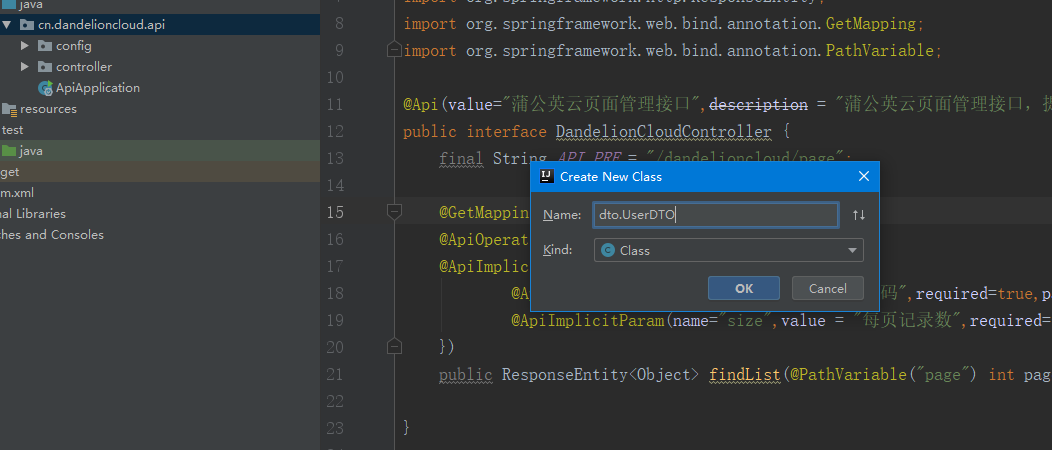
创建一个DTO
本來想使用lombok发现没有引入依赖那就在加一个依赖吧。
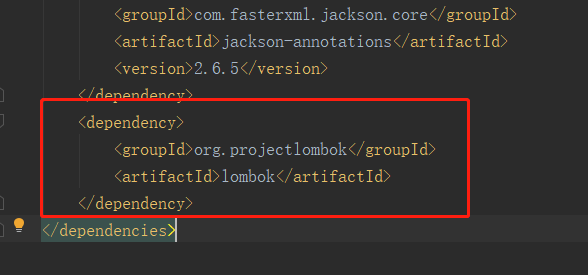
<dependency><groupId>org.projectlombok</groupId><artifactId>lombok</artifactId></dependency>
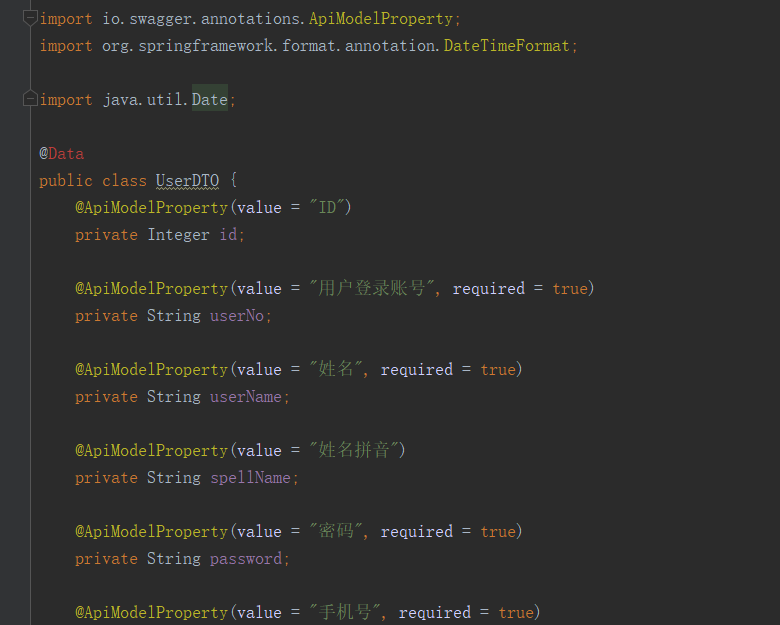
DTO代碼
package cn.dandelioncloud.api.dto;import io.swagger.annotations.ApiModelProperty;import lombok.Data;import org.springframework.format.annotation.DateTimeFormat;import java.util.Date;@Datapublic class UserDTO {@ApiModelProperty(value = "ID")private Integer id;@ApiModelProperty(value = "用户登录账号", required = true)private String userNo;@ApiModelProperty(value = "姓名", required = true)private String userName;@ApiModelProperty(value = "姓名拼音")private String spellName;@ApiModelProperty(value = "密码", required = true)private String password;@ApiModelProperty(value = "手机号", required = true)private String userPhone;@ApiModelProperty(value = "性别")private Integer userGender;@ApiModelProperty(value = "记录创建时间")@DateTimeFormat(pattern = "yyyy-MM-dd HH:mm:ss")private Date createTime;@ApiModelProperty(value = "记录修改时间")@DateTimeFormat(pattern = "yyyy-MM-dd HH:mm:ss")private Date updateTime;}
这样也就算了大功告成了。业务逻辑这里不写,只写接口。
最后在启动类上加上swagger的注解就可以完成启动了
@EnableSwagger2
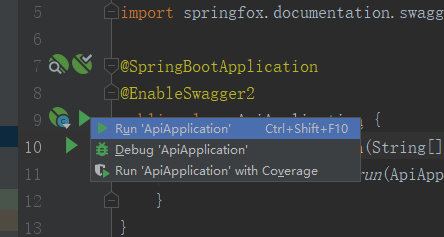
启动项目
启动成功。端口号8080

最后访问swagger地址
http://localhost:8080/swagger-ui.htmlhttp://localhost:端口号/swagger-ui.html

这里没有写实现类,实现类需要自己写,现在是调不通的。由于时间关系就不提供接口实现类的编写了。期待有机会下次续上。


