SpringBoot整合kafka
Maven依赖
<parent><groupId>org.springframework.boot</groupId><artifactId>spring-boot-starter-parent</artifactId><version>2.0.1.RELEASE</version></parent><dependencies><!-- springBoot集成kafka --><dependency><groupId>org.springframework.kafka</groupId><artifactId>spring-kafka</artifactId></dependency><!-- SpringBoot整合Web组件 --><dependency><groupId>org.springframework.boot</groupId><artifactId>spring-boot-starter-web</artifactId></dependency></dependencies>
application.yml配置文件
# kafkaspring:kafka:# kafka服务器地址(可以多个)bootstrap-servers: 192.168.128.139:9092,192.168.128.140:9092,192.168.128.141:9092consumer:# 指定一个默认的组名group-id: kafka2# earliest:当各分区下有已提交的offset时,从提交的offset开始消费;无提交的offset时,从头开始消费# latest:当各分区下有已提交的offset时,从提交的offset开始消费;无提交的offset时,消费新产生的该分区下的数据# none:topic各分区都存在已提交的offset时,从offset后开始消费;只要有一个分区不存在已提交的offset,则抛出异常auto-offset-reset: earliest# key/value的反序列化key-deserializer: org.apache.kafka.common.serialization.StringDeserializervalue-deserializer: org.apache.kafka.common.serialization.StringDeserializerproducer:# key/value的序列化key-serializer: org.apache.kafka.common.serialization.StringSerializervalue-serializer: org.apache.kafka.common.serialization.StringSerializer# 批量抓取batch-size: 65536# 缓存容量buffer-memory: 524288# 服务器地址bootstrap-servers: 192.168.128.139:9092,192.168.128.140:9092,192.168.128.141:9092
测试代码如下:
import org.apache.kafka.clients.consumer.ConsumerRecord;import org.springframework.beans.factory.annotation.Autowired;import org.springframework.boot.SpringApplication;import org.springframework.boot.autoconfigure.SpringBootApplication;import org.springframework.kafka.annotation.KafkaListener;import org.springframework.kafka.core.KafkaTemplate;import org.springframework.web.bind.annotation.RequestMapping;import org.springframework.web.bind.annotation.RestController;@RestController@SpringBootApplicationpublic class KafkaController {/*** 注入kafkaTemplate*/@Autowiredprivate KafkaTemplate<String, String> kafkaTemplate;/*** 发送消息的方法** @param key* 推送数据的key* @param data* 推送数据的data*/private void send(String key, String data) {// topic 名称 key data 消息数据kafkaTemplate.send("test-all", key, data);}@RequestMapping("/kafka")public String testKafka() {for (int i = 6; i <= 10; i++) {send("key" + i, "data" + i);}return "success";}public static void main(String[] args) {SpringApplication.run(KafkaController.class, args);}/*** 消费者使用日志打印消息*/@KafkaListener(topics = "test-all")public void receive(ConsumerRecord<?, ?> consumer) {System.out.println("topic名称:" + consumer.topic() + ",key:" + consumer.key() + ",分区位置:" + consumer.partition()+ ", 下标" + consumer.offset());}}
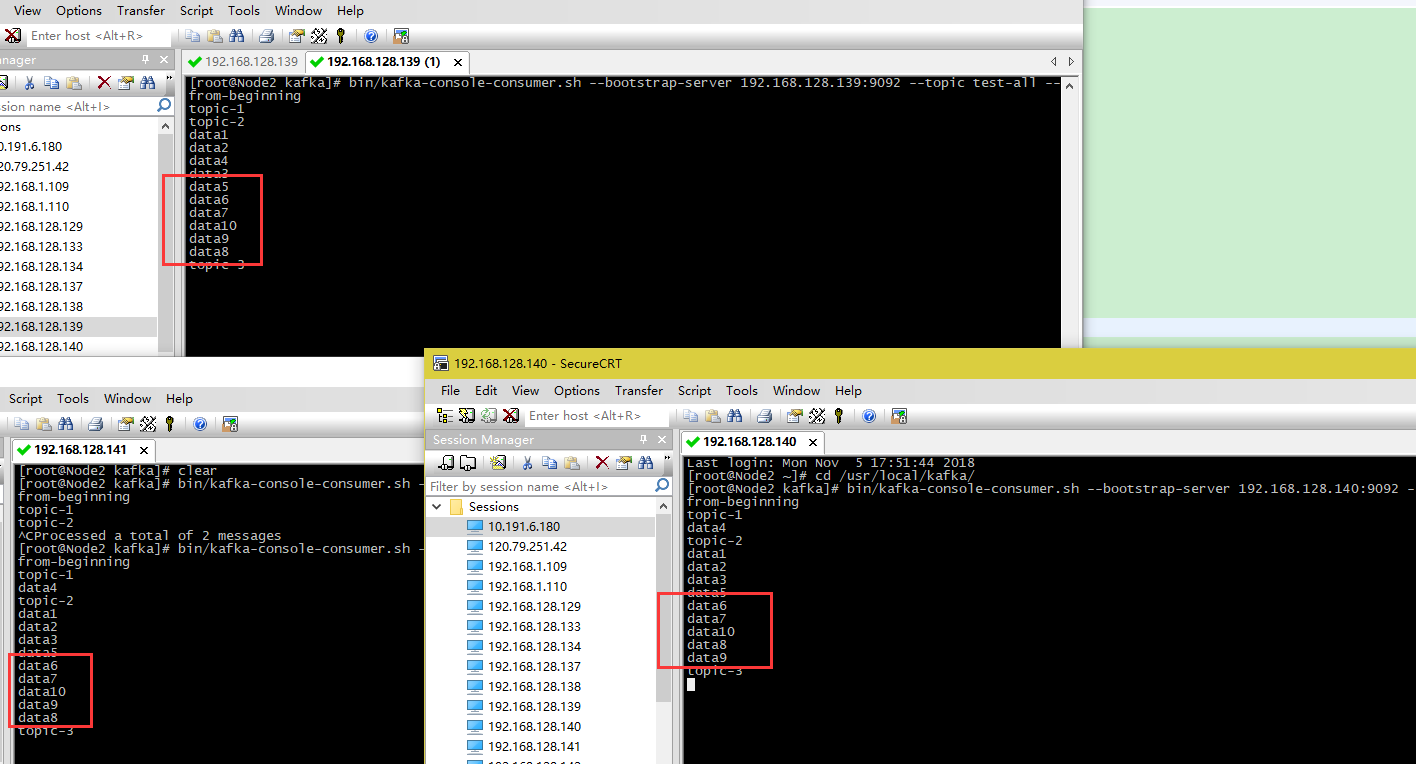
消费者收到的消息:


")
")


还没有评论,来说两句吧...