SpringBoot2.X集成Redis3.2 Jedis
一、概述
前两三年使用Redis,后面工作中也一直使用。后来由于搭建公司框架,主要是先使用SpringBoot,在SpringBoot的基础上集成Redis。
二、win10下安装Redis3.2
2.1 下载Redis3.2
首先下载Redis3.2,目前来讲,3.2是相对稳定且比较新的版本了。下载地址:[Redis-64(V3.2)][Redis-64_V3.2]。
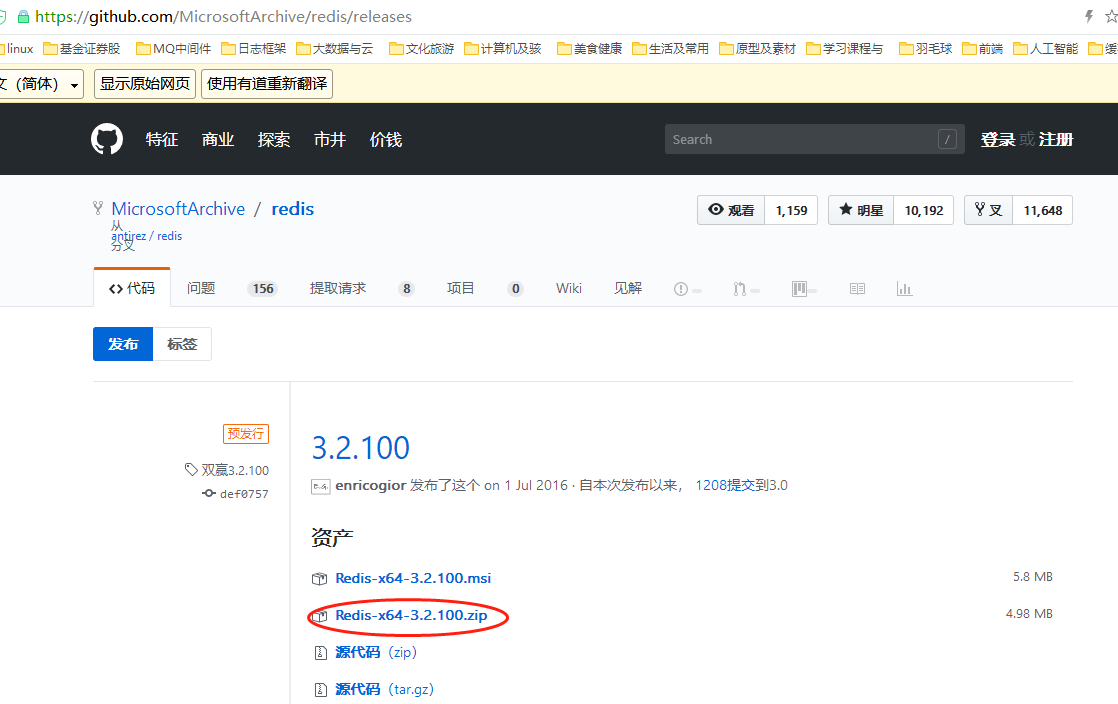
2.2 安装Redis3.2
安装很简单,将下载的文件进行解压即可。![70 1][]
2.3 启动测试Redis
启动时,进入Redis的安装目录,在硬盘的路径一栏输入“cmd”,然后回车,即可直接cmd命令窗口,且目录已经是Redis的安装目录。![70 2][]然后在cmd窗口中输入命令:redis-server redis.windows.conf,如下图所示,说明启动成功。![70 3][]
2.4 安装Redis Desktop Manager
Redis Desktop Manager是Redis的桌面管理工具,可以说是Redis的可视化窗口工具。下载地址:[Redis Desktop Manager][]。![70 4][]下载后,安装基本上下一步,很简单。安装完成时,提醒查看Redis Desktop Manager的快速入门:[快速入门][Link 1]。
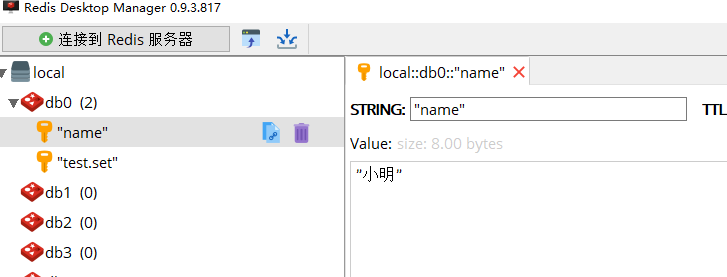
2.5 Redis Desktop Manager连接Redis服务
安装好Redis Desktop Manager后,就可以连接之前启动的Redis服务了。因为之前没有配置Redis服务密码,所以下面不需输入密码,只要输入连接名、地址、端口,然后连接就可以了。 ![70 5][]连接成功后,如下图所示。之所以会的db0到db15,是因为Redis默认会给出16个db,且是从0开始的。 Redis Desktop Manager的具体使用,可以参考上面给出的快速入门连接,网上也有很多资料。 ![70 6][]
三、SpringBoot集成Redis3.2
3.1 引入Redis的依赖
这里要特别说明一下,因为我使用的SpringBoot是2.X,Redis是3.2,SpringBoot2.X默认采用lettuce,而1.5默认采用的是jdeis,本文描述的是使用jedis,所以在依赖里要排除lettuce。否则会报错:
Caused by: org.springframework.beans.factory.BeanCreationException: Error creating bean with name ‘redisConnectionFactory’ defined in class path resource [org/springframework/boot/autoconfigure/data/redis/LettuceConnectionConfiguration.class]: Invocation of init method failed; nested exception is java.lang.NoClassDefFoundError: io/netty/handler/ssl/SslProvider
<!-- Redis --><dependency><groupId>org.springframework.boot</groupId><artifactId>spring-boot-starter-data-redis</artifactId><!-- 1.5的版本默认采用的连接池技术是jedis,2.0以上版本默认连接池是lettuce, 因为此次是采用jedis,所以需要排除lettuce的jar --><exclusions><exclusion><groupId>redis.clients</groupId><artifactId>jedis</artifactId></exclusion><exclusion><groupId>io.lettuce</groupId><artifactId>lettuce-core</artifactId></exclusion></exclusions></dependency><!-- jedis客户端 --><dependency><groupId>redis.clients</groupId><artifactId>jedis</artifactId></dependency><!-- spring2.X集成redis所需common-pool2,使用jedis必须依赖它--><dependency><groupId>org.apache.commons</groupId><artifactId>commons-pool2</artifactId><version>2.5.0</version></dependency><!--<dependency>--><!--<groupId>org.springframework.session</groupId>--><!--<artifactId>spring-session-data-redis</artifactId>--><!--</dependency>-->
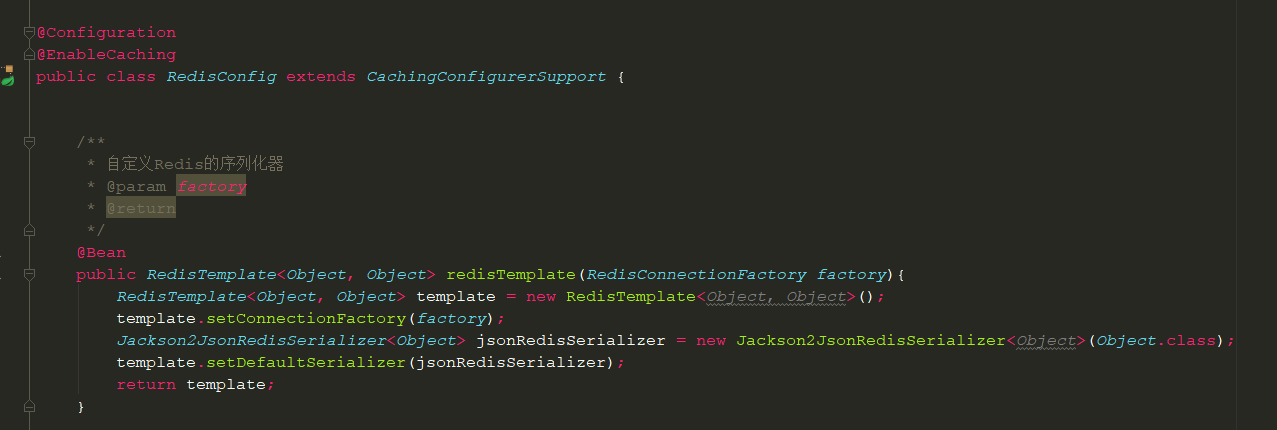
3.2 Redis配置文件
当引入依赖成功后,在书写配置信息时,会自动给出提示,如下图所示。![70 7][]具体配置内容如下所示。写在application-dev.properties中。#redis#redis数据库索引,默认为0spring.redis.database=0#服务地址spring.redis.host=localhost#端口spring.redis.port=6379#密码,默认为空,本地没有设置密码,所以这里不填写spring.redis.password=#连接池最大的连接数,若使用负值表示没有限制spring.redis.jedis.pool.max-active=8#连接池最大阻塞等待时间,若使用负值表示没有限制spring.redis.jedis.pool.max-wait=-1#连接池中的最大空闲连接spring.redis.jedis.pool.max-idle=8#连接池中的最小空闲连接spring.redis.jedis.pool.min-idle=0#连接超时时间(单位为毫秒)spring.redis.timeout=0因为我们存储的数据有可能是字符串、对象等不同的内容,也会有中文等不同编码的数据,所以这里先自定义下Redis的序列化器。
3.3 SpringBoot与Redis集成测试
测试代码如下: 
到这里,SpringBoot2.x与Redis3.2的集成已经成功了,至于在项目中怎么使用,主要还是看团队的情况了。
#
四、Redis简要说明
下面对本次集成过程中一些点进行简要说明。首先是在启动Redis的时候,输入的命令是:redis-server redis.windows.conf,其中redis-server对应是redis-server.exe,即Redis的服务程序,redis.windows.conf对应的是windows系统下Redis的配置文件,可以配置Redis的端口、密码等。在集成过程中,一定要注意SpringBoot和Redis不同版本的情况。此次使用的SpringBoot版本是2.X,Redis版本是3.2,SpringBoot2.X默认采用lettuce,而1.5默认采用的是jdeis,本文描述的是使用jedis,所以在引入依赖里要排除lettuce。更大的区别是SpringBoot2.X集成Redis的时候,引入的依赖spring-boot-starter-redis,而SpringBoot2.X使用的依赖是spring-boot-starter-data-redis,它们的RedisCacheManager就不一样了,在写Redis的配置类时就会遇到问题。


(2)")


还没有评论,来说两句吧...