Spring的事件发布机制
一:Spring的事件发布
ApplicationContext提供了针对Bean的事件传播功能,其中的主角是publishEvent()方法,通过这个方法可以将事件通知给系统内的监听器(需实现ApplicationListener接口)。
ApplicationContext这个接口,是Spring的上下文,通常获取Bean就需要这个接口,这个接口并不是直接继承于BeanFactory,其中最著名的是直接继承了ApplicationPublisher接口,这个接口查看源码可以发现:只有一个方法,那就是主角 void publishEvent(ApplicationEvent event);
Spring提供的基于Aware相关的接口有ApplicationContextAware,ResourceloaderAware,ServletContextAware(注意:Struts2也有这个接口,注意区分),最常用的就这三个,而Spring的事件发布机制需要用到ApplicationContextAware接口。
实现了ApplicationContextAware的Bean,在Bean初始化时将会被注入ApplicationContext实例(因为这个接口里有set(ApplictationContext ctx)方法)
二:有了以上基础,看示例代码:
1.首先创建事件类 TradeEvent
1 2 3 4 5 6 7 8 9 10 11 12 13 14 15 16 17 | package net.wang.test;import org.springframework.context.ApplicationEvent;/* 事件Event @author LiuRuoWang /public class TradeEvent extends ApplicationEvent{ public TradeEvent(Object source) { super(source); System.out.println(“事件:TradeEvent event !!”); } }事件必须继承Spring提供的ApplicationEvent抽象类 |
2.然后编写 事件的发布者HelloWorld |
1 2 3 4 5 6 7 8 9 10 11 12 13 14 15 16 17 18 19 20 21 22 23 24 25 26 27 28 29 30 | package net.wang.test;import org.springframework.context.ApplicationEventPublisher;import org.springframework.context.ApplicationEventPublisherAware;/* 事件的发布者 @author LiuRuoWang /public class HelloWorld implements ApplicationEventPublisherAware{ private String word; public void setWord(String word) { this.word = word; } private ApplicationEventPublisher tradeEventPublisher; public void setApplicationEventPublisher(ApplicationEventPublisher applicationEventPublisher) { this.tradeEventPublisher=applicationEventPublisher; } public void say(){ System.out.println(“say:”+this.word); TradeEvent tradeEvent = new TradeEvent(new String(“HelloWorld!”)); this.tradeEventPublisher.publishEvent(tradeEvent); } } |
1 | 其中在say()方法里发布了事件 |
1 | 3.最后编写 事件的接收者EventReceiver: |
1 2 3 4 5 6 7 8 9 10 11 12 13 14 | package net.wang.test;import org.springframework.context.ApplicationListener;/* 事件的接收者 @author LiuRuoWang /public class EventReceiver implements ApplicationListener<TradeEvent>{ public void onApplicationEvent(TradeEvent event) { System.out.println(“监听到的事件:”+event.getSource()); }} |
1 | 事件的接收者其实是一个监听器,必须实现ApplicationListener,注意把事件TradeEvent直接写到泛型中 |
1 | 4.applicationContext.xml: |
1 2 3 4 5 6 7 8 9 10 11 12 13 14 15 16 17 18 19 20 21 | <?xml version=“1.0” encoding=“GBK”?><beans xsi:schemaLocation=”http://www.springframework.org/schema/beans http://www.springframework.org/schema/beans/spring-beans-3.1.xsd http://www.springframework.org/schema/aop http://www.springframework.org/schema/aop/spring-aop-3.1.xsd http://www.springframework.org/schema/tx http://www.springframework.org/schema/tx/spring-tx-3.1.xsd”> <bean name=“helloWrold” class=“net.wang.test.HelloWorld”> <property name=“word” value=“Word!”/> </bean> <bean name=“eventReceiver” class=“net.wang.test.EventReceiver”/> </beans> |
注意把事件的接收者写入配置文件中
5.测试Test:
1 2 3 4 5 6 7 8 9 10 11 12 | package net.wang.test;import org.springframework.context.ApplicationContext;import org.springframework.context.support.ClassPathXmlApplicationContext;public class Test { public static void main(String[] args) { ApplicationContext ctx=new ClassPathXmlApplicationContext(“applicationContext.xml”); HelloWorld h = (HelloWorld) ctx.getBean(“helloWrold”); h.say(); }} |
6.结果显示:
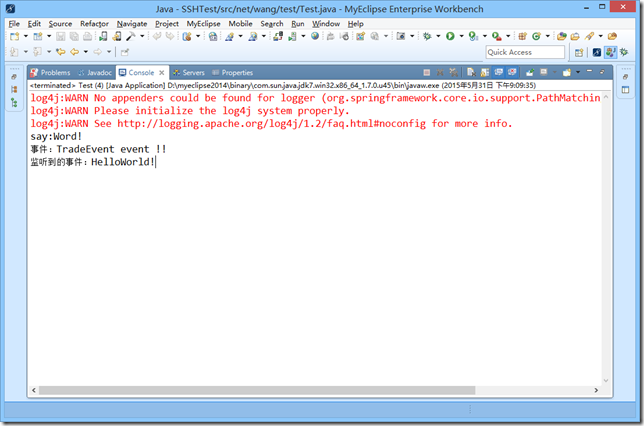
结果中已经显示监听到的事件,说明成功。
Spring 中的事件监听的实现
这里我们不讨论事件监听的机制的原理,我们只讨论如何在项目中实现时间监听。
Spring的事件监听是基于观察者模式。设计开发中。如下类与接口是我们必须要使用的。
ApplicationContext
首先我们了解一下ApplicationContext,还记得
ApplicationContext ac=new ClassPathXmlApplicationContext("beans.xml");1
ApplicationContext相当于Spring的一个与IOC容器连接的桥梁,通过getBean();方法,我们可以轻松的从IOC容器中获取Bean对象。
因为ApplicationContext是实现ApplicationEventPublisher的。查看ApplicationEventPublisher的源码,我们发现有一方法publishEvent。此方法便是发布事件的方法,即触发事件的方法,通过调用publishEvent方法,注入事件ApplicationEvent的子类,实现事件的触发。
//这个是ApplicationContext类的声明public interface ApplicationContext extends EnvironmentCapable,ListableBeanFactory,HierarchicalBeanFactory,MessageSource, ApplicationEventPublisher, ResourcePatternResolver {//...}12//ApplicationEventPublisher源码public interface ApplicationEventPublisher {//该类只有这一个方法,用于发布通知,需要事件作为参数void publishEvent(ApplicationEvent event);}123456
说了一大堆,就是想说ApplicationContext的
publicEvent(ApplicationEvent event);
方法是可以用来发布通知,相当于触发事件的事件源。
ApplicationContextAware
ApplicationContextAware类似于ServeletRequestAware,通过让Action实现Aware,使得Action初始化之后便可以获得一些资源,这里我们让Action实现ApplicationContext,使得Action拥有ApplicationContext,Action中拥有ApplicationContext之后就可以调用publicEvent方法进行通知
public interface ApplicationContextAware extends Aware {void setApplicationContext(ApplicationContext applicationContext) throws BeansException;}1234
ApplicationEvent
ApplicationEvent相当于一个事件,所有自定义事件都需要继承这个抽象类。在Eclipse中Ctrl+Shift+H调用类的层次结构列表,可以看到如下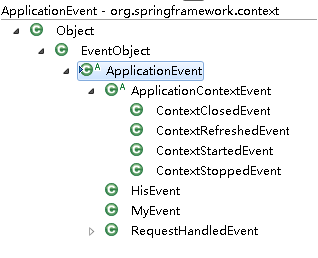
Application下抽象子类ApplicationContextEvent的下面有4个已经实现好的事件
ContextClosedEvent(容器关闭时)
ContextRefreshedEvent(容器刷新是)
ContextStartedEvent(容器启动时候)
ContextStoppedEvent(容器停止的时候)
同样,这四个事件都继承了ApplicationEvent,如果我们想自定义事件,也可以通过继承ApplicationEvent来实现
嗯,同样是一句话总结ApplicationEvent就是一个抽象类,创建时间的时候只需要继承它就可以。
ApplicationListener
从名字可以看出来,这是一个监听器。为什么需要监听器呢?监听器是用于接收事件,并触发事件的操作,这样说起来可能有点费解,简单的说就是,Listener是监听ApplicationContext.publishEvent,方法的调用,一旦调用publishEvent,就会执行ApplicaitonListener中的方法,下面这个是ApplicationContext的源码。
public interface ApplicationListener<E extends ApplicationEvent> extends EventListener {/*** publishEvent触发该方方法* 可以在该方法中写各种业务逻辑*/void onApplicationEvent(E event);}123456789
这里是实际代码实现的过程
新建一个MyEvent的类,继承ApplicationEvent抽象类
package cn.blueboz.elec.event;
import org.springframework.context.ApplicationEvent;
public class MyEvent extends ApplicationEvent {
//存放构造器送入的值private String msg;//构造器参数可以随意设置,这里为了方便调试,设置为字符串public MyEvent(String msg) {super(msg);this.msg=msg;}//自定义一个方法,这个方法也可以随意写,这里也是测试用public void myevent(){System.out.println("********My event**************");System.out.println(msg);System.out.println("*******************************");}
}
12345678910111213141516171819
2.新建一个监听器MyListener
package cn.blueboz.elec.listener;import org.springframework.context.ApplicationEvent;import org.springframework.context.ApplicationListener;import org.springframework.context.event.ContextClosedEvent;import org.springframework.context.event.ContextRefreshedEvent;import org.springframework.context.event.ContextStartedEvent;import org.springframework.context.event.ContextStoppedEvent;import org.springframework.stereotype.Service;import cn.blueboz.elec.event.HisEvent;import cn.blueboz.elec.event.MyEvent;//注入IOC容器中@Service("myListener")public class MyListener implements ApplicationListener<ApplicationEvent> {//调用ApplicationContext.publishEvent方法时会触发执行该方法@Overridepublic void onApplicationEvent(ApplicationEvent event) {//判断事件为MyEvent时候执行if(event instanceof MyEvent){//强制转换MyEvent evt=(MyEvent) event;//执行自定义事件中的自定义方法evt.myevent();}//如果容器关闭时,触发if(event instanceof ContextClosedEvent){ContextClosedEvent cce=(ContextClosedEvent) event;System.out.println("#####################");System.out.println("容器关闭");System.out.println(cce);System.out.println("#####################");}//容器刷新时候触发if(event instanceof ContextRefreshedEvent){ContextRefreshedEvent cre=(ContextRefreshedEvent) event;System.out.println("#####################");System.out.println("容器刷新");System.out.println(cre);System.out.println("#####################");}//容器启动的时候触发if(event instanceof ContextStartedEvent){ContextStartedEvent cse=(ContextStartedEvent) event;System.out.println("#####################");System.out.println("容器启动");System.out.println(cse);System.out.println("#####################");}//容器停止时候触发if(event instanceof ContextStoppedEvent){ContextStoppedEvent cse=(ContextStoppedEvent) event;System.out.println("#####################");System.out.println("容器停止");System.out.println(cse);System.out.println("#####################");}}}12345678910111213141516171819202122232425262728293031323334353637383940414243444546474849505152535455565758596061
3.最后,我们要再Action中发布通知publishEvent;
package cn.blueboz.elec.web.action;import javax.annotation.Resource;import org.apache.struts2.interceptor.ServletRequestAware;import org.springframework.beans.BeansException;import org.springframework.context.ApplicationContext;import org.springframework.context.ApplicationContextAware;import org.springframework.context.annotation.Scope;import org.springframework.context.support.ClassPathXmlApplicationContext;import org.springframework.stereotype.Controller;import cn.blueboz.elec.domain.ElecText;import cn.blueboz.elec.event.MyEvent;import cn.blueboz.elec.service.IElecTextService;//指定为prototype原型,对应每一个请求都会产生一个实例对象@Controller("elecTextAction")@Scope(value="prototype")public class ElecTextAction extends BaseAction<ElecText> implements ApplicationContextAware,ServletRequestAware {//首先获得模型驱动对象ElecText elecText=getModel();protected ApplicationContext applicationContext;//注入Service指定从Spring的IOC容器中注入的对象的名称@Resource(name=IElecTextService.SERVICE_NAME)private IElecTextService elecTextService;public String save(){//从表单中传送过来的实例对象elecTextService.saveElecText(elecText);/*** 请关注这一行代码,在页面中访问时候调用save方法* save方法中执行了publishEvent方法发布通知。* 传入参数是自定义事件MyEvent*/applicationContext.publishEvent(new MyEvent("在Action中的save方法Public了Event"));return "save";}@Overridepublic void setApplicationContext(ApplicationContext applicationContext)throws BeansException {this.applicationContext=applicationContext;}}12345678910111213141516171819202122232425262728293031323334353637383940414243444546
4.启动Tomcat时候命令行输出
#####################容器刷新org.springframework.context.event.ContextRefreshedEvent[source=Root WebApplicationContext: startup date [Fri Nov 20 17:12:47 CST 2015]; root of context hierarchy]#####################1234
访问页面的时候,命令行输出,可以看出,触发了MyEvent方法输出。
********My event**************在Action中的save方法Public了Event*******************************


跳跃链表")


还没有评论,来说两句吧...