shiro讲解之 SpringMVC 集成Shiro
shiro讲解之 SpringMVC 集成Shiro
本章节将通过实例来学习下SpringMVC+Spring+Shiro如何集成并用一个精简的例子说明。
整合
新建一个完整的Spring+SpringMVC 框架
- 关于Spring整个SpringMVC的例子已在SpingMVC模块有分享,可移步至SpringMVC。
项目目录
整合 Shiro 步骤
下载 Shiro 及相关jar包
pom.xml新增以下依赖
<!-- Shiro --><!-- https://mvnrepository.com/artifact/org.apache.shiro/shiro-all --><dependency><groupId>org.apache.shiro</groupId><artifactId>shiro-all</artifactId><version>1.3.2</version></dependency><!-- Shiro end --><!-- Ehcache --><!-- https://mvnrepository.com/artifact/org.apache.shiro/shiro-ehcache --><dependency><groupId>org.apache.shiro</groupId><artifactId>shiro-ehcache</artifactId><version>1.2.4</version></dependency><!-- Ehcahche end -->
配置web.xml
Shiro web.xml配置信息参考 Shiro Web App。这里我们的整合将直接参考Spring Example中的web.xml的配置信息。
<!-- 配置Shiro Filter --><!-- Shiro Filter is defined in the spring application context: --><filter><filter-name>shiroFilter</filter-name><filter-class>org.springframework.web.filter.DelegatingFilterProxy</filter-class><init-param><param-name>targetFilterLifecycle</param-name><param-value>true</param-value></init-param></filter><filter-mapping><filter-name>shiroFilter</filter-name><url-pattern>/*</url-pattern></filter-mapping>
web.xml文件中配置Shiro 的DelegatingFilterProxy,该Filter的核心作用点就是用户拦截和过滤请求的URL,之于如何处理URL将在Shiro配置文件的 shiroFilter中有具体的说明。
新建ehcache.xml缓存
在整合Shiro的过程中我们在使用shiro的缓存机制时会使用到缓存,这一点在pom.xml的依赖有提现,另外在后续的篇章中我们也将详细说明Shiro的缓存机制,这里做初步了解。
在classpath(一般建议,也可以自定义)下新建一个ehcache.xml,配置信息如下,如有必要可全部复制<?xml version="1.0" encoding="UTF-8"?><ehcache><diskStore path="java.io.tmpdir" /> <!-- 缓存存放目录(此目录为放入系统默认缓存目录),也可以是”D:/cache“ java.io.tmpdir -->
<!-- 登录记录缓存 锁定10分钟 --><cache name="passwordRetryCache" maxEntriesLocalHeap="2000" eternal="false" timeToIdleSeconds="3600" timeToLiveSeconds="0" overflowToDisk="false" statistics="true"></cache><cache name="authorizationCache" maxEntriesLocalHeap="2000" eternal="false" timeToIdleSeconds="3600" timeToLiveSeconds="0" overflowToDisk="false" statistics="true"></cache><cache name="authenticationCache" maxEntriesLocalHeap="2000" eternal="false" timeToIdleSeconds="3600" timeToLiveSeconds="0" overflowToDisk="false" statistics="true"></cache><cache name="shiro-activeSessionCache" maxEntriesLocalHeap="2000" eternal="false" timeToIdleSeconds="3600" timeToLiveSeconds="0" overflowToDisk="false" statistics="true"></cache><defaultCache maxElementsInMemory="10000" eternal="false" timeToIdleSeconds="120" timeToLiveSeconds="120" overflowToDisk="true" maxElementsOnDisk="10000000" diskPersistent="false" diskExpiryThreadIntervalSeconds="120" memoryStoreEvictionPolicy="LRU" /><!-- name:Cache的唯一标识 maxElementsInMemory:内存中最大缓存对象数 maxElementsOnDisk:磁盘中最大缓存对象数,若是0表示无穷大 eternal:Element是否永久有效,一但设置了,timeout将不起作用 overflowToDisk:配置此属性,当内存中Element数量达到maxElementsInMemory时,Ehcache将会Element写到磁盘中 timeToIdleSeconds:设置Element在失效前的允许闲置时间。仅当element不是永久有效时使用,可选属性,默认值是0,也就是可闲置时间无穷大 timeToLiveSeconds:设置Element在失效前允许存活时间。最大时间介于创建时间和失效时间之间。仅当element不是永久有效时使用,默认是0.,也就是element存活时间无穷大 diskPersistent:是否缓存虚拟机重启期数据 diskExpiryThreadIntervalSeconds:磁盘失效线程运行时间间隔,默认是120秒 diskSpoolBufferSizeMB:这个参数设置DiskStore(磁盘缓存)的缓存区大小。默认是30MB。每个Cache都应该有自己的一个缓冲区 memoryStoreEvictionPolicy:当达到maxElementsInMemory限制时,Ehcache将会根据指定的策略去清理内存。默认策略是LRU(最近最少使用)。你可以设置为FIFO(先进先出)或是LFU(较少使用) --></ehcache>* 在ApplicationContext.xml中配置Shiro相关信息在ApplicationContext.xml文件中配置Shiro的必要信息,这里我们的整合将直接参考Spring Example中的applicationContext.xml的配置信息。基本配置如下(在讲解后续功能时会不断完善该配置)<!-- 1.配置SecurityManager --><bean id="securityManager" class="org.apache.shiro.web.mgt.DefaultWebSecurityManager"><property name="cacheManager" ref="cacheManager" /><!-- Shiro 多Realm认证策略 --><!-- <property name="authenticator" ref="authenticator"></property> --><property name="realms"><list><ref bean="shiroRealm"></ref></list></property></bean><!-- 2.配置 cacheManager --><!-- 2.1 自定义ehcache 此处需要加入ehcache jar 及其配置文件 --><bean id="cacheManager" class="org.apache.shiro.cache.ehcache.EhCacheManager"><property name="cacheManagerConfigFile" value="classpath:ehcache.xml"></property></bean><!-- 3.配置Realm --><bean id="shiroRealm" class="com.shiro.example.interceptor.realm.ShiroRealm"><!-- <property name="credentialsMatcher"> <bean class="org.apache.shiro.authc.credential.HashedCredentialsMatcher"> <property name="hashAlgorithmName" value="SHA1"></property> <property name="hashIterations" value="1024"></property> </bean> </property> --></bean><!-- <bean id="authenticator" class="org.apache.shiro.authc.pam.ModularRealmAuthenticator"> <property name="authenticationStrategy"> 多个Reaml认证中有一个认证成功即成功策略 <bean class="org.apache.shiro.authc.pam.AtLeastOneSuccessfulStrategy"></bean> 第一个Reaml认证策略 <bean class="org.apache.shiro.authc.pam.FirstSuccessfulStrategy"></bean> 必须所有Reaml都成功认证策略 <bean class="org.apache.shiro.authc.pam.AllSuccessfulStrategy"></bean> </property> </bean> --><!-- 4.配置lifecycleBeanPostProcessor,可以自动的调用Spring IOC 容器中shiro bean的生命周期方法 --><bean id="lifecycleBeanPostProcessor" class="org.apache.shiro.spring.LifecycleBeanPostProcessor" /><!-- 5.启用ICO 容器中使用Shiro 注解,但必须在配置了lifecycleBeanPostProcessor之后方可使用 --><bean class="org.springframework.aop.framework.autoproxy.DefaultAdvisorAutoProxyCreator" depends-on="lifecycleBeanPostProcessor" /><bean class="org.apache.shiro.spring.security.interceptor.AuthorizationAttributeSourceAdvisor"><property name="securityManager" ref="securityManager" /></bean><!-- 6.配置ShiroFilter 6.1 id必须和web.xml中的DelegatingFilterProxy的 FilterName一致 --><bean id="shiroFilter" class="org.apache.shiro.spring.web.ShiroFilterFactoryBean"><property name="securityManager" ref="securityManager" /><property name="loginUrl" value="/login/toLogin" /><property name="successUrl" value="/example/index" /><property name="unauthorizedUrl" value="/example/unauthorized" /><property name="filterChainDefinitions"><value>/login/toLogin = anon/login/loginVal = anon/login/logout = logout/** = authc</value></property></bean>
一个Shiro例子
以上配置好以后我们将做一个Shiro 认证的登录例子。
新建Form表单,本例子中的login.jsp
<%@ page language="java" contentType="text/html; charset=utf-8" pageEncoding="utf-8"%><% String path = request.getContextPath(); String basePath = request.getScheme() + "://" + request.getServerName() + ":" + request.getServerPort() + path; %><!DOCTYPE html PUBLIC "-//W3C//DTD HTML 4.01 Transitional//EN" "http://www.w3.org/TR/html4/loose.dtd"><html><head><meta http-equiv="Content-Type" content="text/html; charset=utf-8"><title>Insert title here</title></head><body>
<form action="<%=basePath %>/login/loginVal" method="POST">username: <input type="text" name="username" /> <br> <br>password: <input type="password" name="password" /> <br> <br><input type="submit" value="Submit" /></form></body></html>
实现Controller方法
package com.shiro.example.controller;import org.apache.shiro.SecurityUtils;import org.apache.shiro.authc.UsernamePasswordToken;import org.apache.shiro.subject.Subject;import org.springframework.stereotype.Controller;import org.springframework.web.bind.annotation.RequestMapping;import org.springframework.web.bind.annotation.RequestParam;@Controller@RequestMapping(value = "/login")public class LoginProcess {@RequestMapping("/loginVal")public String login(@RequestParam("username") String username, @RequestParam("password") String password)throws Exception {System.out.println("username: " + username + "+ password: " + password);Subject subject = SecurityUtils.getSubject();// 如果当前用户并未经过认证登录的/*if (!subject.isAuthenticated()) {*/UsernamePasswordToken token = new UsernamePasswordToken(username, password);token.setRememberMe(true);try {subject.login(token);} catch (Exception e) {System.out.println("登录失败: " + e.getMessage());return "erro";}/*} System.out.println("用户尚未被认证");*/return "index";}@RequestMapping("/toLogin")public String toLogin() throws Exception {return "login";}}
实现自定义Realm方法
package com.shiro.example.interceptor.realm;import java.util.HashSet;import java.util.Set;import org.apache.shiro.authc.AuthenticationException;import org.apache.shiro.authc.AuthenticationInfo;import org.apache.shiro.authc.AuthenticationToken;import org.apache.shiro.authc.LockedAccountException;import org.apache.shiro.authc.SimpleAuthenticationInfo;import org.apache.shiro.authc.UnknownAccountException;import org.apache.shiro.authc.UsernamePasswordToken;import org.apache.shiro.authz.AuthorizationInfo;import org.apache.shiro.authz.SimpleAuthorizationInfo;import org.apache.shiro.crypto.hash.SimpleHash;import org.apache.shiro.realm.AuthorizingRealm;import org.apache.shiro.subject.PrincipalCollection;import org.apache.shiro.util.ByteSource;import com.shiro.example.entity.SubjectEntity;public class ShiroRealm extends AuthorizingRealm {@Overrideprotected AuthenticationInfo doGetAuthenticationInfo(AuthenticationToken token) throws AuthenticationException {System.out.println("[FirstRealm] doGetAuthenticationInfo");// 1. 把 AuthenticationToken 转换为 UsernamePasswordTokenUsernamePasswordToken upToken = (UsernamePasswordToken) token;// 2. 从 UsernamePasswordToken 中来获取 usernameString username = upToken.getUsername();// 3. 调用数据库的方法, 从数据库中查询 username 对应的用户记录SubjectEntity principals = new SubjectEntity("123456", "Dustyone");// 4. 若用户不存在, 则可以抛出 UnknownAccountException 异常if ("unknown".equals(username)) {throw new UnknownAccountException("用户不存在!");}// 5. 根据用户信息的情况, 决定是否需要抛出其他的 AuthenticationException 异常.if ("monster".equals(username)) {throw new LockedAccountException("用户被锁定");}// 6. 根据用户的情况, 来构建 AuthenticationInfo 对象并返回. 通常使用的实现类为:// SimpleAuthenticationInfo// 以下信息是从数据库中获取的.// 1). principal: 认证的实体信息. 可以是 username, 也可以是数据表对应的用户的实体类对象.Object principal = principals.getUsername();// 2). credentials: 密码.Object credentials = principals.getPassword(); // "fc1709d0a95a6be30bc5926fdb7f22f4";
// 3). realmName: 当前 realm 对象的 name. 调用父类的 getName() 方法即可String realmName = getName();SimpleAuthenticationInfo info = new SimpleAuthenticationInfo(principal, credentials, realmName);/* * //3). realmName: 当前 realm 对象的 name. 调用父类的 getName() 方法即可 String * realmName = getName(); //4). 盐值. ByteSource credentialsSalt = * ByteSource.Util.bytes(username); * * SimpleAuthenticationInfo info = null; //new * SimpleAuthenticationInfo(principal, credentials, realmName); info = * new SimpleAuthenticationInfo(principal, credentials, credentialsSalt, * realmName); */return info;}
新建Subject Entity
package com.shiro.example.entity;import java.io.Serializable;public class SubjectEntity implements Serializable{/** * Subject Entity */private static final long serialVersionUID = 1L;public SubjectEntity() {super();}@Overridepublic String toString() {return "SubjectEntity [username=" + username + ", password=" + password + "]";}public SubjectEntity(String password, String username) {super();this.username = username;this.password = password;}public String getUsername() {return username;}public void setUsername(String username) {this.username = username;}public String getPassword() {return password;}public void setPassword(String password) {this.password = password;}private String username;private String password;}
Example 文件
```package com.shiro.example.controller;import org.springframework.stereotype.Controller;import org.springframework.web.bind.annotation.RequestMapping;@Controller@RequestMapping("/example")public class Example {@RequestMapping(value = "/index")public String example() throws Exception {return "example";}@RequestMapping(value="/unauthorized")public String unauthorized(){return "unauthorized";}}```
本例子涉及的核心功能点
Shiro 认证(登录验证)
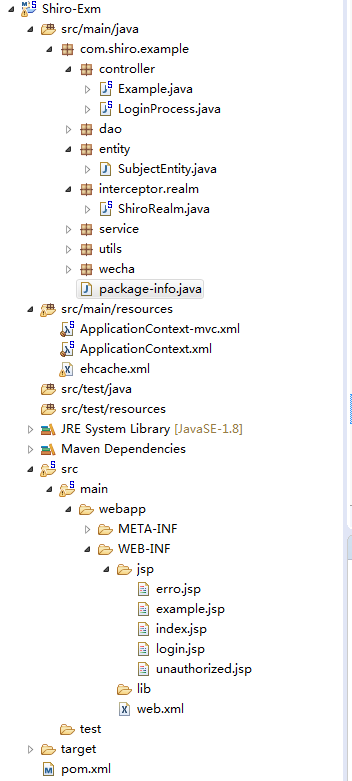
- 由我们自定义的Realm代码中可知我们指定登录的Subject的usernam=Dustyone password=123456。唯有此principal(实体)组合才能通过Shiro认证(暂时不涉及加密)。
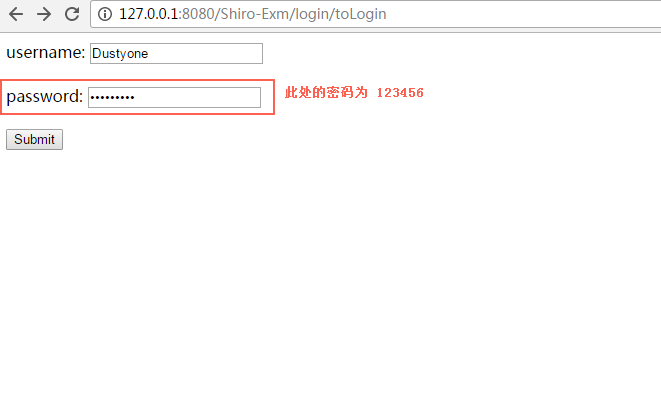
正确登录
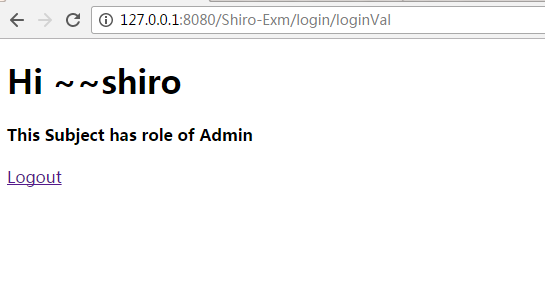
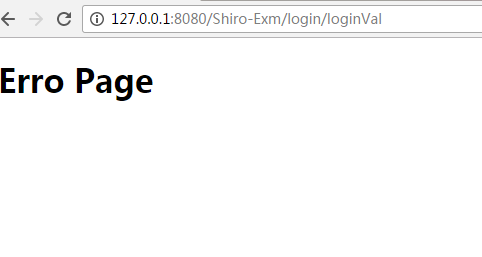
错误principal登录
Shiro 授权
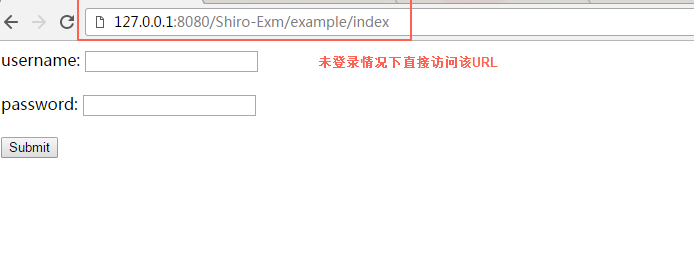
- 在shiroFilter的 filterChainDefinitions我们做了访问权限声明即除了 /login/toLogin 和 /login/loginVal 可以被匿名访问意外其他的任何url请都将被 shiro filetr收集并进行Subject 授权(即用户是否有权限访问**, 此处的两个星号标识资源。)。以 /example/index请求为例,在用户未登录的情况下访问该路径将直接跳转至登录页面。只有在登录成功的情况下才能访问 /example/index
- 未登录的情况下访问 /example/index 将直接跳至登录页面
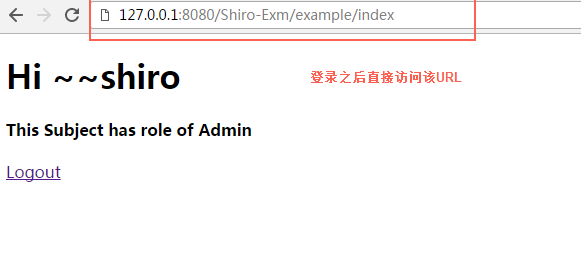
已登录的情况下访问 /example/index 直接可以访问该资源

- Shiro 缓存
用户登录成功之后(特质在启用了shiro的缓存机制之后),shiro 缓存将对最近一个Subject的认证或授权信息写入缓存。当该Subject 再次访问需要认证或授权的资源时,shiro将从缓存中(本例子中特指ehcache.xml)读取Subject的相关信息而不再此对该Subject进行认证或授权处理(这里的认证或授权特指我们自定义的Reaml中的 doGetAuthenticationInfo 和 doGetAuthorizationInfo 两个方法)。 - Shiro 登出
在访问logout 之后shiro将清除所有缓存信息并跳至登录页面。


还没有评论,来说两句吧...