springMVC系列之(三) spring+springMVC集成(annotation方式)
个人认为使用框架并不是很难,关键要理解其思想,这对于我们提高编程水平很有帮助。不过,如果用都不会,谈思想就变成纸上谈兵了!!!先技术,再思想。实践出真知。
1、基本概念
1.1、Spring
Spring是一个开源框架,Spring是于2003 年兴起的一个轻量级的Java 开发框架,由Rod Johnson 在其著作Expert One-On-One J2EE Development and Design中阐述的部分理念和原型衍生而来。它是为了解决企业应用开发的复杂性而创建的。Spring使用基本的JavaBean来完成以前只可能由EJB完成的事情。然而,Spring的用途不仅限于服务器端的开发。从简单性、可测试性和松耦合的角度而言,任何Java应用都可以从Spring中受益。 简单来说,Spring是一个轻量级的控制反转(IoC)和面向切面(AOP)的容器框架。
1.2、SpringMVC
Spring MVC属于SpringFrameWork的后续产品,已经融合在Spring Web Flow里面。Spring MVC 分离了[控制器][Link 1]、模型[对象][Link 2]、分派器以及处理程序对象的角色,这种分离让它们更容易进行定制。
2.环境搭建详解
2.1引入相应的包
springMVC和spring包的结构发生了很大的变化,各个包都分开了,灵活,要求使用者更加深入的学习使用,当我们引入包的时候,以少为原则,少的话可以根据报错来找到相应的包,如果过多的话,包会报错异常的混乱,不容易分辨;sprinMVC和spring本身就是一家的,所以引入的包来说基本上和spring需要的架构包是一致的.

2.2 新建注解xml文件 :springAnnotation-servlet.xml
<span style="font-size:18px;"><span style="font-size:18px;"><span style="font-size:18px;"><?xml version="1.0" encoding="UTF-8"?><beans xmlns="http://www.springframework.org/schema/beans"xmlns:context="http://www.springframework.org/schema/context"xmlns:p="http://www.springframework.org/schema/p"xmlns:mvc="http://www.springframework.org/schema/mvc"xmlns:xsi="http://www.w3.org/2001/XMLSchema-instance"xsi:schemaLocation="http://www.springframework.org/schema/beanshttp://www.springframework.org/schema/beans/spring-beans-3.0.xsdhttp://www.springframework.org/schema/contexthttp://www.springframework.org/schema/context/spring-context.xsdhttp://www.springframework.org/schema/mvchttp://www.springframework.org/schema/mvc/spring-mvc-3.0.xsd"><!-- 注解扫描包 --><context:component-scan base-package="com.tgb.web.controller.annotation" /><!-- 开启注解 --><mvc:annotation-driven/><!-- <bean class="org.springframework.web.servlet.mvc.annotation.AnnotationMethodHandlerAdapter" /><bean class="org.springframework.web.servlet.mvc.annotation.DefaultAnnotationHandlerMapping"></bean> --><!-- 静态资源访问 --><mvc:resources location="/img/" mapping="/img/**"/><mvc:resources location="/js/" mapping="/js/**"/><bean id="viewResolver" class="org.springframework.web.servlet.view.InternalResourceViewResolver"><property name="prefix" value="/"></property><property name="suffix" value=".jsp"></property></bean><bean id="multipartResolver" class="org.springframework.web.multipart.commons.CommonsMultipartResolver"><property name="defaultEncoding" value="utf-8" /><property name="maxUploadSize" value="10485760000" /><property name="maxInMemorySize" value="40960" /></bean></beans> </span></span></span>
2.3 建springxml文件 springAnnotation-core.xml
通过bean注入要调用的接口实现类<span style="font-size:18px;"><span style="font-size:18px;"><span style="font-size:18px;"><beans><bean id="springManager" class="com.tgb.web.controller.annotation.SpringManager"></bean></beans></span></span></span>
2.3.1 ISpring接口
<span style="font-size:18px;"><span style="font-size:18px;"><span style="font-size:18px;">public interface ISpring {public String get();}</span></span></span>
2.3.2 ISpring实现类
<span style="font-size:18px;"><span style="font-size:18px;"><span style="font-size:18px;">public class SpringManager implements ISpring {@Overridepublic String get() {//判定是否调用了System.out.println("------I am springManager----");return "I am getMethod";}}</span></span></span>
2.3.3 SpringController类
<span style="font-size:18px;"><span style="font-size:18px;"><span style="font-size:18px;">public class SpringController {//这样代替了再xml中配置属性的过程@Resource(name="springManager")private ISpring springManager;//注入springManager@RequestMapping("/spring/get")public String get(){System.out.println(springManager.get());return "/success";}}</span></span></span>
一个项目的全局配置点在web.xml,一个项目需要使用了多少框架,通过xml可以查看.
<span style="font-size:18px;"><span style="font-size:18px;"><span style="font-size:18px;"><?xml version="1.0" encoding="UTF-8"?><web-app xmlns:xsi="http://www.w3.org/2001/XMLSchema-instance" xmlns="http://java.sun.com/xml/ns/javaee" xmlns:web="http://java.sun.com/xml/ns/javaee/web-app_2_5.xsd" xsi:schemaLocation="http://java.sun.com/xml/ns/javaee http://java.sun.com/xml/ns/javaee/web-app_2_5.xsd" id="WebApp_ID" version="2.5"><display-name>springMVC8</display-name><welcome-file-list><welcome-file>index.html</welcome-file><welcome-file>index.htm</welcome-file><welcome-file>index.jsp</welcome-file><welcome-file>default.html</welcome-file><welcome-file>default.htm</welcome-file><welcome-file>default.jsp</welcome-file></welcome-file-list><context-param><param-name>contextConfigLocation</param-name><param-value>classpath*:config/springAnnotation-core.xml</param-value><!-- <param-value>classpath*:config/springAnnotation-servlet.xml</param-value> --></context-param><!-- 配置spring启动listener入口 --><listener><listener-class>org.springframework.web.context.ContextLoaderListener</listener-class></listener><!-- 配置springMVC启动DispatcherServlete入口 --><servlet><servlet-name>springMVC</servlet-name><servlet-class>org.springframework.web.servlet.DispatcherServlet</servlet-class><init-param><param-name>contextConfigLocation</param-name><!-- <param-value>classpath*:config/springAnnotation-core.xml</param-value> --><param-value>classpath*:config/springAnnotation-servlet.xml</param-value></init-param><load-on-startup>1</load-on-startup></servlet><filter><filter-name>encodingFilter</filter-name><filter-class>org.springframework.web.filter.CharacterEncodingFilter</filter-class><init-param><param-name>encoding</param-name><param-value>UTF-8</param-value></init-param><init-param><param-name>forceEncoding</param-name><param-value>true</param-value></init-param></filter><!-- encoding filter for jsp page --><filter-mapping><filter-name>encodingFilter</filter-name><url-pattern>/*</url-pattern></filter-mapping><servlet-mapping><servlet-name>springMVC</servlet-name><url-pattern>/</url-pattern></servlet-mapping></web-app></span></span></span>
注解:springMVC是通过dispastservlet来监听的,spring使用linstener监听的,他们之间的启动顺序,web容器有又一个即,
第一:context-param
第二:Listerer
第三:Filter
第四:servlet
这样的启动顺序是有一定联系的

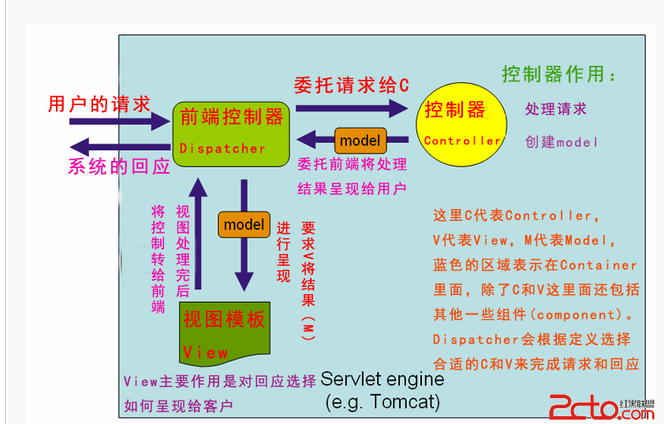
总结
一张图胜过千言万语哈!
接下来是<SpringMVC+Hibernate+Spring三大架构的集成实例>,请期待学习!


还没有评论,来说两句吧...