NanoPi M1 Plus:Allwinner H3 搭建编译环境、编译主线Uboot、编译主线Linux Kernel 4.14、加Matrix2‘8屏、加Qt
文章目录
- 参考的官方wiki:
- 主线Linux
- 零、组件来源
- 一、搭建编译环境
- 使用:arm-cortexa9-linux-gnueabihf-gcc -v
- 使用:arm-linux-gcc -v
- 二、SD卡分区信息
- 三、使用编译环境编译uboot
- 下载Uboot
- 使用:arm-linux- 编译
- 使用:arm-linux-gnueabihf- 编译
- 烧录文件到SD卡
- 四、使用编译环境编译Linux Kernel
- 使用:arm-linux- 编译
- 使用:arm-linux-gnueabihf- 编译
- 拷贝Kernel和设备树文件到SD卡的Boot分区
- 问题
- 五、U-Boot上电成功,Kernel启动失败
- U-Boot的bootcmd参数不正常
- 可以在Uboot命令行里将kernel和dtb文件加载到RAM里面跑一下
- Kernel无法启动
- 六、卡在 Starting kernel …
- Device Tree出现之前(我的是linux-sunxi-4.14.y已经使用了设备树)
- Device Tree出现之后
- 可能一:设备树文件名错误
- 可能二:配置的串口输出端口错误
- 调试:
- 1.开启kernel的early_printk
- 2.直接读取缓存
- 失败:跑不起来
- 哭笑不得,电源不稳导致一直卡在Starting kernel …
- 七、文件系统
- 挂不起文件系统,尴尬了!
- 错误:串口打印卡在:Waiting for root device /dev/mmcblk0p2…
- 有信息说是由于Kernel不支持大于8G的mmc设备导致的
- 错误解决:bootargs里面添加一个init=/linuxrc就可以挂起根文件系统了
- 八、添加一块屏幕
- 屏幕介绍
- 为了使用屏幕需要修改设备树sun8i-h3-nanopi.dtsi
- 测试屏幕:满屏雪花,清屏操作
- 九、添加Qt
- 错误:运行Qt例程后,命令行有一些提示
- 异常:Qt例程没有画面加载到屏幕上去
- 搞定,完结撒花!

全网最全,趟坑记录!
参考的官方wiki:
Building U-boot and Linux for H5/H3/H2+/zh
主线Linux
Mainline即主线的意思,Linux内核的开发分为Linus维护的主线、其他开发分支以及各种稳定版本。开发分支最终都会统一提交到Linus维护的主线中。 最新版本的U-boot和主线Linux内核已经支持了全志的H3/H5 CPU,我们在最新版本的的U-boot和主线Linux内核的基础上进行了定制开发,使其能支持上NanoPi H5/H3/H2+系列的开发板。本内容仅适用于基于Linux-4.14内核的系统固件。
零、组件来源
百度网盘地址:https://pan.baidu.com/share/init?surl=1dqMYCXeKBcGDA9HmqT5Kw 提取码:u2a4
一、搭建编译环境
网盘目录:H3/NanoPi-M1-Plus/toolchain
编译工具:arm-cortexa9-linux-gnueabihf-4.9.3-20160512.tar.xz
解压:arm-cortexa9-linux-gnueabihf-4.9.3-20160512.tar.xz,tar -xvf xxxxx.tar.xz得到 4.9.3 目录,与其他平台搭建交叉编译环境方法一样,将该目录复制到 /usr/local/arm/ 目录下
设置环境变量:
方式一:在 ~/.bashrc 最后添加:
# vim ~/.bashrcPATH=$PATH:/usr/local/arm/4.9.3/bin/export PATH
方式二:或者通过设置/etc/profile文件,在文件最后添加:
# sudo vim /etc/profileexport PATH=$PATH:/usr/local/arm/4.9.3/bin
重启或者注销用户再登录即可使用该交叉编译工具。
验证安装是否成功
验证交叉编译工具是否安装成功,可以使用两种方式:
- arm-cortexa9-linux-gnueabihf-gcc -v
- arm-linux-gcc -v
使用:arm-cortexa9-linux-gnueabihf-gcc -v
liefyuan@ubuntu:$ arm-cortexa9-linux-gnueabihf-gcc -vUsing built-in specs.COLLECT_GCC=arm-cortexa9-linux-gnueabihf-gccCOLLECT_LTO_WRAPPER=/usr/local/arm/4.9.3/bin/../libexec/gcc/arm-cortexa9-linux-gnueabihf/4.9.3/lto-wrapperTarget: arm-cortexa9-linux-gnueabihfConfigured with: /work/toolchain/build/src/gcc-4.9.3/configure --build=x86_64-build_pc-linux-gnu --host=x86_64-build_pc-linux-gnu --target=arm-cortexa9-linux-gnueabihf --prefix=/opt/FriendlyARM/toolchain/4.9.3 --with-sysroot=/opt/FriendlyARM/toolchain/4.9.3/arm-cortexa9-linux-gnueabihf/sys-root --enable-languages=c,c++ --with-arch=armv7-a --with-tune=cortex-a9 --with-fpu=vfpv3 --with-float=hard --with-pkgversion=ctng-1.21.0-229g-FA --with-bugurl=http://www.friendlyarm.com/ --enable-__cxa_atexit --disable-libmudflap --disable-libgomp --disable-libssp --disable-libquadmath --disable-libquadmath-support --disable-libsanitizer --with-gmp=/work/toolchain/build/arm-cortexa9-linux-gnueabihf/buildtools --with-mpfr=/work/toolchain/build/arm-cortexa9-linux-gnueabihf/buildtools --with-mpc=/work/toolchain/build/arm-cortexa9-linux-gnueabihf/buildtools --with-isl=/work/toolchain/build/arm-cortexa9-linux-gnueabihf/buildtools --with-cloog=/work/toolchain/build/arm-cortexa9-linux-gnueabihf/buildtools --with-libelf=/work/toolchain/build/arm-cortexa9-linux-gnueabihf/buildtools --enable-lto --with-host-libstdcxx='-static-libgcc -Wl,-Bstatic,-lstdc++,-Bdynamic -lm' --enable-threads=posix --enable-linker-build-id --with-linker-hash-style=gnu --enable-plugin --enable-gold --disable-multilib --with-local-prefix=/opt/FriendlyARM/toolchain/4.9.3/arm-cortexa9-linux-gnueabihf/sys-root --enable-long-longThread model: posixgcc version 4.9.3 (ctng-1.21.0-229g-FA)
使用:arm-linux-gcc -v
liefyuan@ubuntu:$ arm-linux-gcc -vUsing built-in specs.COLLECT_GCC=arm-linux-gccCOLLECT_LTO_WRAPPER=/usr/local/arm/4.9.3/bin/../libexec/gcc/arm-cortexa9-linux-gnueabihf/4.9.3/lto-wrapperTarget: arm-cortexa9-linux-gnueabihfConfigured with: /work/toolchain/build/src/gcc-4.9.3/configure --build=x86_64-build_pc-linux-gnu --host=x86_64-build_pc-linux-gnu --target=arm-cortexa9-linux-gnueabihf --prefix=/opt/FriendlyARM/toolchain/4.9.3 --with-sysroot=/opt/FriendlyARM/toolchain/4.9.3/arm-cortexa9-linux-gnueabihf/sys-root --enable-languages=c,c++ --with-arch=armv7-a --with-tune=cortex-a9 --with-fpu=vfpv3 --with-float=hard --with-pkgversion=ctng-1.21.0-229g-FA --with-bugurl=http://www.friendlyarm.com/ --enable-__cxa_atexit --disable-libmudflap --disable-libgomp --disable-libssp --disable-libquadmath --disable-libquadmath-support --disable-libsanitizer --with-gmp=/work/toolchain/build/arm-cortexa9-linux-gnueabihf/buildtools --with-mpfr=/work/toolchain/build/arm-cortexa9-linux-gnueabihf/buildtools --with-mpc=/work/toolchain/build/arm-cortexa9-linux-gnueabihf/buildtools --with-isl=/work/toolchain/build/arm-cortexa9-linux-gnueabihf/buildtools --with-cloog=/work/toolchain/build/arm-cortexa9-linux-gnueabihf/buildtools --with-libelf=/work/toolchain/build/arm-cortexa9-linux-gnueabihf/buildtools --enable-lto --with-host-libstdcxx='-static-libgcc -Wl,-Bstatic,-lstdc++,-Bdynamic -lm' --enable-threads=posix --enable-linker-build-id --with-linker-hash-style=gnu --enable-plugin --enable-gold --disable-multilib --with-local-prefix=/opt/FriendlyARM/toolchain/4.9.3/arm-cortexa9-linux-gnueabihf/sys-root --enable-long-longThread model: posixgcc version 4.9.3 (ctng-1.21.0-229g-FA)
二、SD卡分区信息
| 分区 | 分区一 | 分区二 | 分区三 |
|---|---|---|---|
| 格式 | RAW(不存在文件系统格式) | FAT16 | EXT4 |
| 用途 | U-boot文件 | Kernel、设备树文件 | 根文件系统 |
| 大小 | 3MiB | 32MiB | 余下所有的 |
三、使用编译环境编译uboot
下载Uboot
git clone https://github.com/friendlyarm/u-boot.git -b sunxi-v2017.x --depth 1
文件名:u-boot-sunxi-v2017.x.zip
解压文件:unzip u-boot-sunxi-v2017.x.zip
使用:arm-linux- 编译
sudo apt-get install swig python-dev python3-devmake nanopi_h3_defconfig ARCH=arm CROSS_COMPILE=arm-linux-make ARCH=arm CROSS_COMPILE=arm-linux- -j16
使用:arm-linux-gnueabihf- 编译
sudo apt-get install swig python-dev python3-devmake cleanmake nanopi_m1_plus_defconfig ARCH=arm CROSS_COMPILE=arm-linux-gnueabihf-make ARCH=arm CROSS_COMPILE=arm-linux-gnueabihf- -j16
经过测试,使用这两个编译器都可以编译出的U-Boot都可以正常运行。
烧录文件到SD卡
dd if=u-boot-sunxi-with-spl.bin of=/dev/sdX bs=1024 seek=8sync && eject /dev/sdX
- /dev/sdx请替换为实际的TF卡设备文件名。
- sync命令可以确保数据成功写到TF卡中,eject命令用于弹出TF卡。
- 注意:因为这个u-boot-sunxi-with-spl.bin文件比较大,所以在设置SD文件分区时需要在boot分区前预留至少3MiB的空间用来存放U-Boot文件。
四、使用编译环境编译Linux Kernel
下载Linux内核源码,并切换分支:
$ git clone https://github.com/friendlyarm/linux.git -b sunxi-4.14.y --depth 1
文件名:linux-sunxi-4.14.y.zip
使用:arm-linux- 编译
sudo apt-get install u-boot-toolsmake cleantouch .scmversionmake sunxi_defconfig ARCH=arm CROSS_COMPILE=arm-linux-make zImage dtbs ARCH=arm CROSS_COMPILE=arm-linux- -j16
使用:arm-linux-gnueabihf- 编译
sudo apt-get install u-boot-toolsmake cleantouch .scmversionmake sunxi_defconfig ARCH=arm CROSS_COMPILE=arm-linux-gnueabihf-make zImage dtbs ARCH=arm CROSS_COMPILE=arm-linux-gnueabihf- -j16
拷贝Kernel和设备树文件到SD卡的Boot分区
sudo cp arch/arm/boot/zImage /media/liefyuan/BOOT/sudo cp arch/arm/boot/dts/sun8i-h3-nanopi-m1-plus.dtb /media/liefyuan/BOOT/
问题
使用这两个编译器编译出来的Kernel文件都无法启动。
五、U-Boot上电成功,Kernel启动失败
U-Boot的bootcmd参数不正常
U-Boot SPL 2017.11 (Oct 02 2021 - 02:01:52)DRAM: 1024 MiB(408MHz)CPU Freq: 408MHzmemory test: 1Pattern 55aa Writing...Reading...OKTrying to boot from MMC1Boot device: sdU-Boot 2017.11 (Oct 02 2021 - 02:01:52 +0800) Allwinner TechnologyCPU: Allwinner H3 (SUN8I 1680)Model: FriendlyElec NanoPi H3DRAM: 1 GiBCPU Freq: 1008MHzMMC: SUNXI SD/MMC: 0, SUNXI SD/MMC: 1In: serialOut: serialErr: serialNet: No ethernet found.BOARD: nanopi-m1-plusstarting USB...No controllers foundHit any key to stop autoboot: 0switch to partitions #0, OKmmc0 is current deviceScanning mmc 0:1...reading /sun8i-h3-nanopi-m1-plus.dtb37691 bytes read in 26 ms (1.4 MiB/s)starting USB...No controllers foundUSB is stopped. Please issue 'usb start' first.starting USB...No controllers foundNo ethernet found.missing environment variable: pxeuuidmissing environment variable: bootfileRetrieving file: pxelinux.cfg/00000000No ethernet found.missing environment variable: bootfileRetrieving file: pxelinux.cfg/0000000No ethernet found.missing environment variable: bootfileRetrieving file: pxelinux.cfg/000000No ethernet found.missing environment variable: bootfileRetrieving file: pxelinux.cfg/00000No ethernet found.missing environment variable: bootfileRetrieving file: pxelinux.cfg/0000No ethernet found.missing environment variable: bootfileRetrieving file: pxelinux.cfg/000No ethernet found.missing environment variable: bootfileRetrieving file: pxelinux.cfg/00No ethernet found.missing environment variable: bootfileRetrieving file: pxelinux.cfg/0No ethernet found.missing environment variable: bootfileRetrieving file: pxelinux.cfg/default-arm-sunxiNo ethernet found.missing environment variable: bootfileRetrieving file: pxelinux.cfg/default-armNo ethernet found.missing environment variable: bootfileRetrieving file: pxelinux.cfg/defaultNo ethernet found.Config file not foundstarting USB...No controllers foundNo ethernet found.No ethernet found.=>
需要重新配置一下
地址设置
- 全志的H3芯片从地址上把DRAM分配的地址为:0x4000 0000—0xBFFF FFFF最大支持的DRAM为2GiB
| Module | Address (It is for Cluster CPU) | Size (byte) |
|---|---|---|
| DDR-III/LPDDR-II | 0x4000 0000—0xBFFF FFFF | 2G |
- Nanopi M1 Plus开发板的DDR是1GiB (4000 0000H)因此DDR的可用地址范围是:0x4000 0000 — 0x8000 0000
- kernel加载到RAM的0x41000000
- 设备树加载到RAM的0x48000000
设置参数为:
bootcmd
=> setenv bootcmd 'setenv bootm_boot_mode sec; load mmc 0:1 0x41000000 zImage; load mmc 0:1 0x48000000 sun8i-h3-nanopi-m1-plus.dtb; bootz 0x41000000 - 0x48000000;'
bootargs
=> setenv bootargs 'console=tty0 console=ttyS0,115200 panic=5 rootwait root=/dev/mmcblk0p2 earlyprintk rw vt.global_cursor_default=0'
保存一下
=> saveenv
可以在Uboot命令行里将kernel和dtb文件加载到RAM里面跑一下
fatls mmc 0:1 # 列出分区1里面的所有文件fatload mmc 0:1 0x41000000 zImage # 将Kernel文件加载到RAM里面的0x41000000地址里面去fatload mmc 0:1 0x48000000 sun8i-h3-nanopi-m1-plus.dtb # 将设备树文件加载到RAM里面去bootz 0x41000000 - 0x48000000
运行Kernel失败
## Flattened Device Tree blob at 48000000Booting using the fdt blob at 0x48000000Loading Device Tree to 49ff3000, end 49fff33a ... OKStarting kernel ...
还在研究为啥不能启动
Kernel无法启动
U-Boot SPL 2017.11 (Oct 14 2021 - 21:53:14)DRAM: 1024 MiB(408MHz)CPU Freq: 408MHzmemory test: 1Pattern 55aa Writing...Reading...OKTrying to boot from MMC1Boot device: sdU-Boot 2017.11 (Oct 14 2021 - 21:53:14 +0800) Allwinner TechnologyCPU: Allwinner H3 (SUN8I 1680)Model: FriendlyElec NanoPi H3DRAM: 1 GiBCPU Freq: 1008MHzMMC: SUNXI SD/MMC: 0, SUNXI SD/MMC: 1In: serialOut: serialErr: serialNet: No ethernet found.BOARD: nanopi-m1-plusstarting USB...No controllers foundHit any key to stop autoboot: 0reading zImage5902672 bytes read in 297 ms (19 MiB/s)reading sun8i-h3-nanopi-m1-plus.dtb37691 bytes read in 26 ms (1.4 MiB/s)## Flattened Device Tree blob at 48000000Booting using the fdt blob at 0x48000000Loading Device Tree to 49ff3000, end 49fff33a ... OKStarting kernel ...
六、卡在 Starting kernel …
Device Tree出现之前(我的是linux-sunxi-4.14.y已经使用了设备树)
Device Tree出现之前,也就是kernel 3.0之前的版本,这种情况下,当bootloader将控制权移交给kernel时,kernel会将自身的Machine ID与bootloader的Machine ID进行对比,这时,如果二者不一致,则会出现卡在Starting kernel的情况。那么这个Machine ID是什么?又在哪里进行修改呢?
由于ARM嵌入式系统芯片和平台种类繁多,也不像x86硬件系统有自己的标准体系,所以,Linux Kernel需要依赖bootloader告诉它是什么ARM平台,这样才能知道去匹配相应的hard code在kernel里的相关硬件定义及BSP代码(也就是arch/arm/mach-xxxx目录),这就是Machine ID出现的根源所在。
所以当我们做了一个新板子时,需要先向社区申请Machine ID(http://www.arm.linux.org.uk/developer/machines/),或者沿用类似已有平台的Machine ID,之后,我们要修改u-boot下的Machine ID,则需要到board/xxx/xxx.c中的board init函数中去制定相应的Machine ID。比如以ti的am335x评估板为例,其名称为MACH_TYPE_AM335EVM,修改目录在/board/ti/am335x/evm.c。
Device Tree出现之后
可能一:设备树文件名错误
我的内核是linux-sunxi-4.14.y,就是支持设备树了。
- 当uboot环境变量fdt_file与生成的Device Tree的dtb文件名称不一致或找不到相应的dtb文件时,就会出现卡在Starting kernel的情况。这种类型的错误,现在一般u-boot层面会报出相应的错误log,所以比较容易定位问题。
注意检查下uboot向kernel传递的参数有没有拼写错误之类的低级原因。
reading zImage
5902672 bytes read in 297 ms (19 MiB/s)
reading sun8i-h3-nanopi-m1-plus.dtb
37691 bytes read in 26 ms (1.4 MiB/s)Flattened Device Tree blob at 48000000
Booting using the fdt blob at 0x48000000
Loading Device Tree to 49ff3000, end 49fff33a … OKStarting kernel …
应该不是设备树的问题,这里正确读取了设备树文件了。
可能二:配置的串口输出端口错误
至于这个starting kernel其实是uboot阶段输出最后的一句信息,这时候正准备进入内核引导。这个错误一般由于错误的配置 debug串口导致的,你可以检验下你内核配置的时候,你所配置的串口输出端口是多少。
我的bootargs参数如下
=> setenv bootargs 'console=tty0 console=ttyS0,115200 panic=5 rootwait root=/dev/mmcblk0p2 earlyprintk rw vt.global_cursor_default=0'=> setenv bootargs 'console=ttyS0,115200 console=tty0 root=/dev/mmcblk0p2 rootfstype=ext4 rootwait init=/sbin/init'
失败!
调试:
首先想到的是打开使能early_printk
1.开启kernel的early_printk
开启make menuconfig Kernel hacking—>Kernel low-level debugging functions
和Kernel hacking—>Early printk
在uboot启动项上加上earlyprintk
setenv mmcboot "setenv bootargs console=ttyS0,115200 mem=512M earlyprintk libata.force=noncq root=/dev/mmcblk0p2 rw rootwait fbmode=VGA; bootz 0x8000 - 0x00000100"
2.直接读取缓存
- 1.编译完成后在kernel中找到system.map文件
find . -name "*.map" - 2.打开文件找到 __log_buf,获得 __log_buf的地址,比如
c126d778 b __log_buf - 3.启动内核,内核此时卡在Starting kernel …位置
- 4.重新启动系统,复位,不要断电启动,进入UBoot命令行界面
5.输入
md c126d778,就可以看到debug信息,按回车看打印停在了那里setenv bootcmd “fatload mmc 0:1 46000000 zImage;fatload mmc 0:1 47000000 sun8i-h3-nanopi-m1.dtb;bootz 46000000 0:0 47000000”
setenv bootargs “root=/dev/mmcblk1p2 rw console=ttyS0,115200”
saveenv
失败:跑不起来
尝试了所有还是跑不起来,放弃了,还是使用lichee源码编译Linux3.14的内核。
哭笑不得,电源不稳导致一直卡在Starting kernel …
七、文件系统
解压根文件系统包:
sudo tar -zxvf rootfs-brmin.tar.gz -C /media/liefyuan/rootfs/
拷贝Qt文件到根文件系统中去
sudo cp -r qt5.12.9-arm/ /media/liefyuan/rootfs/opt/sudo cp -r tslib/ /media/liefyuan/rootfs/opt/
挂不起文件系统,尴尬了!
错误:串口打印卡在:Waiting for root device /dev/mmcblk0p2…
[ 4.278983] ALSA device list:[ 4.287210] #0: Dummy 1[ 4.295022] #1: Loopback 1[ 4.303052] #2: H3 Audio Codec[ 4.311385] #3: allwinner,hdmi[ 4.320258] Waiting for root device /dev/mmcblk0p2...
首先看打印信息,涉及到MMC的打印信息如下:
[ 2.232298] sunxi-mmc 1c0f000.mmc: initialized, max. request size: 16384 KB[ 2.246618] sunxi-mmc 1c10000.mmc: allocated mmc-pwrseq[ 2.295464] mmc1: host does not support reading read-only switch, assuming write-enable[ 2.312354] mmc1: new high speed SDHC card at address aaaa[ 2.323644] mmcblk1: mmc1:aaaa SD32G 29.7 GiB[ 2.334762] mmcblk1: p1 p2[ 2.507265] sunxi-mmc 1c10000.mmc: initialized, max. request size: 16384 KB[ 2.534920] mmc2: queuing unknown CIS tuple 0x80 (2 bytes)[ 2.547388] mmc2: queuing unknown CIS tuple 0x80 (3 bytes)[ 2.559697] mmc2: queuing unknown CIS tuple 0x80 (3 bytes)[ 2.570499] sunxi-mmc 1c11000.mmc: initialized, max. request size: 16384 KB[ 2.584208] ledtrig-cpu: registered to indicate activity on CPUs[ 2.596880] hidraw: raw HID events driver (C) Jiri Kosina[ 2.609680] mmc2: queuing unknown CIS tuple 0x80 (7 bytes)[ 2.620649] usbcore: registered new interface driver usbhid[ 2.631591] usbhid: USB HID core driver[ 2.643841] mmc2: queuing unknown CIS tuple 0x81 (9 bytes)[ 2.666647] sun4i-codec 1c22c00.codec: Codec <-> 1c22c00.codec mapping ok[ 2.682998] Initializing XFRM netlink socket[ 2.693714] NET: Registered protocol family 10[ 2.705923] Segment Routing with IPv6[ 2.715359] NET: Registered protocol family 17[ 2.725290] NET: Registered protocol family 15[ 2.735069] can: controller area network core (rev 20170425 abi 9)[ 2.746752] NET: Registered protocol family 29[ 2.756544] can: raw protocol (rev 20170425)[ 2.766123] can: broadcast manager protocol (rev 20170425 t)[ 2.777182] can: netlink gateway (rev 20170425) max_hops=1[ 2.788369] mmc3: new DDR MMC card at address 0001[ 2.799363] rfkill_gpio rfkill_bt: sunxi-bt device registered.[ 2.811184] mmcblk3: mmc3:0001 8GTF4R 7.28 GiB[ 2.821236] Key type dns_resolver registered[ 2.831291] mmcblk3boot0: mmc3:0001 8GTF4R partition 1 4.00 MiB[ 2.842635] Registering SWP/SWPB emulation handler[ 2.853070] mmcblk3boot1: mmc3:0001 8GTF4R partition 2 4.00 MiB[ 2.866770] registered taskstats version 1[ 2.876611] mmcblk3: p1 p2 p3
可以看出,系统识别出了两个mmc设备:mmcblk1 和 mmcblk3
更多的信息为:
- mmcblk1识别出了两个分区:p1 p2
- mmcblk1识别出是:29.7 GiB
- mmcblk3识别出了三个分区:p1 p2 p3
- mmcblk3识别出是:7.28 GiB
这些信息可以让我们写bootargs参数
... root=/dev/mmcblk1p2 ...
有信息说是由于Kernel不支持大于8G的mmc设备导致的
Waiting for root device /dev/mmcblk0p2。
问题原因:emmc增加到32G,原来的内核不支持。
处理:vim driver/mmc/core/mmc.c
定位到
card->ext_csd.rev = ext_csd;
if (card->ext_csd.rev > 8) { //注意:改为大于8即可
pr_err(“%s: unrecognised EXT_CSD revision %d\n”,
mmc_hostname(card->host), card->ext_csd.rev);
err = -EINVAL;
goto out;
}
希望为后来者提供一个参考
和这个没有关系!
错误解决:bootargs里面添加一个init=/linuxrc就可以挂起根文件系统了
init 参数
init指定的是内核启起来后,进入系统中运行的第一个脚本,一般init=/linuxrc, 或者init=/etc/preinit,preinit的内容一般是创建console,null设备节点,运行init程序,挂载一些文件系统等等操作。请注意,很多初学者以为init=/linuxrc是固定写法,其实不然,/linuxrc指的是/目录下面的linuxrc脚本,一般是一个连接罢了。
正确可以用的参数:
setenv bootargs 'console=tty0 console=ttyS0,115200 panic=5 rootwait root=/dev/mmcblk1p2 rw rootfstype=ext4 earlyprintk rw init=/linuxrc vt.global_cursor_default=0'setenv bootcmd 'setenv bootm_boot_mode sec; load mmc 0:1 0x41000000 zImage; load mmc 0:1 0x41800000 sun8i-h3-nanopi-m1-plus.dtb; bootz 0x41000000 - 0x41800000;'
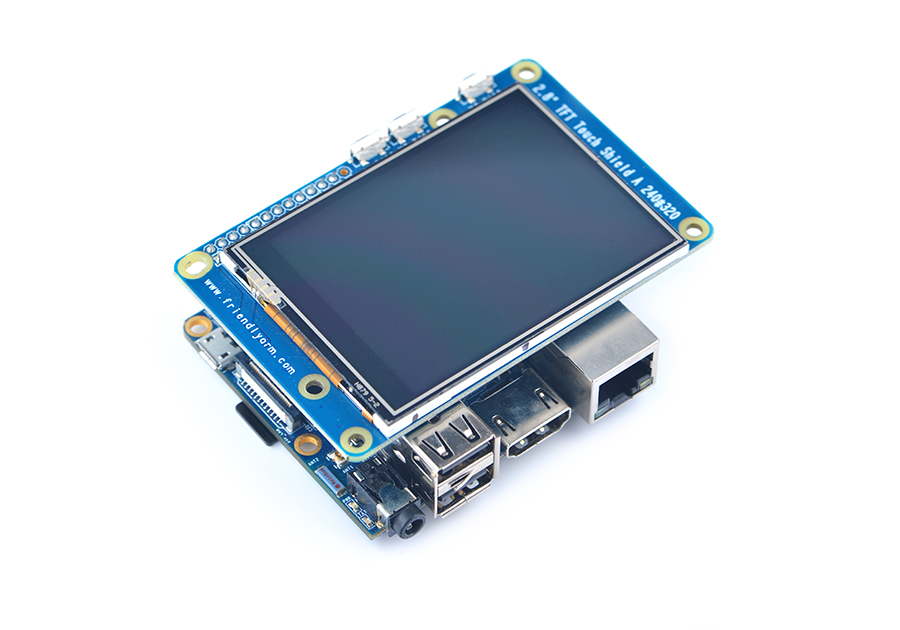
八、添加一块屏幕
屏幕介绍
Matrix - 2’8 SPI Key TFT/zh
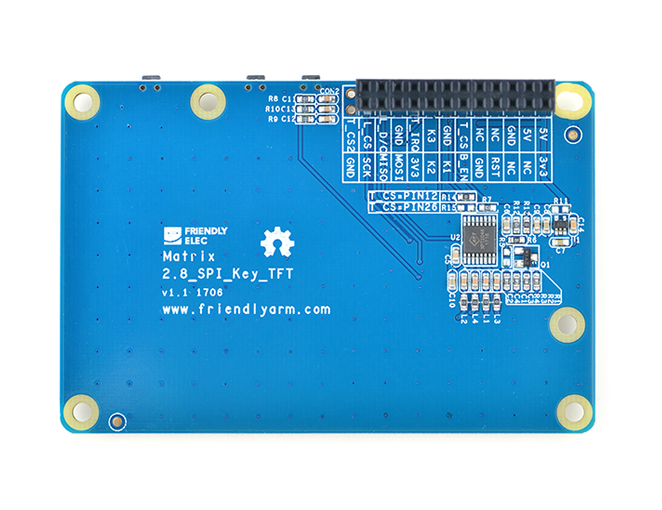
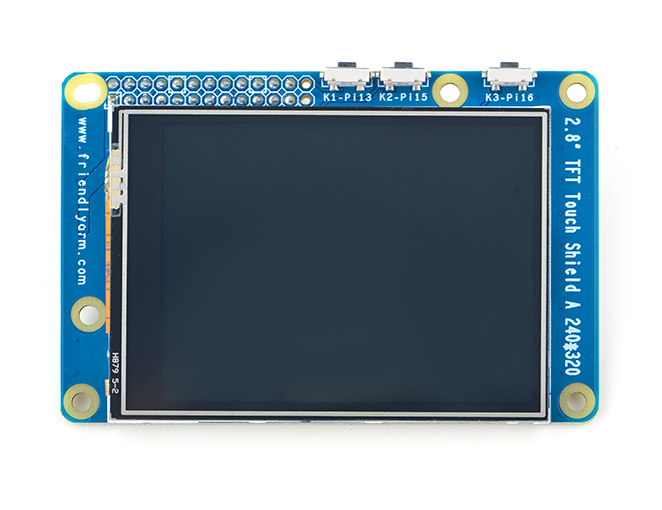
Matrix-2’8_SPI_Key_TFT模块是一款2.8英寸的TFT 触摸LCD,模块采用ST7789V驱动IC和XPT2046电阻式触摸IC,屏幕分辨率为240*320,采用SPI控制接口,模块还包含3个独立按键,可根据需要自定义功能。
详细规格如下所示:
| LCD尺寸 | 2.8寸 |
|---|---|
| 显示区域 | 57.6mm43.2mm |
| 驱动IC | ST7789V |
| 分辨率 | 240320(RGB) |
| 接口方式 | SPI |
| 工作电压 | 5V |
| 背光电压 | 5V |
| 触摸屏类型 | 电阻式,钢化玻璃触摸屏 |
模块上电默认打开背光,可通过置低LED_EN引脚关闭背光。如果需要关闭上电打开背光,只需要拿到电路板上的R12电阻,再通过置高LED_EN引脚打开背光;
Matrix-2’8_SPI_Key_TFT-1706
| Pin# | Name | Pin# | Name |
|---|---|---|---|
| 1 | VDD_3.3V | 2 | VDD_5V |
| 3 | NC | 4 | VDD_5V |
| 5 | NC | 6 | GND |
| 7 | LCD_RESET | 8 | NC |
| 9 | GND | 10 | NC |
| 11 | LED_EN | 12 | T_CS |
| 13 | KEY_1 | 14 | GND |
| 15 | KEY_2 | 16 | KEY_3 |
| 17 | VDD_3.3V | 18 | T_IRQ |
| 19 | SPI_MOSI | 20 | GND |
| 21 | SPI_MISO | 22 | LCD_D/C |
| 23 | SPI_CLK | 24 | LCD_CS |
| 25 | GND | 26 | NC |
Matrix-2’8_SPI_Key_TFT-1706将触摸芯片的使能引脚T_CS从Pin26修改为Pin12,这样修改之后NEO/NEO2/NEO-Plus2等引脚是24Pin兼容的开发板就能正常使用触摸芯片了。
 命令行输入命令出现雪花:
cat /dev/urandom > /dev/fb0
没有出现雪花,说明没有配置好屏幕
查看上电信息涉及到fb0的
[ 1.140510] sun4i-drm display-engine: bound 1100000.mixer (ops 0xc0c51ba8)[ 1.147612] sun4i-drm display-engine: No panel or bridge found... RGB output disabled[ 1.155473] sun4i-drm display-engine: bound 1c0c000.lcd-controller (ops 0xc0c508ac)[ 1.287505] sun8i-dw-hdmi 1ee0000.hdmi: Detected HDMI TX controller v1.32a with HDCP (sun8i_dw_hdmi_phy)[ 1.297434] sun8i-dw-hdmi 1ee0000.hdmi: registered DesignWare HDMI I2C bus driver[ 1.305162] sun4i-drm display-engine: bound 1ee0000.hdmi (ops 0xc0c51f28)[ 1.312017] [drm] Cannot find any crtc or sizes - going 1920x1080[ 1.355843] Console: switching to colour frame buffer device 240x67[ 1.386457] sun4i-drm display-engine: fb0: frame buffer device[ 1.392889] [drm] Initialized sun4i-drm 1.0.0 20150629 for display-engine on minor 0[ 1.409363] loop: module loaded[ 1.427850] st: Version 20160209, fixed bufsize 32768, s/g segs 256
为了使用屏幕需要修改设备树sun8i-h3-nanopi.dtsi
需要编辑sun8i-h3-nanopi.dtsi
vim arch/arm/boot/dts/sun8i-h3-nanopi.dtsi
- 关闭
 spi@0
spi@0 - 打开:pitft: pitft@0
打开:pitft_ts: pitft-ts@1
spidev0: spi@0 {
compatible = "nanopi,spidev";reg = <0>;status = "disabled";spi-max-frequency = <10000000>;};
pitft: pitft@0{
compatible = "sitronix,st7789v";reg = <0>;status = "okay";spi-max-frequency = <50000000>;rotate = <90>;fps = <33>;buswidth = <8>;dc-gpios = <&pio 0 1 GPIO_ACTIVE_HIGH>; /* PA1 */reset-gpios = <&pio 6 11 GPIO_ACTIVE_HIGH>; /* PG11 */led-gpios = <&pio 0 0 GPIO_ACTIVE_LOW>; /* PA0 */debug = <0x0>;};
pitft_ts: pitft-ts@1 {
compatible = "ti,ads7846";reg = <1>;status = "okay";spi-max-frequency = <2000000>;interrupt-parent = <&pio>;interrupts = <6 9 IRQ_TYPE_EDGE_FALLING>; /* PG9 / EINT9 */pendown-gpio = <&pio 6 9 GPIO_ACTIVE_LOW>;ti,swap-xy;ti,vref-delay-usecs = <1000>;ti,x-min = /bits/ 16 <100>;ti,x-max = /bits/ 16 <0xfff>;ti,y-min = /bits/ 16 <100>;ti,y-max = /bits/ 16 <0xfff>;ti,vref-mv = <3300>;ti,x-plate-ohms = /bits/ 16 <256>;ti,penirq-recheck-delay-usecs = <10>;ti,settle-delay-usec = /bits/ 16 <100>;ti,keep-vref-on = <1>;ti,pressure-max = /bits/ 16 <0xfff>;ti,debounce-max = <10>;ti,debounce-tol = <30>;ti,debounce-rep = <1>;};
就可以了
[ 2.641141] fbtft_of_value: buswidth = 8[ 2.650449] fbtft_of_value: debug = 0[ 2.659396] fbtft_of_value: rotate = 90[ 2.668454] fbtft_of_value: fps = 33[ 2.799599] mmc2: queuing unknown CIS tuple 0x81 (9 bytes)[ 2.828814] random: fast init done[ 2.846987] graphics fb1: fb_st7789v frame buffer, 320x240, 150 KiB video memory, 4 KiB buffer memory, fps=33, spi0.0 at 50 MHz
测试屏幕:满屏雪花,清屏操作
注意这里是fb1
cat /dev/urandom > /dev/fb1
雪花成功出现!
cat /dev/zero > /dev/fb1
这样可以清屏。
九、添加Qt
拷贝之前编译好的Qt文件和tslib文件
sudo cp -r qt5.12.9-arm/ /media/liefyuan/rootfs/opt/sudo cp -r tslib/ /media/liefyuan/rootfs/opt/
在开发板上的etc/profile上添加
export TSLIB_ROOT=/opt/tslibexport TSLIB_CONSOLEDEVICE=noneexport TSLIB_FBDEVICE=/dev/fb0export TSLIB_TSDEVICE=/dev/input/event0export TSLIB_CONFFILE=$TSLIB_ROOT/etc/ts.confexport TSLIB_PLUGINDIR=$TSLIB_ROOT/lib/tsexport TSLIB_CALIBFILE=/etc/pointercalexport LD_PRELOAD=$TSLIB_ROOT/lib/libts.soexport QT_ROOT=/opt/qt5.12.9-armexport QT_QPA_GENERIC_PLUGINS=tslib:/dev/input/event0export QT_QPA_FONTDIR=$QT_ROOT/lib/fontsexport QT_QPA_PLATFORM_PLUGIN_PATH=$QT_ROOT/pluginsexport QT_QPA_PLATFORM=linuxfb:tty=/dev/fb0export QT_PLUGIN_PATH=$QT_ROOT/pluginsexport LD_LIBRARY_PATH=$QT_ROOT/lib:$QT_ROOT/plugins/platformsexport QML2_IMPORT_PATH=$QT_ROOT/qmlexport QT_QPA_FB_TSLIB=1
还是无法运行Qt例程
错误:运行Qt例程后,命令行有一些提示
# ./analogclockQStandardPaths: XDG_RUNTIME_DIR not set, defaulting to '/tmp/runtime-root'
在/etc/profile末尾增加两句
export XDG_RUNTIME_DIR=/usr/lib/export RUNLEVEL=3
然后刷新全局变量
source /etc/profile
这样就没有提示了,可是还是没有Qt例程在屏幕上面。
异常:Qt例程没有画面加载到屏幕上去
还是不出画面
乖乖再加上这个就可以显示例程了:
export QT_QPA_PLATFORM=linuxfb:fb=/dev/fb1export QT_QPA_EGLFS_TSLIB=1export QT_QPA_GENERIC_PLUGINS=tslib,evdevkeyboard
所以完整的/etc/profile文件的内容就是:
export PATH=/bin:/sbin:/usr/bin:/usr/sbinif [ "$PS1" ]; thenif [ "`id -u`" -eq 0 ]; thenexport PS1='# 'elseexport PS1='$ 'fifiexport PAGER='/bin/more 'export EDITOR='/bin/vi'# Source configuration files from /etc/profile.dfor i in /etc/profile.d/*.sh ; doif [ -r "$i" ]; then. $ifiunset idoneexport TSLIB_ROOT=/opt/tslibexport TSLIB_CONSOLEDEVICE=noneexport TSLIB_FBDEVICE=/dev/fb1export TSLIB_TSDEVICE=/dev/input/event1export TSLIB_CONFFILE=$TSLIB_ROOT/etc/ts.confexport TSLIB_PLUGINDIR=$TSLIB_ROOT/lib/tsexport TSLIB_CALIBFILE=/etc/pointercalexport LD_PRELOAD=$TSLIB_ROOT/lib/libts.soexport QT_ROOT=/opt/qt5.12.9-armexport QT_QPA_GENERIC_PLUGINS=tslib:/dev/input/event1export QT_QPA_FONTDIR=$QT_ROOT/lib/fontsexport QT_QPA_PLATFORM_PLUGIN_PATH=$QT_ROOT/pluginsexport QT_QPA_PLATFORM=linuxfb:tty=/dev/fb1export QT_PLUGIN_PATH=$QT_ROOT/pluginsexport LD_LIBRARY_PATH=$QT_ROOT/lib:$QT_ROOT/plugins/platformsexport QML2_IMPORT_PATH=$QT_ROOT/qmlexport QT_QPA_FB_TSLIB=1export QT_QPA_PLATFORM=linuxfb:fb=/dev/fb1export QT_QPA_EGLFS_TSLIB=1export QT_QPA_GENERIC_PLUGINS=tslib,evdevkeyboardexport XDG_RUNTIME_DIR=/usr/lib/export RUNLEVEL=3$QT_ROOT/examples/widgets/widgets/tetrix/tetrix
哈哈哈,终于搞完了,趟了好多坑啊!


还没有评论,来说两句吧...