MyBatis-Plus 基本使用
推荐:MyBatis Plus汇总
MyBatis-Plus 基本使用
首先我们需要创建一个数据库表,用于演示MyBatis-Plus的基本用法。
CREATE TABLE `user` (`id` varchar(32) NOT NULL,`username` varchar(32) DEFAULT '',`password` varchar(32) DEFAULT '',PRIMARY KEY (`id`));
然后创建一个Spring Boot项目,pom.xml和配置如下:
<?xml version="1.0" encoding="UTF-8"?><project xmlns="http://maven.apache.org/POM/4.0.0" xmlns:xsi="http://www.w3.org/2001/XMLSchema-instance" xsi:schemaLocation="http://maven.apache.org/POM/4.0.0 http://maven.apache.org/xsd/maven-4.0.0.xsd"><modelVersion>4.0.0</modelVersion><groupId>org.kaven</groupId><artifactId>mybatis-plus</artifactId><version>1.0-SNAPSHOT</version><parent><groupId>org.springframework.boot</groupId><artifactId>spring-boot-starter-parent</artifactId><version>2.3.4.RELEASE</version><relativePath/></parent><properties><java.version>1.8</java.version></properties><dependencies><dependency><groupId>org.springframework.boot</groupId><artifactId>spring-boot-starter</artifactId></dependency><dependency><groupId>org.springframework.boot</groupId><artifactId>spring-boot-starter-test</artifactId></dependency><dependency><groupId>org.springframework.boot</groupId><artifactId>spring-boot-starter-webflux</artifactId></dependency><dependency><groupId>com.baomidou</groupId><artifactId>mybatis-plus-boot-starter</artifactId><version>3.4.0</version></dependency><dependency><groupId>mysql</groupId><artifactId>mysql-connector-java</artifactId><version>5.1.49</version></dependency><dependency><groupId>org.projectlombok</groupId><artifactId>lombok</artifactId></dependency></dependencies><build><plugins><plugin><groupId>org.springframework.boot</groupId><artifactId>spring-boot-maven-plugin</artifactId></plugin></plugins></build></project>spring:application:name: mybatis-plusdatasource:driver-class-name: com.mysql.jdbc.Driverusername: rootpassword: 123456url: jdbc:mysql://127.0.0.1:3306/test?characterEncoding=utf-8&useSSL=falseserver:port: 8085logging:level:root: warncom.kaven.mybatisplus.dao: tracepattern:console: '%p%m%n'
实体类User:
package com.kaven.mybatisplus.entity;import com.baomidou.mybatisplus.annotation.TableField;import com.baomidou.mybatisplus.annotation.TableId;import com.baomidou.mybatisplus.annotation.TableName;import lombok.Data;@TableName("user")@Datapublic class User {@TableIdprivate String id;@TableField("username")private String username;@TableField("password")private String password;/** * 使用 @TableField(exist = false) ,表示该字段在数据库中不存在 ,所以不会插入到数据库中 * 使用 transient 、 static 修饰的属性也不会插入数据库中 */@TableField(exist = false)private String phone;}
Mapper接口UserMapper:
package com.kaven.mybatisplus.dao;import com.baomidou.mybatisplus.core.mapper.BaseMapper;import com.kaven.mybatisplus.entity.User;import org.springframework.stereotype.Component;@Componentpublic interface UserMapper extends BaseMapper<User> {}
UserMapper需要继承MyBatis-Plus的BaseMapper接口。
BaseMapper接口源码如下,其实就是定义了一些数据库表的CRUD方法。
package com.baomidou.mybatisplus.core.mapper;import com.baomidou.mybatisplus.core.conditions.Wrapper;import com.baomidou.mybatisplus.core.metadata.IPage;import java.io.Serializable;import java.util.Collection;import java.util.List;import java.util.Map;import org.apache.ibatis.annotations.Param;public interface BaseMapper<T> extends Mapper<T> {int insert(T entity);int deleteById(Serializable id);int deleteByMap(@Param("cm") Map<String, Object> columnMap);int delete(@Param("ew") Wrapper<T> wrapper);int deleteBatchIds(@Param("coll") Collection<? extends Serializable> idList);int updateById(@Param("et") T entity);int update(@Param("et") T entity, @Param("ew") Wrapper<T> updateWrapper);T selectById(Serializable id);List<T> selectBatchIds(@Param("coll") Collection<? extends Serializable> idList);List<T> selectByMap(@Param("cm") Map<String, Object> columnMap);T selectOne(@Param("ew") Wrapper<T> queryWrapper);Integer selectCount(@Param("ew") Wrapper<T> queryWrapper);List<T> selectList(@Param("ew") Wrapper<T> queryWrapper);List<Map<String, Object>> selectMaps(@Param("ew") Wrapper<T> queryWrapper);List<Object> selectObjs(@Param("ew") Wrapper<T> queryWrapper);<E extends IPage<T>> E selectPage(E page, @Param("ew") Wrapper<T> queryWrapper);<E extends IPage<Map<String, Object>>> E selectMapsPage(E page, @Param("ew") Wrapper<T> queryWrapper);}
启动类:
package com.kaven.mybatisplus;import org.mybatis.spring.annotation.MapperScan;import org.springframework.boot.SpringApplication;import org.springframework.boot.autoconfigure.SpringBootApplication;@SpringBootApplication@MapperScan(basePackages = "com.kaven.mybatisplus.dao")public class AppRun {public static void main(String[] args) {SpringApplication.run(AppRun.class , args);}}
@MapperScan(basePackages = "com.kaven.mybatisplus.dao")这个一定要加上。
这样就构建好了项目,使用MyBatis-Plus可以不用写Mapper.xml配置文件,是不是贼方便。
我们先在数据库中添加几行数据,方便演示。
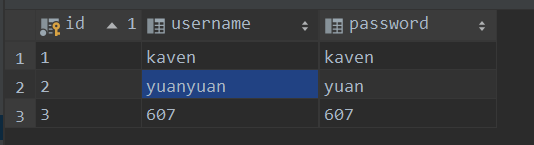
我们来演示几个基本的查询方法。
package com.kaven.mybatisplus.dao;import com.kaven.mybatisplus.entity.User;import org.junit.Test;import org.junit.runner.RunWith;import org.springframework.beans.factory.annotation.Autowired;import org.springframework.boot.test.context.SpringBootTest;import org.springframework.test.context.junit4.SpringRunner;import java.util.Arrays;import java.util.HashMap;import java.util.List;import java.util.Map;@RunWith(SpringRunner.class)@SpringBootTestpublic class UserMapperTest {@Autowiredprivate UserMapper userMapper;@Testpublic void selectList(){// 条件设置为null , 就是没有条件,即查询所有数据List<User> userList = userMapper.selectList(null);userList.forEach(System.out::println);}@Testpublic void selectById(){// 根据Id查询User user = userMapper.selectById("1");System.out.println(user);}@Testpublic void selectBatchIds(){// 根据Id列表进行批查询List<String> idList = Arrays.asList("1" , "2" , "3");List<User> userList = userMapper.selectBatchIds(idList);userList.forEach(System.out::println);}@Testpublic void selectByMap(){// 根据<属性 , 值>来进行匹配查询 , 多个<属性 , 值>会通过and方式来查询Map<String , Object> map = new HashMap<>();// 这里是数据库的列名 , 而不是实体类的属性名map.put("username" , "kaven");map.put("password" , "kaven");List<User> userList = userMapper.selectByMap(map);userList.forEach(System.out::println);}}
运行结果:
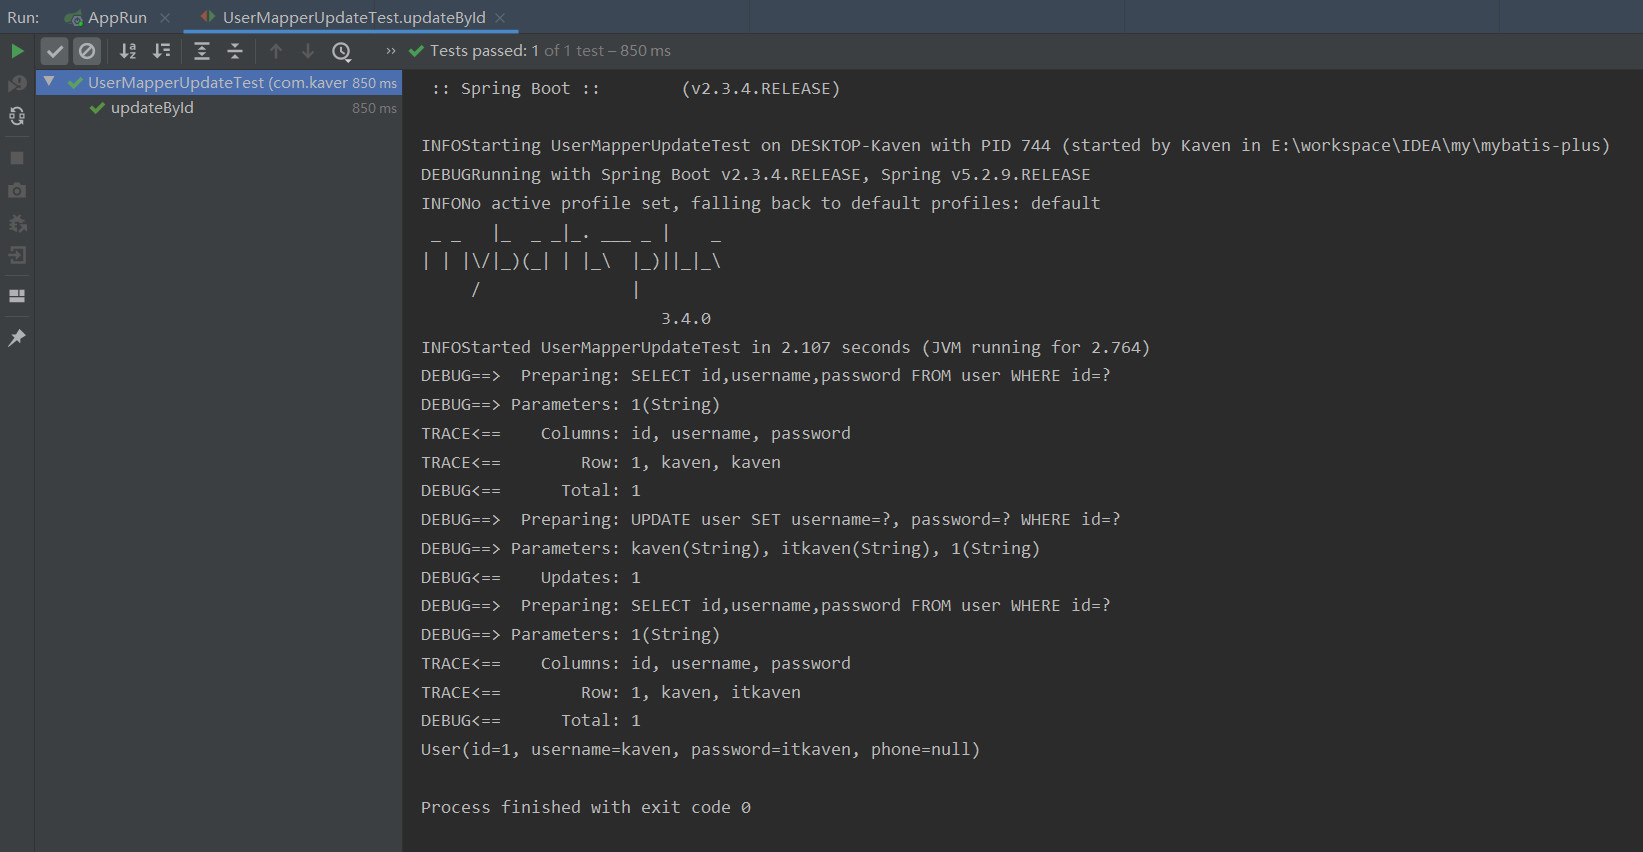
再演示更新方法。
package com.kaven.mybatisplus.dao;import com.kaven.mybatisplus.entity.User;import org.junit.Test;import org.junit.runner.RunWith;import org.springframework.beans.factory.annotation.Autowired;import org.springframework.boot.test.context.SpringBootTest;import org.springframework.test.context.junit4.SpringRunner;@RunWith(SpringRunner.class)@SpringBootTestpublic class UserMapperUpdateTest {@Autowiredprivate UserMapper userMapper;@Testpublic void updateById(){// 根据Id进行更新User user = userMapper.selectById("1");user.setPassword("itkaven");int rows = userMapper.updateById(user);System.out.println(userMapper.selectById(user.getId()));}}
其实还有一个update方法,但它需要一个条件,条件也可以设置为null,但这样会更新所有的数据,这里先不演示,之后的博客再进行演示说明,两个更新方法的定义如下。
/** * 根据 ID 修改 * * @param entity 实体对象 */int updateById(@Param(Constants.ENTITY) T entity);/** * 根据 whereEntity 条件,更新记录 * * @param entity 实体对象 (set 条件值,可以为 null) * @param updateWrapper 实体对象封装操作类(可以为 null,里面的 entity 用于生成 where 语句) */int update(@Param(Constants.ENTITY) T entity, @Param(Constants.WRAPPER) Wrapper<T> updateWrapper);
再演示几个删除方法。
package com.kaven.mybatisplus.dao;import org.junit.Assert;import org.junit.Test;import org.junit.runner.RunWith;import org.springframework.beans.factory.annotation.Autowired;import org.springframework.boot.test.context.SpringBootTest;import org.springframework.test.context.junit4.SpringRunner;import org.springframework.transaction.annotation.Transactional;import java.util.Arrays;import java.util.HashMap;import java.util.List;import java.util.Map;@RunWith(SpringRunner.class)@SpringBootTestpublic class UserMapperDeleteTest {@Autowiredprivate UserMapper userMapper;@Test@Transactionalpublic void deleteById(){// 根据Id进行删除int rows = userMapper.deleteById("1");Assert.assertEquals(rows , 1);}@Test@Transactionalpublic void deleteByMap(){// 根据<属性 , 值>进行匹配删除Map<String , Object> map = new HashMap<>();map.put("username" , "607");map.put("password" , "607");int rows = userMapper.deleteByMap(map);Assert.assertEquals(rows , 1);}@Test@Transactionalpublic void deleteBatchIds(){// 根据Id列表进行批删除List<String> idList = Arrays.asList("1" , "2" , "3");int rows = userMapper.deleteBatchIds(idList);Assert.assertEquals(rows , 3);}}
结果如下: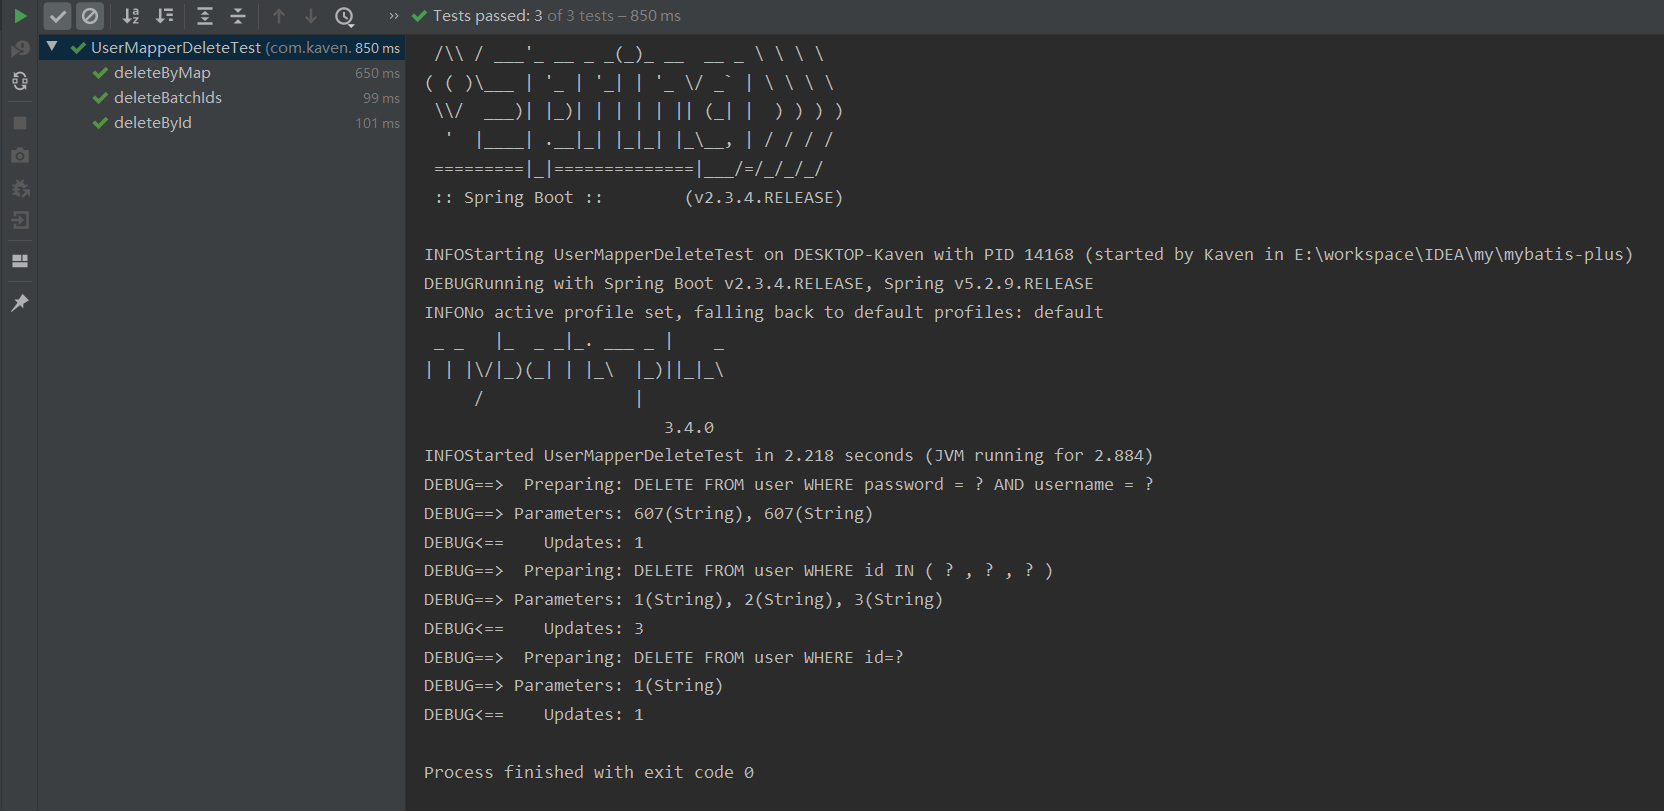
这里也还有一个delete方法,也需要一个条件,所以也不进行演示了。
再演示插入方法。
package com.kaven.mybatisplus.dao;import com.kaven.mybatisplus.entity.User;import org.junit.Test;import org.junit.runner.RunWith;import org.springframework.beans.factory.annotation.Autowired;import org.springframework.boot.test.context.SpringBootTest;import org.springframework.test.context.junit4.SpringRunner;@RunWith(SpringRunner.class)@SpringBootTestpublic class UserMapperInsertTest {@Autowiredprivate UserMapper userMapper;@Testpublic void insert(){// 直接实体插入User user = new User();user.setId("4");user.setUsername("hn");user.setPassword("hn");userMapper.insert(user);}}
结果如下: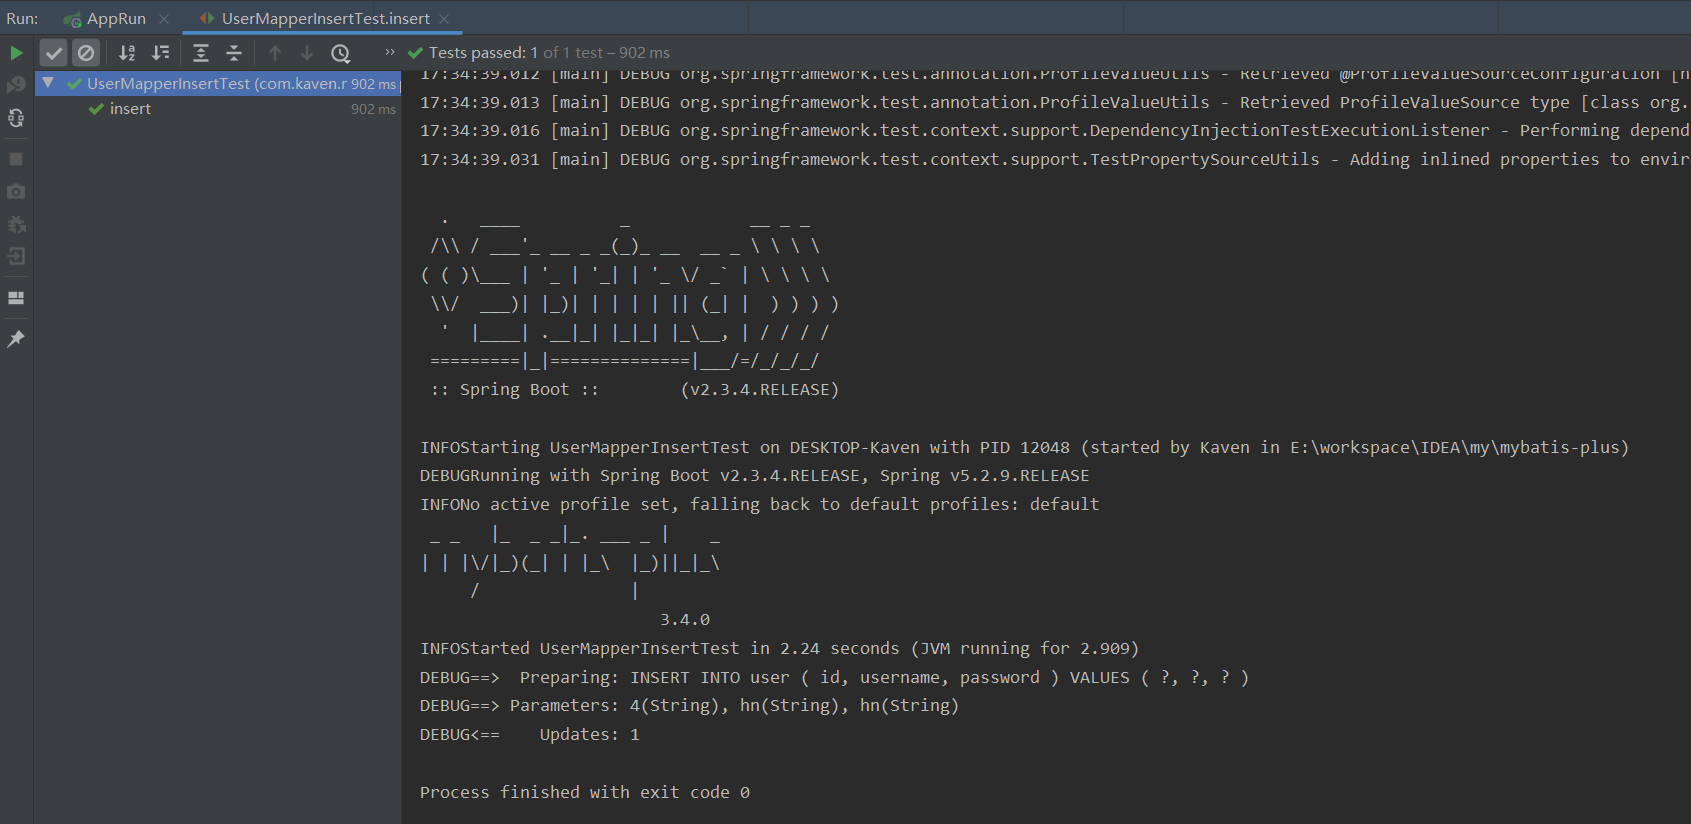
这就是MyBatis-Plus的基本使用了。
写博客是博主记录自己的学习过程,如果有错误,请指正,谢谢!


")
集群会话的解决方案")


还没有评论,来说两句吧...