mac nginx 非brew安装_Mac——brew替换源地址&安装配置mysql@5.7版本
问题描述:使用brew方式安装mysql,存在以下问题:1.由于mysql已经升级到8.x版本,会默认安装8.x版本,会对之前部分特性不友好支持;2.brew默认安装源下载响应时间非常慢,下载时间过长容易超时;
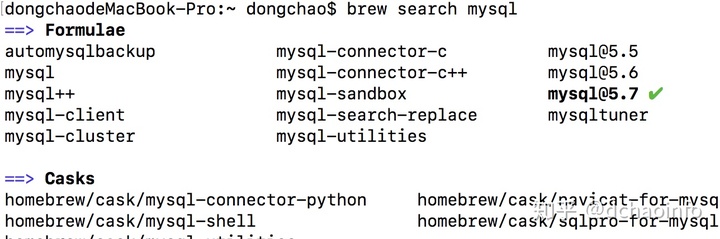
问题解决:问题一通过brew search mysql可以查看到是有历史版本可以下载的包括经典的5.7版本;
问题二需要更换brew源地址,具体更换源地址如下:
问题延伸:网上搜索大家都说跳转到/usr/local目录下使用git remote操作,结果如下:
$ git remote -vfatal: Not a git repository (or any of the parent directories): .git
这就很无语了,后来终于找到另一种姿势(使用环境变量去找);
替换以下几个镜像源:
替换为中科大的镜像:
替换brew.git:
cd "$(brew --repo)"git remote set-url origin https://mirrors.ustc.edu.cn/brew.git
替换homebrew-core.git:
cd "$(brew --repo)/Library/Taps/homebrew/homebrew-core"git remote set-url origin https://mirrors.ustc.edu.cn/homebrew-core.git
替换成功后更新下源:
brew update
对于bash用户:
echo 'export HOMEBREW_BOTTLE_DOMAIN=https://mirrors.ustc.edu.cn/homebrew-bottles' >> ~/.bash_profilesource ~/.bash_profile
对于zsh用户:
echo 'export HOMEBREW_BOTTLE_DOMAIN=https://mirrors.ustc.edu.cn/homebrew-bottles' >> ~/.zshrcsource ~/.zshrc
也可以选择替换清华大学镜像(和上边部分效果相同):
替换brew.git:
cd "$(brew --repo)"git remote set-url origin https://mirrors.tuna.tsinghua.edu.cn/git/homebrew/brew.git
替换homebrew-core.git:
cd "$(brew --repo)/Library/Taps/homebrew/homebrew-core"git remote set-url origin https://mirrors.tuna.tsinghua.edu.cn/git/homebrew/homebrew-core.gitbrew update
使用homebrew-science或者homebrew-python还需要替换
cd "$(brew --repo)/Library/Taps/homebrew/homebrew-science"git remote set-url origin https://mirrors.tuna.tsinghua.edu.cn/git/homebrew/homebrew-science.gitcd "$(brew --repo)/Library/Taps/homebrew/homebrew-python"git remote set-url origin https://mirrors.tuna.tsinghua.edu.cn/git/homebrew/homebrew-python.gitbrew update
对于bash用户:
echo 'export HOMEBREW_BOTTLE_DOMAIN=https://mirrors.tuna.tsinghua.edu.cn/homebrew-bottles' >> ~/.bash_profilesource ~/.bash_profile
对于zsh用户:
echo 'export HOMEBREW_BOTTLE_DOMAIN=https://mirrors.tuna.tsinghua.edu.cn/homebrew-bottles' >> ~/.zshrcsource ~/.zshrc
替换好brew源地址安装mysql@5.7就会轻松很多;
brew源配置生效后使用brew install mysql@5.7安装即可;
安装完成后提示如下:
We've installed your MySQL database without a root password. To secure it run:mysql_secure_installation #初始化配置MySQL is configured to only allow connections from localhost by defaultTo connect run:mysql -uroot #运行连接mysql@5.7 is keg-only, which means it was not symlinked into /usr/local,because this is an alternate version of another formula.If you need to have mysql@5.7 first in your PATH run: #配置环境变量echo 'export PATH="/usr/local/opt/mysql@5.7/bin:$PATH"' >> ~/.bash_profileFor compilers to find mysql@5.7 you may need to set:export LDFLAGS="-L/usr/local/opt/mysql@5.7/lib" #想要系统编译运行认识mysql@5.7配置环境变量export CPPFLAGS="-I/usr/local/opt/mysql@5.7/include"To have launchd start mysql@5.7 now and restart at login:brew services start mysql@5.7 #启动安装后的mysql数据库Or, if you don't want/need a background service you can just run:/usr/local/opt/mysql@5.7/bin/mysql.server start #通过配置文件启动mysql数据库
根据安装后提示信息第一步配置环境变量:
家目录下,vi .bashprofile文件,将安装后提示的:
export PATH=”/usr/local/opt/mysql@5.7/bin:$PATH”
export LDFLAGS=”-L/usr/local/opt/mysql@5.7/lib”
export CPPFLAGS=”-I/usr/local/opt/mysql@5.7/include”
加入到.bash_profile文件中,加入保存后使用source .bashprofile使配置到环境变量生效;
完成后使用:brew services start mysql@5.7或者你根据配置文件启动mysql数据库,服务启动后开始初始化配置;
运行:mysql_secure_installation
提示如下:
Securing the MySQL server deployment.Connecting to MySQL using a blank password.VALIDATE PASSWORD PLUGIN can be used to test passwordsand improve security. It checks the strength of passwordand allows the users to set only those passwords which aresecure enough. Would you like to setup VALIDATE PASSWORD plugin?Press y|Y for Yes, any other key for No: k //是否采用mysql密码安全检测插件,我本地使用果断拒绝了,因为密码检查插件要求密码复杂程度高,大小写字母+数字+字符等Please set the password for root here. // 首次使用自带配置脚本,设置root密码New password:Re-enter new password:By default, a MySQL installation has an anonymous user,allowing anyone to log into MySQL without having to havea user account created for them. This is intended only fortesting, and to make the installation go a bit smoother.You should remove them before moving into a productionenvironment.Remove anonymous users? (Press y|Y for Yes, any other key for No) : y //是否删除匿名用户Success.Normally, root should only be allowed to connect from'localhost'. This ensures that someone cannot guess atthe root password from the network.Disallow root login remotely? (Press y|Y for Yes, any other key for No) : y //是否禁止远程登录Success.By default, MySQL comes with a database named 'test' thatanyone can access. This is also intended only for testing,and should be removed before moving into a productionenvironment.Remove test database and access to it? (Press y|Y for Yes, any other key for No) : y //删除测试数据库,并登录- Dropping test database...Success.- Removing privileges on test database...Success.Reloading the privilege tables will ensure that all changesmade so far will take effect immediately.Reload privilege tables now? (Press y|Y for Yes, any other key for No) : y //重新载入权限表Success.All done!
配置完成,使用mysql -uroot -p,然后输入配置到root密码登陆到mysql数据库;


还没有评论,来说两句吧...