Kafka是一个分布式的、可分区的、可复制的消息系统,下面是Kafka的几个基本术语:
- Kafka将消息以topic为单位进行归纳;
- 将向Kafka topic发布消息的程序成为producers;
- 将预订topics并消费消息的程序成为consumer;
- Kafka以集群的方式运行,可以由一个或多个服务组成,每个服务叫做一个broker。
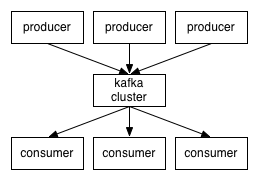
producers通过网络将消息发送到Kafka集群,集群向消费者提供消息,如下图所示:
创建一个topic时,可以指定partitions(分区)数目,partitions数越多,其吞吐量也越大,但是需要的资源也越多,同时也会导致更高的不可用性,kafka在接收到producers发送的消息之后,会根据均衡策略将消息存储到不同的partitions中:
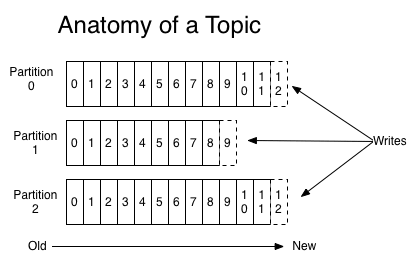
在每个partitions中,消息以顺序存储,最晚接收的的消息会最后被消费。
producers在向kafka集群发送消息的时候,可以通过指定partitions来发送到指定的partitions中。也可以通过指定均衡策略来将消息发送到不同的partitions中。如果不指定,就会采用默认的随机均衡策略,将消息随机的存储到不同的partitions中。
在consumer消费消息时,kafka使用offset来记录当前消费的位置:
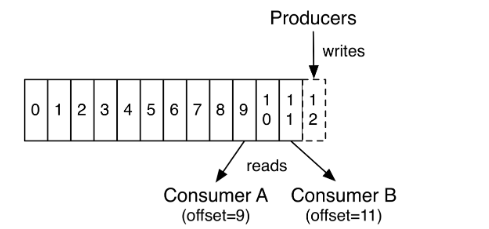
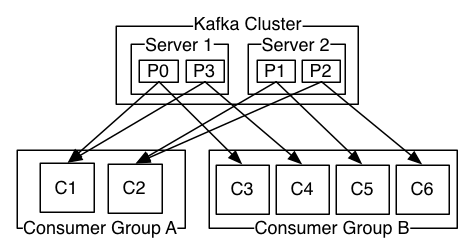
在kafka的设计中,可以有多个不同的group来同时消费同一个topic下的消息,如图,我们有两个不同的group同时消费,他们的的消费的记录位置offset各不项目,不互相干扰。
对于一个group而言,consumer的数量不应该多于partitions的数量,因为在一个group中,每个partitions至多只能绑定到一个consumer上,即一个consumer可以消费多个partitions,一个partitions只能给一个consumer消费。因此,若一个group中的consumer数量大于partitions数量的话,多余的consumer将不会收到任何消息。
Kafka安装使用
这里演示在Windows下Kafka安装与使用。Kafka下载地址:http://kafka.apache.org/downloads,选择二进制文件下载(Binary downloads),然后解压即可。
Kafka的配置文件位于config目录下,因为Kafka集成了Zookeeper(Kafka存储消息的地方),所以config目录下除了有Kafka的配置文件server.properties外,还可以看到一个Zookeeper配置文件zookeeper.properties:
打开server.properties,将broker.id的值修改为1,每个broker的id都必须设置为Integer类型,且不能重复。Zookeeper的配置保持默认即可。
接下来开始使用Kafka。
启动Zookeeper
在Windows下执行下面这些命令可能会出现找不到或无法加载主类的问题,解决方案可参考:https://blog.csdn.net/cx2932350/article/details/78870135。
在Kafka根目录下使用cmd执行下面这条命令,启动ZK:
- 1
| - bin\windows\zookeeper-server-start.bat config\zookeeper.properties
|
在Linux下,可以使用后台进程的方式启动ZK:
- 1
| - bin/zookeeper-server-start.sh -daemon config/zookeeper.properties
|
启动Kafka
执行下面这条命令启动Kafka:
- 1
| - bin\windows\kafka-server-start.bat config\server.properties
|
Linux对应命令:
- 1
| - bin/kafka-server-start.sh config/server.properties
|
当看到命令行打印如下信息,说明启动完毕:

创建Topic
执行下面这条命令创建一个Topic
- 1
| - bin\windows\kafka-topics.bat —create —zookeeper localhost:2181 —replication-factor 1 —partitions 1 —topic test
|
这条命令的意思是,创建一个Topic到ZK(指定ZK的地址),副本个数为1,分区数为1,Topic的名称为test。
Linux对应的命令为:
- 1
| - bin/kafka-topics.sh —create —zookeeper localhost:2181 —replication-factor 1 —partitions 1 —topic test
|
创建好后我们可以查看Kafka里的Topic列表:
- 1
| - bin\windows\kafka-topics.bat —list —zookeeper localhost:2181
|

可看到目前只包含一个我们刚创建的test Topic。
Linux对应的命令为:
- 1
| - bin/kafka-topics.sh —list —zookeeper localhost:2181
|
查看test Topic的具体信息:
- 1
| - bin\windows\kafka-topics.bat —describe —zookeeper localhost:2181 —topic test
|

Linux对应的命令为:
- 1
| - bin/kafka-topics.sh —describe —zookeeper localhost:2181 —topic test
|
生产消息和消费消息
启动Producers
- 1
| - bin\windows\kafka-console-producer.bat —broker-list localhost:9092 —topic test
|
9092为生产者的默认端口号。这里启动了生产者,准备往test Topic里发送数据。
Linux下对应的命令为:
- 1
| - bin/kafka-console-producer.sh —broker-list localhost:9092 —topic test
|
启动Consumers
接着启动一个消费者用于消费生产者生产的数据,新建一个cmd窗口,输入下面这条命令:
- 1
| - bin\windows\kafka-console-consumer.bat —bootstrap-server localhost:9092 —topic test —from-beginning
|
from-beginning表示从头开始读取数据。
Linux下对应的命令为:
- 1
| - bin/kafka-console-consumer.sh —bootstrap-server localhost:9092 —topic test —from-beginning
|
启动好生产者和消费者后我们在生产者里生产几条数据:

消费者成功接收到数据:

Spring Boot整合Kafaka
上面简单介绍了Kafka的使用,下面我们开始在Spring Boot里使用Kafka。
新建一个Spring Boot项目,版本为2.1.3.RELEASE,并引入如下依赖:
- 1
2
3
4
5
6
7
8
| - <dependency>
<groupId>org.springframework.boot</groupId>
<artifactId>spring-boot-starter-web</artifactId>
</dependency>
<dependency>
<groupId>org.springframework.kafka</groupId>
<artifactId>spring-kafka</artifactId>
</dependency>
|
生产者配置
新建一个Java配置类KafkaProducerConfig,用于配置生产者:
- 1
2
3
4
5
6
7
8
9
10
11
12
13
14
15
16
17
18
19
20
21
22
23
24
25
26
| - @Configuration
public class KafkaProducerConfig {
@Value(“${spring.kafka.bootstrap-servers}”)
private String bootstrapServers;
@Bean
public ProducerFactory<String, String> producerFactory() {
Map<String, Object> configProps = new HashMap<>();
configProps.put(
ProducerConfig.BOOTSTRAP_SERVERS_CONFIG,
bootstrapServers);
configProps.put(
ProducerConfig.KEY_SERIALIZER_CLASS_CONFIG,
StringSerializer.class);
configProps.put(
ProducerConfig.VALUE_SERIALIZER_CLASS_CONFIG,
StringSerializer.class);
return new DefaultKafkaProducerFactory<>(configProps);
}
@Bean
public KafkaTemplate<String, String> kafkaTemplate() {
return new KafkaTemplate<>(producerFactory());
}
}
|
首先我们配置了一个producerFactory,方法里配置了Kafka Producer实例的策略。bootstrapServers为Kafka生产者的地址,我们在配置文件application.yml里配置它:
- 1
2
3
| - spring:
kafka:
bootstrap-servers: localhost:9092
|
ProducerConfig.KEY_SERIALIZER_CLASS_CONFIG和ProducerConfig.VALUE_SERIALIZER_CLASS_CONFIG指定了key,value序列化策略,这里指定为Kafka提供的StringSerializer,因为我们暂时只发送简单的String类型的消息。
接着我们使用producerFactory配置了kafkaTemplate,其包含了发送消息的便捷方法,后面我们就用这个对象来发送消息。
发布消息
配置好生产者,我们就可以开始发布消息了。
新建一个SendMessageController:
- 1
2
3
4
5
6
7
8
9
10
11
| - @RestController
public class SendMessageController {
@Autowired
private KafkaTemplate<String, String> kafkaTemplate;
@GetMapping(“send/{message}”)
public void send(@PathVariable String message) {
this.kafkaTemplate.send(“test”, message);
}
}
|
我们注入了kafkaTemplate对象,key-value都为String类型,并通过它的send方法来发送消息。其中test为Topic的名称,上面我们已经使用命令创建过这个Topic了。
send方法是一个异步方法,我们可以通过回调的方式来确定消息是否发送成功,我们改造SendMessageController:
- 1
2
3
4
5
6
7
8
9
10
11
12
13
14
15
16
17
18
19
20
21
22
23
24
| - @RestController
public class SendMessageController {
private Logger logger = LoggerFactory.getLogger(this.getClass());
@Autowired
private KafkaTemplate<String, String> kafkaTemplate;
@GetMapping(“send/{message}”)
public void send(@PathVariable String message) {
ListenableFuture<SendResult<String, String>> future = this.kafkaTemplate.send(“test”, message);
future.addCallback(new ListenableFutureCallback<SendResult<String, String>>() {
@Override
public void onSuccess(SendResult<String, String> result) {
logger.info(“成功发送消息:{},offset=[{}]”, message, result.getRecordMetadata().offset());
}
@Override
public void onFailure(Throwable ex) {
logger.error(“消息:{} 发送失败,原因:{}”, message, ex.getMessage());
}
});
}
}
|
消息发送成功后,会回调onSuccess方法,发送失败后回调onFailure方法。
消费者配置
接着我们来配置消费者,新建一个Java配置类KafkaConsumerConfig:
- 1
2
3
4
5
6
7
8
9
10
11
12
13
14
15
16
17
18
19
20
21
22
23
24
25
26
27
28
29
30
31
32
33
34
35
36
37
38
39
40
41
42
| - @EnableKafka
@Configuration
public class KafkaConsumerConfig {
@Value(“${spring.kafka.bootstrap-servers}”)
private String bootstrapServers;
@Value(“${spring.kafka.consumer.group-id}”)
private String consumerGroupId;
@Value(“${spring.kafka.consumer.auto-offset-reset}”)
private String autoOffsetReset;
@Bean
public ConsumerFactory<String, String> consumerFactory() {
Map<String, Object> props = new HashMap<>();
props.put(
ConsumerConfig.BOOTSTRAP_SERVERS_CONFIG,
bootstrapServers);
props.put(
ConsumerConfig.GROUP_ID_CONFIG,
consumerGroupId);
props.put(
ConsumerConfig.AUTO_OFFSET_RESET_CONFIG,
autoOffsetReset);
props.put(
ConsumerConfig.KEY_DESERIALIZER_CLASS_CONFIG,
StringDeserializer.class);
props.put(
ConsumerConfig.VALUE_DESERIALIZER_CLASS_CONFIG,
StringDeserializer.class);
return new DefaultKafkaConsumerFactory<>(props);
}
@Bean
public ConcurrentKafkaListenerContainerFactory<String, String> kafkaListenerContainerFactory() {
ConcurrentKafkaListenerContainerFactory<String, String> factory
= new ConcurrentKafkaListenerContainerFactory<>();
factory.setConsumerFactory(consumerFactory());
return factory;
}
}
|
consumerGroupId和autoOffsetReset需要在application.yml里配置:
- 1
2
3
4
5
| - spring:
kafka:
consumer:
group-id: test-consumer
auto-offset-reset: latest
|
其中group-id将消费者进行分组(你也可以不进行分组),组名为test-consumer,并指定了消息读取策略,包含四个可选值:

- earliest:当各分区下有已提交的offset时,从提交的offset开始消费;无提交的offset时,从头开始消费
- latest:当各分区下有已提交的offset时,从提交的offset开始消费;无提交的offset时,消费新产生的该分区下的数据
- none:topic各分区都存在已提交的offset时,从offset后开始消费;只要有一个分区不存在已提交的offset,则抛出异常
- exception:直接抛出异常
在KafkaConsumerConfig中我们配置了ConsumerFactory和KafkaListenerContainerFactory。当这两个Bean成功注册到Spring IOC容器中后,我们便可以使用@KafkaListener注解来监听消息了。
配置类上需要@EnableKafka注释才能在Spring托管Bean上检测@KafkaListener注解。
消息消费
配置好消费者,我们就可以开始消费消息了,新建KafkaMessageListener:
- 1
2
3
4
5
6
7
8
9
10
| - @Component
public class KafkaMessageListener {
private Logger logger = LoggerFactory.getLogger(this.getClass());
@KafkaListener(topics = “test”, groupId = “test-consumer”)
public void listen(String message) {
logger.info(“接收消息: {}”, message);
}
}
|
我们通过@KafkaListener注解来监听名称为test的Topic,消费者分组的组名为test-consumer。
演示
启动Spring Boot项目,启动过程中,控制台会输出Kafka的配置,启动好后,访问http://localhost:8080/send/hello,mrbird,控制台输出如下:

@KafkaListener详解
@KafkaListener除了可以指定Topic名称和分组id外,我们还可以同时监听来自多个Topic的消息:
- 1
| - @KafkaListener(topics = “topic1, topic2”)
|
我们还可以通过@Header注解来获取当前消息来自哪个分区(partitions):
- 1
2
3
4
5
| - @KafkaListener(topics = “test”, groupId = “test-consumer”)
public void listen(@Payload String message,
@Header(KafkaHeaders.RECEIVED_PARTITION_ID) int partition) {
logger.info(“接收消息: {},partition:{}”, message, partition);
}
|
重启项目,再次访问http://localhost:8080/send/hello,mrbird,控制台输出如下:

因为我们没有进行分区,所以test Topic只有一个区,下标为0。
我们可以通过@KafkaListener来指定只接收来自特定分区的消息:
- 1
2
3
4
5
6
7
8
9
| - @KafkaListener(groupId = “test-consumer”,
topicPartitions = @TopicPartition(topic = “test”,
partitionOffsets = {
@PartitionOffset(partition = “0”, initialOffset = “0”)
}))
public void listen(@Payload String message,
@Header(KafkaHeaders.RECEIVED_PARTITION_ID) int partition) {
logger.info(“接收消息: {},partition:{}”, message, partition);
}
|
如果不需要指定initialOffset,上面代码可以简化为:
- 1
2
| - @KafkaListener(groupId = “test-consumer”,
topicPartitions = @TopicPartition(topic = “test”, partitions = { “0”, “1” }))
|
消息过滤器
我们可以为消息监听添加过滤器来过滤一些特定的信息。我们在消费者配置类KafkaConsumerConfig的kafkaListenerContainerFactory方法里配置过滤规则:
- 1
2
3
4
5
6
7
8
9
10
11
| - @Bean
public ConcurrentKafkaListenerContainerFactory<String, String> kafkaListenerContainerFactory() {
ConcurrentKafkaListenerContainerFactory<String, String> factory
= new ConcurrentKafkaListenerContainerFactory<>();
factory.setConsumerFactory(consumerFactory());
// ———- 过滤配置 ————
factory.setRecordFilterStrategy(
r -> r.value().contains(“fuck”)
);
return factory;
}
|
setRecordFilterStrategy接收RecordFilterStrategy<K, V>,他是一个函数式接口:
- 1
2
3
| - public interface RecordFilterStrategy<K, V> {
boolean filter(ConsumerRecord<K, V> var1);
}
|
所以我们用lambda表达式指定了上面这条规则,即如果消息内容包含fuck这个粗鄙之语的时候,则不接受消息。
配置好后我们重启项目,分别发送下面这两条请求:
- http://localhost:8080/send/fuck,mrbird
- http://localhost:8080/send/love,mrbird
观察控制台:

可以看到,fuck,mrbird这条消息没有被接收。
发送复杂的消息
截至目前位置我们只发送了简单的字符串类型的消息,我们可以自定义消息转换器来发送复杂的消息。
定义消息实体
创建一个Message类:
- 1
2
3
4
5
6
7
8
9
10
11
12
13
14
15
16
17
18
19
20
21
22
23
24
25
26
| - public class Message implements Serializable {
private static final long serialVersionUID = 6678420965611108427L;
private String from;
private String message;
public Message() {
}
public Message(String from, String message) {
this.from = from;
this.message = message;
}
@Override
public String toString() {
return “Message{“ +
“from=’” + from + ‘\’’ +
“, message=’” + message + ‘\’’ +
‘}’;
}
// get set 略
}
|
改造消息生产者配置
- 1
2
3
4
5
6
7
8
9
10
11
12
13
14
15
16
17
18
19
20
21
22
23
24
25
26
| - @Configuration
public class KafkaProducerConfig {
@Value(“${spring.kafka.bootstrap-servers}”)
private String bootstrapServers;
@Bean
public ProducerFactory<String, Message> producerFactory() {
Map<String, Object> configProps = new HashMap<>();
configProps.put(
ProducerConfig.BOOTSTRAP_SERVERS_CONFIG,
bootstrapServers);
configProps.put(
ProducerConfig.KEY_SERIALIZER_CLASS_CONFIG,
StringSerializer.class);
configProps.put(
ProducerConfig.VALUE_SERIALIZER_CLASS_CONFIG,
JsonSerializer.class);
return new DefaultKafkaProducerFactory<>(configProps);
}
@Bean
public KafkaTemplate<String, Message> kafkaTemplate() {
return new KafkaTemplate<>(producerFactory());
}
}
|
我们将value序列化策略指定为了Kafka提供的JsonSerializer,并且kafkaTemplate返回类型为KafkaTemplate<String, Message>。
发送新的消息
在SendMessageController里发送复杂的消息:
- 1
2
3
4
5
6
7
| - @Autowired
private KafkaTemplate<String, Message> kafkaTemplate;
@GetMapping(“send/{message}”)
public void sendMessage(@PathVariable String message) {
this.kafkaTemplate.send(“test”, new Message(“mrbird”, message));
}
|
修改消费者配置
修改消费者配置KafkaConsumerConfig:
- 1
2
3
4
5
6
7
8
9
10
11
12
13
14
15
16
17
18
19
20
21
22
23
24
25
26
27
28
29
30
31
32
33
34
35
36
37
38
39
| - @EnableKafka
@Configuration
public class KafkaConsumerConfig {
@Value(“${spring.kafka.bootstrap-servers}”)
private String bootstrapServers;
@Value(“${spring.kafka.consumer.group-id}”)
private String consumerGroupId;
@Value(“${spring.kafka.consumer.auto-offset-reset}”)
private String autoOffsetReset;
@Bean
public ConsumerFactory<String, Message> consumerFactory() {
Map<String, Object> props = new HashMap<>();
props.put(
ConsumerConfig.BOOTSTRAP_SERVERS_CONFIG,
bootstrapServers);
props.put(
ConsumerConfig.GROUP_ID_CONFIG,
consumerGroupId);
props.put(
ConsumerConfig.AUTO_OFFSET_RESET_CONFIG,
autoOffsetReset);
return new DefaultKafkaConsumerFactory<>(
props,
new StringDeserializer(),
new JsonDeserializer<>(Message.class));
}
@Bean
public ConcurrentKafkaListenerContainerFactory<String, Message> kafkaListenerContainerFactory() {
ConcurrentKafkaListenerContainerFactory<String, Message> factory
= new ConcurrentKafkaListenerContainerFactory<>();
factory.setConsumerFactory(consumerFactory());
return factory;
}
}
|
修改消息监听
修改KafkaMessageListener:
- 1
2
3
4
| - @KafkaListener(topics = “test”, groupId = “test-consumer”)
public void listen(Message message) {
logger.info(“接收消息: {}”, message);
}
|
重启项目,访问http://localhost:8080/send/hello,控制台输出如下:

更多配置
- 1
2
3
4
5
6
7
8
9
10
11
12
13
14
15
16
17
18
19
20
21
22
23
24
25
26
27
28
29
30
31
32
33
34
35
36
37
38
39
40
41
42
43
44
45
46
47
48
49
50
51
52
53
54
55
56
57
58
59
60
61
62
63
64
65
66
67
68
69
70
71
72
73
74
75
76
77
78
79
80
81
82
83
84
85
86
87
88
89
90
91
92
93
94
| - spring.kafka.admin.client-id= # ID to pass to the server when making requests. Used for server-side logging.
spring.kafka.admin.fail-fast=false # Whether to fail fast if the broker is not available on startup.
spring.kafka.admin.properties.= # Additional admin-specific properties used to configure the client.
spring.kafka.admin.ssl.key-password= # Password of the private key in the key store file.
spring.kafka.admin.ssl.key-store-location= # Location of the key store file.
spring.kafka.admin.ssl.key-store-password= # Store password for the key store file.
spring.kafka.admin.ssl.key-store-type= # Type of the key store.
spring.kafka.admin.ssl.protocol= # SSL protocol to use.
spring.kafka.admin.ssl.trust-store-location= # Location of the trust store file.
spring.kafka.admin.ssl.trust-store-password= # Store password for the trust store file.
spring.kafka.admin.ssl.trust-store-type= # Type of the trust store.
spring.kafka.bootstrap-servers= # Comma-delimited list of host:port pairs to use for establishing the initial connections to the Kafka cluster. Applies to all components unless overridden.
spring.kafka.client-id= # ID to pass to the server when making requests. Used for server-side logging.
spring.kafka.consumer.auto-commit-interval= # Frequency with which the consumer offsets are auto-committed to Kafka if ‘enable.auto.commit’ is set to true.
spring.kafka.consumer.auto-offset-reset= # What to do when there is no initial offset in Kafka or if the current offset no longer exists on the server.
spring.kafka.consumer.bootstrap-servers= # Comma-delimited list of host:port pairs to use for establishing the initial connections to the Kafka cluster. Overrides the global property, for consumers.
spring.kafka.consumer.client-id= # ID to pass to the server when making requests. Used for server-side logging.
spring.kafka.consumer.enable-auto-commit= # Whether the consumer’s offset is periodically committed in the background.
spring.kafka.consumer.fetch-max-wait= # Maximum amount of time the server blocks before answering the fetch request if there isn’t sufficient data to immediately satisfy the requirement given by “fetch-min-size”.
spring.kafka.consumer.fetch-min-size= # Minimum amount of data the server should return for a fetch request.
spring.kafka.consumer.group-id= # Unique string that identifies the consumer group to which this consumer belongs.
spring.kafka.consumer.heartbeat-interval= # Expected time between heartbeats to the consumer coordinator.
spring.kafka.consumer.key-deserializer= # Deserializer class for keys.
spring.kafka.consumer.max-poll-records= # Maximum number of records returned in a single call to poll().
spring.kafka.consumer.properties.= # Additional consumer-specific properties used to configure the client.
spring.kafka.consumer.ssl.key-password= # Password of the private key in the key store file.
spring.kafka.consumer.ssl.key-store-location= # Location of the key store file.
spring.kafka.consumer.ssl.key-store-password= # Store password for the key store file.
spring.kafka.consumer.ssl.key-store-type= # Type of the key store.
spring.kafka.consumer.ssl.protocol= # SSL protocol to use.
spring.kafka.consumer.ssl.trust-store-location= # Location of the trust store file.
spring.kafka.consumer.ssl.trust-store-password= # Store password for the trust store file.
spring.kafka.consumer.ssl.trust-store-type= # Type of the trust store.
spring.kafka.consumer.value-deserializer= # Deserializer class for values.
spring.kafka.jaas.control-flag=required # Control flag for login configuration.
spring.kafka.jaas.enabled=false # Whether to enable JAAS configuration.
spring.kafka.jaas.login-module=com.sun.security.auth.module.Krb5LoginModule # Login module.
spring.kafka.jaas.options= # Additional JAAS options.
spring.kafka.listener.ack-count= # Number of records between offset commits when ackMode is “COUNT” or “COUNT_TIME”.
spring.kafka.listener.ack-mode= # Listener AckMode. See the spring-kafka documentation.
spring.kafka.listener.ack-time= # Time between offset commits when ackMode is “TIME” or “COUNT_TIME”.
spring.kafka.listener.client-id= # Prefix for the listener’s consumer client.id property.
spring.kafka.listener.concurrency= # Number of threads to run in the listener containers.
spring.kafka.listener.idle-event-interval= # Time between publishing idle consumer events (no data received).
spring.kafka.listener.log-container-config= # Whether to log the container configuration during initialization (INFO level).
spring.kafka.listener.monitor-interval= # Time between checks for non-responsive consumers. If a duration suffix is not specified, seconds will be used.
spring.kafka.listener.no-poll-threshold= # Multiplier applied to “pollTimeout” to determine if a consumer is non-responsive.
spring.kafka.listener.poll-timeout= # Timeout to use when polling the consumer.
spring.kafka.listener.type=single # Listener type.
spring.kafka.producer.acks= # Number of acknowledgments the producer requires the leader to have received before considering a request complete.
spring.kafka.producer.batch-size= # Default batch size.
spring.kafka.producer.bootstrap-servers= # Comma-delimited list of host:port pairs to use for establishing the initial connections to the Kafka cluster. Overrides the global property, for producers.
spring.kafka.producer.buffer-memory= # Total memory size the producer can use to buffer records waiting to be sent to the server.
spring.kafka.producer.client-id= # ID to pass to the server when making requests. Used for server-side logging.
spring.kafka.producer.compression-type= # Compression type for all data generated by the producer.
spring.kafka.producer.key-serializer= # Serializer class for keys.
spring.kafka.producer.properties.= # Additional producer-specific properties used to configure the client.
spring.kafka.producer.retries= # When greater than zero, enables retrying of failed sends.
spring.kafka.producer.ssl.key-password= # Password of the private key in the key store file.
spring.kafka.producer.ssl.key-store-location= # Location of the key store file.
spring.kafka.producer.ssl.key-store-password= # Store password for the key store file.
spring.kafka.producer.ssl.key-store-type= # Type of the key store.
spring.kafka.producer.ssl.protocol= # SSL protocol to use.
spring.kafka.producer.ssl.trust-store-location= # Location of the trust store file.
spring.kafka.producer.ssl.trust-store-password= # Store password for the trust store file.
spring.kafka.producer.ssl.trust-store-type= # Type of the trust store.
spring.kafka.producer.transaction-id-prefix= # When non empty, enables transaction support for producer.
spring.kafka.producer.value-serializer= # Serializer class for values.
spring.kafka.properties.= # Additional properties, common to producers and consumers, used to configure the client.
spring.kafka.ssl.key-password= # Password of the private key in the key store file.
spring.kafka.ssl.key-store-location= # Location of the key store file.
spring.kafka.ssl.key-store-password= # Store password for the key store file.
spring.kafka.ssl.key-store-type= # Type of the key store.
spring.kafka.ssl.protocol= # SSL protocol to use.
spring.kafka.ssl.trust-store-location= # Location of the trust store file.
spring.kafka.ssl.trust-store-password= # Store password for the trust store file.
spring.kafka.ssl.trust-store-type= # Type of the trust store.
spring.kafka.streams.application-id= # Kafka streams application.id property; default spring.application.name.
spring.kafka.streams.auto-startup=true # Whether or not to auto-start the streams factory bean.
spring.kafka.streams.bootstrap-servers= # Comma-delimited list of host:port pairs to use for establishing the initial connections to the Kafka cluster. Overrides the global property, for streams.
spring.kafka.streams.cache-max-size-buffering= # Maximum memory size to be used for buffering across all threads.
spring.kafka.streams.client-id= # ID to pass to the server when making requests. Used for server-side logging.
spring.kafka.streams.properties.*= # Additional Kafka properties used to configure the streams.
spring.kafka.streams.replication-factor= # The replication factor for change log topics and repartition topics created by the stream processing application.
spring.kafka.streams.ssl.key-password= # Password of the private key in the key store file.
spring.kafka.streams.ssl.key-store-location= # Location of the key store file.
spring.kafka.streams.ssl.key-store-password= # Store password for the key store file.
spring.kafka.streams.ssl.key-store-type= # Type of the key store.
spring.kafka.streams.ssl.protocol= # SSL protocol to use.
spring.kafka.streams.ssl.trust-store-location= # Location of the trust store file.
spring.kafka.streams.ssl.trust-store-password= # Store password for the trust store file.
spring.kafka.streams.ssl.trust-store-type= # Type of the trust store.
spring.kafka.streams.state-dir= # Directory location for the state store.
spring.kafka.template.default-topic= # Default topic to which messages are sent.
|


的使用方法汇总")


还没有评论,来说两句吧...