睿智的目标检测18——Keras搭建Faster-RCNN目标检测平台
睿智的目标检测18——Keras搭建FasterRCNN目标检测平台
- 学习前言
- 什么是FasterRCNN目标检测算法
- 源码下载
- Faster-RCNN实现思路
- 一、预测部分
- 1、主干网络介绍
- 2、获得Proposal建议框
- 3、Proposal建议框的解码
- 4、对Proposal建议框加以利用(RoiPoolingConv)
- 5、在原图上进行绘制
- 6、整体的执行流程
- 二、训练部分
- 1、建议框网络的训练
- 2、Roi网络的训练
- 训练自己的Faster-RCNN模型
- 一、数据集的准备
- 二、数据集的处理
- 三、开始网络训练
- 四、训练结果预测
学习前言
最近对实例分割感兴趣了,不过实例分割MaskRCNN是基于FasterRCNN的,之前学了非常多的One-Stage的目标检测算法,对FasterRCNN并不感兴趣,这次我们来学学FasterRCNN。
什么是FasterRCNN目标检测算法
Faster-RCNN是一个非常有效的目标检测算法,虽然是一个比较早的论文, 但它至今仍是许多目标检测算法的基础。
Faster-RCNN作为一种two-stage的算法,与one-stage的算法相比,two-stage的算法更加复杂且速度较慢,但是检测精度会更高。
事实上也确实是这样,Faster-RCNN的检测效果非常不错,但是检测速度与训练速度有待提高。
源码下载
https://github.com/bubbliiiing/faster-rcnn-keras
喜欢的可以点个star噢。
Faster-RCNN实现思路
一、预测部分
1、主干网络介绍

Faster-RCNN可以采用多种的主干特征提取网络,常用的有VGG,Resnet,Xception等等,本文采用的是Resnet网络,关于Resnet的介绍大家可以看我的另外一篇博客https://blog.csdn.net/weixin_44791964/article/details/102790260。
Faster-RCNN对输入进来的图片尺寸没有固定,但是一般会把输入进来的图片短边固定成600,如输入一张1200x1800的图片,会把图片不失真的resize到600x900上。
ResNet50有两个基本的块,分别名为Conv Block和Identity Block。其中:
- Conv Block输入和输出的维度是不一样的,所以不能连续串联,它的作用是改变网络的维度;
- Identity Block输入维度和输出维度相同,可以串联,用于加深网络的。
上述提到的Conv Block的结构如下,由于残差边上存在卷积,Conv Block输入和输出的维度是不一样的:
Identity Block的结构如下,由于残差边上不存在卷积,Identity Block输入维度和输出维度相同:
Faster-RCNN的主干特征提取网络部分只用到了Resnet50当中高宽压缩四次的特征层,此时我们可以获得一个共享特征层,假设我们输入进来的图片是600x600x3,我们最后会获得一个38x38x3的特征层。
原本Resnet50第五次高宽压缩的部分在ROI中使用。
对Faster-RCNN的主干特征提取网络部分而言,以输入的图片为600x600为例,shape变化如下: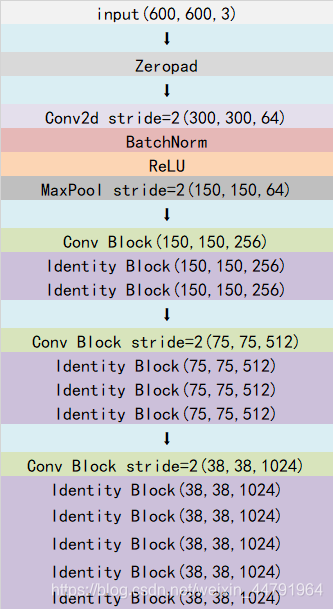
最后一层的输出就是公用特征层。
实现代码:
class BatchNormalization(Layer):def __init__(self, epsilon=1e-3, axis=-1,weights=None, beta_init='zero', gamma_init='one',gamma_regularizer=None, beta_regularizer=None, **kwargs):self.supports_masking = Trueself.beta_init = initializers.get(beta_init)self.gamma_init = initializers.get(gamma_init)self.epsilon = epsilonself.axis = axisself.gamma_regularizer = regularizers.get(gamma_regularizer)self.beta_regularizer = regularizers.get(beta_regularizer)self.initial_weights = weightssuper(BatchNormalization, self).__init__(**kwargs)def build(self, input_shape):self.input_spec = [InputSpec(shape=input_shape)]shape = (input_shape[self.axis],)self.gamma = self.add_weight(shape,initializer=self.gamma_init,regularizer=self.gamma_regularizer,name='{}_gamma'.format(self.name),trainable=False)self.beta = self.add_weight(shape,initializer=self.beta_init,regularizer=self.beta_regularizer,name='{}_beta'.format(self.name),trainable=False)self.running_mean = self.add_weight(shape, initializer='zero',name='{}_running_mean'.format(self.name),trainable=False)self.running_std = self.add_weight(shape, initializer='one',name='{}_running_std'.format(self.name),trainable=False)if self.initial_weights is not None:self.set_weights(self.initial_weights)del self.initial_weightsself.built = Truedef call(self, x, mask=None):assert self.built, 'Layer must be built before being called'input_shape = K.int_shape(x)reduction_axes = list(range(len(input_shape)))del reduction_axes[self.axis]broadcast_shape = [1] * len(input_shape)broadcast_shape[self.axis] = input_shape[self.axis]if sorted(reduction_axes) == range(K.ndim(x))[:-1]:x_normed = K.batch_normalization(x, self.running_mean, self.running_std,self.beta, self.gamma,epsilon=self.epsilon)else:broadcast_running_mean = K.reshape(self.running_mean, broadcast_shape)broadcast_running_std = K.reshape(self.running_std, broadcast_shape)broadcast_beta = K.reshape(self.beta, broadcast_shape)broadcast_gamma = K.reshape(self.gamma, broadcast_shape)x_normed = K.batch_normalization(x, broadcast_running_mean, broadcast_running_std,broadcast_beta, broadcast_gamma,epsilon=self.epsilon)return x_normeddef get_config(self):config = {'epsilon': self.epsilon,'axis': self.axis,'gamma_regularizer': self.gamma_regularizer.get_config() if self.gamma_regularizer else None,'beta_regularizer': self.beta_regularizer.get_config() if self.beta_regularizer else None}base_config = super(BatchNormalization, self).get_config()return dict(list(base_config.items()) + list(config.items()))def identity_block(input_tensor, kernel_size, filters, stage, block):filters1, filters2, filters3 = filtersconv_name_base = 'res' + str(stage) + block + '_branch'bn_name_base = 'bn' + str(stage) + block + '_branch'x = Conv2D(filters1, (1, 1), name=conv_name_base + '2a')(input_tensor)x = BatchNormalization(name=bn_name_base + '2a')(x)x = Activation('relu')(x)x = Conv2D(filters2, kernel_size,padding='same', name=conv_name_base + '2b')(x)x = BatchNormalization(name=bn_name_base + '2b')(x)x = Activation('relu')(x)x = Conv2D(filters3, (1, 1), name=conv_name_base + '2c')(x)x = BatchNormalization(name=bn_name_base + '2c')(x)x = layers.add([x, input_tensor])x = Activation('relu')(x)return xdef conv_block(input_tensor, kernel_size, filters, stage, block, strides=(2, 2)):filters1, filters2, filters3 = filtersconv_name_base = 'res' + str(stage) + block + '_branch'bn_name_base = 'bn' + str(stage) + block + '_branch'x = Conv2D(filters1, (1, 1), strides=strides,name=conv_name_base + '2a')(input_tensor)x = BatchNormalization(name=bn_name_base + '2a')(x)x = Activation('relu')(x)x = Conv2D(filters2, kernel_size, padding='same',name=conv_name_base + '2b')(x)x = BatchNormalization(name=bn_name_base + '2b')(x)x = Activation('relu')(x)x = Conv2D(filters3, (1, 1), name=conv_name_base + '2c')(x)x = BatchNormalization(name=bn_name_base + '2c')(x)shortcut = Conv2D(filters3, (1, 1), strides=strides,name=conv_name_base + '1')(input_tensor)shortcut = BatchNormalization(name=bn_name_base + '1')(shortcut)x = layers.add([x, shortcut])x = Activation('relu')(x)return xdef ResNet50(inputs):#-----------------------------------## 假设输入进来的图片是600,600,3#-----------------------------------#img_input = inputs# 600,600,3 -> 300,300,64x = ZeroPadding2D((3, 3))(img_input)x = Conv2D(64, (7, 7), strides=(2, 2), name='conv1')(x)x = BatchNormalization(name='bn_conv1')(x)x = Activation('relu')(x)# 300,300,64 -> 150,150,64x = MaxPooling2D((3, 3), strides=(2, 2), padding="same")(x)# 150,150,64 -> 150,150,256x = conv_block(x, 3, [64, 64, 256], stage=2, block='a', strides=(1, 1))x = identity_block(x, 3, [64, 64, 256], stage=2, block='b')x = identity_block(x, 3, [64, 64, 256], stage=2, block='c')# 150,150,256 -> 75,75,512x = conv_block(x, 3, [128, 128, 512], stage=3, block='a')x = identity_block(x, 3, [128, 128, 512], stage=3, block='b')x = identity_block(x, 3, [128, 128, 512], stage=3, block='c')x = identity_block(x, 3, [128, 128, 512], stage=3, block='d')# 75,75,512 -> 38,38,1024x = conv_block(x, 3, [256, 256, 1024], stage=4, block='a')x = identity_block(x, 3, [256, 256, 1024], stage=4, block='b')x = identity_block(x, 3, [256, 256, 1024], stage=4, block='c')x = identity_block(x, 3, [256, 256, 1024], stage=4, block='d')x = identity_block(x, 3, [256, 256, 1024], stage=4, block='e')x = identity_block(x, 3, [256, 256, 1024], stage=4, block='f')# 最终获得一个38,38,1024的共享特征层return x
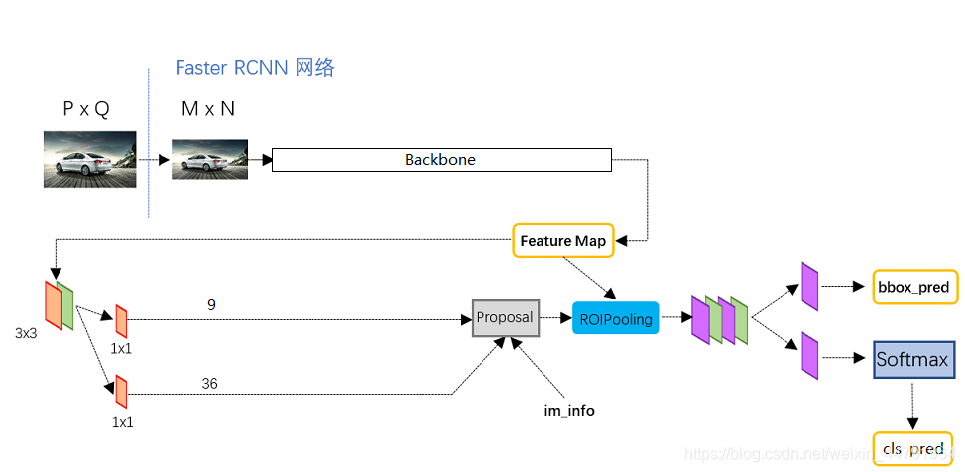
2、获得Proposal建议框
上一步获得的公用特征层在图像中就是Feature Map。
假设我们输入进来的图片是600x600x3,我们最后会获得一个38x38x3的特征层。
其有两个应用:
- 一个是利用一次3x3的卷积进行特征整合,再进行一个9(分解为9 x 1)通道的1x1卷积,还有一个36(分解为9 x 4)通道的1x1卷积。这两个卷积的结果分别用于判断先验框内部是否包含物体以及这个先验框的调整参数。
- 一个是和ROIPooling结合使用。
这一部分主要是解析第一个应用。
在Faster-RCNN中,共享特征层上的每一个像素点的先验框的数量是9,上述提到的两个1x1卷积的结果对应了下述两个内容:
- 9 x 4的卷积 用于预测 共享特征层上 每一个网格点上 每一个先验框的变化情况。(为什么说是变化情况呢,这是因为Faster-RCNN需要结合先验框获得建议框,9 x 4卷积的预测结果就是先验框的变化情况。)
- 9 x 1的卷积 用于预测 共享特征层上 每一个网格点上 每一个先验框内部是否包含了物体。
当我们输入的图片的shape是600x600x3的时候,共享特征层的shape就是38x38x1024,相当于把输入进来的图像分割成38x38的网格,然后每个网格点存在9个先验框,这些先验框有不同的大小,在图像上密密麻麻。
上述提到的两个卷积:
- 9 x 4的卷积的结果会对这些先验框进行调整,获得建议框。
- 9 x 1的卷积的结果会判断先验框内是否包含物体。
到此位置还只是粗略的一个框的获取,也就是一个建议框。然后我们会在建议框里面继续找东西。
实现代码为:
#----------------------------------------------------## 创建建议框网络# 该网络结果会对先验框进行调整获得建议框#----------------------------------------------------#def get_rpn(base_layers, num_anchors):#----------------------------------------------------## 利用一个512通道的3x3卷积进行特征整合#----------------------------------------------------#x = Conv2D(512, (3, 3), padding='same', activation='relu', kernel_initializer=random_normal(stddev=0.02), name='rpn_conv1')(base_layers)#----------------------------------------------------## 利用一个1x1卷积调整通道数,获得预测结果#----------------------------------------------------#x_class = Conv2D(num_anchors, (1, 1), activation = 'sigmoid', kernel_initializer=random_normal(stddev=0.02), name='rpn_out_class')(x)x_regr = Conv2D(num_anchors * 4, (1, 1), activation = 'linear', kernel_initializer=random_normal(stddev=0.02), name='rpn_out_regress')(x)x_class = Reshape((-1, 1),name="classification")(x_class)x_regr = Reshape((-1, 4),name="regression")(x_regr)return [x_class, x_regr]
3、Proposal建议框的解码
通过第二步我们获得了38x38x9个先验框对应的预测结果。预测结果包含两部分。
9 x 4的卷积 用于预测 共享特征层上 每一个网格点上 每一个先验框的变化情况。
9 x 1的卷积 用于预测 共享特征层上 每一个网格点上 每一个先验框内部是否包含了物体。
该共享特征层相当于将整个图像分成38x38个网格;然后从每个网格中心建立9个先验框,一共38x38x9个,12996个先验框。
当输入图像shape不同时,先验框的数量也会发生改变。这和共享特征层的shape相关。
先验框虽然可以代表一定的框的位置信息与框的大小信息,但是其是有限的,无法表示任意情况,因此还需要调整。
9 x 4中的9表示了这个网格点所包含的先验框数量,其中的4表示了框的中心与长宽的调整情况。
实现代码如下:
def decode_boxes(self, mbox_loc, anchors, variances):# 获得先验框的宽与高anchor_width = anchors[:, 2] - anchors[:, 0]anchor_height = anchors[:, 3] - anchors[:, 1]# 获得先验框的中心点anchor_center_x = 0.5 * (anchors[:, 2] + anchors[:, 0])anchor_center_y = 0.5 * (anchors[:, 3] + anchors[:, 1])# 建议框距离先验框中心的xy轴偏移情况detections_center_x = mbox_loc[:, 0] * anchor_width * variances[0]detections_center_x += anchor_center_xdetections_center_y = mbox_loc[:, 1] * anchor_height * variances[1]detections_center_y += anchor_center_y# 建议框的宽与高的求取detections_width = np.exp(mbox_loc[:, 2] * variances[2])detections_width *= anchor_widthdetections_height = np.exp(mbox_loc[:, 3] * variances[3])detections_height *= anchor_height# 获取建议框的左上角与右下角detections_xmin = detections_center_x - 0.5 * detections_widthdetections_ymin = detections_center_y - 0.5 * detections_heightdetections_xmax = detections_center_x + 0.5 * detections_widthdetections_ymax = detections_center_y + 0.5 * detections_height# 建议框的左上角与右下角进行堆叠detections = np.concatenate((detections_xmin[:, None],detections_ymin[:, None],detections_xmax[:, None],detections_ymax[:, None]), axis=-1)# 防止超出0与1detections = np.minimum(np.maximum(detections, 0.0), 1.0)return detectionsdef detection_out_rpn(self, predictions, anchors, variances = [0.25, 0.25, 0.25, 0.25]):#---------------------------------------------------## 获得种类的置信度#---------------------------------------------------#mbox_conf = predictions[0]#---------------------------------------------------## mbox_loc是回归预测结果#---------------------------------------------------#mbox_loc = predictions[1]results = []#----------------------------------------------------------------------------------------------------------------------## 对每一张图片进行处理,由于在predict.py的时候,我们只输入一张图片,所以for i in range(len(mbox_loc))只进行一次#----------------------------------------------------------------------------------------------------------------------#for i in range(len(mbox_loc)):#--------------------------------## 利用回归结果对先验框进行解码#--------------------------------#detections = self.decode_boxes(mbox_loc[i], anchors, variances)#--------------------------------## 取出先验框内包含物体的概率#--------------------------------#c_confs = mbox_conf[i, :, 0]c_confs_argsort = np.argsort(c_confs)[::-1][:self.rpn_pre_boxes]#------------------------------------## 原始的预测框较多,先选一些高分框#------------------------------------#confs_to_process = c_confs[c_confs_argsort]boxes_to_process = detections[c_confs_argsort, :]#--------------------------------## 进行iou的非极大抑制#--------------------------------#idx = self.sess.run(self.nms_out_rpn, feed_dict={self.boxes: boxes_to_process, self.scores: confs_to_process})#--------------------------------## 取出在非极大抑制中效果较好的内容#--------------------------------#good_boxes = boxes_to_process[idx]results.append(good_boxes)return np.array(results)return np.array(results)
4、对Proposal建议框加以利用(RoiPoolingConv)
让我们对建议框有一个整体的理解:
事实上建议框就是对图片哪一个区域有物体存在进行初步筛选。
通过主干特征提取网络,我们可以获得一个公用特征层,当输入图片为600x600x3的时候,它的shape是38x38x1024,然后建议框会对这个公用特征层进行截取。
其实公用特征层里面的38x38对应着图片里的38x38个区域,38x38中的每一个点相当于这个区域内部所有特征的浓缩。
建议框会对这38x38个区域进行截取,也就是认为这些区域里存在目标,然后将截取的结果进行resize,resize到14x14x1024的大小。这个过程称为ROIPooling,本质上是对截取到的各区域分割为14x14的大小后分区域池化,在tensorflow中的实现形式为resize。在这里我们称上述截取到的特征层为局部特征层。
然后我们再对每个局部特征层再进行Resnet原有的第五次压缩。压缩完后进行一个平均池化,再进行一个Flatten,此时,对于每一个局部特征层,我们可以获得一个长度为2048的特征向量。我们最后对这个特征向量分别进行一个num_classes的全连接和(num_classes-1)x4全连接。其中:
- num_classes的全连接用于对建议框进行分类;
- (num_classes-1)x4的全连接用于对建议框进行调整(之所以-1是不调整被认定为背景的框。)
通过这些操作,我们可以获得所有建议框的调整情况,和这个建议框调整后框内物体的类别。
事实上,我们可以将建议框,看作是ROIPooling层的先验框。
对Proposal建议框加以利用的过程与shape变化如图所示: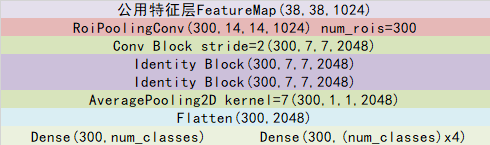
建议框调整后的结果就是最终的预测结果了,可以在图上进行绘画了。
class RoiPoolingConv(Layer):def __init__(self, pool_size, **kwargs):self.pool_size = pool_sizesuper(RoiPoolingConv, self).__init__(**kwargs)def build(self, input_shape):self.nb_channels = input_shape[0][3]def compute_output_shape(self, input_shape):input_shape2 = input_shape[1]return None, input_shape2[1], self.pool_size, self.pool_size, self.nb_channelsdef call(self, x, mask=None):assert(len(x) == 2)#--------------------------------## 共享特征层# batch_size, 38, 38, 1024#--------------------------------#feature_map = x[0]#--------------------------------## 建议框# batch_size, num_rois, 4#--------------------------------#rois = x[1]#---------------------------------## 建议框数量,batch_size大小#---------------------------------#num_rois = tf.shape(rois)[1]batch_size = tf.shape(rois)[0]#---------------------------------## 生成建议框序号信息# 用于在进行crop_and_resize时# 帮助建议框找到对应的共享特征层#---------------------------------#box_index = tf.expand_dims(tf.range(0, batch_size), 1)box_index = tf.tile(box_index, (1, num_rois))box_index = tf.reshape(box_index, [-1])rs = tf.image.crop_and_resize(feature_map, tf.reshape(rois, [-1, 4]), box_index, (self.pool_size, self.pool_size))#---------------------------------------------------------------------------------## 最终的输出为# (batch_size, num_rois, 14, 14, 1024)#---------------------------------------------------------------------------------#final_output = K.reshape(rs, (batch_size, num_rois, self.pool_size, self.pool_size, self.nb_channels))return final_outputdef identity_block_td(input_tensor, kernel_size, filters, stage, block):nb_filter1, nb_filter2, nb_filter3 = filtersconv_name_base = 'res' + str(stage) + block + '_branch'bn_name_base = 'bn' + str(stage) + block + '_branch'x = TimeDistributed(Conv2D(nb_filter1, (1, 1), kernel_initializer='normal'), name=conv_name_base + '2a')(input_tensor)x = TimeDistributed(BatchNormalization(), name=bn_name_base + '2a')(x)x = Activation('relu')(x)x = TimeDistributed(Conv2D(nb_filter2, (kernel_size, kernel_size), kernel_initializer='normal',padding='same'), name=conv_name_base + '2b')(x)x = TimeDistributed(BatchNormalization(), name=bn_name_base + '2b')(x)x = Activation('relu')(x)x = TimeDistributed(Conv2D(nb_filter3, (1, 1), kernel_initializer='normal'), name=conv_name_base + '2c')(x)x = TimeDistributed(BatchNormalization(), name=bn_name_base + '2c')(x)x = Add()([x, input_tensor])x = Activation('relu')(x)return xdef conv_block_td(input_tensor, kernel_size, filters, stage, block, strides=(2, 2)):nb_filter1, nb_filter2, nb_filter3 = filtersconv_name_base = 'res' + str(stage) + block + '_branch'bn_name_base = 'bn' + str(stage) + block + '_branch'x = TimeDistributed(Conv2D(nb_filter1, (1, 1), strides=strides, kernel_initializer='normal'), name=conv_name_base + '2a')(input_tensor)x = TimeDistributed(BatchNormalization(), name=bn_name_base + '2a')(x)x = Activation('relu')(x)x = TimeDistributed(Conv2D(nb_filter2, (kernel_size, kernel_size), padding='same', kernel_initializer='normal'), name=conv_name_base + '2b')(x)x = TimeDistributed(BatchNormalization(), name=bn_name_base + '2b')(x)x = Activation('relu')(x)x = TimeDistributed(Conv2D(nb_filter3, (1, 1), kernel_initializer='normal'), name=conv_name_base + '2c')(x)x = TimeDistributed(BatchNormalization(), name=bn_name_base + '2c')(x)shortcut = TimeDistributed(Conv2D(nb_filter3, (1, 1), strides=strides, kernel_initializer='normal'), name=conv_name_base + '1')(input_tensor)shortcut = TimeDistributed(BatchNormalization(), name=bn_name_base + '1')(shortcut)x = Add()([x, shortcut])x = Activation('relu')(x)return xdef resnet50_classifier_layers(x):# batch_size, num_rois, 14, 14, 1024 -> batch_size, num_rois, 7, 7, 2048x = conv_block_td(x, 3, [512, 512, 2048], stage=5, block='a', strides=(2, 2))# batch_size, num_rois, 7, 7, 2048 -> batch_size, num_rois, 7, 7, 2048x = identity_block_td(x, 3, [512, 512, 2048], stage=5, block='b')# batch_size, num_rois, 7, 7, 2048 -> batch_size, num_rois, 7, 7, 2048x = identity_block_td(x, 3, [512, 512, 2048], stage=5, block='c')# batch_size, num_rois, 7, 7, 2048 -> batch_size, num_rois, 1, 1, 2048x = TimeDistributed(AveragePooling2D((7, 7)), name='avg_pool')(x)return x#----------------------------------------------------## 将共享特征层和建议框传入classifier网络# 该网络结果会对建议框进行调整获得预测框#----------------------------------------------------#def get_resnet50_classifier(base_layers, input_rois, roi_size, num_classes=21):# batch_size, 38, 38, 1024 -> batch_size, num_rois, 14, 14, 1024out_roi_pool = RoiPoolingConv(roi_size)([base_layers, input_rois])# batch_size, num_rois, 14, 14, 1024 -> num_rois, 1, 1, 2048out = resnet50_classifier_layers(out_roi_pool)# batch_size, num_rois, 1, 1, 2048 -> batch_size, num_rois, 2048out = TimeDistributed(Flatten())(out)# batch_size, num_rois, 2048 -> batch_size, num_rois, num_classesout_class = TimeDistributed(Dense(num_classes, activation='softmax', kernel_initializer=random_normal(stddev=0.02)), name='dense_class_{}'.format(num_classes))(out)# batch_size, num_rois, 2048 -> batch_size, num_rois, 4 * (num_classes-1)out_regr = TimeDistributed(Dense(4 * (num_classes - 1), activation='linear', kernel_initializer=random_normal(stddev=0.02)), name='dense_regress_{}'.format(num_classes))(out)return [out_class, out_regr]
5、在原图上进行绘制
在第四步的结尾,我们对建议框进行再一次进行解码后,我们可以获得预测框在原图上的位置,而且这些预测框都是经过筛选的。这些筛选后的框可以直接绘制在图片上,就可以获得结果了。
6、整体的执行流程

几个小tip:
1、共包含了两次解码过程。
2、先进行粗略的筛选再细调。
3、第一次获得的建议框解码后的结果是对共享特征层featuremap进行截取。
二、训练部分
Faster-RCNN的训练过程和它的预测过程一样,分为两部分,首先要训练获得建议框网络,然后再训练后面利用ROI获得预测结果的网络。
1、建议框网络的训练
在预测过程中我们知道,如果想要对先验框调整获得建议框,我们需要对共享特征层利用一次3x3的卷积进行特征整合,然后进行两个卷积操作。这两个卷积分别为:
- 一个36(分解为9 x 4)通道的1x1卷积。
- 一个9(分解为9 x 1)通道的1x1卷积。
两个1x1卷积的结果实际上也就是:
9 x 4的卷积 用于预测 公用特征层上 每一个网格点上 每一个先验框的变化情况。(为什么说是变化情况呢,这是因为Faster-RCNN的预测结果需要结合先验框获得预测框,预测结果就是先验框的变化情况。)
9 x 1的卷积 用于预测 公用特征层上 每一个网格点上 每一个预测框内部是否包含了物体。
也就是说,我们直接利用Faster-RCNN建议框网络预测到的结果,并不是建议框在图片上的真实位置,需要解码才能得到真实位置。
而在训练的时候,我们需要计算loss函数,这个loss函数是相对于Faster-RCNN建议框网络的预测结果的。计算loss函数我们需要进行两个操作,分别是:
- 我们需要把图片输入到当前的Faster-RCNN建议框的网络中,得到建议框网络的预测结果;
- 同时还需要对真实框进行编码,这个编码是把真实框的位置信息格式转化为Faster-RCNN建议框预测结果的格式信息。
也就是,我们需要找到 每一张用于训练的图片的每一个真实框对应的先验框,并求出如果想要得到这样一个真实框,我们的建议框预测结果应该是怎么样的。
从建议框预测结果获得真实框的过程被称作解码,而从真实框获得建议框预测结果的过程就是编码的过程。
因此我们只需要将解码过程逆过来就是编码过程了。
在进行编码前,我们还需要找到每一个真实框对应的先验框,代表这个真实框由某个先验框进行预测。
我们首先需要将每一个的真实框和所有的先验框进行一个iou计算,这一步做的工作是计算每一个真实框和所有的先验框的重合程度。
在获得每一个真实框和所有的先验框的重合程度之后,选出和每一个真实框重合程度大于一定门限的先验框。代表这个真实框由这些先验框负责预测。
由于一个先验框只能负责一个真实框的预测,所以如果某个先验框和多个真实框的重合度较大,那么这个先验框只负责与其iou最大的真实框的预测。
在这一步后,我们可以找到每一个先验框所负责预测的真实框,然后再进行上述提到的编码行为。
实现代码如下:
def iou(self, box):#---------------------------------------------## 计算出每个真实框与所有的先验框的iou# 判断真实框与先验框的重合情况#---------------------------------------------#inter_upleft = np.maximum(self.anchors[:, :2], box[:2])inter_botright = np.minimum(self.anchors[:, 2:4], box[2:])inter_wh = inter_botright - inter_upleftinter_wh = np.maximum(inter_wh, 0)inter = inter_wh[:, 0] * inter_wh[:, 1]#---------------------------------------------## 真实框的面积#---------------------------------------------#area_true = (box[2] - box[0]) * (box[3] - box[1])#---------------------------------------------## 先验框的面积#---------------------------------------------#area_gt = (self.anchors[:, 2] - self.anchors[:, 0])*(self.anchors[:, 3] - self.anchors[:, 1])#---------------------------------------------## 计算iou#---------------------------------------------#union = area_true + area_gt - interiou = inter / unionreturn ioudef encode_ignore_box(self, box, return_iou=True, variances = [0.25, 0.25, 0.25, 0.25]):#---------------------------------------------## 计算当前真实框和先验框的重合情况#---------------------------------------------#iou = self.iou(box)ignored_box = np.zeros((self.num_anchors, 1))#---------------------------------------------------## 找到处于忽略门限值范围内的先验框#---------------------------------------------------#assign_mask_ignore = (iou > self.ignore_threshold) & (iou < self.overlap_threshold)ignored_box[:, 0][assign_mask_ignore] = iou[assign_mask_ignore]encoded_box = np.zeros((self.num_anchors, 4 + return_iou))#---------------------------------------------------## 找到每一个真实框,重合程度较高的先验框#---------------------------------------------------#assign_mask = iou > self.overlap_threshold#---------------------------------------------## 如果没有一个先验框重合度大于self.overlap_threshold# 则选择重合度最大的为正样本#---------------------------------------------#if not assign_mask.any():assign_mask[iou.argmax()] = True#---------------------------------------------## 利用iou进行赋值#---------------------------------------------#if return_iou:encoded_box[:, -1][assign_mask] = iou[assign_mask]#---------------------------------------------## 找到对应的先验框#---------------------------------------------#assigned_anchors = self.anchors[assign_mask]#---------------------------------------------## 逆向编码,将真实框转化为FRCNN预测结果的格式# 先计算真实框的中心与长宽#---------------------------------------------#box_center = 0.5 * (box[:2] + box[2:])box_wh = box[2:] - box[:2]#---------------------------------------------## 再计算重合度较高的先验框的中心与长宽#---------------------------------------------#assigned_anchors_center = 0.5 * (assigned_anchors[:, :2] + assigned_anchors[:, 2:4])assigned_anchors_wh = assigned_anchors[:, 2:4] - assigned_anchors[:, :2]# 逆向求取FasterRCNN应该有的预测结果encoded_box[:, :2][assign_mask] = box_center - assigned_anchors_centerencoded_box[:, :2][assign_mask] /= assigned_anchors_whencoded_box[:, :2][assign_mask] /= np.array(variances)[:2]encoded_box[:, 2:4][assign_mask] = np.log(box_wh / assigned_anchors_wh)encoded_box[:, 2:4][assign_mask] /= np.array(variances)[2:4]return encoded_box.ravel(), ignored_box.ravel()def assign_boxes(self, boxes):#---------------------------------------------------## assignment分为2个部分# :4 的内容为网络应该有的回归预测结果# 4 的内容为先验框是否包含物体,默认为背景#---------------------------------------------------#assignment = np.zeros((self.num_anchors, 4 + 1))assignment[:, 4] = 0.0if len(boxes) == 0:return assignment#---------------------------------------------------## 对每一个真实框都进行iou计算#---------------------------------------------------#apply_along_axis_boxes = np.apply_along_axis(self.encode_ignore_box, 1, boxes[:, :4])encoded_boxes = np.array([apply_along_axis_boxes[i, 0] for i in range(len(apply_along_axis_boxes))])ingored_boxes = np.array([apply_along_axis_boxes[i, 1] for i in range(len(apply_along_axis_boxes))])#---------------------------------------------------## 在reshape后,获得的ingored_boxes的shape为:# [num_true_box, num_anchors, 1] 其中1为iou#---------------------------------------------------#ingored_boxes = ingored_boxes.reshape(-1, self.num_anchors, 1)ignore_iou = ingored_boxes[:, :, 0].max(axis=0)ignore_iou_mask = ignore_iou > 0assignment[:, 4][ignore_iou_mask] = -1#---------------------------------------------------## 在reshape后,获得的encoded_boxes的shape为:# [num_true_box, num_anchors, 4+1]# 4是编码后的结果,1为iou#---------------------------------------------------#encoded_boxes = encoded_boxes.reshape(-1, self.num_anchors, 5)#---------------------------------------------------## [num_anchors]求取每一个先验框重合度最大的真实框#---------------------------------------------------#best_iou = encoded_boxes[:, :, -1].max(axis=0)best_iou_idx = encoded_boxes[:, :, -1].argmax(axis=0)best_iou_mask = best_iou > 0best_iou_idx = best_iou_idx[best_iou_mask]#---------------------------------------------------## 计算一共有多少先验框满足需求#---------------------------------------------------#assign_num = len(best_iou_idx)# 将编码后的真实框取出encoded_boxes = encoded_boxes[:, best_iou_mask, :]assignment[:, :4][best_iou_mask] = encoded_boxes[best_iou_idx,np.arange(assign_num), :4]#----------------------------------------------------------## 4代表为背景的概率,设定为0,因为这些先验框有对应的物体#----------------------------------------------------------#assignment[:, 4][best_iou_mask] = 1# 通过assign_boxes我们就获得了,输入进来的这张图片,应该有的预测结果是什么样子的return assignment
focal会忽略一些重合度相对较高但是不是非常高的先验框,一般将重合度在0.3-0.7之间的先验框进行忽略。
2、Roi网络的训练
通过上一步已经可以对建议框网络进行训练了,建议框网络会提供一些位置的建议,在ROI网络部分,其会将建议框根据进行一定的截取,并获得对应的预测结果,事实上就是将上一步建议框当作了ROI网络的先验框。
因此,我们需要计算所有建议框和真实框的重合程度,并进行筛选,如果某个真实框和建议框的重合程度大于0.5则认为该建议框为正样本,如果重合程度小于0.5则认为该建议框为负样本
因此我们可以对真实框进行编码,这个编码是相对于建议框的,也就是,当我们存在这些建议框的时候,我们的ROI预测网络需要有什么样的预测结果才能将这些建议框调整成真实框。
每次训练我们都放入128个建议框进行训练,同时要注意正负样本的平衡。
实现代码如下:
class ProposalTargetCreator(object):def __init__(self, num_classes, n_sample=128, pos_ratio=0.5, pos_iou_thresh=0.5,neg_iou_thresh_high=0.5, neg_iou_thresh_low=0, variance=[0.125, 0.125, 0.25, 0.25]):self.n_sample = n_sampleself.pos_ratio = pos_ratioself.pos_roi_per_image = np.round(self.n_sample * self.pos_ratio)self.pos_iou_thresh = pos_iou_threshself.neg_iou_thresh_high = neg_iou_thresh_highself.neg_iou_thresh_low = neg_iou_thresh_lowself.num_classes = num_classesself.variance = variancedef bbox_iou(self, bbox_a, bbox_b):if bbox_a.shape[1] != 4 or bbox_b.shape[1] != 4:print(bbox_a, bbox_b)raise IndexErrortl = np.maximum(bbox_a[:, None, :2], bbox_b[:, :2])br = np.minimum(bbox_a[:, None, 2:], bbox_b[:, 2:])area_i = np.prod(br - tl, axis=2) * (tl < br).all(axis=2)area_a = np.prod(bbox_a[:, 2:] - bbox_a[:, :2], axis=1)area_b = np.prod(bbox_b[:, 2:] - bbox_b[:, :2], axis=1)return area_i / (area_a[:, None] + area_b - area_i)def bbox2loc(self, src_bbox, dst_bbox):width = src_bbox[:, 2] - src_bbox[:, 0]height = src_bbox[:, 3] - src_bbox[:, 1]ctr_x = src_bbox[:, 0] + 0.5 * widthctr_y = src_bbox[:, 1] + 0.5 * heightbase_width = dst_bbox[:, 2] - dst_bbox[:, 0]base_height = dst_bbox[:, 3] - dst_bbox[:, 1]base_ctr_x = dst_bbox[:, 0] + 0.5 * base_widthbase_ctr_y = dst_bbox[:, 1] + 0.5 * base_heighteps = np.finfo(height.dtype).epswidth = np.maximum(width, eps)height = np.maximum(height, eps)dx = (base_ctr_x - ctr_x) / widthdy = (base_ctr_y - ctr_y) / heightdw = np.log(base_width / width)dh = np.log(base_height / height)loc = np.vstack((dx, dy, dw, dh)).transpose()return locdef calc_iou(self, R, all_boxes):bboxes = all_boxes[:, :4]label = all_boxes[:, 4]R = np.concatenate([R, bboxes], axis=0)# ----------------------------------------------------- ## 计算建议框和真实框的重合程度# ----------------------------------------------------- #if len(bboxes)==0:max_iou = np.zeros(len(R))gt_assignment = np.zeros(len(R), np.int32)gt_roi_label = np.zeros(len(R))else:iou = self.bbox_iou(R, bboxes)#---------------------------------------------------------## 获得每一个建议框最对应的真实框的iou [num_roi, ]#---------------------------------------------------------#max_iou = iou.max(axis=1)#---------------------------------------------------------## 获得每一个建议框最对应的真实框 [num_roi, ]#---------------------------------------------------------#gt_assignment = iou.argmax(axis=1)#---------------------------------------------------------## 真实框的标签#---------------------------------------------------------#gt_roi_label = label[gt_assignment]#----------------------------------------------------------------## 满足建议框和真实框重合程度大于neg_iou_thresh_high的作为负样本# 将正样本的数量限制在self.pos_roi_per_image以内#----------------------------------------------------------------#pos_index = np.where(max_iou >= self.pos_iou_thresh)[0]pos_roi_per_this_image = int(min(self.n_sample//2, pos_index.size))if pos_index.size > 0:pos_index = np.random.choice(pos_index, size=pos_roi_per_this_image, replace=False)#-----------------------------------------------------------------------------------------------------## 满足建议框和真实框重合程度小于neg_iou_thresh_high大于neg_iou_thresh_low作为负样本# 将正样本的数量和负样本的数量的总和固定成self.n_sample#-----------------------------------------------------------------------------------------------------#neg_index = np.where((max_iou < self.neg_iou_thresh_high) & (max_iou >= self.neg_iou_thresh_low))[0]neg_roi_per_this_image = self.n_sample - pos_roi_per_this_imageif neg_roi_per_this_image > neg_index.size:neg_index = np.random.choice(neg_index, size=neg_roi_per_this_image, replace=True)else:neg_index = np.random.choice(neg_index, size=neg_roi_per_this_image, replace=False)#---------------------------------------------------------## sample_roi [n_sample, ]# gt_roi_loc [n_sample, 4]# gt_roi_label [n_sample, ]#---------------------------------------------------------#keep_index = np.append(pos_index, neg_index)sample_roi = R[keep_index]if len(bboxes) != 0:gt_roi_loc = self.bbox2loc(sample_roi, bboxes[gt_assignment[keep_index]])gt_roi_loc = gt_roi_loc / np.array(self.variance)else:gt_roi_loc = np.zeros_like(sample_roi)gt_roi_label = gt_roi_label[keep_index]gt_roi_label[pos_roi_per_this_image:] = self.num_classes - 1#---------------------------------------------------------## X [n_sample, 4]# Y1 [n_sample, num_classes]# Y2 [n_sample, (num_clssees-1) * 8]#---------------------------------------------------------#X = np.zeros_like(sample_roi)X[:, [0, 1, 2, 3]] = sample_roi[:, [1, 0, 3, 2]]Y1 = np.eye(self.num_classes)[np.array(gt_roi_label, np.int32)]y_class_regr_label = np.zeros([np.shape(gt_roi_loc)[0], self.num_classes-1, 4])y_class_regr_coords = np.zeros([np.shape(gt_roi_loc)[0], self.num_classes-1, 4])y_class_regr_label[np.arange(np.shape(gt_roi_loc)[0])[:pos_roi_per_this_image], np.array(gt_roi_label[:pos_roi_per_this_image], np.int32)] = 1y_class_regr_coords[np.arange(np.shape(gt_roi_loc)[0])[:pos_roi_per_this_image], np.array(gt_roi_label[:pos_roi_per_this_image], np.int32)] = \gt_roi_loc[:pos_roi_per_this_image]y_class_regr_label = np.reshape(y_class_regr_label, [np.shape(gt_roi_loc)[0], -1])y_class_regr_coords = np.reshape(y_class_regr_coords, [np.shape(gt_roi_loc)[0], -1])Y2 = np.concatenate([np.array(y_class_regr_label), np.array(y_class_regr_coords)], axis = 1)return X, Y1, Y2
训练自己的Faster-RCNN模型
首先前往Github下载对应的仓库,下载完后利用解压软件解压,之后用编程软件打开文件夹。
注意打开的根目录必须正确,否则相对目录不正确的情况下,代码将无法运行。
一定要注意打开后的根目录是文件存放的目录。
一、数据集的准备
本文使用VOC格式进行训练,训练前需要自己制作好数据集,如果没有自己的数据集,可以通过Github连接下载VOC12+07的数据集尝试下。
训练前将标签文件放在VOCdevkit文件夹下的VOC2007文件夹下的Annotation中。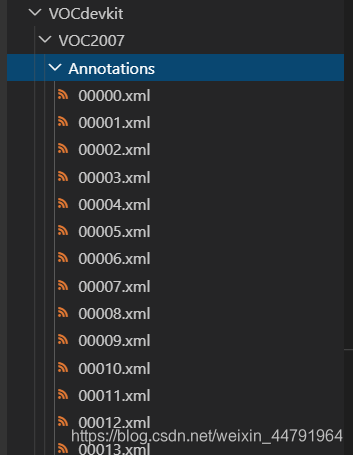
训练前将图片文件放在VOCdevkit文件夹下的VOC2007文件夹下的JPEGImages中。
此时数据集的摆放已经结束。
二、数据集的处理
在完成数据集的摆放之后,我们需要对数据集进行下一步的处理,目的是获得训练用的2007_train.txt以及2007_val.txt,需要用到根目录下的voc_annotation.py。
voc_annotation.py里面有一些参数需要设置。
分别是annotation_mode、classes_path、trainval_percent、train_percent、VOCdevkit_path,第一次训练可以仅修改classes_path
'''annotation_mode用于指定该文件运行时计算的内容annotation_mode为0代表整个标签处理过程,包括获得VOCdevkit/VOC2007/ImageSets里面的txt以及训练用的2007_train.txt、2007_val.txtannotation_mode为1代表获得VOCdevkit/VOC2007/ImageSets里面的txtannotation_mode为2代表获得训练用的2007_train.txt、2007_val.txt'''annotation_mode = 0'''必须要修改,用于生成2007_train.txt、2007_val.txt的目标信息与训练和预测所用的classes_path一致即可如果生成的2007_train.txt里面没有目标信息那么就是因为classes没有设定正确仅在annotation_mode为0和2的时候有效'''classes_path = 'model_data/voc_classes.txt''''trainval_percent用于指定(训练集+验证集)与测试集的比例,默认情况下 (训练集+验证集):测试集 = 9:1train_percent用于指定(训练集+验证集)中训练集与验证集的比例,默认情况下 训练集:验证集 = 9:1仅在annotation_mode为0和1的时候有效'''trainval_percent = 0.9train_percent = 0.9'''指向VOC数据集所在的文件夹默认指向根目录下的VOC数据集'''VOCdevkit_path = 'VOCdevkit'
classes_path用于指向检测类别所对应的txt,以voc数据集为例,我们用的txt为: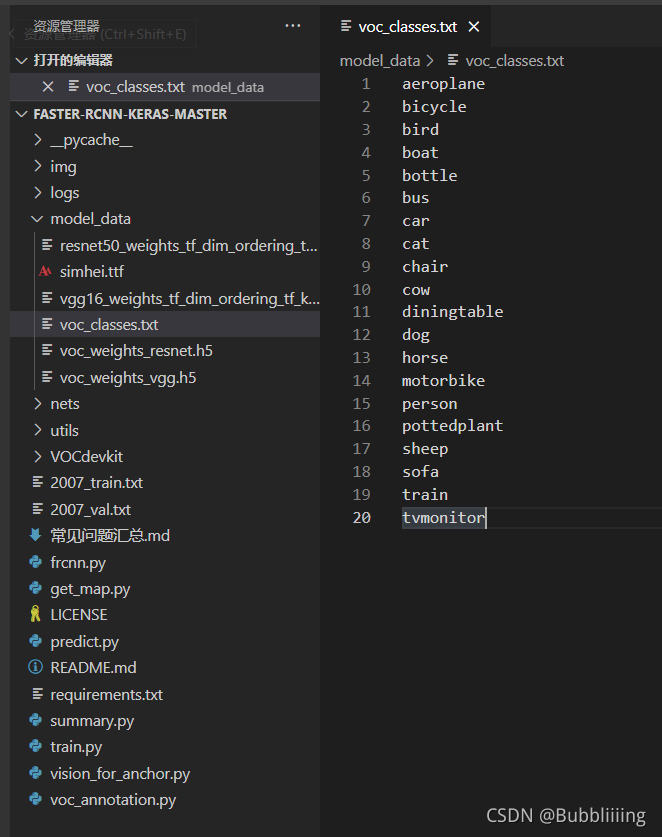
训练自己的数据集时,可以自己建立一个cls_classes.txt,里面写自己所需要区分的类别。
三、开始网络训练
通过voc_annotation.py我们已经生成了2007_train.txt以及2007_val.txt,此时我们可以开始训练了。
训练的参数较多,大家可以在下载库后仔细看注释,其中最重要的部分依然是train.py里的classes_path。
classes_path用于指向检测类别所对应的txt,这个txt和voc_annotation.py里面的txt一样!训练自己的数据集必须要修改!
修改完classes_path后就可以运行train.py开始训练了,在训练多个epoch后,权值会生成在logs文件夹中。
其它参数的作用如下:
#--------------------------------------------------------## 训练前一定要修改classes_path,使其对应自己的数据集#--------------------------------------------------------#classes_path = 'model_data/voc_classes.txt'#----------------------------------------------------------------------------------------------------------------------------## 权值文件请看README,百度网盘下载。数据的预训练权重对不同数据集是通用的,因为特征是通用的。# 预训练权重对于99%的情况都必须要用,不用的话权值太过随机,特征提取效果不明显,网络训练的结果也不会好。# 训练自己的数据集时提示维度不匹配正常,预测的东西都不一样了自然维度不匹配## 如果想要断点续练就将model_path设置成logs文件夹下已经训练的权值文件。# 当model_path = ''的时候不加载整个模型的权值。## 此处使用的是整个模型的权重,因此是在train.py进行加载的。# 如果想要让模型从主干的预训练权值开始训练,则设置model_path为主干网络的权值,此时仅加载主干。# 如果想要让模型从0开始训练,则设置model_path = '',Freeze_Train = Fasle,此时从0开始训练,且没有冻结主干的过程。# 一般来讲,从0开始训练效果会很差,因为权值太过随机,特征提取效果不明显。#----------------------------------------------------------------------------------------------------------------------------#model_path = 'model_data/voc_weights_resnet.h5'#------------------------------------------------------## 输入的shape大小#------------------------------------------------------#input_shape = [600, 600]#---------------------------------------------## vgg或者resnet50#---------------------------------------------#backbone = "resnet50"#------------------------------------------------------------------------## anchors_size用于设定先验框的大小,每个特征点均存在9个先验框。# anchors_size每个数对应3个先验框。# 当anchors_size = [8, 16, 32]的时候,生成的先验框宽高约为:# [128, 128] ; [256, 256]; [512, 512]; [128, 256];# [256, 512]; [512, 1024]; [256, 128] ; [512, 256];# [1024, 512]; 详情查看anchors.py# 如果想要检测小物体,可以减小anchors_size靠前的数。# 比如设置anchors_size = [64, 256, 512]#------------------------------------------------------------------------#anchors_size = [128, 256, 512]#----------------------------------------------------## 训练分为两个阶段,分别是冻结阶段和解冻阶段。# 显存不足与数据集大小无关,提示显存不足请调小batch_size。#----------------------------------------------------##----------------------------------------------------## 冻结阶段训练参数# 此时模型的主干被冻结了,特征提取网络不发生改变# 占用的显存较小,仅对网络进行微调#----------------------------------------------------#Init_Epoch = 0Freeze_Epoch = 50Freeze_batch_size = 4Freeze_lr = 1e-4#----------------------------------------------------## 解冻阶段训练参数# 此时模型的主干不被冻结了,特征提取网络会发生改变# 占用的显存较大,网络所有的参数都会发生改变#----------------------------------------------------#UnFreeze_Epoch = 100Unfreeze_batch_size = 2Unfreeze_lr = 1e-5#------------------------------------------------------## 是否进行冻结训练,默认先冻结主干训练后解冻训练。#------------------------------------------------------#Freeze_Train = True#----------------------------------------------------## 获得图片路径和标签#----------------------------------------------------#train_annotation_path = '2007_train.txt'val_annotation_path = '2007_val.txt'
四、训练结果预测
训练结果预测需要用到两个文件,分别是yolo.py和predict.py。
我们首先需要去yolo.py里面修改model_path以及classes_path,这两个参数必须要修改。
model_path指向训练好的权值文件,在logs文件夹里。
classes_path指向检测类别所对应的txt。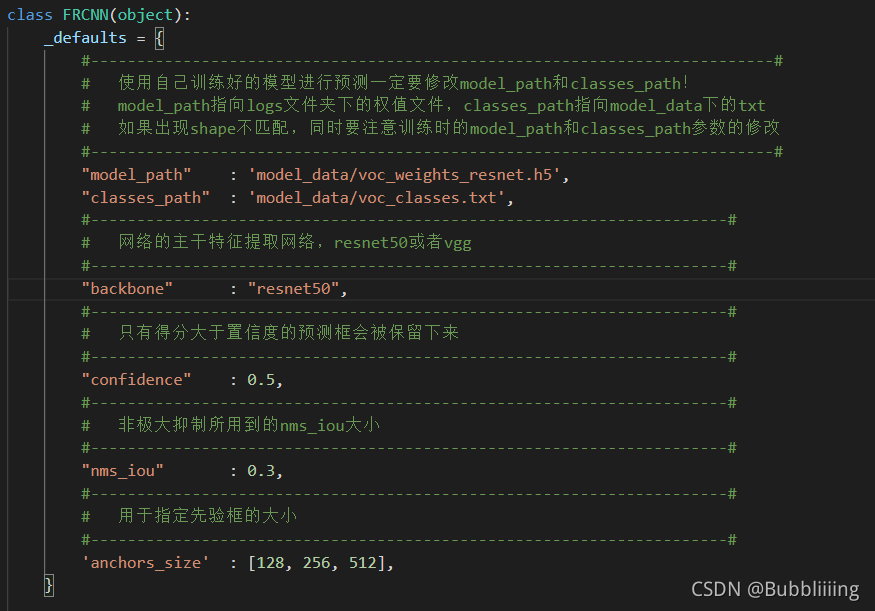
完成修改后就可以运行predict.py进行检测了。运行后输入图片路径即可检测。


 ---- PyTorch目标检测")


还没有评论,来说两句吧...