Ariduino入门笔记——9. Arduino 默认函数(串口通信)
文章目录
- 什么是串口
- Serial
- 串口函数
- 串口准备——if(Serial)
- 获取可读取的字节数——available()
- 获取可写入的最大字节数——availableForWrite()
- 串口连接配置——begin()
- 函数原型
- 关闭串口通信——end()
- 查找指定的字节或字节串——find()
- 函数原型
- 查找指定的字节或字节串,直到终止符——findUntil()
- 函数原型
- 等待输出结束——flush()
- 解析浮点数——parseFloat()
- 函数原型
- 解析整型数——parseInt()
- 函数原型
- 查找第一个有效字节——peek()
- 写入字符串——print()
- 写入字符串,带换行符——println()
- 函数原型
- 读取字节——read()
- 读取字节串——readBytes()
- 函数原型
- 读取字节数据,直到终止符——readBytesUntil()
- 函数原型
- 读取字符数据——readString()
- 读取字符数据,直到终止符——readStringUntil()
- 函数原型
- 超时管理——setTimeout()
- 函数原型
- 写入字节数据——write()
- 函数原型
- 串口事件响应,非必要——serialEvent()
什么是串口
到目前为止,介绍的Arduino API接口都是一些比较底层的接口——即简单的通过电位高低获得指定输入输出的信号。既然这部分系列的文章是介绍Arduino的默认系统API,那么作为嵌入式设备需要提供的几个重要接口之一的——串口协议自然不能不提到。
串行接口简称串口,也称串行通信接口或串行通讯接口,是采用串行通信方式的扩展接口。串行接口 (Serial Interface)是指数据一位一位地顺序传送。其特点是通信线路简单,只要一对传输线就可以实现双向通信(可以直接利用电话线作为传输线),从而大大降低了成本,特别适用于远距离通信,但传送速度较慢。
通常在很多设备的引脚接口上,能看到TXD和RXD的印刷标识,这表明了设备提供了串行接口,或者支持串口协议。Arduino的绝大部分开发版或针对其协议制作的开源板(非Arduino官方出品),都留有串口支持。

串口设备之间,除了供电可能根据你实际使用情况进行调整,串口数据线的对接方法通常是两模块之间,RXD->TXD, TXD->RXD, 彼此交换对接,如图下所示:
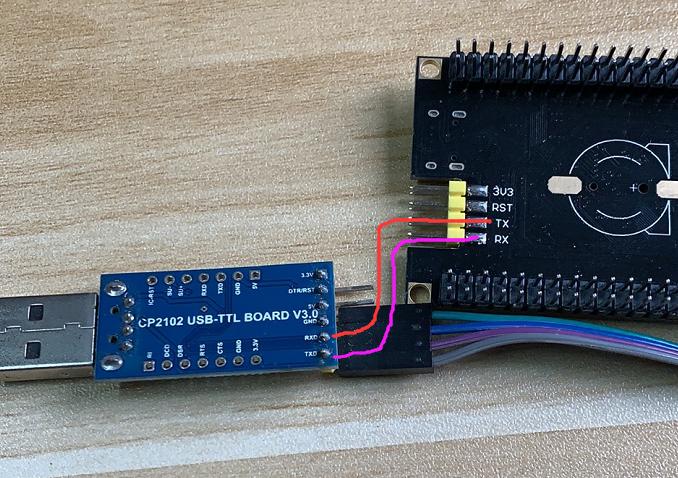
由于使用Arduino作为方案的嵌入式开发板有很多,所以具体上你自己的开发板哪几个针脚支持串口,需要看具体的技术手册才行。
Serial
如果没有串口设备,也没关系。在开发和学习阶段,通过USB连接到Arduino板时,可以直接调试串口代码。对于不同的Arduino板来说,支持串口协议的可能不止一对引脚,根据官方提供的描述信息,有的开发板上可能会提供多达3个串口通信通道。
| BOARD | USB CDC NAME | SERIAL PINS | SERIAL1 PINS | SERIAL2 PINS | SERIAL3 PINS |
|---|---|---|---|---|---|
| Uno, Nano, Mini | 0(RX), 1(TX) | ||||
| Mega | 0(RX), 1(TX) | 19(RX), 18(TX) | 17(RX), 16(TX) | 15(RX), 14(TX) | |
| Leonardo, Micro, Yún | Serial | 0(RX), 1(TX) | |||
| Uno WiFi Rev.2 | Connected to USB | 0(RX), 1(TX) | Connected to NINA | ||
| MKR boards | Serial | 13(RX), 14(TX) | |||
| Zero | SerialUSB (Native USB Port only) | Connected to Programming Port | 0(RX), 1(TX) | ||
| Due | SerialUSB (Native USB Port only) | 0(RX), 1(TX) | 19(RX), 18(TX) | 17(RX), 16(TX) | 15(RX), 14(TX) |
| 101 | Serial | 0(RX), 1(TX) |
在你进行开发阶段,由于Arduino IDE自身有Arduino串口监视器,所以可以在不连接串口设备前,通过IDE 自带的串口监视器进行Debug。
Arduino 的TX/RX 信号使用的是TTL逻辑信号(根据板子的设计或者当前使用的工作电压决定,通常是3.3v 或 5v),因此如果打算把Arduino连接其他设备,例如树莓派(树莓派引脚工作电压最高为3,3V),由于直接引脚对接会导致芯片烧毁,所以需要做必要的电平转换。
最简单的电平转换是在数据信号中串联一个1K电阻;其次也可以通过三极管或MOS管做一个相对简单且安全的电平转换电路。或者直接使用芯片的方案。
串口函数
相关的串口函数,都被包含在名为Serial的类中,你不需要创建它的具体对象。我虽然没有看过源代码,但是你可以理解为在创建的Arduino工程,会自动默认的为用户创建一个Serial的对象:
SerialPort Serial()
所在在实际的工程中,要想使用它的下列函数,需要使用类似的命令:
Serial.function_name(...)
那么接下来我们详细的介绍Serial的每一个函数:
串口准备——if(Serial)
用于检测Arduino的串口是否准备妥当。对于Uno和Due这一类有CDC USB支持的板子来说,这个函数也包含检测对USB设备的连接是否准备妥当。
返回True时表示串口已经就绪,你可以开始发送或接受来自串口设备的数据了。
获取可读取的字节数——available()
当接收到来自串口的数据,这些数据都会以字节的形式存储在Serial的缓存中。而这个函数的作用,就时告诉用户或者程序,当前可以读取的字节数有多少。
获取可写入的最大字节数——availableForWrite()
和我们做Socket编程一样,对于Arduino来说,其底层也有最大可写缓存的限制。这个函数的作用就是告诉用户,我们最大可以向Arduino中写入多少缓存数据,数据的基本单位是字节(Byte)。
串口连接配置——begin()
由于串口协议是直接给目标机器发送高低电平的TTL信号,所以应该属于网络模型中的第一层协议形式。所以用户在使用串口,并使串口协议生效,就需要约定电线端子两头的设备通信基本信息。这里包含单位时间内发送的最大比特数(波特率),优先级,奇偶校验,以及数据停止位等基本信息。
所以Arduino提供了两个函数形式:
函数原型
- Serial.begin(speed)
- Serial.begin(speed, config)
默认的波特率是9600,config通常不需要设置,因为是默认值,其可用参数如下:
SERIAL_5N1
SERIAL_6N1
SERIAL_7N1
SERIAL_8N1 (the default)
SERIAL_5N2
SERIAL_6N2
SERIAL_7N2
SERIAL_8N2
SERIAL_5E1: even parity
SERIAL_6E1
SERIAL_7E1
SERIAL_8E1
SERIAL_5E2
SERIAL_6E2
SERIAL_7E2
SERIAL_8E2
SERIAL_5O1: odd parity
SERIAL_6O1
SERIAL_7O1
SERIAL_8O1
SERIAL_5O2
SERIAL_6O2
SERIAL_7O2
SERIAL_8O2
void setup() {Serial.begin(9600); // opens serial port, sets data rate to 9600 bps}void loop() { }
针对Mega系列的板子,则可以使用多达4组串口通信信道
// Arduino Mega using all four of its Serial ports// (Serial, Serial1, Serial2, Serial3),// with different baud rates:void setup() {Serial.begin(9600);Serial1.begin(38400);Serial2.begin(19200);Serial3.begin(4800);Serial.println("Hello Computer");Serial1.println("Hello Serial 1");Serial2.println("Hello Serial 2");Serial3.println("Hello Serial 3");}void loop() { }
关闭串口通信——end()
关闭串口通信,使RX、TX针脚变成普通的信号针脚。需要重新启用串口通信功能,使用Serial.begin()
查找指定的字节或字节串——find()
如果你的数据长度很大,比方说你要把一张图片编码成BASE64,然后通过串口协议发送给Arduino,让它显示在某个LED或者LCD显示屏上,那么你可能需要使用这个指令。
它的作用是在接收到的字节缓存中,从第一位开始逐个查找指定的字节或字节组合(例如特定的字符串),所以你可以用它来检测自定义的数据包头或者包尾。找到则返回True,超时或者没有找到则返回False。
函数原型
- Serial.find(target)
- Serial.find(target, length)
参数说明
- Serial: serial port object. See the list of available serial ports for each board on the Serial main page.
- target: the string to search for. Allowed data types: char.
- length: length of the target. Allowed data types: size_t.
查找指定的字节或字节串,直到终止符——findUntil()
和find函数很相似,只不过多了一个同时查找终止符的功能,相当在缓存中查找指定字符,直到找到终止符,找到则返回True,超时或者没有找到则返回False。
函数原型
- Serial.findUntil(target, terminal)
参数说明
- Serial: serial port object. See the list of available serial ports for each board on the Serial main page.
- target: the string to search for. Allowed data types: char.
- terminal: the terminal string in the search. Allowed data types: char.
等待输出结束——flush()
数据开始发送后,可以使用这个函数,等待所有数据全部发送完毕。数据量少的时候,可以不使用这个函数。
解析浮点数——parseFloat()
从接收到的数据中,逐个进行解析,直到找到第一个合法的浮点数,并返回给用户。
函数原型
- Serial.parseFloat()
- Serial.parseFloat(lookahead)
- Serial.parseFloat(lookahead, ignore)
参数说明
- Serial: serial port object. See the list of available serial ports for each board on the Serial main page.
- lookahead: the mode used to look ahead in the stream for a floating point number. Allowed data types: LookaheadMode. Allowed lookahead values:
- SKIP_ALL: all characters other than a minus sign, decimal point, or digits are ignored when scanning the stream for a floating point number. This is the default mode.
- SKIP_NONE: Nothing is skipped, and the stream is not touched unless the first waiting character is valid.
- SKIP_WHITESPACE: Only tabs, spaces, line feeds, and carriage returns are skipped.
- ignore: used to skip the indicated char in the search. Used for example to skip thousands divider. Allowed data types: char
解析整型数——parseInt()
和上一个函数的作用十分相似,也是返回第一个合法的整型数据。但无论parseFloat还是parseInt都有个等待时间,超时后任务中止,会直接进入到下个环节。
你可以使用setTimeout修改超时时间。
函数原型
- Serial.parseInt()
- Serial.parseInt(lookahead)
- Serial.parseInt(lookahead, ignore)
参数说明
- Serial: serial port object. See the list of available serial ports for each board on the Serial main page.
- lookahead: the mode used to look ahead in the stream for an integer. Allowed data types: LookaheadMode. Allowed lookahead values:
- SKIP_ALL: all characters other than digits or a minus sign are ignored when scanning the stream for an integer. This is the default mode.
- SKIP_NONE: Nothing is skipped, and the stream is not touched unless the first waiting character is valid.
- SKIP_WHITESPACE: Only tabs, spaces, line feeds, and carriage returns are skipped.
- ignore: used to skip the indicated char in the search. Used for example to skip thousands divider. Allowed data types: char
查找第一个有效字节——peek()
它的主要作用是帮你在Serial的缓存中找到下一个正确的字节(开始的第一个字节)。连续的调用都将得到第一个字节的位子。如果使用read函数,则会返回下一个字节。
返回值说明
有数据的时候返回字节(Byte),如果没有数据的时候返回-1.
写入字符串——print()
串口通信的输出指令,在不特别指定输出格式之前,给串口设备输出的数据都是字符串类型。比如说对于整型数据:100输出的字符串就转换为“100”,同理,对于浮点类型,也是以字符串形式输出,默认保留两位精度。
用例说明
- Serial.print(78) ———————————-> “78”
- Serial.print(1.23456) ————————>“1.23”
- Serial.print(‘N’) ————————————> “N”
- Serial.print(“Hello world.”) —————> “Hello world.”
另外用户自己可以指定输出格式,比如以“二进制字符串形式输出”, 或者以把数字转换为8进制后,再以字符串形式输出。总之就是一个只输出字符串的函数。
- Serial.print(78, BIN) gives “1001110”
- Serial.print(78, OCT) gives “116”
- Serial.print(78, DEC) gives “78”
- Serial.print(78, HEX) gives “4E”
- Serial.print(1.23456, 0) gives “1”
- Serial.print(1.23456, 2) gives “1.23”
- Serial.print(1.23456, 4) gives “1.2345”
如果你需要数据不做任何形式的修改,就以二进制串的形式输出到其他串口设备上,那么你要使用Serial.write函数。
写入字符串,带换行符——println()
效用跟上面那个函数是差不多的,只不过多了一个换行的功能。
函数原型
- Serial.println(val)
- Serial.println(val, format)
参数说明
- Serial: serial port object. See the list of available serial ports for each board on the Serial main page.
- val: the value to print. Allowed data types: any data type.
- format: specifies the number base (for integral data types) or number of decimal places (for floating point types).
可以使用的FORMAT格式,也一并参考Print函数。
读取字节——read()
读取串口数据,一次返回一个字节。
返回值说明
有数据的时候返回字节(Byte),如果没有数据的时候返回-1.
int incomingByte = 0; // for incoming serial datavoid setup() {Serial.begin(9600); // opens serial port, sets data rate to 9600 bps}void loop() {// send data only when you receive data:if (Serial.available() > 0) {// read the incoming byte:incomingByte = Serial.read();// say what you got:Serial.print("I received: ");Serial.println(incomingByte, DEC);}}
读取字节串——readBytes()
readBytes比read稍微多了一点功能,就是一次性可以取出一块数据。比一个一个读取字节要快不少,当然也可能比较容易出错。
函数原型
- Serial.readBytes(buffer, length)
参数说明
- Serial: serial port object. See the list of available serial ports for each board on the Serial main page.
- buffer: the buffer to store the bytes in. Allowed data types: array of char or byte.
- length: the number of bytes to read. Allowed data types: int.
返回值说明
返回取到的有效数据长度。
读取字节数据,直到终止符——readBytesUntil()
从串口缓存读取指定长度的字符到数组buffer,遇到终止字符character后停止。
函数原型
- Serial.readBytesUntil(character, buffer, length)
参数说明
- Serial: serial port object. See the list of available serial ports for each board on the Serial main page.
- character: the character to search for. Allowed data types: char.
- buffer: the buffer to store the bytes in. Allowed data types: array of char or byte.
- length: the number of bytes to read. Allowed data types: int.
返回值说明
返回取到的有效数据长度。
读取字符数据——readString()
从串口缓存区读取全部数据到一个字符串型变量。
返回值说明
字符串。
读取字符数据,直到终止符——readStringUntil()
从串口缓存区读取字符到一个字符串型变量,直至读完或遇到某终止字符。
函数原型
Serial.readStringUntil(terminator)
参数说明
- Serial: serial port object. See the list of available serial ports for each board on the Serial main page.
- terminator: the character to search for. Allowed data types: char.
返回值说明
字符串。
超时管理——setTimeout()
所有的IO通信都存在着超时处理,自然串口函数也提供了超时处理。默认的超时时间是1s,即1000 milliseconds.
函数原型
Serial.readStringUntil(terminator)
参数说明
- Serial: serial port object. See the list of available serial ports for each board on the Serial main page.
- time: timeout duration in milliseconds. Allowed data types: long.
写入字节数据——write()
串口输出数据函数。写二进制数据到串口。可以写值,字符串,或者一段内存数据。
函数原型
- Serial.write(val)
- Serial.write(str)
- Serial.write(buf, len)
返回值说明
返回成功写入的数据,如果数据过长,你需要加上flush命令,等待数据处理完毕。
void setup() {Serial.begin(9600);}void loop() {Serial.write(45); // send a byte with the value 45int bytesSent = Serial.write("hello"); //send the string "hello" and return the length of the string.}
注意事项
为了传输效率,从1.0版本开始,write的方式是异步的。如果底层缓存有足够的空间,那么这个函数也会先于数据发送完成前返回给用户。而如果缓存已经占满,那么这个函数会被自动锁定,等待数据传输完毕后,将缓存转为可写后,才可以继续使用。
为避免出现由于缓存占满无法写入的问题出现,需要在传输开始前,使用availableForWrite().检查可写缓存大小。或者在每次发送数据后,使用flush命名等待数据全部传输完毕后再进入下一步。
串口事件响应,非必要——serialEvent()
在串口接收到传入数据的时候,会激活这个函数,你可以利用这个机制用来处理一些需要有串口数据时才进行响应的事件。例如在接收到串口数据时点亮LED灯。
通常一个串口对应一个serialEvent,但是在Mega等板子上有多达4组可用的串口,也就意味着可以实现多达4组的serialEvent。
例如:
void serialEvent() {//点亮LED1}void serialEvent1() {//点亮LED2}void serialEvent2() {//点亮LED3}void serialEvent3() {//点亮LED4}
如果板子只有一组串口,例如Uno,那么可使用的serialEvent只有一个:
void serialEvent() {//点亮LED}
对于其他一些特殊的板子,这个函数不起作用


还没有评论,来说两句吧...