Ariduino入门笔记——11. Arduino 默认函数(USB设备控制)
文章目录
- Keyboard
- 开启键盘模拟 Keyboard.begin()
- 关闭键盘模拟 Keyboard.end()
- 长摁键盘 Keyboard.press()
- 敲击键盘 Keyboard.print()
- 带回车的敲击事件 Keyboard.println()
- 释放按键 Keyboard.release()
- 释放全部按键 Keyboard.releaseAll()
- 发送单个敲击指令 Keyboard.write()
- Mouse
- 开启鼠标模拟 Mouse.begin()
- 鼠标点击事件 Mouse.click()
- 函数原型
- 参数说明
- 关闭鼠标模拟 Mouse.end()
- 鼠标移动事件 Mouse.move()
- 函数原型
- 参数说明
- 长按鼠标 Mouse.press()
- 函数原型
- 参数说明
- 鼠标按键释放 Mouse.release()
- 函数原型
- 参数说明
- 鼠标状态检测 Mouse.isPressed()
- 函数原型
- 参数说明
作为本系列的最后一篇了,这里介绍一下Arduino用来模拟USB设备,比如键盘和鼠标的方法。比如做硬件外挂等,就可以使用到Arduino这里提供的功能。
Keyboard
首先来看一看在Arduino中文社区提供的一段栗子1
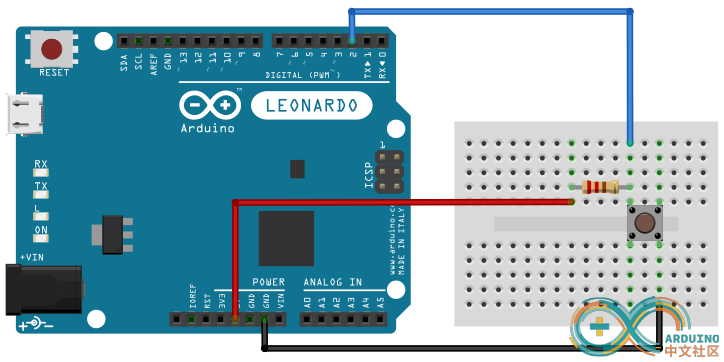
VCC 5V串联一只1K欧姆的电阻,然后电阻一端连接Arduino针脚,另一端和开关连接。开关的另一只引脚接地。开关没有接通时,输入引脚4的电位因为VCC接地所以是低电平。当开关摁下后,VCC和接地被阻断,引脚4收到高电平信号,于是在每次摁下开关后,计数器就加1。
于是我们得到一个简单的USB控制代码,它大概如下面这样:
#include "Keyboard.h"const int buttonPin = 4; // 按键连接引脚int previousButtonState = HIGH; // 之前按键状态int counter = 0; // 按键计数器void setup() {// 初始化按键引脚,如果没有上拉电阻,需要使用INPUT_PULLUPpinMode(buttonPin, INPUT);// 初始化模拟键盘功能Keyboard.begin();}void loop() {// 读按键状态int buttonState = digitalRead(buttonPin);// 如果按键状态改变,且当前按键状态为高电平if ((buttonState != previousButtonState) && (buttonState == HIGH)) {// 按键计数器加1counter++;// 模拟键盘输出信息Keyboard.print("You pressed the button ");Keyboard.print(counter);Keyboard.println(" times.");}// 保存当前按键状态,用于下一次比较previousButtonState = buttonState;}
回到官方的文档,分别提供了关于键盘的以及鼠标的USB连接方案。那么对于键盘呢,首先需要注意的是:
无法处理ASC II表中的非打印字符,也就是EOF、蜂鸣器等控制字符是无法处理的。
另外,Arduino 支持基于32u4和SAMD系列的主控板,比如SAMD21和电脑相连。至于重要不重要,我觉得反正对于我们这种主打软件的人来说,只要能验证方案就行了,并不需要花费过多心思在嵌入式芯片和主控板的选型上。如果有条件的话,最好一个主做软件,一个主做硬件的朋友搭伙一起搞设备是比较合适的。
哦,对了,再多说一句。如果你已经使用USB模块并已经让程序运行起来,那么此时试图修改代码会非常困难。因为Arduino会接管你的鼠标和键盘,由于程序处理效率比手工高出不知道多少倍。所以你会发现鼠标会到处游走,或者键盘不停的输出字符。
解决方案是,比如在设计电路的时候,多增加一个按钮,当摁下的时候启动USB托管程序,当再次摁下这个摁钮的时候,就关闭USB托管功能,这样方便你进行调试。此外,在正式运行程序之前,官方建议你先用 Serial.print 把运行结果打印出来,以验证程序是否正确,再接入到USB库里。
当然,你也可以无视这些warning。
开启键盘模拟 Keyboard.begin()
对于Leonardo和Due板来说,这个函数的意义在于启动一个虚拟的键盘,并连接到电脑上,如果需要终止这个连结,使用 Keyboard.end()。
#include <Keyboard.h>void setup() {// make pin 2 an input and turn on the// pullup resistor so it goes high unless// connected to ground:pinMode(2, INPUT_PULLUP);Keyboard.begin();}void loop() {//if the button is pressedif (digitalRead(2) == LOW) {//Send the messageKeyboard.print("Hello!");}}
关闭键盘模拟 Keyboard.end()
没啥好说的,就是关闭键盘模拟
长摁键盘 Keyboard.press()
这是十分有用的指令,用于向电脑输入某个被摁下的按键,就像你为了在FPS游戏中,控制角色前后左右移动,需要长摁WSAD一样。那么释放某个按键,就使用Keyboard.release() 或者Keyboard.releaseAll()。
#include <Keyboard.h>// use this option for OSX:char ctrlKey = KEY_LEFT_GUI;// use this option for Windows and Linux:// char ctrlKey = KEY_LEFT_CTRL;void setup() {// make pin 2 an input and turn on the// pullup resistor so it goes high unless// connected to ground:pinMode(2, INPUT_PULLUP);// initialize control over the keyboard:Keyboard.begin();}void loop() {while (digitalRead(2) == HIGH) {// do nothing until pin 2 goes lowdelay(500);}delay(1000);// new document:Keyboard.press(ctrlKey);Keyboard.press('n');delay(100);Keyboard.releaseAll();// wait for new window to open:delay(1000);}
敲击键盘 Keyboard.print()
模拟敲击事件,比如模拟文本输入。可以使用这个指令。不过都需要注意,所有跟键盘有关的指令,都需要在Keyboard.begin() 被设置后才会有效。
#include <Keyboard.h>void setup() {// make pin 2 an input and turn on the// pullup resistor so it goes high unless// connected to ground:pinMode(2, INPUT_PULLUP);Keyboard.begin();}void loop() {//if the button is pressedif (digitalRead(2) == LOW) {//Send the messageKeyboard.print("Hello!");}}
带回车的敲击事件 Keyboard.println()
和上面的功能相似,区别只是多了一个回车功能。
#include <Keyboard.h>void setup() {// make pin 2 an input and turn on the// pullup resistor so it goes high unless// connected to ground:pinMode(2, INPUT_PULLUP);Keyboard.begin();}void loop() {//if the button is pressedif (digitalRead(2) == LOW) {//Send the messageKeyboard.println("Hello!");}}
释放按键 Keyboard.release()
跟Press功能对应,不过release是释放具体的按键
#include <Keyboard.h>// use this option for OSX:char ctrlKey = KEY_LEFT_GUI;// use this option for Windows and Linux:// char ctrlKey = KEY_LEFT_CTRL;void setup() {// make pin 2 an input and turn on the// pullup resistor so it goes high unless// connected to ground:pinMode(2, INPUT_PULLUP);// initialize control over the keyboard:Keyboard.begin();}void loop() {while (digitalRead(2) == HIGH) {// do nothing until pin 2 goes lowdelay(500);}delay(1000);// new document:Keyboard.press(ctrlKey);Keyboard.press('n');delay(100);Keyboard.release(ctrlKey);Keyboard.release('n');// wait for new window to open:delay(1000);}
释放全部按键 Keyboard.releaseAll()
跟上面的功能相似,不过这是释放全部按键的。
发送单个敲击指令 Keyboard.write()
跟print和println的作用相似,只不过这是只发送一个键位的敲击指令。
Keyboard.write(65); // sends ASCII value 65, or AKeyboard.write('A'); // same thing as a quoted characterKeyboard.write(0x41); // same thing in hexadecimalKeyboard.write(0b01000001); // same thing in binary (weird choice, but it works)
需要注意的是,无论println还是print或者write指令,都只能发送ASC II可打印字符,换句话说,就是你键盘上可以敲击的按键,比如字符的ABCD,数字的1234,或者空格、回车、Ctrl这一类的,对于字符串中止字符\0 ,文章EOF字符,蜂鸣器等控制指令字符都无法使用。
Mouse
讲完键盘,就需要介绍鼠标的控制。不过注意事项和支持都和键盘一样,所以这里不做过多赘述。
开启鼠标模拟 Mouse.begin()
启动鼠标模拟,如果需要关闭鼠标模拟,那么可以通过Mouse.end() 关闭。
#include <Mouse.h>void setup() {pinMode(2, INPUT);}void loop() {//initiate the Mouse library when button is pressedif (digitalRead(2) == HIGH) {Mouse.begin();}}
鼠标点击事件 Mouse.click()
发送瞬间的鼠标点击事件,比如你平时的左击选中,或者右击菜单这样。
函数原型
- Mouse.click()
- Mouse.click(button)
参数说明
通常有三个按键可供选择,左键,右键,和中建。
- MOUSE_LEFT (default)
- MOUSE_RIGHT
- MOUSE_MIDDLE
关闭鼠标模拟 Mouse.end()
没什么好说的,就是关闭鼠标模拟的。
鼠标移动事件 Mouse.move()
把光标移动到指定的位置。
函数原型
Mouse.move(xVal, yVal, wheel)
参数说明
- xVal: amount to move along the x-axis. Allowed data types: signed char.
- yVal: amount to move along the y-axis. Allowed data types: signed char.
wheel: amount to move scroll wheel. Allowed data types: signed char.
include
const int xAxis = A1; //analog sensor for X axis
const int yAxis = A2; // analog sensor for Y axisint range = 12; // output range of X or Y movement
int responseDelay = 2; // response delay of the mouse, in ms
int threshold = range / 4; // resting threshold
int center = range / 2; // resting position value
int minima[] = { 1023, 1023}; // actual analogRead minima for {x, y}
int maxima[] = { 0, 0}; // actual analogRead maxima for {x, y}
int axis[] = { xAxis, yAxis}; // pin numbers for {x, y}
int mouseReading[2]; // final mouse readings for {x, y}
void setup() {Mouse.begin();}void loop() {// read and scale the two axes:int xReading = readAxis(0);int yReading = readAxis(1);// move the mouse:Mouse.move(xReading, yReading, 0);delay(responseDelay);}/* reads an axis (0 or 1 for x or y) and scales the analog input range to a range from 0 to <range> */int readAxis(int axisNumber) {int distance = 0; // distance from center of the output range// read the analog input:int reading = analogRead(axis[axisNumber]);// of the current reading exceeds the max or min for this axis,// reset the max or min:if (reading < minima[axisNumber]) {minima[axisNumber] = reading;}if (reading > maxima[axisNumber]) {maxima[axisNumber] = reading;}// map the reading from the analog input range to the output range:reading = map(reading, minima[axisNumber], maxima[axisNumber], 0, range);// if the output reading is outside from the// rest position threshold, use it:if (abs(reading - center) > threshold) {distance = (reading - center);}// the Y axis needs to be inverted in order to// map the movemment correctly:if (axisNumber == 1) {distance = -distance;}// return the distance for this axis:return distance;}
长按鼠标 Mouse.press()
比如拉取选框、拖拽的时候,通常配合move函数一起可以实现这种功能。需要释放的时候,可以使用Mouse.release()。
函数原型
- Mouse.press()
- Mouse.press(button)
参数说明
- MOUSE_LEFT (default)
- MOUSE_RIGHT
MOUSE_MIDDLE
include
void setup() {
//The switch that will initiate the Mouse press
pinMode(2, INPUT);
//The switch that will terminate the Mouse press
pinMode(3, INPUT);
//initiate the Mouse library
Mouse.begin();
}void loop() {
//if the switch attached to pin 2 is closed, press and hold the left mouse button
if (digitalRead(2) == HIGH) {Mouse.press();
}
//if the switch attached to pin 3 is closed, release the left mouse button
if (digitalRead(3) == HIGH) {Mouse.release();
}
}
鼠标按键释放 Mouse.release()
如果鼠标中有某个按键被摁下后,使用这个函数可以释放该按键。
函数原型
- Mouse.release()
- Mouse.release(button)
参数说明
- MOUSE_LEFT (default)
- MOUSE_RIGHT
- MOUSE_MIDDLE
鼠标状态检测 Mouse.isPressed()
如果某个鼠标按键被摁下了,或者Mouse.press 发送了长摁命令,则返回true
函数原型
- Mouse.isPressed();
- Mouse.isPressed(button);
参数说明
- MOUSE_LEFT (default)
- MOUSE_RIGHT
MOUSE_MIDDLE
include
void setup() {
//The switch that will initiate the Mouse press
pinMode(2, INPUT);
//The switch that will terminate the Mouse press
pinMode(3, INPUT);
//Start serial communication with the computer
Serial.begin(9600);
//initiate the Mouse library
Mouse.begin();
}void loop() {
//a variable for checking the button’s state
int mouseState = 0;
//if the switch attached to pin 2 is closed, press and hold the left mouse button and save the state ina variable
if (digitalRead(2) == HIGH) {Mouse.press();mouseState = Mouse.isPressed();
}
//if the switch attached to pin 3 is closed, release the left mouse button and save the state in a variable
if (digitalRead(3) == HIGH) {Mouse.release();mouseState = Mouse.isPressed();
}
//print out the current mouse button state
Serial.println(mouseState);
delay(10);
}
- 《Arduino模拟USB键盘》 https://www.arduino.cn/thread-81605-1-1.html ↩︎


还没有评论,来说两句吧...