【HTM 算法】第一个例子 Online Prediction Framework (OPF)
HTM Python
安装好 NuPIC 后,第一个例子。安装教程 前往
官网地址:http://nupic.docs.numenta.org/1.0.5/quick-start/opf.html
总共三个文件,其相对路径关系如图所示:
opf
data
- gymdata.csv
examples
- test.py
params
- model.yaml
Python 代码
新建一个py文件,复制官网文档 该例 代码如下:
import csvimport datetimeimport osimport yamlfrom itertools import islicefrom nupic.frameworks.opf.model_factory import ModelFactory_NUM_RECORDS = 3000_EXAMPLE_DIR = os.path.dirname(os.path.abspath(__file__))_INPUT_FILE_PATH = os.path.join(_EXAMPLE_DIR, os.pardir, "data", "gymdata.csv")_PARAMS_PATH = os.path.join(_EXAMPLE_DIR, os.pardir, "params", "model.yaml")# create model according to the file of params/model.yamldef createModel():with open(_PARAMS_PATH, "r") as f:modelParams = yaml.safe_load(f)return ModelFactory.create(modelParams)# run Hotgym.def runHotgym(numRecords):model = createModel()model.enableInference({ "predictedField": "consumption"})# open the csv file as finwith open(_INPUT_FILE_PATH) as fin:reader = csv.reader(fin)# skip three line useless dataheaders = reader.next()reader.next()reader.next()results = []# for each linefor record in islice(reader, numRecords):# Create a dictionary with field names as keys, row values as values.modelInput = dict(zip(headers, record))# Convert string consumption to float value.modelInput["consumption"] = float(modelInput["consumption"])# Convert timestamp string to Python datetime.modelInput["timestamp"] = datetime.datetime.strptime(modelInput["timestamp"], "%m/%d/%y %H:%M")# Push the data into the model and get back results.result = model.run(modelInput)bestPredictions = result.inferences["multiStepBestPredictions"]allPredictions = result.inferences["multiStepPredictions"]# Confidence values are keyed by prediction value in multiStepPredictions.oneStep = bestPredictions[1]oneStepConfidence = allPredictions[1][oneStep]fiveStep = bestPredictions[5]fiveStepConfidence = allPredictions[5][fiveStep]result = (oneStep, oneStepConfidence * 100,fiveStep, fiveStepConfidence * 100)print "1-step: {:16} ({:4.4}%)\t 5-step: {:16} ({:4.4}%)".format(*result)results.append(result)return resultsif __name__ == "__main__":runHotgym(_NUM_RECORDS)
添加一个yaml文件
需要注意:如果不修改上面的代码,则需要在该py文件的上级目录下新建文件夹,起名为 params ,并且在此params目录下新建一个yaml文件,起名为 model.yaml ,填写内容如下:
model: HTMPredictionversion: 1aggregationInfo:fields:- [consumption, mean]microseconds: 0milliseconds: 0minutes: 0months: 0seconds: 0hours: 1days: 0weeks: 0years: 0predictAheadTime: nullmodelParams:inferenceType: TemporalMultiStepsensorParams:verbosity: 0encoders:consumption:fieldname: consumptionname: consumptionresolution: 0.88seed: 1type: RandomDistributedScalarEncodertimestamp_timeOfDay:fieldname: timestampname: timestamp_timeOfDaytimeOfDay: [21, 1]type: DateEncodertimestamp_weekend:fieldname: timestampname: timestamp_weekendtype: DateEncoderweekend: 21sensorAutoReset: nullspEnable: truespParams:inputWidth: 946columnCount: 2048spVerbosity: 0spatialImp: cppglobalInhibition: 1localAreaDensity: -1.0numActiveColumnsPerInhArea: 40seed: 1956potentialPct: 0.85synPermConnected: 0.1synPermActiveInc: 0.04synPermInactiveDec: 0.005boostStrength: 3.0tmEnable: truetmParams:verbosity: 0columnCount: 2048cellsPerColumn: 32inputWidth: 2048seed: 1960temporalImp: cppnewSynapseCount: 20initialPerm: 0.21permanenceInc: 0.1permanenceDec: 0.1maxAge: 0globalDecay: 0.0maxSynapsesPerSegment: 32maxSegmentsPerCell: 128minThreshold: 12activationThreshold: 16outputType: normalpamLength: 1clParams:verbosity: 0regionName: SDRClassifierRegionalpha: 0.1steps: '1,5'maxCategoryCount: 1000implementation: cpptrainSPNetOnlyIfRequested: false
添加一个 csv 文件
需要注意:如果不修改上面的代码,则需要在该py文件的上级目录下新建文件夹,起名为 data ,并且在此 data目录下新建一个csv文件,起名为 gymdata.csv ,填写内容如下:
timestamp,consumptiondatetime,floatT,7/2/10 0:00,21.27/2/10 1:00,16.47/2/10 2:00,4.77/2/10 3:00,4.77/2/10 4:00,4.67/2/10 5:00,23.57/2/10 6:00,47.57/2/10 7:00,45.47/2/10 8:00,46.17/2/10 9:00,41.57/2/10 10:00,43.47/2/10 11:00,43.87/2/10 12:00,37.87/2/10 13:00,36.67/2/10 14:00,35.77/2/10 15:00,38.97/2/10 16:00,36.2
运行
在该例中py文件所在目录下输入命令如下(根据实际文件名更改):
$ sudo python test.py
效果展示
运行后可以看到控制台输出内容如下:
1-step: 21.2 (100.0%) 5-step: 21.2 (100.0%)1-step: 16.4 (99.8%) 5-step: 16.4 (99.8%)1-step: 4.7 (99.6%) 5-step: 4.7 (99.6%)1-step: 4.7 (99.6%) 5-step: 4.7 (99.6%)1-step: 4.6 (99.4%) 5-step: 4.6 (99.4%)1-step: 23.5 (99.4%) 5-step: 23.5 (99.4%)1-step: 47.5 (99.21%) 5-step: 47.5 (99.21%)1-step: 45.4 (99.06%) 5-step: 45.4 (99.06%)1-step: 46.1 (98.87%) 5-step: 46.1 (98.87%)1-step: 41.5 (98.87%) 5-step: 41.5 (98.87%)1-step: 43.4 (98.68%) 5-step: 43.4 (98.68%)1-step: 43.8 (33.89%) 5-step: 43.8 (90.87%)1-step: 43.8 (46.41%) 5-step: 37.8 (87.24%)1-step: 36.6 (78.89%) 5-step: 45.61 (46.18%)1-step: 45.61 (40.95%) 5-step: 47.5 (46.79%)1-step: 45.61 (87.64%) 5-step: 43.8 (95.56%)1-step: 38.9 (50.13%) 5-step: 43.8 (16.84%)
常见错误与解决方法
- 保证 python 版本为 2.x
如果提示错误如下:
Traceback (most recent call last):File "test.py", line 4, in <module>import yamlImportError: No module named yaml
可能是没有安装这个yaml包,但是更有可能是需要添加sudo ,比如说输入
python test.py提示以上错误,可以考虑使用sudo python test.py。
略加修改与测试
读python源码,发现只输出step1 和step5,所以我想输出step3。
修改
params/model.yaml文件,查找其中的 1,5的位置,改成1,3,5修改后相应内容如下:
clParams:verbosity: 0regionName: SDRClassifierRegionalpha: 0.1steps: '1,3,5'maxCategoryCount: 1000implementation: cpp
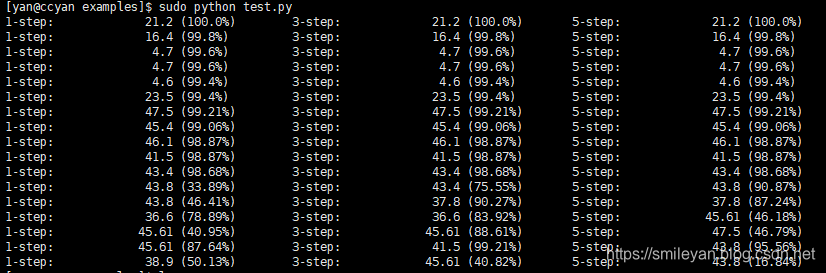
修改python代码,找到oneStep 与 fiveStep,类似地,定义一个变量threeStep,基本过程也是一样,需要修改数组中下标,输出也是需要进行类似修改。总而言之代码如下:
oneStep = bestPredictions[1]oneStepConfidence = allPredictions[1][oneStep]treeStep = bestPredictions[3]treeStepConfidence = allPredictions[3][treeStep]fiveStep = bestPredictions[5]fiveStepConfidence = allPredictions[5][fiveStep]result = (oneStep, oneStepConfidence * 100,treeStep, treeStepConfidence * 100,fiveStep, fiveStepConfidence * 100)print "1-step: {:16} ({:4.4}%)\t 3-step: {:16} ({:4.4}%)\t 5-step: {:16} ({:4.4}%)".format(*result)
测试效果如下:
分析部分将会记录在另一篇博客。
Smileyan
2019年11月8日 20:58


还没有评论,来说两句吧...