RelativeLayout相对布局
RelativeLayout又称作相对布局,也是一种非常常用的布局。和 LinearLayout 的排列规则不同,RelativeLayout 显得更加随意一些,它可以通过相对定位的方式让控件出现在布局的任何位置,不过我个人还是喜欢使用线性布局,因为相对布局里面的属性比较多一些,不过这些属性的值也都是有规律的,这篇文章一起探讨下RelativeLayout相对布局。
1.相对于父布局进行定位参数, 参数为true或者false:
android:layout_centerInparent 相对于父元素完全居中android:layout_alignParentBottom 贴紧父元素的下边缘android:layout_alignParentLeft 贴紧父元素的左边缘android:layout_alignParentRight 贴紧父元素的右边缘android:layout_alignParentTop 贴紧父元素的上边缘12345
所以下图的效果显示: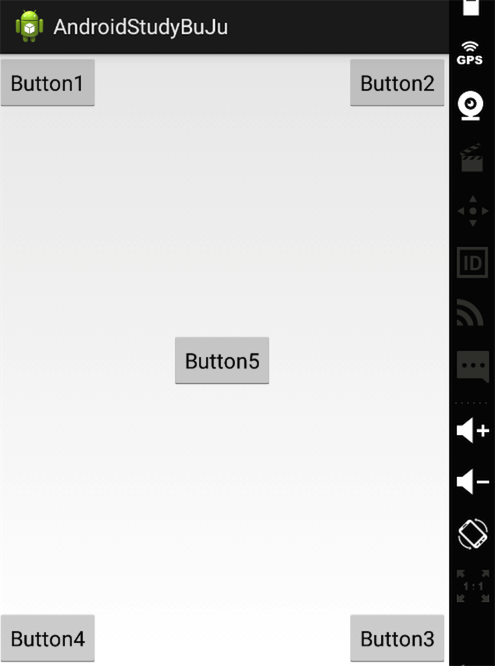
布局文件的代码如下:
<RelativeLayout xmlns:android="http://schemas.android.com/apk/res/android"xmlns:tools="http://schemas.android.com/tools"android:layout_width="match_parent"android:layout_height="match_parent"><Buttonandroid:id="@+id/bt1"android:layout_width="wrap_content"android:layout_height="wrap_content"android:layout_alignParentLeft="true"android:layout_alignParentTop="true"android:text="Button1"/><Buttonandroid:id="@+id/bt2"android:layout_width="wrap_content"android:layout_height="wrap_content"android:layout_alignParentRight="true"android:layout_alignParentTop="true"android:text="Button2"/><Buttonandroid:id="@+id/bt3"android:layout_width="wrap_content"android:layout_height="wrap_content"android:layout_alignParentRight="true"android:layout_alignParentBottom="true"android:text="Button3"/><Buttonandroid:id="@+id/bt4"android:layout_width="wrap_content"android:layout_height="wrap_content"android:layout_alignParentLeft="true"android:layout_alignParentBottom="true"android:text="Button4"/><Buttonandroid:id="@+id/bt5"android:layout_width="wrap_content"android:layout_height="wrap_content"android:layout_centerInParent="true"android:text="Button5"/></RelativeLayout>12345678910111213141516171819202122232425262728293031323334353637383940
2.相对于相对于控件进行定位,参数为“@id/id_name”:
android:layout_below 在某元素的下方android:layout_above 在某元素的的上方android:layout_toLeftOf 在某元素的左边android:layout_toRightOf 在某元素的右边//下面几组用于对原始的边缘,用法可以参考最下面的例子android:layout_alignTop 本元素的上边缘和某元素的的上边缘对齐android:layout_alignLeft 本元素的左边缘和某元素的的左边缘对齐android:layout_alignBottom 本元素的下边缘和某元素的的下边缘对齐android:layout_alignRight 本元素的右边缘和某元素的的右边缘对齐12345678910
所以实现下面的效果图可以使用相对控件参数: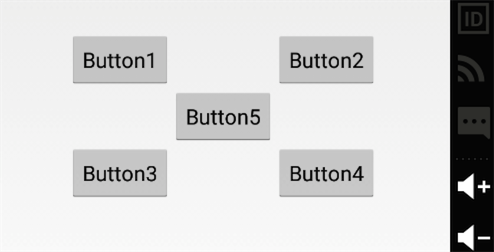
代码如下:
<RelativeLayout xmlns:android="http://schemas.android.com/apk/res/android"xmlns:tools="http://schemas.android.com/tools"android:layout_width="match_parent"android:layout_height="match_parent"><Buttonandroid:id="@+id/bt5"android:layout_width="wrap_content"android:layout_height="wrap_content"android:layout_centerInParent="true"android:text="Button5"/><Buttonandroid:id="@+id/bt1"android:layout_width="wrap_content"android:layout_height="wrap_content"android:layout_toLeftOf="@id/bt5"android:layout_above="@id/bt5"android:text="Button1"/><Buttonandroid:id="@+id/bt2"android:layout_width="wrap_content"android:layout_height="wrap_content"android:layout_toRightOf="@id/bt5"android:layout_above="@id/bt5"android:text="Button2"/><Buttonandroid:id="@+id/bt3"android:layout_width="wrap_content"android:layout_height="wrap_content"android:layout_toLeftOf="@id/bt5"android:layout_below="@id/bt5"android:text="Button3"/><Buttonandroid:id="@+id/bt4"android:layout_width="wrap_content"android:layout_height="wrap_content"android:layout_toRightOf="@id/bt5"android:layout_below="@id/bt5"android:text="Button4"/></RelativeLayout>123456789101112131415161718192021222324252627282930313233343536373839
以上讲完了RelativeLayout中的元素的一些属性,其实是有很大规律的,下面我们来看一个用相对布局完全线性布局中展示如下的一个例子: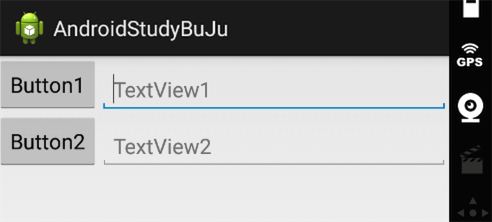
这里用到了android:layout_alignBottom元素,这也是对齐下边缘必须要用到的,这里直接给出代码:
<RelativeLayout xmlns:android="http://schemas.android.com/apk/res/android" xmlns:tools="http://schemas.android.com/tools" android:layout_width="match_parent" android:layout_height="match_parent"><Button android:id="@+id/bt1" android:layout_width="wrap_content" android:layout_height="wrap_content" android:text="Button1"/><EditText android:id="@+id/et1" android:layout_width="match_parent" android:layout_height="wrap_content" android:layout_toRightOf="@id/bt1" android:layout_alignBottom ="@id/bt1" android:hint="TextView1" android:singleLine="true"/><Button android:id="@+id/bt2" android:layout_width="wrap_content" android:layout_height="wrap_content" android:layout_below="@id/bt1" android:text="Button2"/><EditText android:id="@+id/et2" android:layout_width="match_parent" android:layout_height="wrap_content" android:layout_toRightOf="@id/bt2" android:layout_alignBottom ="@id/bt2" android:hint="TextView2" android:singleLine="true"/></RelativeLayout>123456789101112131415161718192021222324252627282930313233


还没有评论,来说两句吧...