Html/CSS开发基础(CSS布局练习)
Html/CSS.基础入门.Html/CSS开发基础.CSS布局练习
- 0 目录
- 1 Html/CSS
- 1.1 CSS布局练习
- 1.1.1 题目
- 1.1.2 源码
- 1.1.3目录结构
- 1.1.4 效果展示
- 2 下一章
0 目录
1 Html/CSS
1.1 CSS布局练习
1.1.1 题目
用DIV+CSS实现如下的布局与网页设计。
具体要求如下:
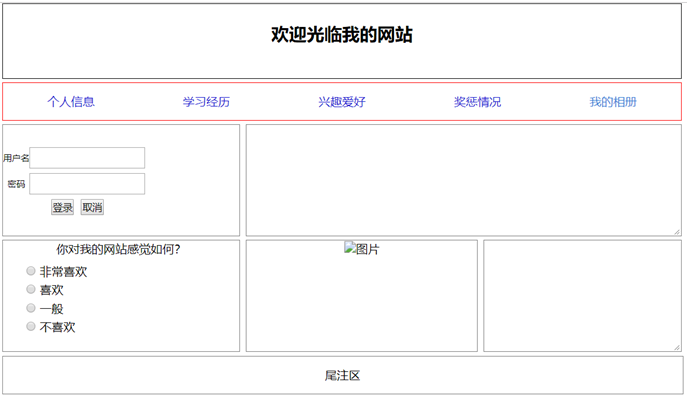
1、页面的宽度占屏幕显示区域的60%,页面的高度为600px。标题区的边框为黑色,标题区的文字内容为“欢迎光临我的网站”,标题为2级标题。导航区的边框颜色为红色,其余所有的区域的边框颜色为灰色。尾注部分的高度为标题区高度的一半。
2、导航区中添加5个链接:个人信息、学习经历、兴趣爱好、奖惩情况和我的相册。分别建立5个网页与其对应。点击链接后可以进入浏览该网页,每个网页中都需要实现返回到主页的功能(通过返回链接或按钮实现)。
3、登录区中包含用户名、密码以及两个用于输入的文本框,一个登录按钮和取消按钮。无须为按钮编写事件代码。内容区2的内容设计为一个投票区,标题为“你对我的网站感觉如何?”,用一组单选按钮表示非常喜欢、喜欢、一般和不喜欢四个选项。
4、内容区1的内容中为文本,内容区3的内容为一个图片(内容自己设定)。内容区4为文本内容。
5、标题区与导航区的间距为5px,导航区与登录区、内容区1的间距为5px。登录区与内容区1间距为8px。登录区与内容区2的间距为5px。内容区2与内容区3之间间距也为8px。内容区3和内容区4间距为8px。尾注区与上面的部分的间距为5px。
【操作提示】:可以先在Dreamweaver环境中建立CSS样式文件和主要的页面设计,如果本机上已经安装了IIS组件,则可以在本机上查看自己的网站效果。如果没有安装IIS,则可以在Visual
Studio环境中查看网页设计效果。通过新建空网站,然后添加现有项的方式把在Dreamweaver中建好的页面添加到自己建的网站中。

1.1.2 源码
1CSS样式
* {padding: 0;margin: 0;}.container {width: 60%;height: 600px;text-align: center;position: relative;left: 20%;}.container .header {width: calc(100% - 2px);height: 100px;line-height: 80px;border: 1px solid black;overflow: hidden;}.container .nav {margin-top: 5px;width: calc(100% - 2px);height: 50px;line-height: 50px;border: 1px solid red;overflow: hidden;}.container .nav a {text-decoration: none;display: block;width: 20%;float: left;color: #1e1bd1;}.container .nav a:hover {color: #3781d6;}.container ul {width: 100%;list-style-type: none;}.container ul li {float: left;margin-top: 5px;height: 150px;border: 1px solid gray;overflow: hidden;}.container ul li textarea {width: calc(100% - 2px);height: calc(100% - 2px);border: 0;margin-top: 1px;}.container ul li:nth-child(1) {width: calc(35% - 2px);position: relative;}.container ul li:nth-child(1).login_container {position: absolute;height: 100px;top: 100px;margin-top: -75px;}.container ul li:nth-child(1).login_container .login {width: 100%;height: 30px;margin-top: 5px;}.container ul li:nth-child(1).login_container .login span {display: block;width: 36px;font-size: 12px;height: 30px;float: left;line-height: 30px;}.container ul li:nth-child(1).login_container .login input {width: calc(100% - 44px);height: 25px;float: left;}.container ul li:nth-child(1).login_container .login_btn {width: 100%;height: 30px;margin-top: 5px;}.container ul li:nth-child(1).login_container .login_btn button {height: 22px;margin-left: 5px;}.container ul li:nth-child(2) {width: calc(65% - 10px);margin-left: 8px;}.container ul li:nth-child(3) {width: calc(35% - 2px);}.container ul li:nth-child(3)div:nth-child(2) {margin-top: 10px;}.container ul li:nth-child(3) div{width: 100%;height: 25px;}.container ul li:nth-child(3) divinput {float: left;margin-left: 10%;margin-top: 4px;}.container ul li:nth-child(3) divspan {float: left;margin-left: 5px;}.container ul li:nth-child(4) {margin-left: 8px;width: calc(35% - 10px);}.container ul li:nth-child(5) {margin-left: 8px;width: calc(30% - 10px);}.container .footer {position: relative;top: 5px;clear: both;line-height: 50px;width: 100%;height: 50px;border: 1px solid gray;}
2HTML元素及其标记代码
<div class="container"><div class="header"><h2>欢迎光临我的网站</h2></div><div class="nav"><a href="myInfo.html">个人信息</a><a href="study.html">学习经历</a><a href="hobby.html">兴趣爱好</a><a href="rewards.html">奖惩情况</a><a href="myPhotos.html">我的相册</a></div><div class="content"><ul><li><div class="login_container"><div class="login"><span>用户名</span><input type="text"></div><div class="login"><span>密码</span><input type="password"></div><div class="login_btn"><button>登录</button><button>取消</button></div></div></li><li><textarea name="" id="" cols="30" rows="10"></textarea></li><li><span>你对我的网站感觉如何?</span><div><input type="radio"><span>非常喜欢</span></div><div><input type="radio"><span>喜欢</span></div><div><input type="radio"><span>一般</span></div><div><input type="radio"><span>不喜欢</span></div></li><li><img src="./test.jpg" alt="图片"></li><li><textarea name="" id="" cols="30" rows="10"></textarea></li></ul></div><div class="footer">尾注区</div></div>
1.1.3目录结构
1.1.4 效果展示
2 下一章
博客地址:


")


还没有评论,来说两句吧...