SpringBoot基本配置详解
SpringBoot项目有一些基本的配置,比如启动图案(banner),比如默认配置文件application.properties,以及相关的默认配置项。
示例项目代码在:https://github.com/laolunsi/spring-boot-examples
一、启动图案banner
编写banner.txt放入resources文件夹下,然后启动项目即可修改默认图案。
关于banner的生成,可以去一些专门的网站。
比如:https://www.bootschool.net/ascii

二、配置文件application
2.1 application.properties/yml
resources下通常会默认生成一个application.properties文件,这个文件包含了SpringBoot项目的全局配置文件。里面的配置项通常是这样的:
server.port=8080
在这个文件里我们可以添加框架支持的配置项,比如项目端口号、JDBC连接的数据源、日志级别等等。
现在比较流行的是将properties文件改为yml文件。yml文件的格式yaml是这样的:
server:port: 8080
yml和properties的作用是一样的。而yml的好处是显而易见的——更易写易读。
属性之间互相调用使用${name}:
eknown:email: eknown@163.comuri: http://www.eknown.cntitle: 'hello, link to ${eknown.uri} or email to ${eknown.email}'
链接:SpringBoot所有官方配置属性
2.2 多环境配置文件
通常开发一个应用会有多个环境,常见如dev/prod,也会有test,甚至其他一些自定义的环境,SpringBoot支持配置文件的灵活切换。
定义新配置文件需要遵循以下格式:application-{profile}.properties 或者application-{profile}.yml
比如现在有dev和prod两个环境,我需要在application.yml文件之外新建两个文件:
application-dev.yml
server:port: 8080application-prod.yml
server:port: 8081
然后在application.yml中通过application.profiles.active={profile}指明启用那个配置:
application:profiles:active: dev
除了在application.yml中指定配置文件外,还可以通过启动命令指定:java -jar xxx.jar --spring.profiles.active=dev
2.2 自定义配置项并获取它
主要介绍两种方式,获取单个配置项和获取多个配置项。
举例:
eknown:email: eknown@163.comuri: http://www.eknown.cn
2.2.1 使用@Value注解获取单个配置项
@Value("${eknown.email}")private String email;@Value("${eknown.uri}")private String url;
注意:使用@Value注解的时候,所在类必须被Spring容器管理,也就是被@Component、@Controller、@Service等注解定义的类。
2.2.2 获取多个配置项
第一种,定义一个bean类,通过@Value获取多个配置项:
@Componentpublic class MyBean {@Value("${eknown.email}")private String email;@Value("${eknown.uri}")private String uri;public String getEmail() {return email;}public String getUri() {return uri;}}
然后我们通过get方法来获取这些值:
@RestControllerpublic class IndexAction {@Autowiredprivate MyBean bean;@GetMapping(value = "bean")public String getConcatByBean() {return "from bean: <br />" + bean.getEmail() + "<br />" + bean.getUri();}}
第二种,使用注解@ConfigurationProperties:
@Component@ConfigurationProperties(perfix="eknown")public class MyConfigBean {private String email;private String uri;}
这里只需要通过prefix指定前缀即可,后面的值自动匹配。
这里我们还使用了@Component注解来让spring容器管理这个MyConfigBean。
此外,我们可以不需要引入@Component,转而在Application启动类上加上@EnableConfigurationProperties({MyConfigBean.class})来启动这个配置。
注意:我们这里是从主配置文件,也就是SpringBoot默认的application-profile文件中获取配置数据的。
而从自定义的配置文件,比如test.yml这种形式中获取配置项时,情况是有点不大一样的。
三、自定义配置文件
上面介绍的配置文件都是springboot默认的application开头的文件。如果要自定义一个配置文件呢,比如test.yml或test.properties,怎么获取其中的配置项呢?
使用**@PageResource**注解即可。
首先我们来看一下读取自定义的properties文件里的内容:
test.properties
hello.time=2019.11.19hello.name=eknown
定义Configuration类:
@Configuration@PropertySource("classpath:test.properties")//@PropertySource("classpath:test.yml") // 注意,yml文件不能直接这样写,会读不出数据@ConfigurationProperties(prefix = "hello")public class TestConfiguration {private String name;private String time;// hide get and set methods}
测试一下:
@RestController@RequestMapping(value = "test")public class TestAction {@Autowiredprivate TestConfiguration testConfiguration;@GetMapping(value = "config")public String test() {return testConfiguration.getName() "<br/>" testConfiguration.getTime();}}

如果将properties文件换成yml文件呢?
我们尝试一下,发现:
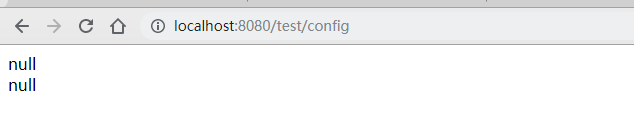
读不出数据?
分析一下@PropertySource注解,发现其使用的PropertySourceFactory是DefaultPropertySourceFactory.
这个类的源码如下:
public class DefaultPropertySourceFactory implements PropertySourceFactory {public DefaultPropertySourceFactory() {}public PropertySource<?> createPropertySource(@Nullable String name, EncodedResource resource) throws IOException {return name != null ? new ResourcePropertySource(name, resource) : new ResourcePropertySource(resource);}}
这个类只能处理properties文件,无法处理yml文件。所以我们需要自定义一个YmlSourceFactory。
public class YamlSourceFactory extends DefaultPropertySourceFactory {@Overridepublic PropertySource<?> createPropertySource(String name, EncodedResource resource) throws IOException {return new YamlPropertySourceLoader().load(resource.getResource().getFilename(), resource.getResource()).get(0);}}
然后定义test.yml文件的config类:
@Configuration@PropertySource(value = "classpath:test.yml", encoding = "utf-8", factory = YamlSourceFactory.class)@ConfigurationProperties(prefix = "yml.hello")public class TestYamlConfiguration {private String name;private String time;// hide get and set methods}
注:为了区分test.properties和test.yml,这里的test.yml中的属性以yml.hello开头。
编写一下测试:
@Autowiredprivate TestYamlConfiguration ymlConfiguration;@GetMapping(value = "yml")public String testYml() {return "yml config: <br/>" ymlConfiguration.getName() "<br/>" ymlConfiguration.getTime();}
访问:

四、补充@ConfigurationProperties
网上一些资料中,为配合使用@ConfigurationProperties,还使用了@EnableConfigurationProperties注解。
经过测试发现:
- 从SpringBoot默认配置文件读取配置信息,使用@ConfigurationProperties + @Component/@Configuration,或者@ConfigurationProperties + 在启动类添加@EnableConfigurationProperties({class})。这两种方式都能解决问题
从非默认配置文件读取配置信息,需要利用@PropertySource注解。同样两种方式:
2.1 @PropertySource + @ConfigurationProperties + @Component/@Configuration
2.2 @PropertySource + @ConfigurationProperties + @Component/@Configuration + @EnableConfigurationProperties,第二种方式存在一个问题,即还是必须要使用@Component注解,如果不使用,则会导致读取配置信息为null,但程序不会报错;而如果采用了,则会导致bean类的set方法被执行两次(也就是生成了两个同样类型的bean类)。这种方式不建议!
交流学习
个人网站:http://www.eknown.cn
GitHub:https://github.com/laolunsi
公众号:猿生物语,“分享技术,也感悟人生”,欢迎关注!


![微信小程序[电商]-撒花完结~](https://image.dandelioncloud.cn/images/20221123/2d6fc62ca0ec49928e1eafdc44c61919.png "微信小程序[电商]-撒花完结~")
")


还没有评论,来说两句吧...