Android笔记---LinearLayout线性布局
LinearLayout这个布局会将它所包含的控件在线性方向上依次排列, 有两种排列方式,分别是垂直排列vertical和水平排列horizontal,而这个只是通过android:orientation属性设定的, 默认是水平布局。
其布局例子可以参考:
<LinearLayout xmlns:android="http://schemas.android.com/apk/res/android"xmlns:tools="http://schemas.android.com/tools"android:layout_width="match_parent"android:layout_height="match_parent"android:orientation="horizontal"><Buttonandroid:id="@+id/button1"android:layout_width="wrap_content"android:layout_height="wrap_content"android:text="Button1" /><Buttonandroid:id="@+id/button2"android:layout_width="wrap_content"android:layout_height="wrap_content"android:text="Button2" /><Buttonandroid:id="@+id/button3"android:layout_width="wrap_content"android:layout_height="wrap_content"android:text="Button3" /></LinearLayout>123456789101112131415161718192021222324
运行程序的截图是下面这样的。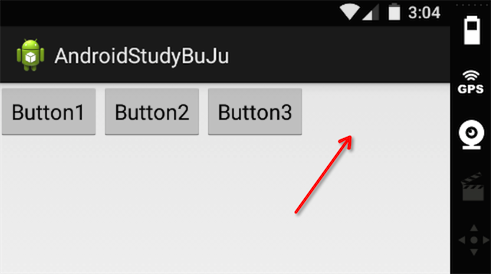
上面的例子简单的讲了下LinearLayout的用法,但是我们肯定还是有很多疑问的,上面的截图中3个按钮后面其实是有一点空白的,如果我想让3个按钮完全能够充满这一行而不流空白该怎么办,或者我再加一个同样的按钮能够平均充满这一行该怎么办呢,带着这些问题我们一起来看下LinearLayout的一些技巧以及需要注意的地方。
1.如果 LinearLayout 的排列方向是 horizontal,内部的控件就绝对不能将 宽度指定为match_parent,因为这样的话单独一个控件就会将整个水平方向占满,其他的控件就没有可放置的位置了。同样的道理,如果 LinearLayout 的排列方向是 vertical,内部的控 件就不能将高度指定为match_parent。
2.介绍一个LinearLayout的关键属性android:layout_gravity,用于指定控件在布局中的对齐方式,可选的值有top、bottom、left、right、center_vertical、fill_vertical、center_horizontal、fill_horizontal、center、fill、clip_vertical,具体解释如下:
但是需要注意的是:
(1)当 android:orientation=”vertical” 时, android:layout_gravity只有水平方向的设置才起作用,垂直方向的设置不起作用。即:left,right,center_horizontal 是生效的。
(2)当 android:orientation=”horizontal”时, android:layout_gravity只有垂直方向的设置才起作用,水平方向的设置不起作用。即:top,bottom,center_vertical 是生效的。
3.介绍另外一个LinearLayout的关键属性android:layout_weight,这个属性允许我们使用比例的方式来指定控件的大小,它在手机屏幕的适配性方面可以起到非常重要的作用,还记得我们上面遇到的问题吗,3个按钮后面有一大处空白,而利用android:layout_weight属性就可以轻松解决这个问题。
修改的代码如下:
<LinearLayout xmlns:android="http://schemas.android.com/apk/res/android"xmlns:tools="http://schemas.android.com/tools"android:layout_width="match_parent"android:layout_height="match_parent"android:orientation="horizontal"><Buttonandroid:id="@+id/button1"android:layout_width="wrap_content"android:layout_height="wrap_content"android:layout_weight="1"android:text="Button1" /><Buttonandroid:id="@+id/button2"android:layout_width="wrap_content"android:layout_height="wrap_content"android:layout_weight="1"android:text="Button2" /><Buttonandroid:id="@+id/button3"android:layout_width="wrap_content"android:layout_height="wrap_content"android:layout_weight="1"android:text="Button3" /></LinearLayout>123456789101112131415161718192021222324252627
运行的效果图如下: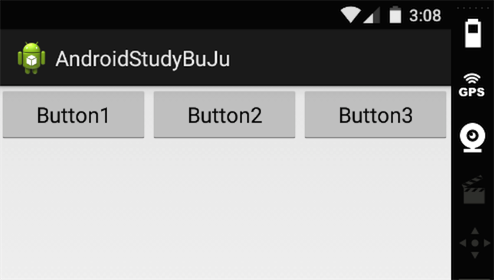
系统会先把 LinearLayout 下所有控件指定的 layout_weight 值相加,得到一个总值, 然后每个控件所占大小的比例就是用该控件的 layout_weight 值除以刚才算出的总值,所以如果想要Button1的宽度是Button2和Button3的两倍,而Button2和Button3显示的宽度一样,只需要将Button1中的该属性这样修改下就可以了android:layout_weight="2"
4.有的时候我们的控件需要组合成需要显示的UI设计功能,比如我们需要实现如下的显示功能,这个时候我们可以通过两个LinearLayout组合布局来实现,当然使用相对布局不需要组合的方式也是可以实现的,具体可以参考关于相对布局写的blog。
这里直接给出xml里面的代码:
//主LinearLayout布局里面设置控件垂直显示<LinearLayout xmlns:android="http://schemas.android.com/apk/res/android" xmlns:tools="http://schemas.android.com/tools" android:layout_width="match_parent" android:layout_height="match_parent" android:orientation="vertical">//子LinearLayout布局1,里面的控件需要水平显示,且android:layout_width属性一定要match_parent充满屏幕宽度才行,不然达不到上面的效果<LinearLayout android:id="@+id/ll1" android:layout_width="match_parent" //必须是wrap_content android:layout_height="wrap_content" android:orientation="horizontal"><Button android:id="@+id/button1" android:layout_width="wrap_content" android:layout_height="wrap_content" android:text="Button1" /><EditText android:id="@+id/tv" android:layout_width="wrap_content" android:layout_height="wrap_content" android:layout_weight="1" android:hint="TextView1" android:singleLine="true"/></LinearLayout>//子LinearLayout布局2,里面的控件需要水平显示,且android:layout_width属性一定要match_parent充满屏幕宽度才行,不然达不到上面的效果<LinearLayout android:id="@+id/ll2" android:layout_width="match_parent" //必须是wrap_content android:layout_height="wrap_content" android:orientation="horizontal"><Button android:id="@+id/button2" android:layout_width="wrap_content" android:layout_height="wrap_content" android:text="Button2" /><EditText android:id="@+id/tv2" android:layout_width="wrap_content" android:layout_height="wrap_content" android:layout_weight="1" android:hint="TextView2" android:singleLine="true"/></LinearLayout></LinearLayout>123456789101112131415161718192021222324252627282930313233343536373839404142434445464748495051525354


还没有评论,来说两句吧...